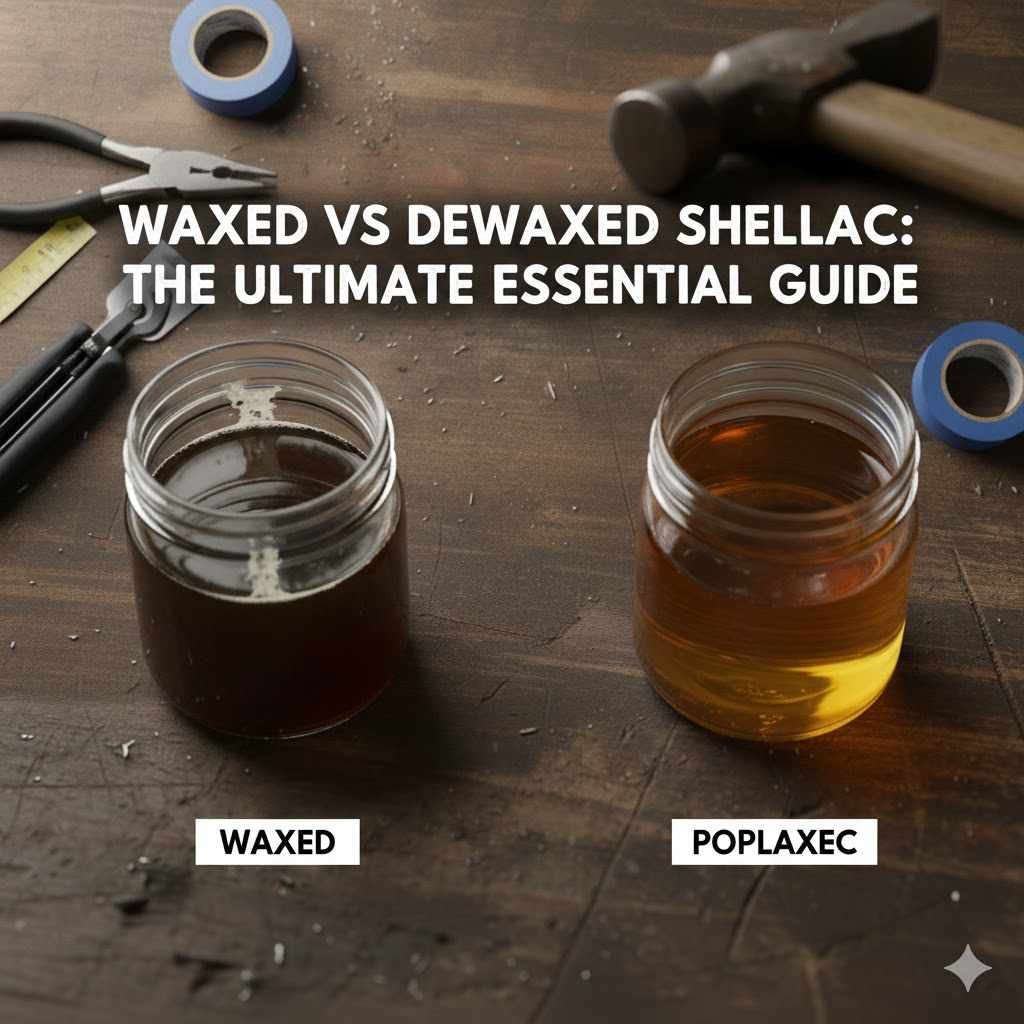
Waxed Vs Dewaxed Shellac: The Essential Guide
The main difference between waxed and dewaxed shellac is compatibility. Dewaxed shellac sticks to everything and everything sticks to it, making it a universal sealer and perfect for use under other topcoats like polyurethane. Waxed shellac, which contains natural wax, is a beautiful standalone finish but will prevent other finishes from adhering properly.
Hello, fellow makers! Md Meraj here, your friend in the workshop. If you’ve ever stood in the wood finish aisle, staring at cans of shellac, you’ve probably seen the words “waxed” and “dewaxed.” It’s a common point of confusion for so many new woodworkers. You might wonder if it really matters which one you pick. The answer is a resounding YES! Choosing the wrong one can lead to a sticky, peeling mess.
But don’t worry. This is one of the easiest things to learn in woodworking, and I’m here to make it simple. We’ll break down what each type is, where it shines, and how to pick the perfect one for your project every single time. By the end of this guide, you’ll feel confident and ready to use shellac like a pro. Let’s get started!
What Is Shellac, Anyway? A Quick Look
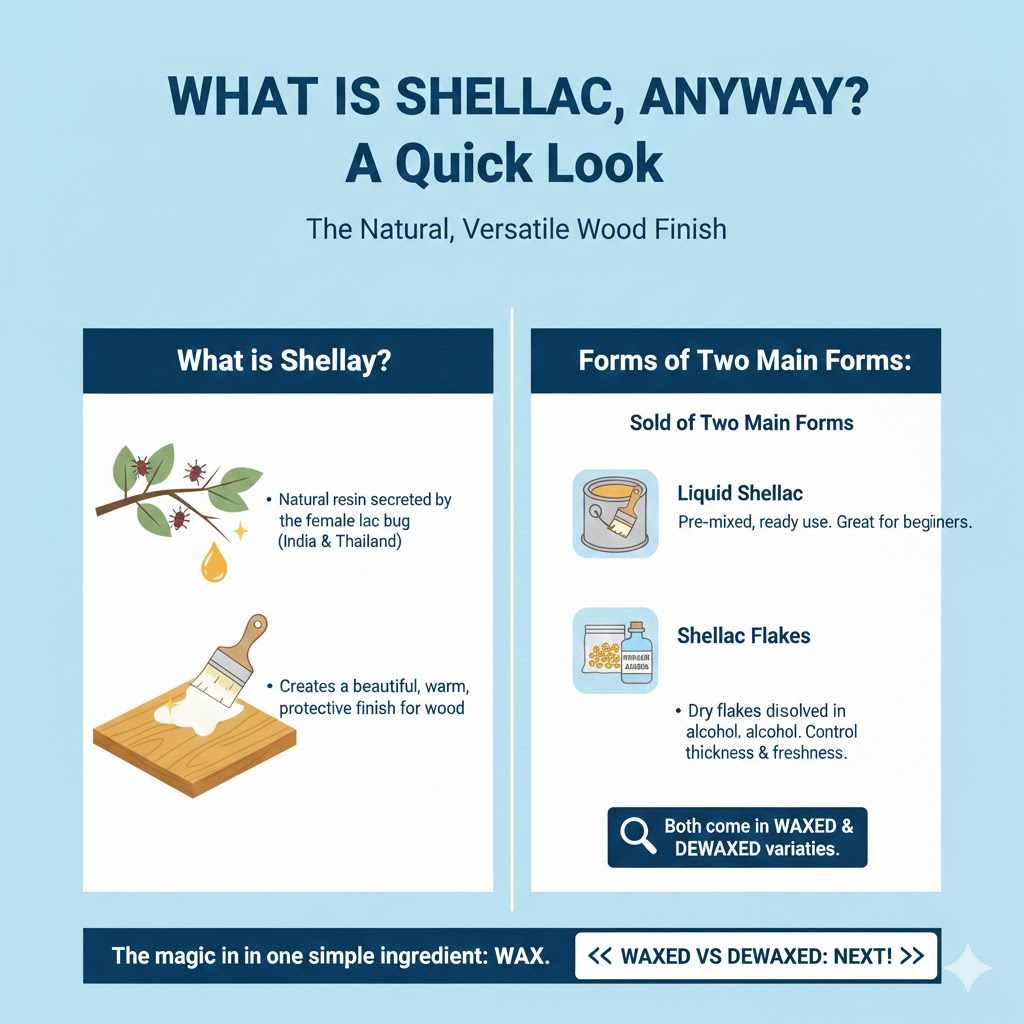
Before we dive into waxed vs. dewaxed, let’s quickly talk about shellac itself. It’s not some scary chemical brewed in a lab. Shellac is actually a natural resin. It’s made from a substance secreted by the female lac bug, found on trees in India and Thailand. For centuries, this amazing resin has been used to create a beautiful, warm, and protective finish for wood.
Shellac is sold in two main forms:
- Liquid Shellac: Pre-mixed and ready to use right out of the can. This is great for beginners.
- Shellac Flakes: Dry flakes that you dissolve in denatured alcohol. This gives you total control over the thickness and freshness of your finish.
Both liquid and flake forms come in waxed and dewaxed varieties. The real magic is in understanding that one simple ingredient: wax.
Understanding Waxed Shellac (Natural Shellac)
Waxed shellac is shellac in its most natural state. When the raw lac resin is harvested and processed into flakes, it contains about 3% to 5% natural wax. This wax isn’t an additive; it’s just part of the original bug secretion. Think of it like pulp in orange juice—it’s naturally there unless it’s filtered out.
What Does the Wax Do?
The natural wax in shellac offers a few unique properties. It helps the finish flow out a little more smoothly, making it slightly easier to apply with a brush for a glass-like surface. It also gives the final finish a slightly softer, warmer glow that many woodworkers love for certain projects.
Pros of Using Waxed Shellac
- Beautiful, Warm Glow: It provides a rich, amber hue and a soft luster that is hard to replicate with other finishes.
- Slightly Easier Application: The wax acts as a lubricant, which can make it a bit more forgiving to brush on.
- Excellent as a Standalone Finish: For projects that only need shellac, the waxed version is a fantastic, traditional choice.
- Food Safe: Once cured, shellac is considered non-toxic and food-safe. It’s often used on wooden toys and some kitchen items.
Cons of Using Waxed Shellac
- Poor Adhesion with Other Finishes: This is the big one! The wax prevents other topcoats, like polyurethane, lacquer, or water-based finishes, from sticking. They will peel, bubble, or fail to cure properly.
- Slightly Softer Finish: The wax makes the final coat a little less durable and more susceptible to water spotting compared to its dewaxed cousin.
- Cloudy Appearance in the Can: The wax doesn’t fully dissolve in alcohol, so liquid waxed shellac looks milky or cloudy. This isn’t a problem, but it can be confusing for beginners.
When Should You Use Waxed Shellac?
Waxed shellac is the perfect choice when it is going to be the only finish on your project. It’s ideal for:
- Antique furniture restoration where a traditional finish is desired.
- Decorative boxes, picture frames, and small craft items.
- Projects where you want a classic, warm, amber look and don’t plan to add another type of topcoat.
Think of waxed shellac as the final word. If you use it, you’re done. Don’t plan on putting anything else on top of it except more shellac or a coat of paste wax for extra protection.
Demystifying Dewaxed Shellac (The Universal Sealer)
Dewaxed shellac is exactly what it sounds like: shellac that has gone through an extra filtering process to remove the natural wax. This simple step transforms it from a beautiful but limited finish into one of the most versatile products in the entire workshop. It is truly a woodworker’s best friend.
What’s Different Without the Wax?
By removing the wax, you solve the biggest problem of natural shellac: adhesion issues. Without the slippery wax content, dewaxed shellac can stick to almost any surface. Even better, almost any other finish can stick right on top of it. This makes it an incredible sealer and barrier coat.
Pros of Using Dewaxed Shellac
- Universal Compatibility: This is its superpower. You can apply it under virtually any topcoat—polyurethane, lacquer, varnish, or water-based finishes—without worrying about peeling.
- Excellent Sealer: It’s the best choice for sealing oily or resinous woods like pine, cedar, or cocobolo. It blocks the oils from bleeding into and ruining your topcoat.
- Blocks Odors and Stains: Got a musty smell in an old drawer? A coat of dewaxed shellac will lock it in for good. It also blocks stains from bleeding through paint.
- Crystal Clear Finish: Unlike the cloudy waxed version, dewaxed shellac dries to a hard, perfectly clear film (though amber and other tones are available).
- Harder, More Durable Finish: Without the soft wax, the cured finish is more resistant to scratches and water than waxed shellac.
Cons of Using Dewaxed Shellac
- Slightly Faster Drying Time: It can dry a little faster, which might make brushing a bit trickier for absolute beginners. But this is a minor issue.
- Less “Warmth”: Some purists feel it lacks the subtle, soft glow of the waxy version, but the difference is often minimal to the untrained eye.
When Is Dewaxed Shellac the Right Choice?
It’s simpler to ask when isn’t it the right choice! If you are ever in doubt, just use dewaxed shellac. You can’t go wrong. Use it for:
- As a Sealer Coat: Apply a thin coat before your main finish to ensure even stain absorption and great topcoat adhesion.
- Between Different Finishes: Need to put a water-based finish over an oil-based stain? A coat of dewaxed shellac in between will prevent any problems. It’s like a peacemaker between finishes that don’t get along.
- Finishing Oily Woods: Essential for woods like pine, rosewood, and teak.
- As a Complete Finish: It works great as a standalone finish too, giving you a clear, durable, and repairable surface.
Waxed vs. Dewaxed Shellac: A Head-to-Head Comparison
Sometimes a simple chart makes everything clearer. Here’s how these two finishes stack up against each other in the areas that matter most to a woodworker.
| Feature | Waxed Shellac | Dewaxed Shellac |
|---|---|---|
| Compatibility | Poor. Do not use under other topcoats. | Excellent. Can be used under any finish. |
| Best Use | A standalone, final finish. | A universal sealer and a standalone finish. |
| Clarity | Slightly hazy in the can, dries with a warm amber glow. | Clear in the can, dries crystal clear (unless tinted). |
| Durability | Softer and less water-resistant. | Harder and more water-resistant. |
| Adhesion | Good adhesion to bare wood. | Excellent adhesion to almost any surface. |
| Example Project | Antique-style picture frame. | Sealing pine knots before painting. |
How to Choose the Right Shellac for Your Project: A Simple Guide
Feeling better already? Let’s make this even easier. The next time you’re starting a project, just ask yourself one simple question:
“Am I going to apply another type of finish on top of the shellac?”
- If the answer is YES (for example, you want to use polyurethane for extra durability), you must use DEWAXED SHELLAC.
- If the answer is NO (you just want a beautiful, simple shellac finish and nothing else), you can use WAXED SHELLAC or DEWAXED SHELLAC.
That’s it! That one question solves 99% of the confusion. When in doubt, always default to dewaxed. It’s the safer, more versatile option, and you can’t get into trouble with it.
Practical Tips for Working with Shellac
Whether you choose waxed or dewaxed, applying shellac is a rewarding process. Here are a few tips to ensure you get great results every time.
Mixing Your Own Shellac from Flakes
While canned shellac is convenient, mixing your own from flakes is cheaper and ensures your finish is always fresh. Shellac has a limited shelf life once mixed (about 6 months), so mixing small batches is a great habit.
The “cut” refers to the ratio of shellac flakes (in pounds) to denatured alcohol (in gallons). A “2-pound cut” is a great all-purpose starting point. You don’t need to mix a whole gallon, of course! Here’s a simple recipe for a small batch.
| Desired Cut | Shellac Flakes (Ounces) | Denatured Alcohol (Fluid Ounces) |
|---|---|---|
| 1-Pound Cut (Sealer) | 1 oz | 8 fl oz (1 cup) |
| 2-Pound Cut (General Purpose) | 2 oz | 8 fl oz (1 cup) |
| 3-Pound Cut (Heavier Finish) | 3 oz | 8 fl oz (1 cup) |
Just combine the flakes and alcohol in a glass jar, seal it, and shake it every few hours. The flakes should dissolve completely within 24 hours.
Applying Shellac Like a Pro
- Work in a well-ventilated area. Denatured alcohol fumes are strong.
- Use a quality natural bristle brush or a lint-free pad (made from an old t-shirt).
- Apply thin coats. This is the secret to a perfect shellac finish. Thick coats will never dry properly and will feel gummy.
- Move quickly and deliberately. Apply the shellac in long, even strokes. Don’t go back over an area you just coated, as it starts to get tacky almost immediately. Let it dry, then fix any issues on the next coat.
- Sand lightly between coats. Use 320 or 400-grit sandpaper to knock down any dust nibs. Just a light scuffing is all you need. Then wipe the surface clean before the next coat.
- Build up several thin layers. Three to four thin coats are usually enough for a beautiful, durable finish.
For more detailed information on wood finishes and their properties, resources like the U.S. Forest Service’s guide on finishing wood provide excellent, in-depth knowledge that can help you understand how different finishes interact with wood.
Common Shellac Mistakes and How to Avoid Them
We all make mistakes, but here are a few common ones you can easily sidestep:
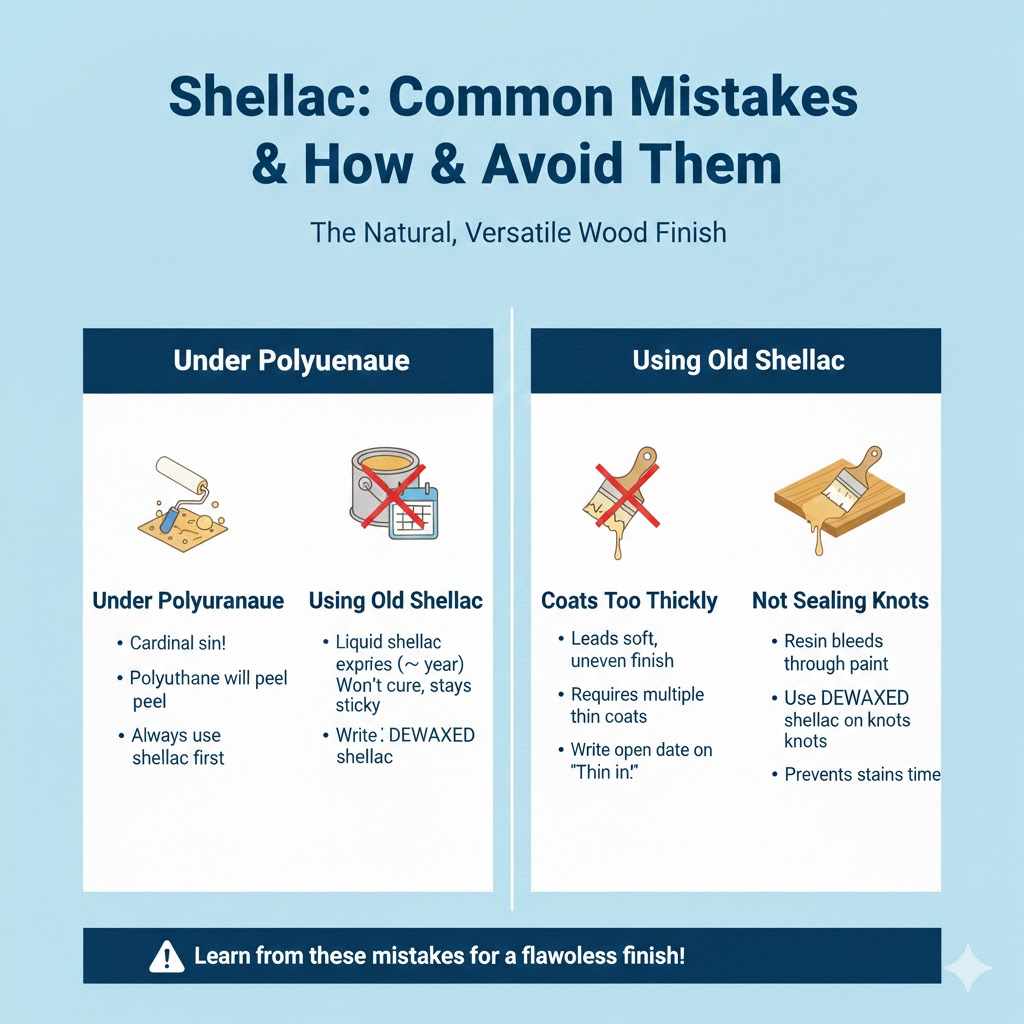
- Using Waxed Shellac Under Polyurethane: This is the cardinal sin. Your polyurethane will look great for a few weeks, then it will start to flake and peel right off. Always use dewaxed shellac as an undercoat.
- Using Old, Expired Shellac: Liquid shellac has a “best by” date on the can for a reason. After about a year (or less), it may not cure properly, leaving you with a permanently sticky surface. Write the date you opened the can on the lid with a marker.
- Applying Coats Too Thickly: Resist the temptation to get the job done in one thick coat. It won’t work. The result will be a soft, uneven finish. Thin is in!
- Not Sealing Knots on Pine: When finishing knotty pine, always apply a coat of dewaxed shellac over the knots before priming or painting. This will block the resin from bleeding through your beautiful new paint job months down the road.
Frequently Asked Questions (FAQ)
Is shellac waterproof?
Shellac is water-resistant, but not waterproof. It can handle a small spill if wiped up quickly, but prolonged exposure to water will cause white rings or damage. It’s not the best choice for a dining table or kitchen counter without a more durable topcoat like polyurethane over it (which means you’d need to use dewaxed shellac first).
How do I know if my old can of shellac is still good?
Dab a small amount on a piece of glass or plastic. If it becomes hard and non-tacky within about 30 minutes, it’s probably still good to use. If it remains sticky after an hour, it’s time to dispose of it properly and buy a fresh can.
Can I put dewaxed shellac over paint?
Yes! Dewaxed shellac is a great way to protect a painted finish, especially for craft projects or furniture that needs an aged, amber tone (if you use amber shellac). It’s also fantastic for sealing in chalk paint before waxing.
What do I use to clean my brushes after using shellac?
Since shellac is dissolved in alcohol, water and mineral spirits won’t work. You need to clean your brushes with denatured alcohol or an ammonia-and-water solution. A 50/50 mix of household ammonia and water works very well.
Can I make waxed shellac into dewaxed shellac?
No, this isn’t a practical process for a home workshop. The de-waxing process is done commercially through filtration and is not something you can easily do yourself. It’s far easier and more effective to simply buy the type you need.
Is shellac durable enough for floors?
Historically, shellac was used on floors, but today there are far more durable options. While it can be used, it will require frequent maintenance and waxing. Modern polyurethanes offer much better protection against the heavy wear and tear a floor endures.
What’s the difference between “clear” and “amber” shellac?
This refers to the color. Amber or “orange” shellac is the most natural color and imparts a warm, orange-yellow hue that looks beautiful on dark woods like walnut and mahogany. Clear or “blonde” shellac is more refined and provides a finish with very little color, making it perfect for light woods like maple where you want to avoid yellowing.
Final Thoughts: You’ve Got This!
See? That wasn’t so bad! The great debate of waxed vs. dewaxed shellac really boils down to one thing: compatibility. If you need a universal sealer that can play nicely with any other finish, dewaxed shellac is your hero. If you want a simple, beautiful, all-in-one traditional finish, waxed shellac is a classic choice.
Don’t be afraid to embrace shellac in your workshop. It’s forgiving, easy to repair, beautiful, and natural. Now that you understand the key difference between its two main forms, you are well-equipped to make the right choice with confidence. Grab a can or some flakes, find a small project, and give it a try. You’ll be amazed at the beautiful results you can achieve.
Happy finishing!