When to Air Layer Japanese Maple Successfully
Many gardeners love Japanese maples but find the idea of air layering them a bit tricky. It seems complicated, and knowing exactly when to start can be confusing. This guide makes it simple.
We’ll break down When to Air Layer Japanese Maple Successfully step by step, so you can grow more of these beautiful trees with ease. Get ready to learn a straightforward method that works.
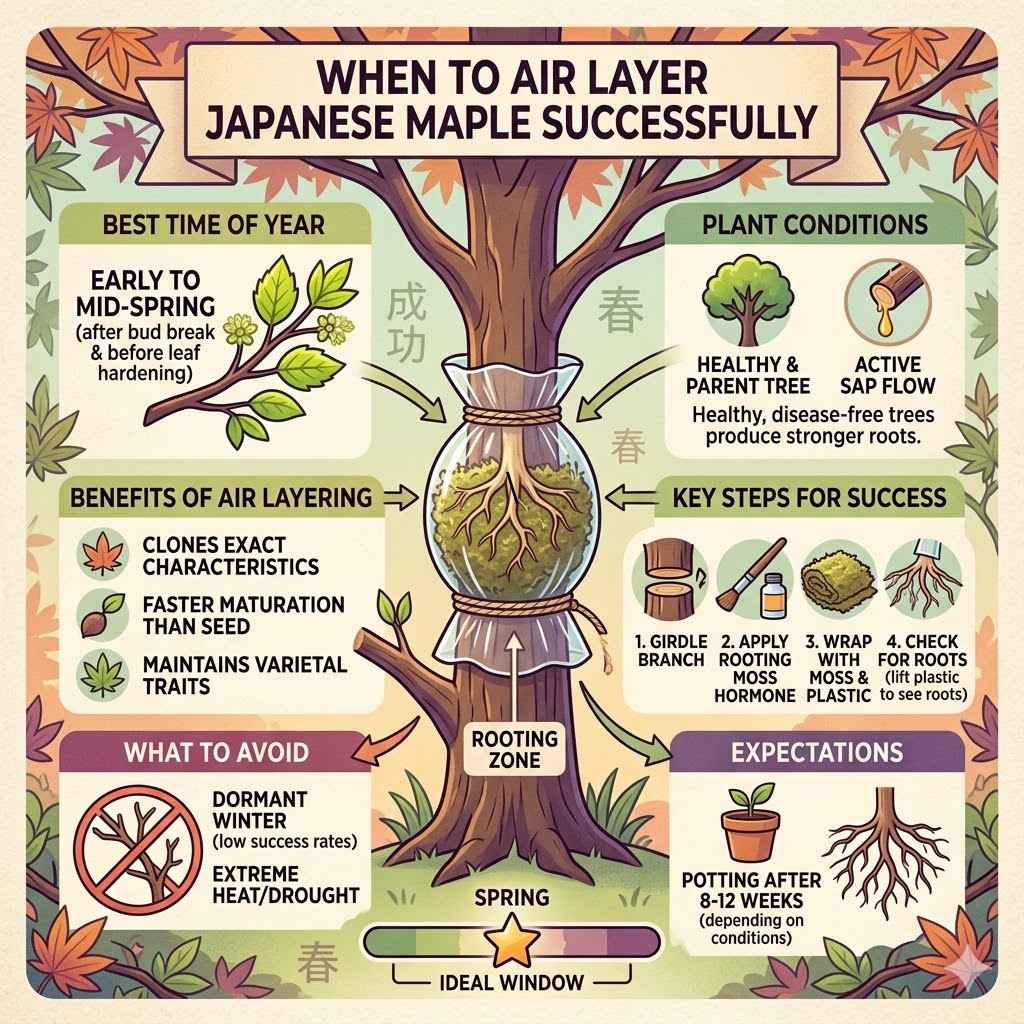
Best Time to Air Layer Japanese Maple
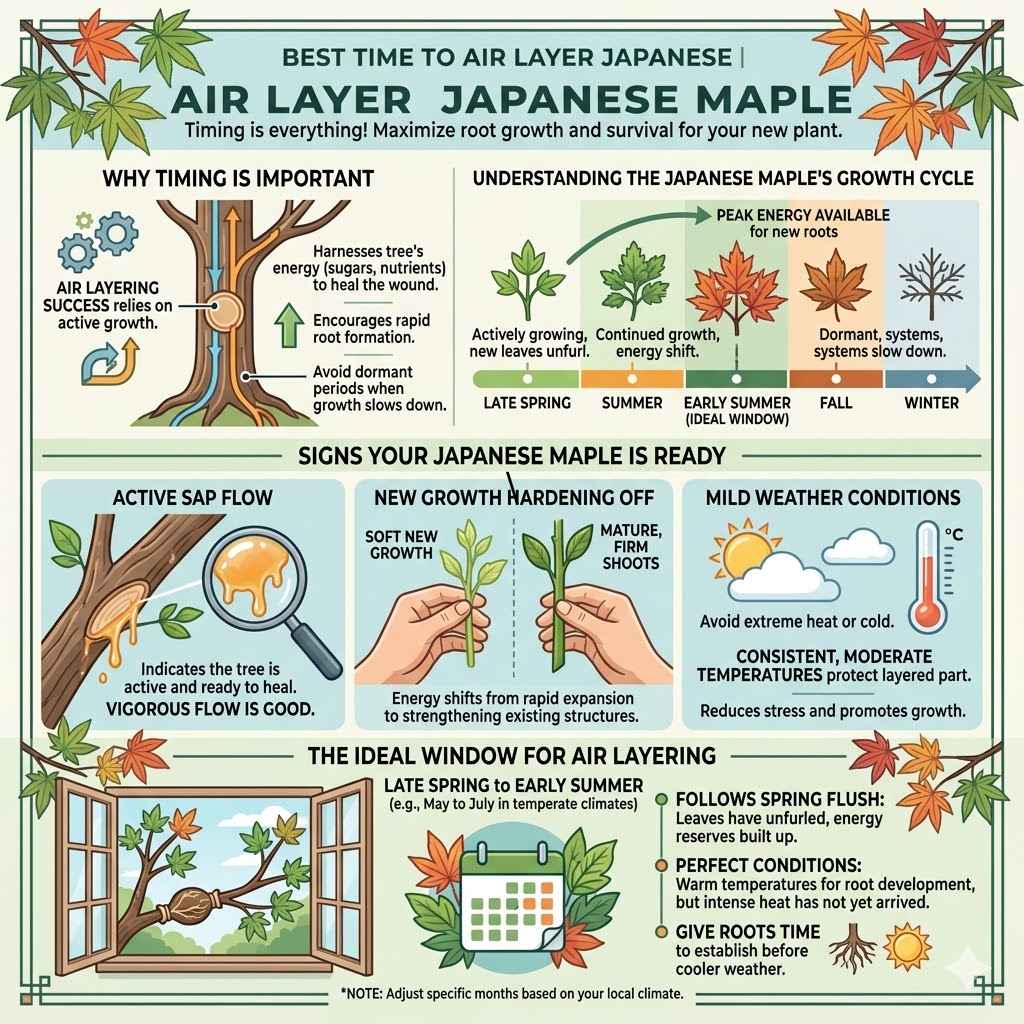
Timing is everything when you want to air layer a Japanese maple. Doing it at the right moment means your new plant will have the best chance to grow strong roots and survive. This section will show you the perfect window for this technique.
We will explain why this timing is so important for success.
Understanding the Japanese Maple’s Growth Cycle
Japanese maples have specific times when they are actively growing and when they are resting. Air layering works best when the tree is in a growth spurt. This is because the plant is busy moving nutrients and sugars around, which helps the wound area heal and encourages root formation.
Dormant periods are not ideal, as the tree’s systems are slowed down.
The active growing season for Japanese maples typically begins in late spring and continues through summer. During this time, new leaves unfurl, and the branches extend. This is when the plant has the most energy available to support the development of new roots on the layered stem.
Understanding this cycle helps you identify the prime time. You are essentially hijacking the tree’s natural growth process to create a new plant. It’s like giving it a little nudge when it’s already in the mood to grow.
Signs Your Japanese Maple Is Ready for Air Layering
You can often tell if your Japanese maple is ready by looking at its current state of growth. The best indicator is when new shoots have stopped extending and have started to harden off. These are often called “firm” or “mature” shoots.
Active Sap Flow
You’ll notice sap flowing freely when you make a cut. This indicates the tree is active and ready to heal. A vigorous flow is a good sign.
If the sap is sticky and abundant, your maple is likely in a good growth phase.
New Growth Hardening Off
The brand-new, bright green, soft shoots should have matured. They will start to feel firmer and may take on a slightly darker green color. This hardening signifies that the plant’s energy is shifting from rapid expansion to strengthening its existing structures.
Mild Weather Conditions
Extreme heat or cold can stress the tree and the developing roots. Aim for periods with consistent, moderate temperatures. This helps the layered part stay healthy and promotes root growth without undue stress from the environment.
Observing these signs will give you confidence that you are choosing the optimal time to begin your air layering project.
The Ideal Window for Air Layering
The most successful air layering of Japanese maples usually happens in late spring or early summer. This is typically from May to July in many temperate climates. This period follows the initial flush of spring growth, allowing the tree to build up energy reserves.
During this time, temperatures are warm enough to encourage root development, but the intense heat of mid-summer has not yet arrived. This combination of active growth and moderate weather creates perfect conditions for successful propagation.
It’s important to avoid air layering too early in the spring when the tree is just waking up. It’s also not ideal to wait until late summer or fall when the tree is preparing for dormancy. The goal is to give the developing roots ample time to establish before cooler weather sets in.
How to Successfully Air Layer Japanese Maple Step By Step
Air layering can sound like a complex horticultural practice, but breaking it down makes it manageable. This guide provides a clear, simple approach. We will walk through each step required for successful air layering.
This makes growing new Japanese maples accessible even for beginners.
Selecting the Right Branch for Air Layering
Choosing the correct branch is a crucial first step. A healthy, well-placed branch will increase your chances of success significantly. Look for branches that are about the thickness of a pencil or a bit thicker.
This size is ideal for both handling and developing a strong root system.
Health of the Branch
Ensure the branch is free from any signs of disease or pest infestation. It should look vibrant and healthy, with good leaf production. A weak or damaged branch will likely not produce viable roots.
Branch Age and Thickness
Branches that are one to two years old are generally the best candidates. They are flexible enough to work with but have enough maturity to support root development. Very thin, flexible shoots might not be strong enough, while very old, woody branches can be difficult to callus and root.
Branch Location on the Tree
Select a branch that is growing outwards or upwards, not one that is drooping excessively or growing back towards the main trunk. The position should allow for easy access for the air layering process and for the eventual removal and potting of the new plant.
Careful selection here sets the stage for a smooth process ahead.
Preparing the Branch for Rooting
Once you have chosen your branch, it’s time to prepare it. This involves making a clean cut that will encourage the plant to form roots. The technique is often referred to as girdling or notching.
You will need a sharp, sterile knife or a specialized air layering tool. Sterilize your tool with rubbing alcohol or a flame to prevent introducing any diseases into the wound.
The process involves removing a ring of bark. This ring should be about 1 to 1.5 times the width of the branch’s diameter. Make two parallel cuts around the branch, about an inch apart.
Then, carefully remove the strip of bark between these two cuts.
For some plants, scratching the cambium layer just beneath the bark with your knife can also help. The cambium is a thin, green layer where growth occurs. This exposure stimulates the plant’s natural response to heal, which includes root formation.
Applying Rooting Hormone and Sphagnum Moss
After preparing the branch, the next step is to stimulate root growth. Rooting hormone is a common tool that helps significantly. It contains plant hormones that signal the stem to develop roots more readily.
You can find rooting hormone powders or gels at most garden centers. Dip the exposed woody part of the branch (the area where the bark was removed) into the rooting hormone. Make sure the entire girdle area is covered.
Next, you need a moist medium for the roots to grow into. Sphagnum moss is an excellent choice because it retains moisture well and provides good aeration. It’s also relatively sterile.
You’ll need to rehydrate the sphagnum moss if it’s dried out. Soak it in water until it’s damp but not dripping wet. Gently squeeze out any excess water.
Now, take a generous handful of the damp sphagnum moss and wrap it firmly around the girdled section of the branch. This moss will hold the moisture and create a humid environment where roots can form.
Securing the Air Layer With Plastic Wrap
To keep the sphagnum moss in place and maintain a moist environment, you’ll use plastic wrap. This creates a mini-greenhouse around the rooting area. It prevents the moss from drying out and allows you to easily see the root development.
Cut a piece of clear plastic wrap large enough to encircle the moss and the branch. Wrap it tightly around the moss, ensuring it seals the moss against the branch. You want to create a snug fit, but not so tight that it constricts the branch’s flow of sap.
Use waterproof tape, such as electrical tape or grafting tape, to secure the plastic wrap at both the top and bottom edges of the moss ball. This seal is important to trap moisture and prevent air from drying out the sphagnum moss. The plastic should be transparent so you can monitor the root growth.
This visual check is a key part of the process. It lets you know when the roots are developing sufficiently.
Monitoring Root Development and Detaching the Layer
Patience is key during the root development phase. Check the air layer periodically by looking through the plastic wrap. You are looking for visible root formation.
Roots will typically appear as small, white, thread-like structures. As they grow, they will become thicker and more numerous, filling the moss ball.
The time it takes for roots to develop can vary. It often takes anywhere from 4 to 12 weeks, depending on the tree species, the time of year, and environmental conditions. You want to see a good, solid mass of roots before you detach the branch.
Once you see a substantial amount of roots, it’s time to detach. Using your sterile, sharp knife, cut the branch off cleanly just below the ball of roots. Be careful not to damage the newly formed roots.
Potting the New Japanese Maple
After successfully detaching your rooted air layer, the next step is to pot it. This is where your new Japanese maple will begin its independent life. Choose a pot that is slightly larger than the root ball.
Make sure it has good drainage holes.
Use a well-draining potting mix. A good blend might include equal parts peat moss, perlite, and compost. This mix provides the necessary moisture retention and aeration for young roots.
Gently remove the plastic wrap and tape from around the root ball. Place the new plant in the center of the pot. Fill the pot with your potting mix, ensuring the roots are fully covered and the plant is stable.
Water the newly potted tree thoroughly. This helps settle the soil around the roots and reduces transplant shock. Keep the potted Japanese maple in a shaded, protected location for the first few weeks.
Gradually introduce it to more sunlight as it establishes.
Common Challenges and Tips for Success
Even with careful planning, air layering can sometimes present challenges. Understanding these common issues can help you overcome them and ensure your Japanese maple project thrives. This section offers practical advice and solutions.
What If No Roots Develop
It can be disheartening when an air layer fails to produce roots. Several factors could be at play. One common reason is that the timing was off.
If the tree wasn’t in its peak growth period, root formation may be sluggish or nonexistent.
Another possibility is insufficient moisture in the sphagnum moss. If the plastic wrap seal wasn’t tight enough, the moss could have dried out, preventing root development. Conversely, too much moisture without adequate drainage can lead to rot.
Improper Girdling Technique
If the bark wasn’t removed properly, or if the cambium layer wasn’t sufficiently exposed, the plant may not initiate root formation. Ensure a clean removal of the bark ring and consider lightly scraping the exposed wood if needed.
Poor Quality Rooting Hormone
Rooting hormones can lose their potency over time, especially if stored improperly. Using fresh, high-quality rooting hormone is essential for stimulating root growth effectively.
Branch Health Issues
If the selected branch was already weak or diseased, it might not have had the energy reserves to develop roots. Always start with the healthiest specimens available.
If roots don’t form, you can often re-attempt the process the following season after assessing what might have gone wrong.
Dealing with Rot or Fungus
Rot is a significant risk when air layering, primarily caused by excess moisture and lack of aeration. The enclosed environment of the plastic wrap can become a breeding ground for fungal diseases if not managed correctly.
To prevent rot, ensure your sphagnum moss is damp, not waterlogged. Squeeze out any excess water before wrapping it around the branch. The plastic wrap should create a sealed environment, but it’s also important that the moss itself isn’t saturated.
Sterilizing your tools before making any cuts is critical. This prevents the introduction of fungal spores or bacteria that can cause rot. If you notice any signs of mold or rot on the exposed wood before applying the moss, it’s best to sterilize the area and make a fresh cut.
Using a small amount of a fungicide on the cut surface before applying the rooting hormone and moss can also be a preventative measure, though it’s usually not necessary if other steps are followed correctly.
Tips for Improving Rooting Success
Several factors can significantly boost your success rate with air layering Japanese maples. These tips focus on optimizing the conditions for root development.
Use Clean and Sharp Tools
This cannot be stressed enough. Dull or dirty tools create ragged wounds that are prone to infection and slow healing. Sharp tools make clean cuts that the tree can seal more effectively, promoting root initiation.
Maintain Consistent Moisture
The sphagnum moss needs to stay consistently moist but not soaking wet. Regularly check the moisture level through the plastic wrap. If it appears dry, you may need to carefully add a little water, or if it’s too wet, try to improve ventilation slightly or adjust your watering schedule for future attempts.
Select Branches from Healthy Parent Trees
A strong, healthy mother plant will produce stronger, more vigorous cuttings. Ensure your Japanese maple is well-cared for, receiving adequate water, sunlight, and nutrients. This vitality translates to the layered branch.
Be Patient and Observe Closely
Root development takes time. Avoid the temptation to open up the air layer too frequently, as this disrupts the environment and can stress the forming roots. Look for clear signs of root growth before considering detachment.
Consider Using Activated Charcoal
Some growers add a small amount of activated charcoal to the sphagnum moss mixture. This can help absorb toxins that might inhibit root growth and can also improve the overall health of the root ball.
By implementing these tips, you can greatly increase your chances of successfully air layering your Japanese maple.
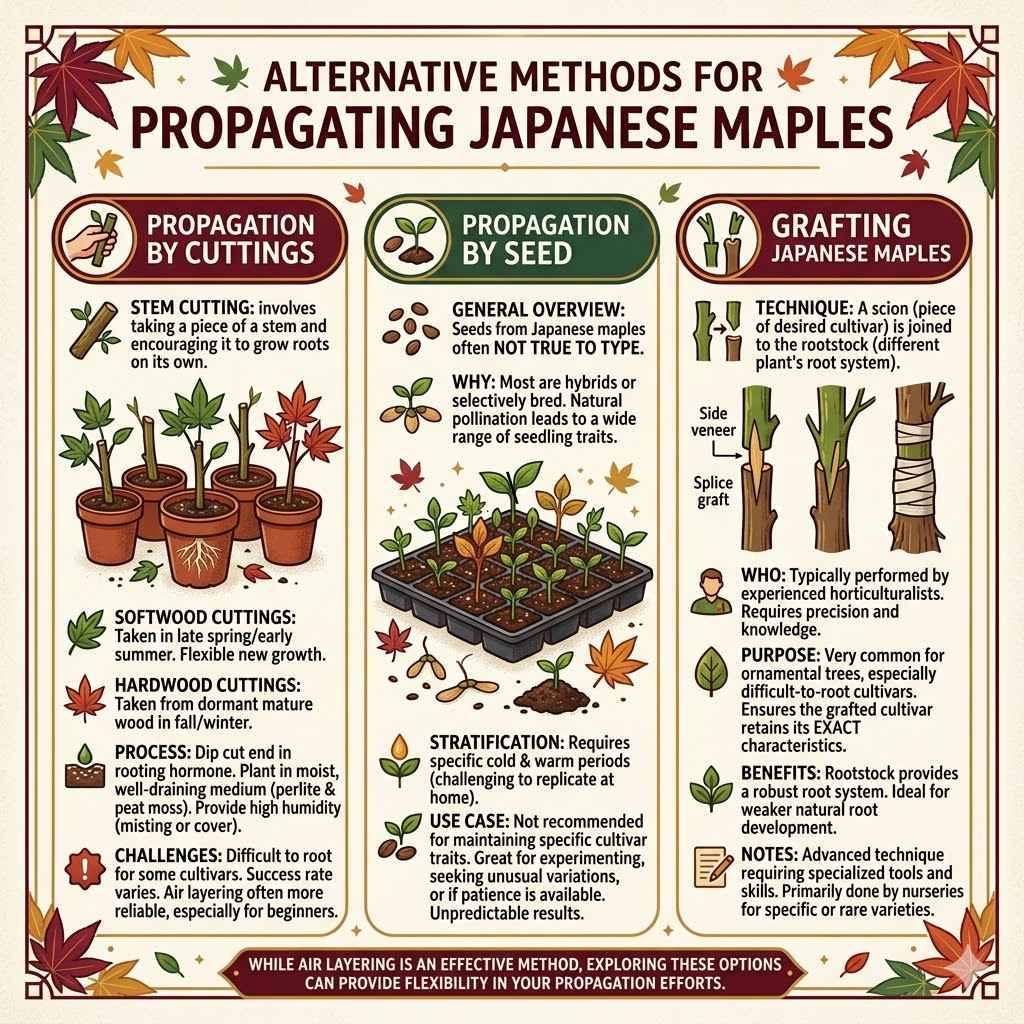
Alternative Methods for Propagating Japanese Maples
While air layering is a very effective method for propagating Japanese maples, it’s not the only way. Other techniques can also yield great results, depending on your goals and the resources available. Exploring these options can provide flexibility in your propagation efforts.
This section briefly touches on other popular methods.
Propagation by Cuttings
Taking cuttings is another widely used method for propagating many plants, including some varieties of Japanese maples. This involves taking a piece of a stem and encouraging it to grow roots on its own.
Softwood cuttings are typically taken in late spring or early summer, when the new growth is still flexible but has started to firm up. Hardwood cuttings are taken from dormant, mature wood in the fall or winter.
The process involves dipping the cut end of the cutting in rooting hormone and then planting it in a moist, well-draining medium, such as a mix of perlite and peat moss. Keeping the cuttings in a humid environment, often with a plastic cover or in a misting system, is crucial for success.
However, Japanese maples can be notoriously difficult to root from cuttings, especially for some cultivars. The success rate can be quite variable, making air layering a more reliable choice for many gardeners, particularly beginners.
Propagation by Seed
Growing Japanese maples from seed is possible, but it comes with a significant caveat. Seeds from Japanese maples are often not true to type. This means the new plants that grow may not look like the parent tree.
This is because most Japanese maples are hybrids or have been selectively bred for specific characteristics like leaf shape, color, and form. When seeds are produced through natural pollination, the resulting seedlings can exhibit a wide range of traits, some desirable and many not.
The process of stratifying Japanese maple seeds also requires specific cold and warm periods, which can be challenging to replicate at home. If you are looking to create a specific cultivar or maintain exact parent tree characteristics, growing from seed is generally not recommended.
However, for those interested in experimenting or seeking unusual variations, growing from seed can be an interesting project, though it requires patience and acceptance of unpredictable results.
Grafting Japanese Maples
Grafting is a technique where a scion (a piece of stem from the desired cultivar) is joined to the rootstock (the root system of a different plant). This method is very common for propagating many ornamental trees, including Japanese maples, especially for specific cultivars that are difficult to root by other means.
Grafting is typically performed by experienced horticulturalists. It requires precision and knowledge of plant anatomy to ensure the vascular tissues of the scion and rootstock align correctly, allowing them to fuse and grow together.
The rootstock provides a robust root system, which can be beneficial for certain Japanese maple cultivars that might have weaker natural root development. This method ensures that the grafted cultivar retains its exact characteristics.
While effective, grafting is a more advanced technique compared to air layering and usually requires specialized tools and skills. It’s often done by nurseries to produce their stock of popular or rare Japanese maple varieties.
Conclusion
Knowing when to air layer Japanese maple successfully makes all the difference. The best time is during active growth in late spring or early summer. Observe your tree for hardened new growth.
This simple guide has provided clear steps. You can now confidently try air layering. Happy growing!
Frequently Asked Questions
Question: Can I air layer a Japanese maple in the fall?
Answer: It is generally not recommended to air layer Japanese maples in the fall. The tree is preparing for dormancy, and the developing roots will not have enough time to establish before cold weather arrives. This can lead to failure or damage to the new layer.
Question: What kind of soil should I use for a newly potted air-layered Japanese maple?
Answer: A well-draining potting mix is essential. A good blend includes equal parts peat moss, perlite, and compost. This provides moisture retention and aeration for young roots.
Question: How long does it take for roots to form on an air-layered Japanese maple?
Answer: Root development can take anywhere from 4 to 12 weeks. This depends on the tree’s health, the time of year, and environmental conditions. Patience and consistent observation are key.
Question: What is the main benefit of air layering over taking cuttings?
Answer: Air layering often has a higher success rate for Japanese maples, as the branch remains attached to the parent tree until roots have formed. This provides the developing roots with continuous support and nutrients from the parent plant.
Question: Should I fertilize the air-layered branch before detaching it?
Answer: No, you should not fertilize the air-layered branch before detaching it. Fertilizing the branch can encourage leaf growth rather than root development, and it could also damage the developing roots. Focus on providing good moisture and a suitable medium.