Master Woodworking Cutting Curves: Tips & Tools
Cutting curves in woodworking can be accomplished with a jigsaw or circular saw for gradual curves, or with a band saw or scroll saw for more intricate designs. Cutting curves in woodworking can add unique and decorative features to furniture, cabinets, and other wooden projects.
Whether you are a beginner or an experienced woodworker, it is important to know the different tools and techniques available for cutting curves. A jigsaw or circular saw can be used for cutting gradual curves, while a band saw or scroll saw is recommended for more complex designs.
We will explore the best practices for cutting and shaping curves in woodworking and highlight some of the tools available for achieving smooth and precise curves. With these tips and techniques, you can elevate your woodworking skills and create stunning curved designs in your projects.
Cutting Curves With A Jigsaw
Cutting curves in woodworking can initially seem daunting, but with the right tools and techniques, it can be a breeze. One effective tool to consider is a jigsaw, which offers precision and versatility for cutting smooth curves in wood. Check out various DIY tips online or consider taking a woodworking class to learn more.
One of the most versatile tools in a woodworker’s arsenal is the jigsaw. This handheld tool can make a variety of cuts, including straight lines, curves, and even intricate designs. Cutting curves with a jigsaw is easy once you understand the proper techniques and have some helpful tips and tricks. In this article, we’ll cover how to cut curves with a jigsaw, using the jigsaw to cut curves, and tips for cutting curves with a jigsaw.
How to Cut Curves with a Jigsaw
Before you begin cutting curves with a jigsaw, it’s important to select the right blade for your project. Blades come in different sizes and with different teeth per inch (TPI) ratings. A blade with a higher TPI rating will leave a smoother finish, while a lower TPI rating will remove material more quickly.
To cut curves with a jigsaw, you’ll want to start by securing your piece of wood to a stable surface, like a workbench. Then, mark out your curve using a pencil or other marking tool. Next, attach the appropriate blade to your jigsaw and adjust the blade speed and angle as needed. Start your cut by lining up the jigsaw blade with your curve and slowly pressing the trigger to begin cutting.
Using the Jigsaw to Cut Curves
One benefit of using a jigsaw to cut curves is that it allows for a high degree of control and precision. You can use the jigsaw to make both large, sweeping curves and small, intricate cuts. Additionally, the jigsaw’s compact size and versatility make it a great tool for curves that are difficult to reach with other tools, such as those in tight corners or on curved edges.
Tips for Cutting Curves with a Jigsaw
Here are some helpful tips to keep in mind when cutting curves with a jigsaw:
1. Choose the right blade for your project, based on the thickness of the wood and the desired finish.
2. Start your cut slowly and work your way up to a faster speed, adjusting as needed.
3. Keep your jigsaw blade as perpendicular to the wood as possible to prevent the blade from wandering off course.
4. For larger curves, use a guide to ensure a smooth cut.
5. Avoid twisting the blade or making sudden turns while cutting to prevent the blade from binding or breaking.
With these tips and techniques, you can master the art of cutting curves with a jigsaw and take your woodworking projects to the next level.
Hand Cutting Curves
Cutting curves in woodworking can seem daunting, but with the right techniques and tools, it can be a breeze. Hand cutting curves is one such method, which can be especially useful when access to power tools is unavailable or impractical.
With practice and patience, anyone can become skilled at hand cutting curves in wood.
Woodworking offers a challenge, and cutting curves is one of the most difficult feats to accomplish when working with wood. It takes patience, skill, and time to achieve a smooth, perfectly measured curve. While there are many ways to cut curves, one of the most satisfying and rewarding methods is to cut them by hand. In this article, we’ll explore how to cut curves by hand, including tools and tips that will make the process easier.
How to Cut Curves by Hand
Cutting curves by hand can be intimidating, but with the right technique and tools, it can be an enjoyable experience. Here’s a step-by-step guide on how to cut curves by hand:
1. Mark the curve: Use a pencil or marking knife to draw the curve on the wood.
2. Cut relief cuts: Cut several relief cuts along the curve, spacing them about 1/8 inch apart. This will make cutting along the curve easier.
3. Cut along the curve: Hold the saw with both hands and cut along the curve, following the relief cuts.
4. Sand the curve: Use sandpaper to smooth out any rough spots and make the curve even.
5. Finish the wood: Sand and apply the desired finish to the wood.
Tools for Hand Cutting Curves
When it comes to tools for hand cutting curves, there are a few essentials that you’ll need:
1. Coping saw or handsaw: A good quality coping saw or handsaw is essential for cutting curves. Look for a saw with a high-quality blade that stays sharp.
2. Sandpaper: You’ll need sandpaper of different grits for smoothing out the rough spots on the curve.
3. Pencils/markers: You’ll need pencils or markers to mark the curve on the wood.
4. Ruler: A ruler or straightedge will help you draw a straight line.
Tips for Hand Cutting Curves
Here are some tips to help make hand cutting curves easier and more efficient:
1. Choose the right saw: A coping saw is best for small curves, while a handsaw works better for larger curves.
2. Cut relief cuts: Cutting relief cuts will help guide the saw through the curve.
3. Take your time: Hand cutting curves is a slow process, take your time and don’t rush it.
4. Use the right grip: Hold the saw with both hands, keeping the blade perpendicular to the saw’s frame.
5. Practice: Practice makes perfect, so set aside some time to practice hand cutting curves.
In conclusion, cutting curves is a challenging task, but doing it by hand can be both rewarding and enjoyable. With the right tools and technique, you can create a beautiful curve that will enhance the beauty of any project. Follow the steps and tips outlined in this article, and you’ll be on your way to becoming a skilled woodworker capable of cutting curves by hand.
Cutting Curves With A Router
Curves add a touch of elegance and style to woodworking projects. They can be challenging to cut, but with the right tools and techniques, it’s a breeze. One such tool that can help you cut curves with ease is a router. It is a versatile woodworking machine that can be fitted with various bits to cut different patterns and designs. In this section, we will explore how to cut curves with a router, the tools required, and some tips to make the process smoother.
How To Cut Curves With A Router
The process of cutting curves with a router involves three primary steps:
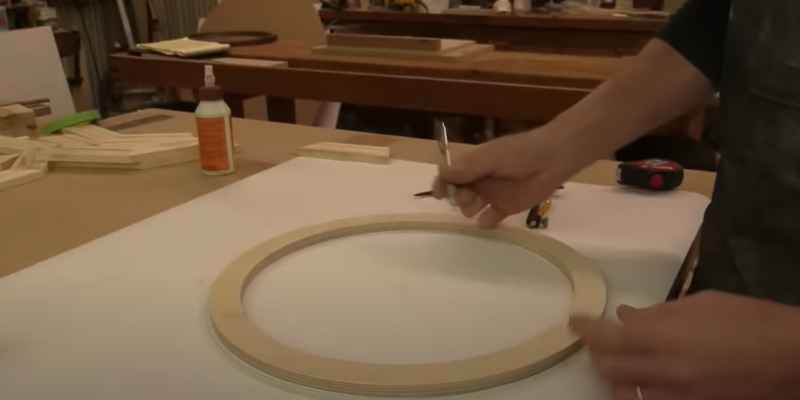
- Creating a Template: Use a piece of hardboard or plywood to create a template of the curve you want to cut. This template will be used as a guide for the router as you cut the curves on your wooden workpiece.
- Setting up the Router: Choose a router bit that matches the curvature of your template. Set the depth of the bit to match the thickness of your workpiece, and attach a guide bushing to the base of the router. The guide bushing will follow the template and guide the router as you cut the curve.
- Cut the Curve: Place the template on your workpiece and clamp it in place. Adjust the router’s speed and start cutting the curve by following the guide bushing along the template. Move the router along the curve in a counterclockwise direction to achieve a smoother cut.
Tools For Cutting Curves With A Router
When cutting curves with a router, you will need:
- A router – choose a handheld router or a router table.
- A router bit – choose a bit that matches the curvature of your template
- A guide bushing – attaches to the router to follow the template as you cut.
- A template – made of hardboard or plywood to guide the router as you cut.
- Clamps – to secure the template in place on your workpiece.
- Safety gear – Router bits can cause accidents. Protect your eyes, ears, and hands by wearing safety goggles, earplugs, and gloves.
Tips For Cutting Curves With A Router
Here are some tips to help you cut curves with a router more smoothly:
- Use a sharp router bit to avoid splintering and chipping
- Take precautionary measurements and use a ruler to make sure your template is aligned with your workpiece.
- Practice on scrap wood before working on your final workpiece.
- Slowly ease the router into the cut and try not to force it.
- Make sure your workspace is clean and free of debris to avoid accidents.
Cutting Curves With A Band Saw
Achieving perfectly curved pieces is possible through the use of a band saw in woodworking. The band saw allows for precise cutting of curves in wood, making it an essential tool for many carpenters and DIY enthusiasts.
Cutting curves is an important and achievable woodworking skill. While it may seem intimidating at first, with the right tools and techniques, anyone can do it. One of the most popular tools for cutting curves is a band saw. In this article, we will explore how to cut curves with a band saw, the tools needed to do so, and some helpful tips to ensure a successful project.
How To Cut Curves With A Band Saw
To start cutting curves with a band saw, you’ll first need to install a narrow blade with at least 3 teeth per inch. This will ensure that you have enough control and speed to make a smooth cut. Here are the steps to follow:
- Draw the curve you want to cut onto the wood.
- Set the blade guide to the height of the board and adjust it so the blade is around 1/4 inch away from the wood.
- Securely clamp the wood onto the band saw table.
- Turn on the band saw and slowly start feeding the wood into the blade, following the curve you drew.
- Make sure to keep your hands well clear of the blade and always wear safety goggles.
Tools For Cutting Curves With A Band Saw
Here are some essential tools you’ll need to cut curves with a band saw:
| Band saw with a narrow blade | The most important tool for cutting curves. Make sure the blade is appropriately sized and have the proper TPI. |
|---|---|
| Clamps | Securely clamp the wood onto the band saw table to prevent it from moving around. |
| Pencil and Ruler | To draw the curve directly onto the wood before cutting. |
| Safety goggles | To protect your eyes from sawdust and debris |
Tips For Cutting Curves With A Band Saw
Here are some tips to help you get the best results when cutting curves with a band saw:
- Start with scrap wood until you have mastered the technique.
- Use a blade with a higher TPI for tighter curves and one with a lower TPI for wider curves.
- Ensure the blade is properly tensioned – a loose blade will drift and make it harder to control the cut.
- Move the wood slowly to maintain control. Making small and gradual adjustments to your feed rate is better than trying to backtrack.
- Try to cut on the outside of the line you drew. It is much easier to sand or shave off excess wood than it is to add it back on.
Cutting curves with a band saw can be challenging but by following these tips and mastering the technique, you’ll be able to add a whole new dimension to your woodworking projects.
Other Tools For Cutting Curves
Cutting curves in woodworking can be achieved with various tools such as a jigsaw, circular saw, bandsaw, and hand saws. Other tools include the convex curve cutter, trend mini flexible curve guide, and simple curves ruler which offer precision when making curved cuts in wood.
Cutting curves in woodworking is often one of the most challenging tasks that often requires skill and precision. While cutting curves using a jigsaw is the most straightforward method, there are other tools you can use depending on the type and size of curve you want to cut. Let’s take a look at some of the other options to consider.
Convex Curve Cutter
Sometimes, cutting a convex curve can be challenging. The convex curve cutter is an easy-to-use tool that can help you achieve a smooth curve quickly. This tool works by clamping onto the workpiece and following an adjustable guide to cut the curve.
Simple Curves Ruler
A simple curves ruler helps you cut curves of different sizes by following a particular curve on a piece of paper. You can then use this as a template to guide your cutting. This tool is excellent for cutting smaller curves, and it is effortless to use.
Flexible Curve Guide
Flexible curve guides give woodworkers more freedom to create complex curves in their projects. The flexible material means you can mold the guide to almost any shape or size, thus providing the opportunity to make unique, creative pieces. It is a great tool for making curved edges and for creating a smooth curve on furniture legs, among other things.
In conclusion, cutting curves in woodworking requires skill, patience, and precision. While the jigsaw is the most common tool for cutting curves, there are other options available. The convex curve cutter, simple curves ruler, and flexible curve guide, offer woodworkers the necessary variety and flexibility to create complex and unique curves, adding a touch of creativity to their projects.
Best Practices For Cutting And Shaping Curves
Mastering the art of cutting and shaping curves in woodworking can be a true game-changer. From the tools and techniques you use to the tips and tricks you apply, there are many best practices to follow if you want to nail those smooth, precise curves every time.
Laying Out Fair Curves
Before you can cut curves in wood, you need to have a plan. Begin by drawing the curve onto the wood surface. Using a compass or flexible strip, create a smooth curve line that accurately matches the design. Make sure the wood surface is free of any debris or dust before moving to the next step.
Cutting And Routing To A Precise Line
Once you have laid out the curve, it is time to start cutting. A jigsaw is the most common tool to use when cutting curves in wood. Ensure the wood is secured by using clamps before you start cutting. Cut the curve line using a slow and steady motion, keeping the blade perpendicular to the surface. If you want a smoother finish, use a router to shape and curve the wood. The router bit must be the right size to match the curve you want to create, and the router must be set to a low speed to avoid any splintering.
Wood Bending Techniques
Wood bending involves using heat and moisture to create a desired curve in the wood. This technique can be used to make curved wood pieces that can be difficult to cut using a saw. One method is to use a steam box or tube to heat the wood and then use a bending jig to create a curve. Another technique is called kerf-cutting, where the wood is cut into thin slices and then bent to a curve.
Cutting Curves With The Right Tools
Using the right tool is essential when cutting curves in wood. A band saw or jigsaw is commonly used to cut rough curves, while a router is effective at cutting smoother curves. The convex curve cutter and simple curves ruler are other tools that can help create precise curves. When using a machine for cutting curves, ensure you follow the manufacturer’s instructions carefully to avoid any injuries or mistakes.
In summary, cutting curves in woodworking requires careful planning, accurate measuring, and using the right tools. Creating fair curves is essential to create a beautiful and functional piece of woodworking. By using precision techniques and tools, one can cut curves that are smooth, even, and structurally sound.
Frequently Asked Questions On Woodworking Cutting Curves
What Is The Best Way To Cut Curves In Woodworking?
The best way to cut curves in woodworking is by using a jigsaw or a bandsaw. However, for cutting gradual curves, a circular saw is a good option. To cut curves smoothly, you need to follow the proper techniques like laying out fair curves and cutting to a precise line.
You can also use tools like a convex curve cutter or a simple curves ruler to make curved cuts in wood.
What Woodworking Machine Is Used For Cutting Curves?
The woodworking machine that is used for cutting curves is a band saw or jigsaw. Both are effective in quickly cutting rough curves in wood. Additionally, smaller hand-powered jigsaws can also be used for the same purpose. Circular saws can be used for cutting smooth curves, but they are not recommended for making furniture pieces.
What Tool Performs Curved Cuts In Wood?
Band saws or scroll saws are commonly used to perform curved cuts in wood. Smaller handheld jigsaws can also be used for this purpose. Additionally, a circular saw can be used to cut gradual curves in wood. It is important to use the appropriate tool for the specific type of curve being cut.
What Are The Different Types Of Curves In Wood?
Circular, curvilinear, and S curves are the different types of curves in wood. Circular curves are simple and round, while curvilinear curves go up and down. S curves, as the name implies, are shaped like the letter S. Band saw and jigsaw are some of the tools used for cutting curves in woodworking.
Conclusion
To master the art of woodworking cutting curves, you need to follow a few methods and techniques. From drawing the perfect template to using the right tools like a jigsaw, circular saw, and band saw, you can create graceful curves on any wood piece.
Don’t forget to sand the curve and apply the finish for a professional look. With these simple steps and patience, you can easily cut curves in wood and create excellent pieces of furniture or artwork. So, practice cutting curves and enjoy the magic of woodworking.