Ash Wood Ideas: Genius & Essential
Unlock the potential of ash wood with these genius ideas! Perfect for beginners, ash offers durability, beauty, and versatility for stunning DIY furniture, decor, and more. Learn how to choose, work with, and finish ash to create beautiful, lasting pieces that enhance your home.
Hey there, fellow makers! Have you ever looked at a piece of wood and wondered about its magic? Ash wood is one of those unsung heroes in the woodworking world. It’s strong, it’s beautiful, and it’s surprisingly friendly to work with, even if you’re just starting out. Sometimes, figuring out what to do with a great material like ash can be the biggest hurdle. That’s where we come in! We’ll guide you through some truly brilliant and essential ash wood ideas, breaking down everything you need to know to bring your woodworking dreams to life, safely and successfully.
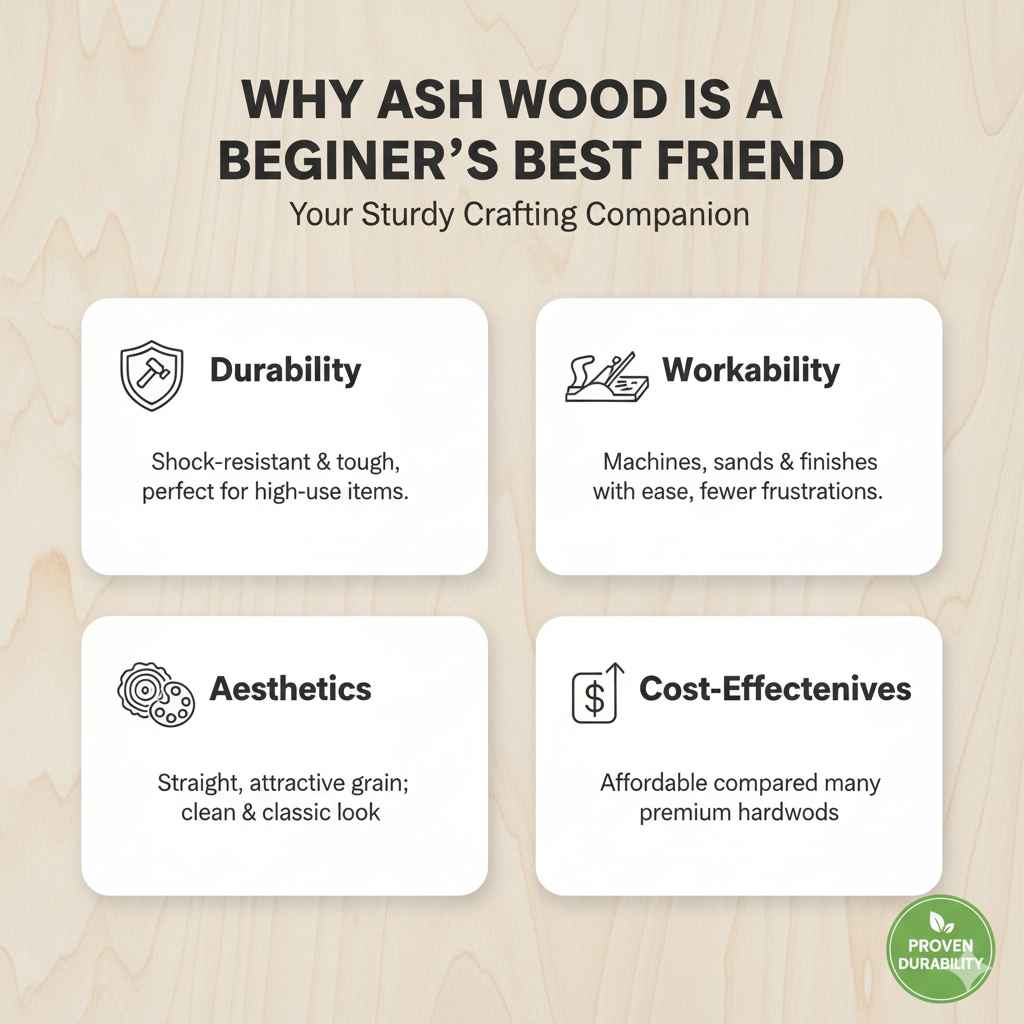
Why Ash Wood is a Beginner’s Best Friend
Ash wood is a fantastic choice for anyone dipping their toes into woodworking. It’s readily available, relatively affordable, and possesses a combination of strength and workability that many other hardwoods lack. Think of it as a sturdy, reliable companion on your crafting journey.
- Durability: Ash is known for its shock resistance, making it ideal for items that get a lot of use.
- Workability: It machines, sands, and finishes well, meaning fewer frustrations for beginners.
- Aesthetics: The grain is usually straight and attractive, offering a clean, classic look.
- Cost-Effectiveness: Compared to some other premium hardwoods, ash is a more budget-friendly option.
Understanding Ash Wood: What Makes It Special?
Before we dive into projects, let’s get a little acquainted with ash. There are several species of ash, but White Ash (Fraxinus americana) is the most common for furniture and woodworking. It’s a hardwood known for its excellent strength and stiffness, but also its ability to absorb shock. This makes it a favorite for tool handles, baseball bats, and, you guessed it, stunning furniture!
The grain of ash is typically straight, with a coarse texture. This can give projects a distinct character, and it takes stains and finishes beautifully, allowing you to achieve a wide range of looks. Its natural color ranges from creamy white to a light to medium brown.
Pros and Cons of Working with Ash Wood
Like any material, ash has its strengths and occasional quirks. Knowing these helps you make informed decisions for your projects.
| Pros | Cons |
|---|---|
| Excellent shock resistance (great for high-use items) | Can sometimes be prone to chipping or tear-out if tools are dull or you plane against the grain. |
| Pleasing natural color and grain pattern | Grain can be somewhat coarse, requiring careful sanding and filling for a super-smooth finish. |
| Takes glues and finishes very well | Susceptible to insect damage (like the Emerald Ash Borer), which can affect availability and price in some regions. Always check local sources for healthy wood. |
| Relatively affordable for a hardwood | Can be a bit harder to join than softer woods, but still very manageable with sharp tools. |
| Strong and durable | The coarse texture might not be ideal for very fine, detailed carvings without extra steps. |
Essential Ash Wood Ideas for Beginners
Now for the fun part! Let’s explore some project ideas that are perfect for beginners and showcase the best of ash wood. We’ll focus on projects that are achievable, look fantastic, and build your woodworking confidence.
1. Simple & Stylish Ash Wood Shelving
Floating shelves or simple wall-mounted shelves are a fantastic entry point for woodworking. Ash’s strength means you can create surprisingly deep or long shelves that feel sturdy and substantial. Its beautiful grain pops with a clear finish, or you can stain it to match your decor.
Why it’s great for beginners:
- Minimal joinery required.
- Relatively few cuts, making it less prone to errors.
- Focuses on finishing techniques and simple assembly.
Tips for your ash shelves:
- Measure twice, cut once! Accuracy is key for a professional look.
- Consider adding a subtle edge profile using a router (a simple chamfer or round-over) for a more refined look.
- For floating shelves, ensure you use a robust mounting system suitable for the weight of the shelf and its contents. Check out guidance from organizations like Woodworking Network for sourcing tips.
2. Classic Ash Wood Cutting Boards
A well-made cutting board is both functional and beautiful. Ash’s durability makes it a great choice because it can withstand the rigors of kitchen use. Its clean grain pattern looks stunning, and you can even create beautiful edge or face grain designs.
Why it’s great for beginners:
- Small enough project to manage workspace and material costs.
- Excellent practice for precise cutting and sanding.
- Opportunity to learn about food-safe finishes.
Tips for your ash cutting board:
- Use only hardwood and ensure it’s kiln-dried to prevent warping.
- Grain orientation matters! For maximum durability, consider an end-grain board (though this is more advanced). For beginners, a face-grain board is a great start.
- Sand progressively through the grits (e.g., 80, 120, 220, 320) for a silky smooth finish.
- Apply a food-safe mineral oil finish, followed by a beeswax conditioner. Reapply regularly to keep it looking its best.
3. Minimalist Ash Wood Coffee Table
A simple coffee table can be a rewarding first big project. Think clean lines, sturdy legs, and a smooth, inviting tabletop. Ash is perfect for this because it’s strong enough to support the weight, and its attractive grain will be the star of the show.
Why it’s great for beginners:
- Introduces basic joinery techniques (e.g., mortise and tenon, pocket holes, or even simple butt joints with braces).
- Teaches how to build a stable, four-legged structure.
- Great practice for larger panel glue-ups and flattening large surfaces.
Tips for your ash coffee table:
- Start with a simple design. A basic tabletop and four legs joined by aprons is a classic for a reason.
- Consider using pocket hole joinery for a quick and strong connection between aprons and legs. You can find great resources on pocket hole techniques from companies like Kreg Tool.
- Ensure your legs are perfectly plumb and square to the apron for a stable table.
- For the tabletop, you can glue up several boards. Flattening this panel after gluing is a key skill – a hand plane or a router sled can be used.
4. Practical Ash Wood Bench
A simple, sturdy bench is incredibly useful, whether it’s for an entryway, a garden, or as extra seating. Ash’s durability makes it ideal for a bench that will see a lot of use.
Why it’s great for beginners:
- Fewer complex joints than a table.
- Can be designed with simple joinery or even screw-together construction for absolute beginners.
- Teaches how to build a stable, functional piece of furniture.
Tips for your ash bench:
- Consider making a design that uses thicker, more forgiving pieces of ash.
- For an outdoor bench, use waterproof glue and a durable exterior finish.
- A very simple design could be two A-frame leg sets connected by the seat planks.
5. Decorative Ash Wood Picture Frames
Elevate your photos and artwork with custom-made ash wood picture frames. This is a wonderful way to practice precise cuts and achieve a professional finish on a smaller scale.
Why it’s great for beginners:
- Perfect for practicing mitre cuts (45-degree angles).
- Teaches how to use a table saw or mitre saw accurately.
- Small material needs, making it budget-friendly and easy to manage.
Tips for your ash picture frames:
- A table saw with a sharp blade and a good mitre gauge, or a compound mitre saw, will give you the cleanest cuts.
- Use a router with a small bit to rout a rabbet on the back of the frame pieces to hold the glass, matting, and backing.
- Clamping securely and ensuring perfectly square corners is crucial. Wood glue and small brad nails or splines can reinforce the mitred joints.
6. Chic Ash Wood Plant Stands
Add a touch of natural warmth to your home with ash wood plant stands. These can range from simple turned legs to modern geometric designs. Ash’s strength means even slender legs can support a good amount of weight.
Why it’s great for beginners:
- Scalable complexity: Start with a simple three-legged stool design or move to more intricate geometric shapes.
- Teaches joinery for angled pieces if you go for a more modern look.
- Great for practicing sanding and finishing to achieve smooth, elegant surfaces.
Tips for your ash plant stands:
- If you plan to use these outdoors, ensure you use a weather-resistant finish.
- Consider the weight of your pots and plants. Design the stand to be stable and strong enough.
- A simple tripod design is very stable and looks great.
Working Safely with Ash Wood
Safety is always my top priority, and woodworking with ash is no different. Always remember these essential safety tips:
- Wear Safety Glasses: Protect your eyes from sawdust and debris at all times.
- Use Hearing Protection: Power tools can be loud.
- Dust Mask: Fine wood dust can be harmful to your lungs. Wear a mask, especially when sanding or using power tools.
- Sharp Tools: Dull tools require more force, increasing the risk of kickback or accidents. Keep your tools sharp!
- Understand Your Tools: Read the manuals for any power tools you use and understand their safety features.
- Secure Your Workpiece: Use clamps to hold wood firmly in place when cutting, drilling, or routing.
- Read Up on Saftey: The Occupational Safety and Health Administration (OSHA) provides excellent general safety guidelines applicable to many workshop activities.
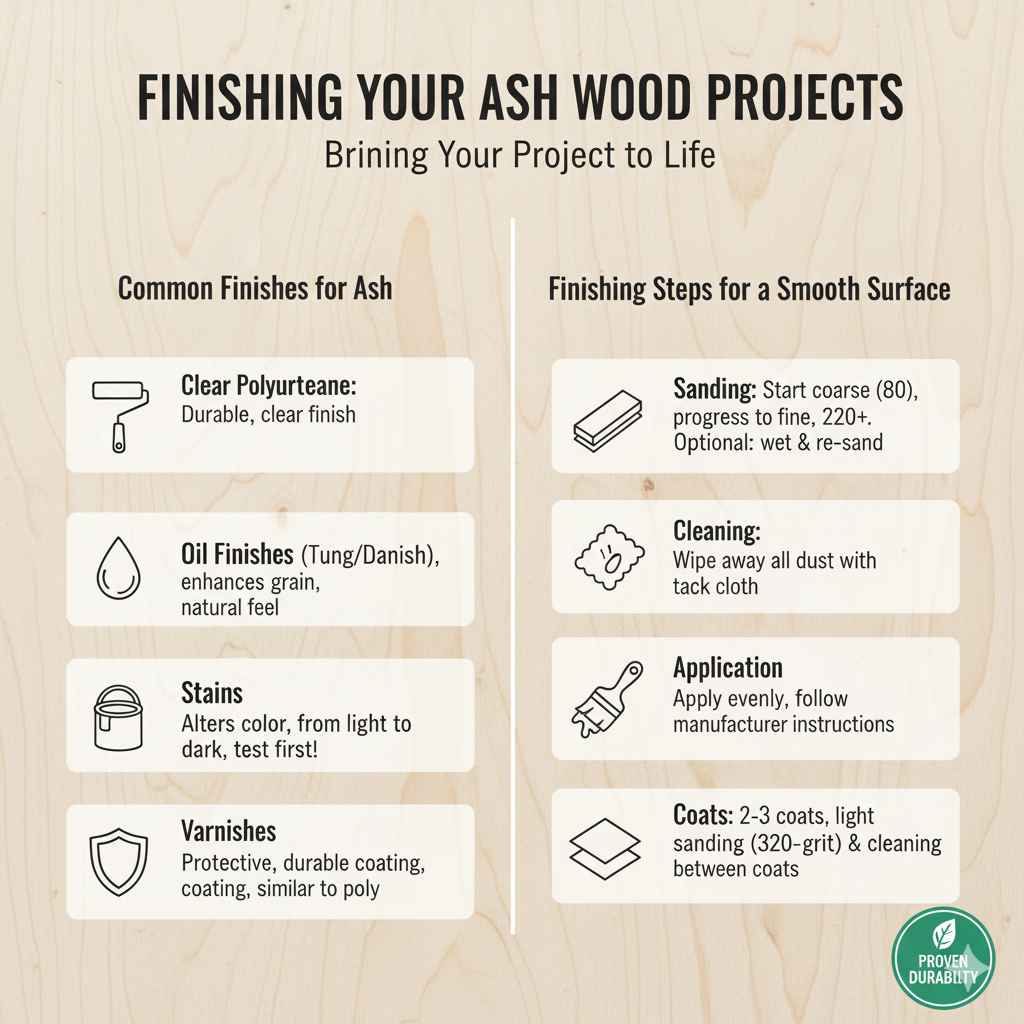
Finishing Your Ash Wood Projects
The finish is what truly brings out the beauty of ash wood. Because ash has an open grain, it accepts finishes beautifully.
Common Finishes for Ash:
- Clear Polyurethane: Offers excellent durability and protection, available in matte, satin, or gloss. Its clarity allows the natural grain to shine through.
- Oil Finishes (like Tung Oil or Danish Oil): These penetrate the wood, enhancing the grain and providing a more natural, hand-rubbed feel. They are often easier to repair than film finishes.
- Stains: If you want to alter the color, ash takes stains well. You can achieve anything from a light, natural look to a dark, rich tone. Always test your stain on a scrap piece first!
- Varnishes: Similar to poly, offering a protective, durable coating.
Finishing Steps for a Smooth Surface:
- Sanding: Start with a coarser grit (e.g., 80 or 100) to remove any mill marks or imperfections. Gradually move to finer grits (120, 180, 220) until the surface is smooth to the touch. For open-grained woods like ash, some people like to raise the grain by lightly wetting the sanded surface with a damp cloth, letting it dry, and then lightly sanding again with the final grit. This helps prevent the grain from raising too much after the finish is applied.
- Cleaning: Wipe away all dust with a tack cloth or a slightly damp rag.
- Application: Apply your chosen finish according to the manufacturer’s instructions. Use even strokes and avoid applying too heavily.
- Coats: Most finishes require multiple coats (2-3 is common). Lightly sand with very fine grit sandpaper (220 or 320) between coats after the previous coat has dried, cleaning off the dust each time.
Frequently Asked Questions About Ash Wood
Q1: Is ash wood good for outdoor furniture?
Ash wood can be used for outdoor furniture, but it requires a robust, weather-resistant finish. Its natural durability helps, but regular maintenance and a high-quality exterior sealant are crucial to protect it from moisture, UV rays, and insects.
Q2: What kind of tools do I need to work with ash?
For basic projects, you’ll need sharp hand tools like saws, chisels, and planes, along with measuring tools and clamps. For more advanced projects or faster work, invest in power tools like a table saw, miter saw, router, and sander. Always ensure your tools are sharp and well-maintained.
Q3: How do I prevent tear-out when cutting or planing ash?
Tear-out happens when the wood fibers are being pulled out rather than cut cleanly. To prevent it: ensure your blades and bits are extremely sharp, plane with the grain (watch for changes in direction), use a fine cut when planing, and consider using a zero-clearance insert on your table saw.
Q4: Can I stain ash wood?
Absolutely! Ash wood takes stains very well due to its open grain. You can achieve a wide range of colors, from light natural tones to deep, rich hues. Always test your stain on a scrap piece of ash from the same project to see how it looks before applying it to your main piece.
Q5: Is ash wood expensive compared to other woods?
Ash is generally considered a mid-range hardwood. It’s typically more affordable than oak or maple but more expensive than softwoods like pine. Its price can fluctuate based on availability and location.
Q6: What is the difference between ash and oak?
Both are strong hardwoods, but oak generally has a more prominent, wilder grain pattern with more figuring and can be more porous. Ash typically has a straighter, more uniform grain and is known for its superior shock resistance, making it ideal for applications like tool handles and sports equipment.
Q7: Is ash wood safe to use for kitchen items?
Yes, ash wood is safe for kitchen items like cutting boards and utensils, provided you use food-safe finishes (like mineral oil and beeswax) and maintain them properly. Its density and durability make it a good choice for these applications.
Your Next Step: Start Crafting!
There you have it! Ash wood is an incredible material that offers a perfect blend of strength, beauty, and workability, making it an ideal choice for beginners and experienced woodworkers alike. From simple shelves to sturdy benches and elegant coffee tables, the possibilities are vast and exciting.
Don’t be intimidated. Start with a project that sparks your interest and build your skills step by step. Remember to always work safely, take your time, and enjoy the rewarding process of creating something beautiful with your own two hands. With these ash wood ideas and a can-do attitude, you’re well on your way to crafting pieces that you and your home will cherish for years to come. Happy building!