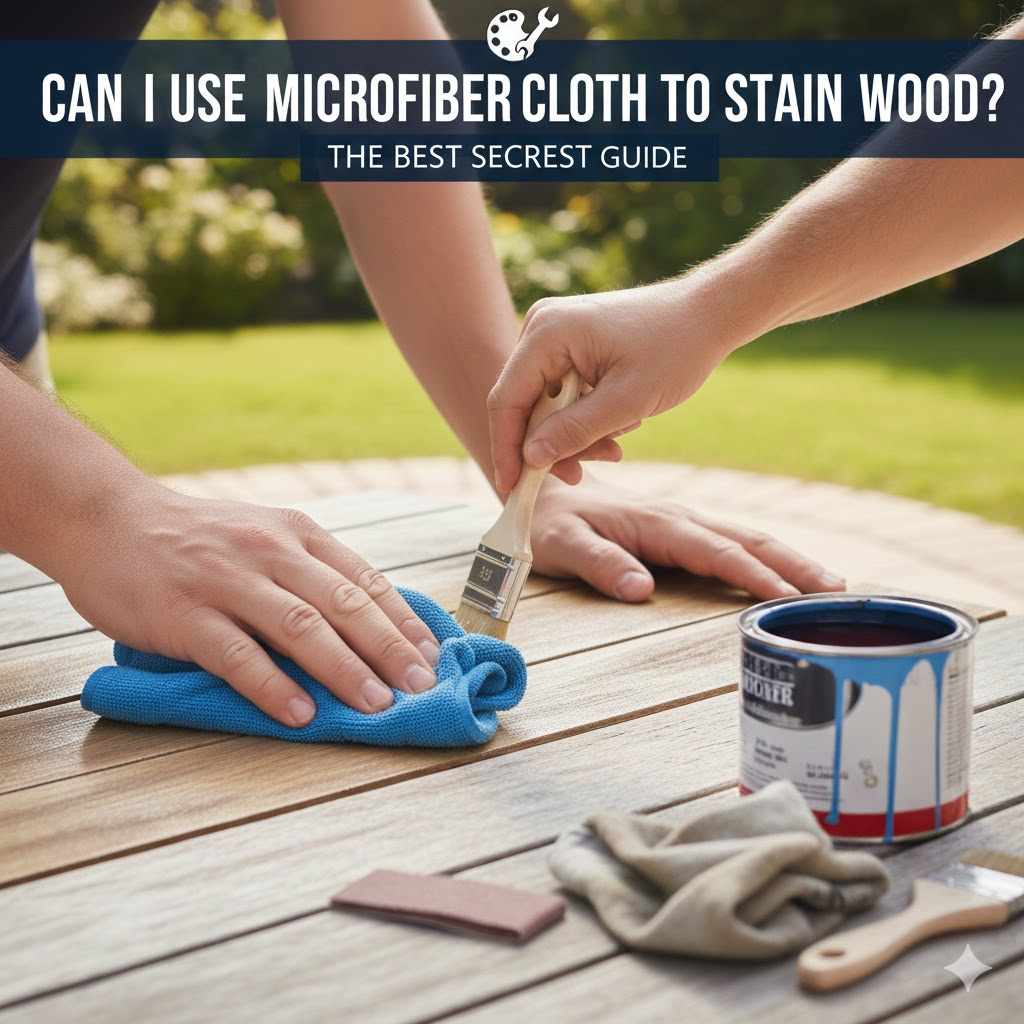
Can I Use Microfiber Cloth To Stain Wood? The Best Secret
Yes, you can absolutely use a microfiber cloth to stain wood, and it’s one of the best secrets for achieving a flawless, professional-looking finish. Microfiber cloths apply stain evenly, prevent streaks, leave no lint behind, and are incredibly affordable. They give you excellent control, making them a fantastic tool for beginners and experts alike.
Have you ever spent hours sanding a beautiful piece of wood, only to have the staining process leave it streaky or fuzzy? It’s one of the most frustrating moments in any DIY project. You picked the perfect color, you did all the prep work, but the final application just didn’t turn out right. Many beginners think they need expensive brushes or special tools to get a great finish, but the solution might already be sitting under your kitchen sink.
Staining wood should be a rewarding step, not a stressful one. It’s where the wood’s natural beauty truly comes to life. In this guide, I’m going to walk you through a simple, game-changing technique. We’ll explore why a simple microfiber cloth is a powerful tool for staining and how you can use it to get stunning, even results every single time. Let’s get started!
Why Your Humble Microfiber Cloth is a Wood Staining Superstar
You might associate microfiber cloths with dusting furniture or cleaning windows, but their unique design makes them surprisingly perfect for applying wood stain. Unlike old cotton t-shirts or cheap rags, microfiber cloths are made of thousands of tiny synthetic fibers. This structure gives them some amazing advantages for woodworking projects.
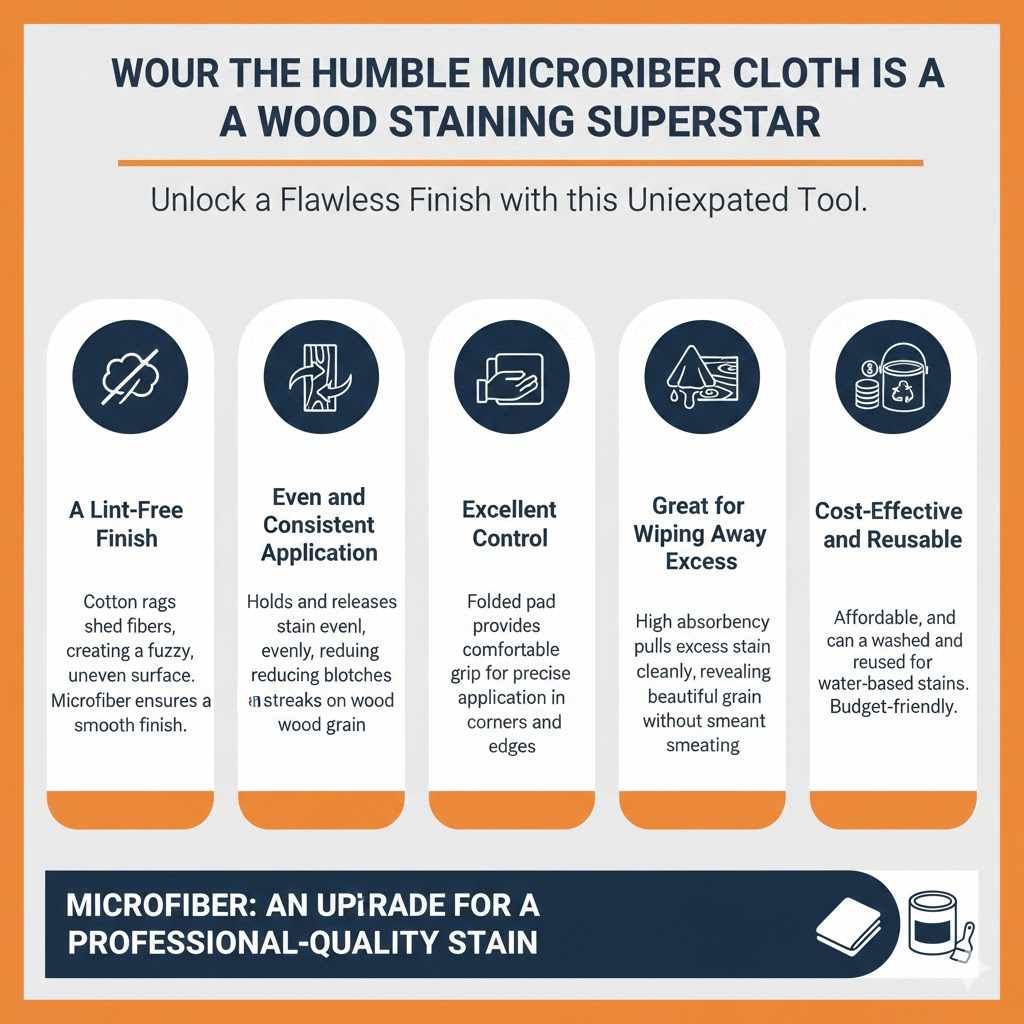
The Benefits of Using a Microfiber Cloth
- A Lint-Free Finish: This is the number one reason to make the switch. Cotton rags often shed tiny fibers that get trapped in the stain, creating a fuzzy, uneven surface. Microfiber is virtually lint-free, ensuring your final finish is smooth as glass.
- Even and Consistent Application: The tiny fibers on the cloth hold and release the stain evenly across the wood surface. This dramatically reduces the risk of blotches and streaks, which are common problems, especially on woods like pine or maple.
- Excellent Control: Folding a microfiber cloth into a small pad gives you a comfortable grip and precise control. You can easily get into corners and navigate detailed edges without the sloppiness of a dripping brush.
- Great for Wiping Away Excess: The high absorbency of microfiber is perfect for the crucial step of wiping off excess stain. It pulls the extra stain off the surface cleanly without smearing it around, revealing the beautiful grain underneath.
- Cost-Effective and Reusable: A pack of microfiber cloths is incredibly affordable. And if you’re using a water-based stain, you can often wash and reuse them for future projects, making them a very budget-friendly option.
In short, a microfiber cloth isn’t just a substitute for a staining rag—it’s an upgrade. It combines the ease of a rag with the smooth finish of a much more expensive applicator.
Picking the Perfect Microfiber Cloth for the Job
While most microfiber cloths will work, a little bit of knowledge goes a long way in choosing the best one for staining. Not all cloths are created equal. When you’re at the store, you might see different thicknesses and weaves. Here’s what to look for to get the best results for your woodworking project.
Key Features to Look For
- High GSM (Grams per Square Meter): GSM is a measure of the cloth’s density and thickness. For staining, look for a cloth with a higher GSM, usually around 300-400. Thicker cloths are more absorbent, hold more stain without dripping, and are more durable. They feel plush and soft to the touch.
- Split Weave Fibers: High-quality microfiber cloths have “split” fibers, which creates more surface area for grabbing dust and absorbing liquids. This is what gives them their amazing cleaning (and staining) power. Cheaper cloths may not be split, making them less effective.
- Avoid Edgeless or Scratchy Edges: Some microfiber cloths have stiff nylon edges. These can potentially scratch soft woods. Look for cloths with soft, microfiber-stitched edges or an “edgeless” design to be extra safe.
- Choose a Light Color: It’s helpful to use a white or light-colored cloth. This allows you to clearly see the color of the stain you’re applying and helps you know when the cloth is getting too saturated.
You can find good quality microfiber cloths in the automotive section of most stores. The cloths designed for car detailing and polishing are usually high-GSM and lint-free, making them perfect for your workshop.
Step-by-Step Guide: How to Stain Wood Flawlessly with a Microfiber Cloth
Ready to see the magic happen? Following these steps will help you achieve a beautiful, professional-looking finish on your next project. We’ll go from prepping the wood to the final wipe-down, ensuring every stage is simple and clear.
First, a Word on Safety
Before you open that can of stain, let’s talk safety. Wood stains contain chemicals and solvents, so it’s important to protect yourself. Always work in a well-ventilated area—open windows and doors, or work outside if you can. It’s also a great idea to wear:
- Nitrile Gloves: These protect your hands from the stain, which can be difficult to wash off and can irritate your skin.
- Safety Glasses: To protect your eyes from any accidental splashes.
- Respirator or Mask: Especially important if you are sensitive to fumes or working in an enclosed space.
The Staining Process
- Prep Your Wood Surface: A great stain finish starts with great prep work. Sand your wood smooth, working your way up through the grits (e.g., 120-grit, then 180-grit, then 220-grit). After sanding, wipe away all the dust with a clean, dry microfiber cloth or a tack cloth. Any leftover dust will create a gritty, rough finish.
- Apply a Pre-Stain Conditioner (Optional but Recommended): For soft woods like pine, fir, or maple that tend to get blotchy, a pre-stain wood conditioner is a lifesaver. Apply it according to the manufacturer’s instructions before you start staining. It helps the wood absorb the stain evenly.
- Test Your Stain Color: Never apply stain to your main project without testing it first! Use a scrap piece of the same wood and apply the stain to see the true color. The color on the can is often different from how it looks on a specific type of wood.
- Apply the Stain: Fold your clean microfiber cloth into a small, manageable pad. Dip a corner of the cloth into the stain—don’t saturate the whole cloth. You only need a small amount to start. Apply the stain to the wood, moving in the direction of the wood grain in long, smooth strokes.
- Wipe Off the Excess Stain: This is the most critical step. After letting the stain penetrate for the time recommended on the can (usually 5-15 minutes), use a separate, clean part of your microfiber cloth (or a new clean cloth) to wipe away all the excess stain. Again, wipe in the direction of the grain. Don’t press too hard; just glide the cloth over the surface. If you leave excess stain to dry on the surface, it will become a sticky, tacky mess.
- Let It Dry Completely: Check the stain can for the recommended drying time. This can vary from a few hours to a full day, depending on the type of stain, temperature, and humidity. Don’t rush this step!
- Apply a Second Coat (If Needed): If you want a deeper, richer color, you can apply a second coat of stain after the first coat is completely dry. Repeat the application and wiping process exactly as before. Most of the color comes from the first coat, so a second coat will only darken it slightly.
- Apply a Top Coat for Protection: Wood stain provides color, but it doesn’t provide much protection. After your stain is fully cured (check the can, this can take 24-72 hours), you need to protect your project with a top coat like polyurethane, lacquer, or wax. This will protect the wood from scratches, moisture, and everyday wear and tear.
Microfiber Cloth vs. Other Staining Tools: A Head-to-Head Showdown
How does a simple microfiber cloth stack up against the traditional tools you see in the hardware store? Each applicator has its place, but for most DIY projects, microfiber offers a fantastic balance of quality, cost, and ease of use.
| Applicator | Best For | Pros | Cons |
|---|---|---|---|
| Microfiber Cloth | Flat surfaces, detailed work, beginners | Lint-free, even application, great control, affordable | Can absorb a lot of stain, not ideal for very rough surfaces |
| Cotton Rag (Old T-shirt) | General staining, budget projects | Very cheap, readily available | Can leave lint, may apply stain unevenly, can be inconsistent |
| Foam Brush | Small projects, edges, water-based stains | Cheap, disposable, good for tight spaces | Can break down with harsh solvents, may create bubbles, not very durable |
| Natural Bristle Brush | Large surfaces, oil-based stains, professional use | Holds a lot of stain, durable, fast application | Expensive, can leave brush marks if used improperly, requires thorough cleaning |
Common Mistakes Beginners Make (and How to Avoid Them)
Using a microfiber cloth is very forgiving, but there are still a few common pitfalls to watch out for. Avoiding these simple mistakes will ensure your project turns out beautifully.
- Using a Dirty Cloth: Always start with a brand-new or perfectly clean microfiber cloth. Any dust, debris, or old finish on the cloth will transfer to your project and ruin the finish.
- Applying Too Much Stain at Once: It’s tempting to load up the cloth to work faster, but this leads to drips and an uneven finish. It’s better to apply two thin, controlled coats than one thick, messy one.
- Not Wiping Off the Excess: Wood stain is meant to penetrate the wood, not sit on top of it like paint. Leaving excess stain on the surface creates a sticky, weak film that will peel and look cloudy. Remember: wipe it on, then wipe it all off.
- Staining in a Poorly Lit Area: Good lighting is your best friend. It allows you to see if you’ve missed any spots or failed to wipe off all the excess stain. Check your work from different angles to catch any streaks or shiny spots.
- Rushing the Drying Time: Patience is key. Applying a second coat or a top coat before the stain is fully dry can ruin all your hard work. Always follow the drying times listed on the can.
Oil-Based vs. Water-Based Stains: Does It Matter for Microfiber?
Yes, the type of stain you use affects cleanup, but the great news is that microfiber cloths work beautifully with both oil-based and water-based stains.
For Water-Based Stains: Microfiber is an excellent choice. It applies these thinner stains smoothly and evenly. The best part is cleanup—you can often just rinse the cloth thoroughly with soap and water and let it air dry to be used again.
For Oil-Based Stains: Microfiber also works wonderfully for applying traditional oil-based stains. It gives you great control over the application. However, cleanup is different and requires special attention. You cannot simply wash these cloths in a machine.
The Most Important Step: Safe Cleanup and Disposal
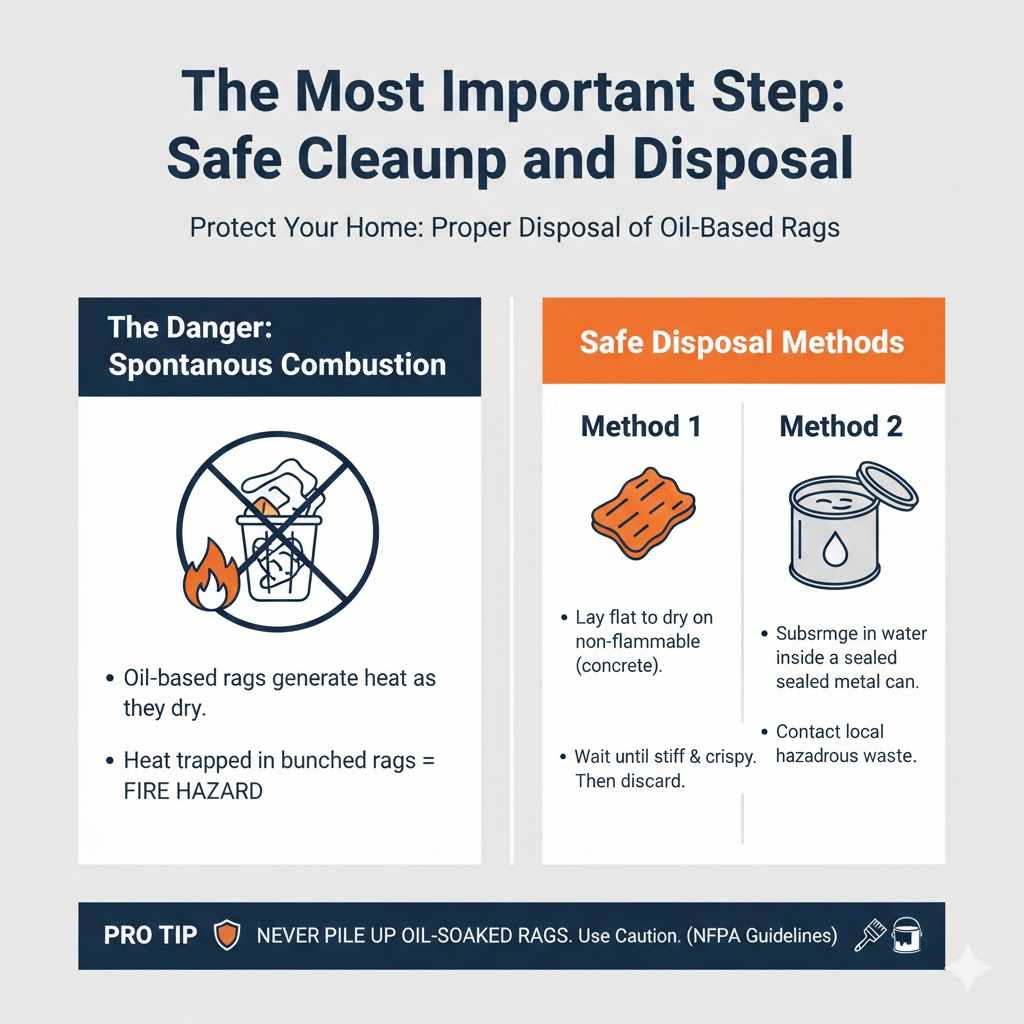
This section is incredibly important, especially when you are working with oil-based products. Rags soaked in oil-based stains can be a serious fire hazard if not handled properly.
Oil-based finishes cure through a process called oxidation, which generates heat. If you bunch up an oil-soaked rag, that heat can get trapped and build up until the rag spontaneously ignites. This is not a rare occurrence; it’s a well-documented cause of workshop and house fires.
How to Safely Dispose of Oil-Soaked Microfiber Cloths:
- Do NOT bunch them up. Never throw oil-soaked cloths in a pile or into a regular trash can.
- Lay them flat to dry. The safest method is to hang the cloths or lay them flat on a non-flammable surface, like a concrete floor or driveway, away from direct sunlight. Allow them to dry completely until they are stiff and crispy.
- Submerge them in water. Alternatively, you can place the used cloths in a metal can with a tight-fitting lid, fill it with water, and seal it.
- Check with your local waste disposal service. Once the rags are fully dry and hardened, or sealed in a can of water, you can dispose of them. According to resources like the National Fire Protection Association, proper disposal is critical. Contact your local hazardous waste facility for their specific guidelines.
For water-based stains, the fire risk is not present. You can simply rinse the cloths with soap and water and let them air dry completely before storing them.
Frequently Asked Questions (FAQ)
Can I reuse a microfiber cloth for staining?
For water-based stains, yes! You can wash the cloth thoroughly with soap and water and let it air dry. For oil-based stains, it is much safer to properly dry out and dispose of the cloth after use due to the risk of spontaneous combustion.
Will a microfiber cloth leave lint in my wood stain?
No, and that’s one of its biggest advantages. High-quality microfiber cloths are designed to be lint-free, which gives you a much smoother and cleaner finish compared to cotton rags or old t-shirts.
Is microfiber better than a regular cotton rag for staining?
For a high-quality finish, yes. Microfiber provides a more even application, leaves no lint, and offers better control. While a cotton rag can work, a microfiber cloth is an easy upgrade that delivers more professional results.
What kind of microfiber cloth is best for staining wood?
Look for a plush, high-density cloth, often sold for automotive detailing. A cloth with a high GSM (Grams per Square Meter) of 300 or more will be absorbent and durable, making it perfect for applying stain smoothly.
How do I get an even finish with a microfiber cloth?
The key is to apply a thin layer of stain in the direction of the wood grain, and then, most importantly, wipe off all the excess with a clean part of the cloth. This technique prevents blotching and ensures the stain highlights the grain beautifully.
Will a microfiber cloth soak up too much stain?
Microfiber is very absorbent, but you can control this by only dipping a small part of the folded cloth into the stain. This prevents wasting stain and keeps the application clean and controlled. You only need a little stain on the cloth to cover a large area.
Conclusion: Your New Secret Weapon for Beautiful Wood Finishes
So, can you use a microfiber cloth to stain wood? The answer is a resounding yes. It’s not just possible; it’s one of the easiest and most effective ways to achieve a stunning, streak-free finish that truly honors the beauty of the wood.
By choosing the right cloth, prepping your surface, and following a few simple steps, you can take the guesswork out of staining. You don’t need to invest in a lot of expensive equipment to get professional results. Sometimes, the best tools are the simple, everyday items we already have on hand. The humble microfiber cloth is a perfect example—a true secret weapon for your workshop.
Next time you start a project, give this method a try. You’ll be amazed at the control it gives you and the beautiful, even finish you can achieve. Happy woodworking!