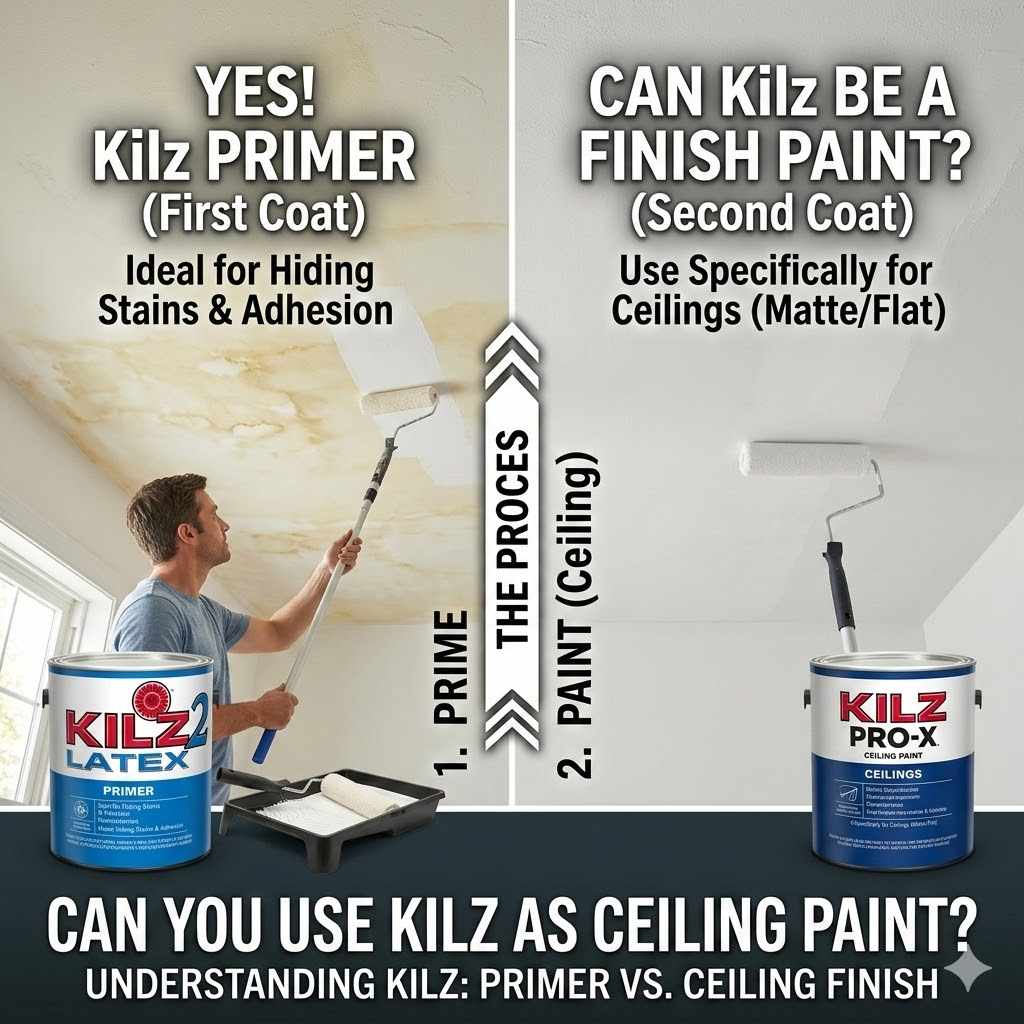
Can You Use Kilz as Ceiling Paint
Many DIYers wonder about using Kilz on ceilings. It’s a common question, especially when tackling a new paint job. You might see Kilz cans in the paint aisle and think, “Can this stuff work up there?” It’s not always straightforward for beginners to know if a primer like Kilz is the right choice for overhead surfaces.
But don’t worry! This guide will make it super simple. We’ll walk you through exactly how to use Kilz on your ceiling, step-by-step, so you can get a great finish without any fuss.
Let’s find out!
Is Kilz Good for Ceilings
Kilz is a popular brand of primer, and many people wonder if it’s suitable for use on ceilings. Primers are designed to prepare surfaces for paint, improve adhesion, and cover stains or dark colors. When it comes to ceilings, the requirements can differ slightly from walls due to gravity and potential issues like water stains or smoke damage.
This section explores why Kilz might be a good option for ceilings and what factors to consider before you start painting overhead.
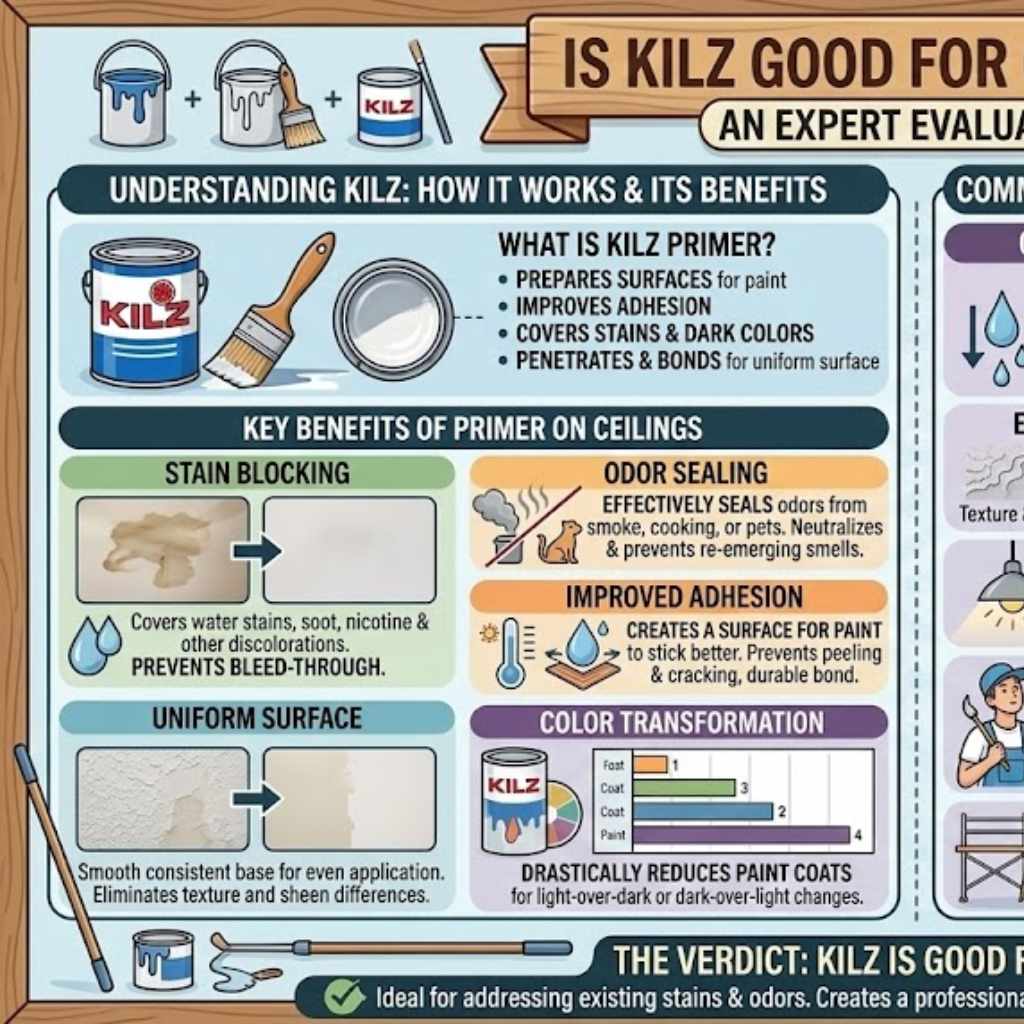
What is Kilz and How Does It Work
Kilz is a brand of primers that helps prepare surfaces for topcoats of paint. They are known for their ability to cover tough stains, seal odors, and create a uniform surface for painting. Kilz primers work by penetrating the surface and forming a strong bond.
This bond helps the final paint adhere better, preventing peeling or chipping. It also provides a consistent color base, meaning you’ll need fewer coats of your finish paint, saving you time and money.
There are many different types of Kilz primers, each designed for specific purposes. Some are good for blocking stains from water damage, smoke, or even crayon marks from children. Others are formulated to seal in strong odors, like those from pets or smoke.
Knowing the specific problem you are trying to solve on your ceiling will help you choose the right Kilz product for the job. This careful selection ensures the primer performs its best.
When you apply Kilz, it dries into a hard, protective layer. This layer acts as a barrier between your ceiling material and the new paint. For example, if you have water stains, the Kilz primer seals them in so they don’t bleed through the new paint.
If you are painting a dark color over a very light ceiling, or vice versa, Kilz can help you achieve coverage with fewer coats of your main paint color. It makes the entire painting process smoother.
The science behind Kilz involves special resins and solvents. These components allow the primer to dry quickly and form a durable film. Some Kilz formulas also contain stain-blocking agents that chemically neutralize or encapsulate stain particles.
This ensures that the stains remain hidden even after the topcoat is applied. The consistency of Kilz is also important; it’s usually thicker than paint, which helps it cling to surfaces and cover imperfections effectively.
Consider this: a common issue on ceilings is discoloration from smoke or water leaks. Without a good primer, these stains will likely reappear through the new paint. Kilz acts as a shield.
Its formulation is designed to create an impenetrable barrier that traps these unsightly marks. This means your ceiling will look fresh and new for longer. It’s like putting a protective shield on your ceiling before adding the final color.
Benefits of Using Primer on Ceilings
Using a primer on your ceiling offers several key benefits that can greatly improve the final look of your paint job. Primers create a uniform surface for paint to adhere to. This is especially important on ceilings where you might have different textures or previous paint layers that are uneven.
A good primer ensures that your new paint will go on smoothly and evenly, without any patches or streaks.
One of the biggest advantages of using primer is its ability to cover stains. Ceilings are prone to water stains from leaks, smoke damage, or even just age. These stains can be difficult to cover with paint alone.
A quality primer, like Kilz, is formulated to block these stains completely. This means your ceiling will look clean and fresh, even if it had unsightly marks before. It’s like starting with a blank canvas.
Primers also help with color changes. If you are painting over a dark color with a lighter one, or vice versa, primer can significantly reduce the number of paint coats you need. This saves both time and money.
A good primer will provide an opaque base that makes the new color appear true and vibrant. Without primer, you might end up painting many coats, which can be exhausting and lead to an uneven finish.
Another benefit is improved paint adhesion. Primer creates a slightly rougher surface that allows the topcoat of paint to stick better. This is particularly useful in areas that might experience temperature or humidity changes, which can sometimes cause paint to peel or crack.
A well-primed surface ensures the paint stays put and looks good for years to come. It’s a small step that makes a big difference in durability.
Here are some specific advantages to consider:
- Stain Blocking: Primers are excellent at covering up water stains, soot, nicotine, and other common ceiling discolorations. This prevents them from showing through your new paint, ensuring a flawless appearance. Without primer, these stains can bleed through even several coats of paint, making your hard work look unfinished and unprofessional. It’s a common frustration that primer effectively solves.
- Odor Sealing: If your ceiling has absorbed odors from smoke, cooking, or pets, primers can effectively seal these smells in. This is particularly important for older homes or properties that may have had smokers. A good primer neutralizes these odors, preventing them from re-emerging and affecting the air quality or smell of your room. It creates a neutral base for your new paint.
- Improved Adhesion: Primer creates a surface that paint can adhere to more easily. This means your paint will be less likely to peel or flake off over time. It creates a strong bond between the ceiling material and the paint, especially important in areas prone to moisture or temperature fluctuations. This leads to a more durable and long-lasting finish.
- Uniform Surface: Ceilings can have varying textures or be patched in places. Primer creates a smooth, consistent surface that the topcoat can be applied to evenly. This eliminates any differences in sheen or texture, giving your ceiling a cohesive and professional look. It ensures that the final color appears consistent across the entire surface.
- Color Transformation: When changing from a dark color to a light one, or vice versa, primer drastically reduces the number of paint coats needed. This saves time and product. A good primer can cover a dark color with one or two coats, allowing your new, lighter color to show through beautifully with just one or two additional coats of paint.
Common Ceiling Paint Challenges
Painting a ceiling can present unique challenges that differ from painting walls. One of the most immediate issues is dealing with gravity. Paint tends to drip and run downwards, making it hard to apply a smooth, even coat.
This means you need to work quickly and carefully, and often, paint application can be more frustrating than on vertical surfaces. It requires a specific technique and the right tools.
Another significant challenge is dealing with existing imperfections. Ceilings often have texture, previous paint that has yellowed or chipped, or even stains from past water leaks. These issues can show through new paint if not properly addressed.
Preparing the surface properly is key, but beginners might not know what to look for or how to fix these problems. This is where a good primer plays a vital role.
Lighting can also be a challenge. Ceilings are usually the largest surface you paint, and the overhead lighting can highlight every imperfection. Areas that look smooth when you’re working might reveal subtle flaws once the light hits them.
This makes achieving a perfectly uniform finish more difficult. Proper prep work and the right primer can help minimize these visible flaws.
Furthermore, the physical act of painting a ceiling can be tiring. You spend a lot of time looking up, often with paint dripping on you. This discomfort can lead to rushing the job or making mistakes.
Using the right equipment, like extension poles and drop cloths, can help, but the angle and effort required remain a hurdle for many.
Here are some specific difficulties:
- Drips and Runs: Paint naturally flows downwards, making it difficult to apply evenly to a ceiling without getting drips and runs. This requires steady hands and a technique that minimizes excess paint on your brush or roller. Constant attention is needed to catch drips before they dry, which can be tiring.
- Stains and Discoloration: Ceilings are prone to water spots, smoke marks, and yellowing with age. These are notoriously hard to cover with paint alone. Without proper sealing, these stains will bleed through new paint, ruining the finish. Identifying and treating these before painting is crucial.
- Uneven Textures: Many ceilings have textured finishes like popcorn or plaster. These can absorb paint differently, leading to an uneven sheen or color. Preparing and priming textured surfaces requires specific techniques to ensure a uniform look.
- Physical Strain: Painting a ceiling involves constantly looking up and working overhead. This can cause neck and shoulder strain, and paint can easily drip into your eyes or onto your clothes. It’s physically demanding work that can lead to fatigue and errors if not managed well.
- Access and Reach: Reaching all areas of the ceiling, especially in larger rooms, can be difficult. You often need scaffolding or sturdy ladders, which can be cumbersome and require careful setup. Ensuring you can reach every spot without overextending yourself is important for safety and coverage.
Using Kilz for Ceiling Paint Applications
When you’re ready to tackle your ceiling and want a smooth, clean finish, using Kilz can be a smart move. It’s especially helpful if your ceiling has seen better days, with stains or an old, uneven color. This section will guide you through the process of applying Kilz to your ceiling.
We’ll cover the preparation steps and the actual application to ensure you get the best results. You’ll see how Kilz can make your ceiling look like new.
Choosing the Right Kilz Product for Ceilings
Selecting the correct Kilz product is crucial for a successful ceiling paint job. Kilz offers a range of primers, and not all are created equal for every situation. For most general ceiling applications, especially if you’re dealing with minor stains or just want a uniform base, Kilz 2 ALL PURPOSE PRIMER or Kilz 3 PREMIUM are excellent choices.
They offer good stain blocking and adhesion.
If your ceiling has significant water stains, nicotine marks, or heavy smoke damage, you might need a more heavy-duty option. Kilz ORIGINAL or Kilz RESTORATION are specifically designed for these tougher jobs. These formulas provide superior stain-blocking power and odor sealing capabilities, ensuring that persistent issues are fully covered.
Always check the product label to ensure it’s suitable for your specific ceiling problem.
Consider the material of your ceiling as well. Most Kilz primers are suitable for drywall, plaster, wood, and other common ceiling materials. However, if you have a unique or unpainted surface, it’s always a good idea to check the Kilz website or contact their customer service for recommendations.
Using the wrong primer on certain surfaces could lead to poor adhesion or surface damage.
When in doubt, it’s better to choose a Kilz primer that offers more protection than you think you might need. An all-purpose primer is good for general use, but if you anticipate problems, investing in a specialized formula will save you headaches down the line. The goal is to create a stable, clean surface that your ceiling paint can adhere to perfectly, no matter the underlying issue.
Here’s a quick guide:
- Kilz 2 All Purpose Primer: Ideal for general stain blocking, covering dark colors, and improving adhesion on most surfaces. Good for minor water stains or when just refreshing a ceiling.
- Kilz 3 Premium: Offers enhanced stain and mildew resistance. It’s a good choice for kitchens and bathrooms where moisture is a concern. It also provides excellent coverage and a smooth finish.
- Kilz Original: This is a powerful stain and odor blocker, especially effective on heavy-duty stains like smoke, water damage, and tannin bleed. It dries to a hard finish and is excellent for difficult situations.
- Kilz Restoration: Specifically formulated to block severe stains and odors, including mold and mildew stains. It’s often recommended for fire and water-damaged surfaces and provides exceptional sealing.
- Kilz Adhesion: If your ceiling has a glossy or hard-to-paint surface like old enamel paint or plastic, Kilz Adhesion is designed to bond to those difficult surfaces. It’s less about stain blocking and more about creating a surface for paint to stick to.
Surface Preparation Before Priming
Proper preparation of your ceiling surface is essential for Kilz to work effectively and for your final paint job to look its best. Skipping this step can lead to primer not adhering well, stains reappearing, or an uneven finish. Take the time to do it right, and you’ll save yourself a lot of trouble later.
First, clear the room as much as possible. Remove furniture or move it to the center of the room and cover it completely with drop cloths. Cover the floor with plastic sheeting or canvas drop cloths, taping them to the baseboards to prevent paint from seeping underneath.
Remember to cover any light fixtures, vents, or ceiling fans that you are not removing.
Next, clean the ceiling. Dust and cobwebs can prevent primer from sticking. Use a soft brush or a vacuum cleaner with a brush attachment to remove loose debris.
If you have grease or grime, especially in a kitchen, use a mild detergent and water solution or a TSP substitute cleaner. Rinse the ceiling thoroughly with clean water and allow it to dry completely before proceeding. This step is critical for adhesion.
Inspect the ceiling for any damage. Fill any small holes or cracks with spackling paste or joint compound. Let the filler dry completely, then sand it smooth with fine-grit sandpaper.
Wipe away any sanding dust with a damp cloth. For larger imperfections or peeling paint, you may need to scrape away loose material, sand the area smooth, and then apply a patch or filler.
If you are dealing with mold or mildew, clean the affected areas with a bleach solution (1 part bleach to 3 parts water) or a commercial mold remover. Wear gloves and eye protection, and ensure good ventilation. Rinse the area thoroughly and let it dry completely.
It’s important to ensure all mold is gone before painting, as primer won’t kill it.
Here’s a checklist for preparation:
- Clear the Room: Remove or cover all furniture and floor coverings. Protect walls and fixtures from dust and paint.
- Dust and Dirt Removal: Thoroughly dust the ceiling to ensure a clean surface for primer. Use a broom or a vacuum cleaner with a soft brush attachment.
- Wash the Ceiling: If necessary, wash the ceiling with a mild cleaner to remove grease, grime, or smoke residue. Rinse and allow to dry completely.
- Repair Damage: Fill holes and cracks with spackle or joint compound. Sand smooth after drying and wipe away dust.
- Address Mold/Mildew: Treat any signs of mold or mildew with an appropriate cleaner, rinse, and dry completely.
How to Apply Kilz to Your Ceiling
Applying Kilz to your ceiling is similar to painting a wall, but with a few key differences due to the overhead work. Always ensure you have good ventilation in the room. Wear old clothes, a hat, and safety glasses to protect yourself from drips.
Start by opening the Kilz can and stirring it well. If the primer seems too thick, you can add a small amount of water (check the product label for specific dilution instructions, but typically only a little is needed, if at all). Use a high-quality paintbrush for cutting in edges and a roller for the main surface.
Use an extension pole for your roller. This will allow you to reach the ceiling comfortably without standing on a ladder for extended periods, reducing strain. Dip the roller into the primer, making sure it’s evenly coated but not dripping excessively.
Roll it gently on a raised part of your drop cloth or in the primer tray to remove excess.
Begin rolling the primer onto the ceiling in a consistent pattern, typically in sections. Overlap each stroke slightly to ensure full coverage and avoid creating lines. Work in manageable sections, and keep a “wet edge” by overlapping your new strokes with the previously primed area before it dries.
This helps prevent lap marks.
For the edges and corners where the ceiling meets the walls, use a good quality paintbrush. Carefully “cut in” these areas, applying a clean, even line of primer. It’s often easier to do this before rolling the main surface, but some prefer to do it after.
Ensure you don’t get too much primer on the walls.
Allow the primer to dry completely according to the manufacturer’s instructions. Drying times can vary based on humidity and temperature. Do not rush this step.
Once dry, inspect the ceiling for any missed spots or areas that need a second coat. If stains are still visible, apply another coat of primer. Most stains require just one good coat, but heavy ones might need two.
Here’s a simple walkthrough:
- Stir the Primer: Open the can of Kilz and stir it thoroughly. Ensure any settled pigment is fully mixed in.
- Cut In Edges: Use a paintbrush to apply primer along the edges where the ceiling meets the walls. Be precise to avoid getting primer on the walls.
- Roll the Ceiling: Load your roller with primer, avoiding drips. Apply primer to the ceiling in smooth, overlapping strokes. Work in sections to maintain a wet edge.
- Apply Second Coat (If Needed): After the first coat is dry, inspect for any missed spots or visible stains. Apply a second coat if necessary.
- Allow to Dry: Let the primer dry completely according to the Kilz product’s instructions before proceeding with your topcoat of paint.
Drying Times and Second Coats
Understanding Kilz drying times is essential for a successful paint job. Kilz primers are formulated to dry relatively quickly, but actual drying can depend on several factors. Always refer to the specific Kilz product’s label for precise drying and recoating recommendations, as these can vary between different Kilz formulations.
Generally, Kilz primers are dry to the touch within 30 minutes to an hour. However, “dry to the touch” doesn’t mean it’s ready for the next coat of paint. For recoating, you typically need to wait longer.
Kilz 2 and Kilz 3 often recommend recoating within 2-4 hours. Some stronger formulas, like Kilz Original or Restoration, might require 24 hours before applying a topcoat, especially if you’ve applied a very thick layer or are dealing with heavy stains.
Humidity and temperature play a significant role in drying time. In humid or cold conditions, Kilz will take longer to dry. If you are painting in a basement or a room with poor ventilation, the drying process will also be extended.
Ensure the room is well-ventilated by opening windows or using fans to promote faster drying.
A second coat of primer is sometimes necessary, especially for tough stains or significant color changes. If stains are still visible after the first coat has dried, apply a second coat. You generally do not need to sand between coats of Kilz primer unless the manufacturer specifically recommends it for a particular product or situation.
However, if the first coat feels rough, a light sanding with fine-grit sandpaper can create a smoother surface for the second coat.
Applying your topcoat of paint too soon can cause problems. If the primer is not fully dry, the paint may not adhere properly, leading to peeling or bubbling. You might also drag the primer off the surface with your roller or brush, creating an uneven mess.
Always err on the side of waiting a bit longer than recommended to ensure the primer is adequately cured.
Key points on drying and recoating:
- Touch Dry vs. Recoat Time: Kilz is usually dry to the touch in about an hour, but it takes longer to be ready for another coat of paint. Check the label for exact times.
- Factors Affecting Drying: Humidity, temperature, and ventilation all impact how quickly Kilz dries. Warmer, drier conditions with good airflow speed up the process.
- When to Apply a Second Coat: If stains or imperfections are still visible after the first coat is dry, it’s time for a second coat. Apply it once the first coat is dry according to instructions.
- Waiting for Topcoat: Crucially, wait the full recommended time before applying your ceiling paint. Rushing can compromise adhesion and the overall finish.
- Light Sanding (Optional): If the dried primer feels rough, a very light sanding with fine-grit sandpaper can create a smoother surface for the topcoat, but this is not always necessary.
The Final Coat Application After Kilz
Once your Kilz primer has dried thoroughly, you’re ready for the final step: applying your ceiling paint. This is where all your hard work in preparation and priming pays off. A well-primed surface makes applying the topcoat much easier and ensures a beautiful, lasting finish.
This section will guide you through the best practices for applying your ceiling paint.
Selecting the Best Ceiling Paint
Choosing the right ceiling paint is important for achieving the desired look and performance. For ceilings, it’s generally recommended to use a flat or matte finish. These finishes are non-reflective, which helps to hide imperfections in the ceiling surface.
Glossy or semi-gloss paints tend to highlight every bump and swirl, making them less ideal for overhead surfaces.
Look for paints specifically labeled as “ceiling paint.” These paints are often formulated to be thicker and less likely to drip, making application easier. They also tend to be whiter and brighter than regular wall paint, which can make a room feel more spacious and airy. The color of ceiling paint is usually white or a very light neutral to maximize brightness.
Consider the environment of the room. For high-moisture areas like bathrooms or kitchens, you’ll want a paint that offers some resistance to mold and mildew. Many ceiling paints include mildewcides to help prevent growth.
For living areas, a durable, washable paint might be a priority, though flat finishes are typically harder to clean than matte or eggshell.
When buying paint, consider the quality. Higher-quality paints generally offer better coverage, durability, and a smoother finish. While they might cost more upfront, they can save you time and effort in the long run, potentially requiring fewer coats.
Always read reviews or ask for recommendations from paint store professionals.
Here’s what to look for in ceiling paint:
- Flat or Matte Finish: These finishes are the best for ceilings as they minimize glare and hide imperfections. Glossy paints will highlight every flaw.
- Ceiling-Specific Formulas: Paints designed for ceilings are often thicker and less prone to dripping, making application easier. They also tend to be very white to brighten the room.
- Mold and Mildew Resistance: For bathrooms, kitchens, or other damp areas, choose a paint with added mildewcides to prevent growth.
- Good Coverage: Higher-quality paints typically provide better coverage, meaning fewer coats are needed. This saves time and effort.
- Color Choice: While most prefer white, some opt for very light grays or off-whites to complement their wall colors. Ensure the chosen color is bright enough for the room.
Techniques for Applying Ceiling Paint
Applying ceiling paint requires a steady hand and a good technique, especially after priming. You’ll use similar tools as you did for the primer: a roller with an extension pole and a paintbrush for cutting in.
Start by stirring your ceiling paint thoroughly. Load your roller with paint, ensuring it’s evenly covered but not overloaded. Roll off excess paint on the roller tray or a scrap piece of cardboard to prevent drips.
Remember that ceiling paint is often thicker than wall paint, so be mindful of drips.
Begin by painting the edges where the ceiling meets the walls. Use your paintbrush to “cut in” a band of paint about 2-3 inches wide along the perimeter. It’s often best to do this before rolling the main area to ensure a clean line and to avoid accidentally rolling paint onto the walls.
When rolling the main surface of the ceiling, work in manageable sections. Apply the paint in long, even strokes, overlapping each stroke by about half its width. This technique, called “laying off,” helps ensure uniform coverage and prevents lap marks, which are visible lines where wet paint meets dried paint.
Work systematically across the ceiling. Some painters prefer to work away from the light source, while others work towards it. Experiment to see what works best for you and helps you best spot and correct any imperfections.
Always maintain a wet edge, meaning you should connect each new section of painted area to the previous one while it’s still wet. This is key to a smooth, seamless finish.
If you notice any drips as you paint, carefully brush them out immediately with your paintbrush before they dry. It’s much easier to fix them when they are wet. After applying the first coat, let it dry completely according to the paint manufacturer’s instructions.
Inspect the ceiling for any missed spots or areas that need more coverage.
Here’s a step-by-step approach:
- Stir the Paint: Thoroughly mix the ceiling paint to ensure uniform color and consistency.
- Cut In Edges: Use a paintbrush to apply paint around the perimeter of the ceiling. Aim for a consistent width.
- Roll the Ceiling: Load the roller evenly with paint and apply in long, overlapping strokes. Work in sections to maintain a wet edge.
- Address Drips: Immediately brush out any drips before they set.
- Apply Second Coat: Once the first coat is completely dry, apply a second coat using the same technique.
When to Use a Second Coat of Paint
Deciding whether a second coat of ceiling paint is necessary often depends on several factors. For the best, most durable finish, a second coat is usually recommended, especially after priming. It ensures complete coverage and a consistent sheen across the entire ceiling.
If you’re painting over a significantly different color, or if the primer didn’t achieve perfect, uniform coverage, a second coat is almost always a good idea. It helps to deepen the color and ensure that any remaining hints of the old color or primer show through. This is particularly important when switching from a dark color to a very light one.
Inspect the ceiling after the first coat has dried. Look for areas where the paint appears thinner, lighter, or less opaque. You might notice subtle variations in sheen or color.
These are signs that a second coat is needed to achieve a uniform and professional-looking finish. Small missed spots or uneven coverage are common reasons for needing a second coat.
Ceiling paint, especially flat finishes, can sometimes absorb paint unevenly, particularly if the ceiling surface has some texture. A second coat helps to even out this absorption and create a consistent look. It also adds an extra layer of protection, making the paint more durable and easier to clean in the future, though flat finishes are inherently less washable.
Always follow the drying times recommended by the paint manufacturer before applying a second coat. Applying paint too soon can lead to issues like peeling, dragging the first coat, or an uneven finish. Allow adequate time for the first coat to cure sufficiently.
This might range from 2 to 4 hours, or longer in humid conditions.
Here are key indicators for a second coat:
- Incomplete Coverage: If you can still see the primer color or previous paint color showing through in spots, a second coat is needed.
- Color Variation: If there are noticeable differences in color or sheen across the ceiling, another coat will even it out.
- Dark to Light Color Change: When painting a dark color to a light one, a second coat of paint is almost always required for full opacity.
- Textured Surfaces: Textured ceilings may absorb paint unevenly, requiring a second coat for uniform color and finish.
- Durability and Longevity: A second coat adds an extra layer of protection, making the paint more resistant to wear and easier to maintain over time.
Comparing Kilz Primers and Other Options
While Kilz is a popular choice, it’s worth exploring how it stacks up against other primer options for ceiling applications. Understanding the differences can help you make the best decision for your project’s specific needs and budget. This section looks at general primers versus specialized ones and highlights the strengths of Kilz.
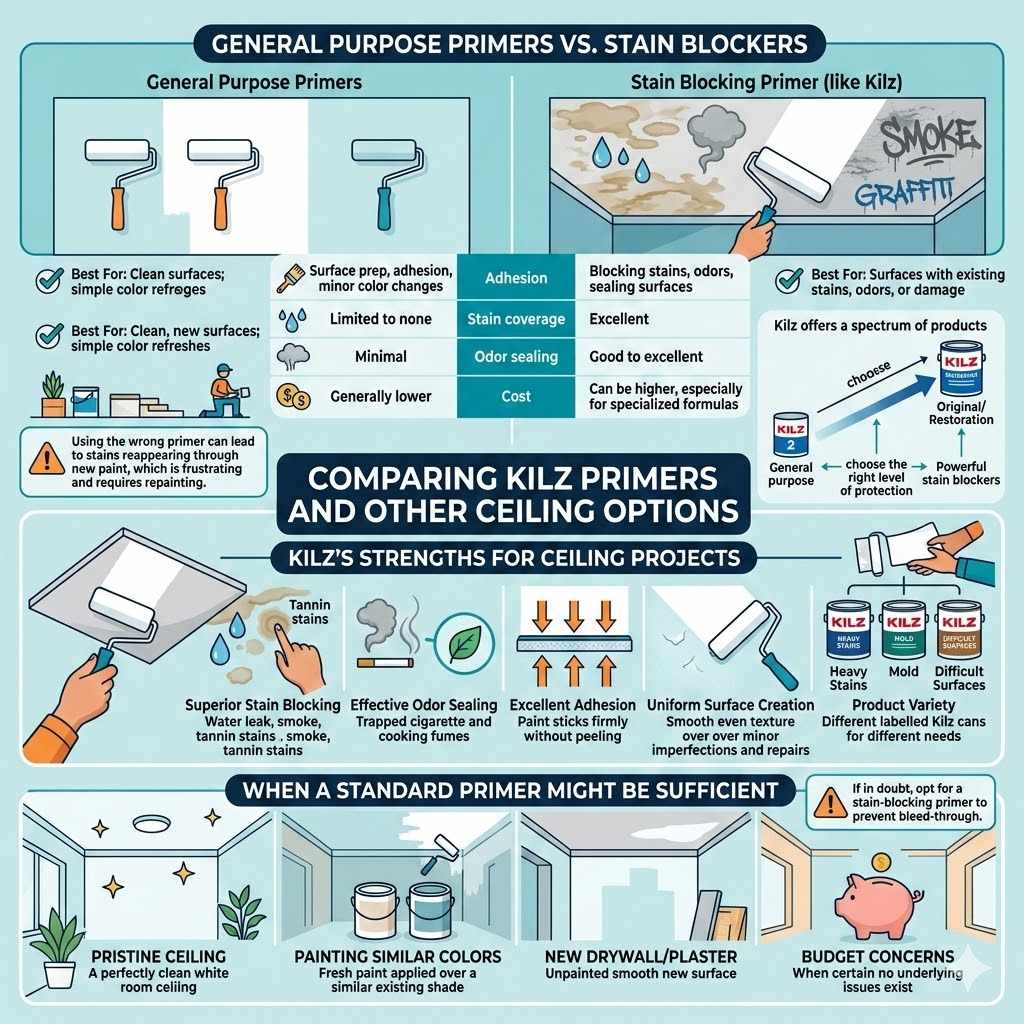
General Purpose Primers vs. Stain Blockers
General purpose primers are designed to prepare most surfaces for paint, improve adhesion, and provide a uniform base. They are good for minor cosmetic touch-ups or when making a simple color change. These primers are typically less expensive and widely available.
Stain-blocking primers, like many Kilz products, are formulated with specific ingredients to tackle tough stains such as water, smoke, tannin, or grease. They create a strong barrier that prevents these stains from bleeding through the topcoat. If your ceiling has visible discoloration, using a dedicated stain blocker is highly recommended over a general-purpose primer.
For a ceiling that is perfectly clean and free of stains, a general-purpose primer might suffice. However, ceilings are often prone to issues that a general primer cannot handle. For example, water stains require a primer with specialized sealing properties that a standard primer lacks.
Using the wrong type of primer can lead to the stains reappearing through your new paint, which is frustrating and requires repainting.
Kilz offers a spectrum of products, with some being more general-purpose (like Kilz 2) and others being powerful stain blockers (like Kilz Original or Restoration). This range allows you to choose the right level of protection for your ceiling. Opting for a stain-blocking primer upfront can save you from having to repaint later if stains bleed through.
Here’s a quick comparison:
| Feature | General Purpose Primer | Stain Blocking Primer (like Kilz) |
|---|---|---|
| Primary Use | Surface prep, adhesion, minor color changes | Blocking stains, odors, sealing surfaces |
| Stain Coverage | Limited to none | Excellent |
| Odor Sealing | Minimal | Good to excellent |
| Cost | Generally lower | Can be higher, especially for specialized formulas |
| Best For | Clean, new surfaces; simple color refreshes | Surfaces with existing stains, odors, or damage |
Kilz’s Strengths for Ceiling Projects
Kilz primers have several strengths that make them a popular and effective choice for ceiling projects. One of their biggest advantages is their robust stain-blocking capability. Many ceilings are prone to water stains from roof leaks, or discoloration from smoke and nicotine.
Kilz is specifically designed to create a barrier that completely encapsulates these stains, preventing them from showing through your new paint.
Another key strength is odor sealing. If your ceiling has absorbed persistent odors, such as from cigarette smoke or cooking fumes, Kilz primers can effectively seal these smells in. This is a significant benefit for improving the overall air quality and freshness of a room.
Without a good odor-sealing primer, these smells can eventually seep through new paint, rendering the paint job ineffective.
Kilz primers also provide excellent adhesion. They create a surface that the topcoat of paint can adhere to firmly. This is important for preventing peeling or chipping, especially in areas where temperature or humidity might fluctuate.
A well-adhered paint job looks better and lasts longer.
Furthermore, Kilz primers create a uniform surface. Whether your ceiling has minor texture variations, previous repairs, or different types of materials, Kilz can help create a smooth, consistent base. This uniformity leads to a more even application of your final paint color and a better overall aesthetic.
This makes your painting job look more professional.
Finally, the variety of Kilz products means you can choose one that best suits your specific needs. Whether you’re dealing with light stains or severe damage, there’s a Kilz primer formulated to handle the job. This specificity ensures you’re using the most effective product for your ceiling project.
Key advantages of Kilz for ceilings:
- Superior Stain Blocking: Kilz excels at covering and blocking tough stains like water, smoke, and tannin. This is vital for older ceilings or those with damage.
- Effective Odor Sealing: It traps unpleasant odors, improving the air quality and scent of the room. This is especially useful for smoke-damaged areas.
- Excellent Adhesion: Kilz creates a strong bond between the ceiling surface and the topcoat, preventing peeling and ensuring a lasting finish.
- Uniform Surface Creation: It smooths out minor imperfections and creates a consistent base for paint, leading to a more professional look.
- Product Variety: Kilz offers different formulas, allowing you to select the best primer for specific issues like heavy stains, mold, or difficult surfaces.
When a Standard Primer Might Be Sufficient
There are specific situations where a standard, general-purpose primer might be sufficient for your ceiling. If your ceiling is relatively new, in good condition, and free from any visible stains, water damage, or smoke discoloration, a standard primer can do the job. It will still help your paint adhere better and provide a uniform surface for a single, even color coat.
For instance, if you’re simply changing your ceiling from one shade of white to another, or from a light neutral to a slightly different light neutral, and the existing paint is in excellent condition, a standard primer can be an economical choice. It will ensure the new color goes on smoothly and covers well, even if it’s a subtle change.
Another scenario is when painting over a well-maintained, recently painted ceiling with a similar color. In such cases, the primary goal is just to refresh the look or slightly alter the shade. A standard primer will provide the necessary adhesion and a slightly more even base for the new paint.
However, if there’s any doubt about the ceiling’s condition, it’s always safer to opt for a stain-blocking primer.
Consider a ceiling in a bedroom that has never had any issues. If you’re just painting it a fresh coat of white, a good quality standard primer will likely be adequate. It will help the paint adhere and create a smooth finish.
But if that same ceiling had a small leak a year ago that was repaired and painted over, even if the stain isn’t visible now, a stain-blocking primer is the wiser choice to prevent future bleed-through.
In summary, a standard primer is suitable when:
- The Ceiling is Pristine: No stains, water marks, smoke damage, or significant discoloration are present.
- Painting Similar Colors: You are repainting with a color very close to the existing one, and the current paint is in good condition.
- New Drywall or Plaster: Unpainted new surfaces that just need a base for paint, though specialized drywall primers are often best here.
- Budget is a Major Concern: And you are certain there are no underlying issues that require a specialized primer.
Frequently Asked Questions
Question: Can I use Kilz on a textured ceiling
Answer: Yes, you can use Kilz on a textured ceiling. Kilz primers adhere well to most common ceiling textures like popcorn or knockdown. Ensure the surface is clean and dry before applying.
You might need to use a roller with a longer nap to get the primer into all the nooks and crannies of the texture.
Question: How many coats of Kilz do I need on a ceiling
Answer: Typically, one coat of Kilz is sufficient for most ceiling applications. However, if you are dealing with severe stains or a drastic color change, a second coat of primer may be necessary. Always check the primer’s coverage and let it dry completely before deciding if a second coat is needed.
Question: Should I use Kilz primer or Kilz primer and paint
Answer: Kilz offers both primers and paint-and-primer products. For most ceiling projects, especially those with stain or odor issues, using a dedicated Kilz primer first, followed by a quality ceiling paint, is generally recommended for the best results. Paint-and-primer products can work for simpler jobs, but a separate primer often provides superior stain blocking and adhesion.
Question: How long should I wait after priming with Kilz before painting
Answer: This depends on the specific Kilz product. Most Kilz primers are ready for a topcoat of paint within 2 to 4 hours. However, some heavy-duty formulas might require up to 24 hours.
Always check the product label for the exact recoat time. It’s important to let the primer dry completely to ensure proper adhesion.
Question: Can Kilz cover peeling paint on a ceiling
Answer: No, Kilz primer is not designed to cover peeling paint. You must scrape off all loose and peeling paint, sand the area smooth, and then prime. Kilz will help seal the repaired area and provide a base for new paint, but it will not adhere properly to or cover compromised paint layers.
Final Thoughts
Yes, you can definitely use Kilz as ceiling paint primer. It’s a smart choice for tackling stains, odors, and ensuring your paint job looks great. Proper surface preparation and choosing the right Kilz product are key.
Follow up with quality ceiling paint for a durable, fresh finish. Your ceiling will look transformed.