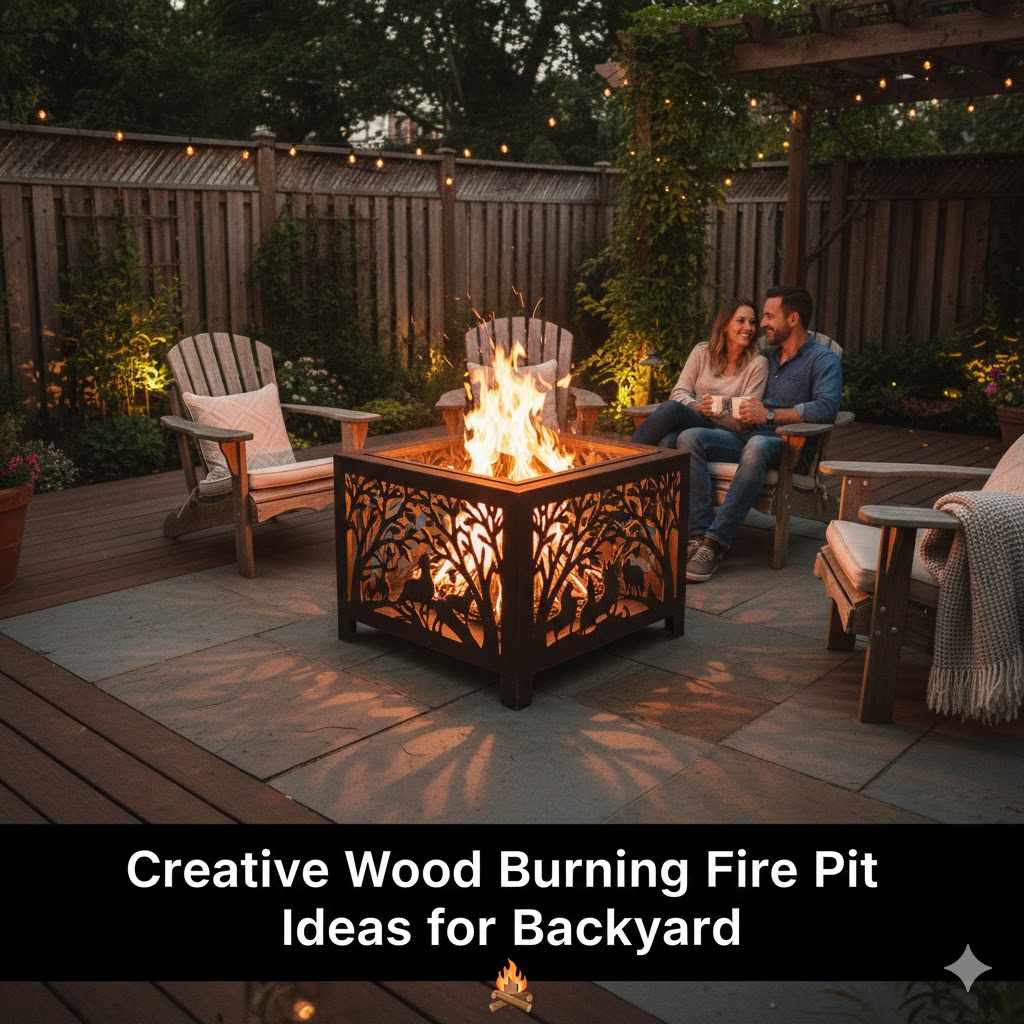
Creative Wood Burning Fire Pit Ideas for Backyard
Thinking about a backyard fire pit can seem a bit tricky at first, especially if you’re new to DIY projects. You might wonder where to start or if you can even do it. But don’t worry!
It’s simpler than you think to create a fantastic gathering spot. We’ll walk through easy steps to get you enjoying warm nights and cozy conversations. Get ready to see how simple it is to bring your outdoor space to life with some amazing Creative Wood Burning Fire Pit Ideas for Backyard.
Amazing Creative Wood Burning Fire Pit Ideas for Backyard
Creating a fire pit is a popular way to make backyards more inviting and fun. Many people want this cozy addition for outdoor gatherings. However, finding the right ideas or knowing where to begin can sometimes feel overwhelming for beginners.
This section will cover various designs and practical tips to help you choose and build a fire pit that suits your space and style. We’ll explore simple yet stunning options that can transform your outdoor living area into a warm and welcoming oasis.
Simple DIY Stone Fire Pit
Building a basic stone fire pit is a rewarding project that adds charm and function to your yard. It’s about creating a safe enclosure for your fire using readily available materials. This design focuses on a straightforward construction method that’s easy for most skill levels to tackle.
You’ll learn about selecting the right stones and assembling them securely.
- Choosing the Right Stones: For a durable and attractive stone fire pit, look for natural stones like flagstone, river rocks, or fieldstones. These are often readily available and come in various shapes and sizes. It’s important to select stones that are dense and not porous, as porous stones can absorb moisture and potentially crack or explode when heated. Aim for stones that are relatively flat on at least one side to make stacking easier and more stable. Avoid using freshly quarried stones that might still contain moisture.
- Foundation and Base: A stable foundation is key to a long-lasting fire pit. Dig a shallow pit and fill it with a layer of gravel or crushed stone for drainage. This helps prevent water from pooling around the base of your fire pit, which can weaken the structure over time. Compact this gravel layer firmly to create a solid base. Some people also add a layer of sand on top of the gravel for an even smoother surface.
- Stacking the Walls: Begin stacking your chosen stones to form the fire pit walls. For safety and stability, it’s best to use a two-layer system. Place larger stones for the inner ring and slightly smaller ones for the outer ring, staggered like brickwork. This interlocking design adds strength. Ensure each layer is level and secure before adding the next. You can use a construction adhesive specifically designed for high temperatures to further secure the stones, especially for the top layers.
- Creating a Hearth: A fire pit often looks and functions best with a distinct hearth area. This could be a simple paved circle around the fire pit using pavers or more flagstones. It provides a clear space for seating and helps contain any stray embers. Ensure the hearth material is non-combustible and extends at least a few feet away from the fire pit itself to offer protection.
A well-built stone fire pit can become the focal point of your backyard, perfect for toasting marshmallows or simply enjoying a cool evening. The natural look of stone blends beautifully with most garden landscapes.
Modern Metal Fire Pit Designs
Metal fire pits offer a contemporary aesthetic and are often available as ready-made units or can be constructed by skilled individuals. They bring a sleek, minimalist look to any outdoor space. These designs often prioritize durability and ease of maintenance.
- Steel and Corten Steel: Fire pits made from steel are popular for their modern appeal. Corten steel, also known as weathering steel, develops a stable, rust-like appearance over time that many find aesthetically pleasing and protective. It’s a popular choice for its unique look and longevity. Stainless steel is another option, offering a shiny, durable finish that resists corrosion.
- Cast Iron: Cast iron fire pits are heavy-duty and can retain heat very well. They often have ornate designs, giving them a classic feel, but modern interpretations also exist. Their weight makes them very stable.
- Built-in vs. Portable: Metal fire pits come in both built-in and portable options. Portable fire pits offer flexibility, allowing you to move them around your yard as needed. Built-in designs are more permanent fixtures, often integrated into patio or decking areas. When choosing, consider how often you might want to relocate the pit.
A great example of a modern metal fire pit is the ‘Fire Sphere,’ a large, spherical steel design that looks like a piece of modern art when not in use. When lit, the flames dance within its curved walls, creating a dramatic display. These can be found from various outdoor living retailers.
DIY Cinder Block Fire Pit
For a budget-friendly and highly adaptable option, cinder blocks are an excellent choice. This method is quick, easy, and allows for a lot of customization in shape and size. It’s a fantastic starting point for anyone new to building outdoor features.
- Materials Needed: You will need standard concrete cinder blocks. The number depends on the size and height you desire. A common setup uses two layers of blocks. You’ll also need gravel for the base and possibly some heat-resistant mortar if you want a more permanent structure, though many build these without mortar for a simpler assembly.
- Planning Your Design: Cinder blocks are square, making it easy to create circular, square, or rectangular fire pits. A typical circular design uses about 10-12 blocks per layer. Decide on the diameter and height before you start buying materials. A height of two blocks is usually sufficient to contain the fire safely.
- Assembly Steps: First, level the ground where your fire pit will sit. Lay down a layer of gravel and compact it. Place your first layer of cinder blocks in your chosen shape, ensuring they are snug against each other. For a second layer, stagger the blocks over the gaps of the first layer, similar to how bricks are laid. This creates a stronger wall. If using mortar, apply it between layers and blocks.
- Adding a Fire Ring: For added durability and safety, many cinder block fire pits benefit from a metal fire ring insert. This protects the blocks from direct, intense heat and helps to contain the fire more effectively. These rings are available at most hardware stores and come in various diameters.
A cinder block fire pit can be painted or covered with stone veneer to enhance its appearance. This allows you to customize its look to match your backyard decor without a lot of extra work.
Unique and Artistic Fire Pit Ideas
Beyond the basic shapes, there are many ways to make your fire pit a unique piece of art. These ideas often involve incorporating unusual materials, shapes, or decorative elements. They turn a functional item into a striking garden feature.
- Repurposed Materials: Old washing machine drums, metal planters, or even repurposed industrial metal pieces can be transformed into eye-catching fire pits. Ensure any material used is heat-resistant and safe for outdoor fires. For example, a large metal tractor wheel rim can make a rustic and durable fire pit base.
- Integrated Seating: Some of the most inviting fire pit designs incorporate built-in seating. This could be a low stone or concrete wall that encircles the pit, providing a place to sit and relax. Curved seating walls create a communal feel, encouraging conversation and connection around the fire.
- Sculptural Designs: For those who want a truly statement piece, consider fire pits that are sculptural in nature. This might involve custom metalwork or uniquely shaped concrete forms. Imagine a fire pit shaped like a giant bowl or one with intricate cut-out patterns that cast beautiful shadows when lit.
- Mosaic and Tile Accents: You can add artistic flair to almost any fire pit material with mosaics or decorative tiles. Applying heat-resistant tiles or mosaic patterns to the exterior of a concrete or metal fire pit can create a vibrant and personal touch. Ensure the adhesive used is rated for high temperatures.
A striking example is a fire pit designed with a built-in water feature, creating a mesmerizing contrast between fire and water when lit at night. This level of creativity can truly elevate your outdoor living space.

Planning Your Backyard Fire Pit Project
Before you start building, careful planning is essential for a successful and safe fire pit. This includes considering the location, size, safety regulations, and materials. Proper preparation ensures your fire pit is not only beautiful but also functional and secure for years of enjoyment.
Let’s break down the key steps to get your project off the ground smoothly.
Choosing the Perfect Location
The placement of your fire pit is crucial for both safety and enjoyment. A good spot ensures it’s a central gathering point without posing risks to your home or surrounding vegetation.
- Safety Distances: Always check local building codes and fire regulations for required distances from structures, fences, trees, and overhanging branches. A common guideline is at least 10 to 25 feet away from any combustible materials. This distance is vital to prevent accidental fires.
- Wind Patterns: Consider prevailing wind directions. You don’t want smoke constantly blowing into your seating area or towards your neighbor’s property. Observing your yard’s wind patterns throughout the day can help you choose the most advantageous spot.
- Accessibility and Ground Surface: Ensure the area is easily accessible for guests and for bringing firewood. The ground surface should be non-combustible, such as gravel, stone, or concrete. Avoid placing fire pits directly on grass or wooden decks, unless they are specifically designed for such installations with proper heat shielding.
- Proximity to Seating: Think about how you want to use the fire pit. If it’s for intimate conversations, place it where comfortable seating can be arranged around it. If it’s for larger gatherings, ensure there’s enough space for people to gather comfortably and safely.
A common mistake is placing a fire pit too close to a wooden fence or beneath low-hanging tree branches, which creates a serious fire hazard. Always err on the side of caution.
Determining Size and Shape
The dimensions of your fire pit should be proportionate to your backyard space and intended use. Too small, and it might not feel substantial; too large, and it could be overwhelming or consume too much fuel.
- Diameter: For most backyard gatherings, an interior diameter of 3 to 4 feet is ideal. This size provides enough warmth and space for a decent fire without becoming unmanageable. Smaller pits, around 2 feet, are suitable for smaller patios or more decorative purposes.
- Height: The height of the fire pit walls typically ranges from 12 to 18 inches. This height is sufficient to contain the fire and embers effectively while also providing a comfortable visual presence. Consider how high you want the flames to appear.
- Shape: The most common shapes are round, square, and rectangular. Round fire pits are excellent for creating a communal atmosphere, as everyone can easily see and interact with each other. Square or rectangular pits can offer a more modern look and can be easier to build with certain materials like cinder blocks.
The shape and size also influence the type of firewood you can use. Longer logs might fit better in rectangular pits, while smaller pieces work well in round ones.
Understanding Fire Pit Materials
The choice of materials impacts the durability, look, and cost of your fire pit. Different materials have unique properties and require different levels of maintenance.
- Natural Stone: Offers a classic, rustic look. It’s durable and can withstand high temperatures. However, some stones can crack under extreme heat if they contain moisture. Examples include granite, sandstone, and fieldstone.
- Concrete/Cinder Blocks: An economical and versatile option. Easy to work with, allowing for many designs. They can be painted or covered to match your decor. Their durability is good, but they may show wear over time.
- Metal (Steel, Cast Iron, Stainless Steel): Provides a modern or industrial aesthetic. Steel is common, Corten steel develops a protective rust patina, and cast iron is heavy and heat-retaining. Stainless steel offers a sleek, corrosion-resistant finish. Metal pits can get very hot to the touch.
- Brick: Fire brick is specifically designed to withstand high temperatures and thermal shock, making it an excellent choice for the inner lining of a fire pit, even if the outer structure is made of other materials. Regular clay bricks are not suitable.
A well-chosen material, like high-temperature fire brick for the interior, can significantly extend the life of your fire pit and improve its safety.
Safety Features and Regulations
Safety should be your top priority when planning and building a fire pit. Adhering to safety guidelines and local regulations ensures a pleasant and secure experience.
- Clearance Zones: Maintain adequate clearance from buildings, fences, trees, and other flammable materials. This zone should be free of dry leaves, grass, and debris. It’s recommended to have a minimum of 10 feet clear space around the pit.
- Spark Screen and Cover: Consider using a spark screen to prevent embers from escaping the fire pit. A heavy-duty cover can protect the fire pit from the elements when not in use and also act as an added safety measure.
- Fire Extinguisher/Water Source: Keep a fire extinguisher or a bucket of water and sand nearby whenever you use the fire pit. This allows for quick action in case of an emergency.
- Local Ordinances: Always check your local city and county ordinances regarding open burning and fire pit regulations. Some areas have restrictions on when and how you can use fire pits, or even require permits.
Failure to comply with safety regulations can lead to fines and, more importantly, put people and property at risk of fire.
Building and Maintaining Your Fire Pit
Once you have your plan, it’s time to bring your fire pit to life. This section covers the practical steps of construction, from site preparation to the finishing touches. Proper maintenance will ensure your fire pit remains a beautiful and functional part of your yard for years to come.
Step-by-Step Construction Guide (Example: Cinder Block Fire Pit)
This guide outlines the process for building a simple, yet effective, cinder block fire pit. This is a popular DIY project because of its affordability and ease of construction.
- Prepare the Site: Choose your location. Mark out the desired diameter of your fire pit. Dig down about 4-6 inches within this circle to remove grass and soil. Fill the excavated area with gravel and compact it firmly to create a level, stable base. This base helps with drainage and prevents weeds from growing up through the blocks.
- Lay the First Course of Blocks: Place your first layer of cinder blocks around the perimeter of the gravel base, forming your chosen shape (e.g., a circle). Ensure the blocks are tightly packed against each other. Use a level to make sure this first course is perfectly even. A level foundation is critical for the stability of subsequent layers.
- Lay the Second Course: Place the second layer of cinder blocks directly on top of the first, staggering them so that the joints of the second layer fall in the middle of the blocks in the first layer. This pattern, known as running bond, greatly increases the structural integrity of the wall. Again, use a level to ensure this layer is also even and stable.
- Add a Fire Ring (Optional but Recommended): If you are using a metal fire ring insert, place it inside the cinder block enclosure now. This protects the blocks from direct heat and makes the pit more durable. Ensure the ring fits snugly within the blocks.
- Finishing Touches: You can fill the gaps between the blocks with gravel or sand. If you plan to paint the blocks, wait until any mortar (if used) has fully cured. You can also add decorative caps to the top layer of blocks for a more finished look.
This straightforward process can often be completed in a single afternoon, making it a quick project to enhance your outdoor space.
Adding Decorative Elements
Once the main structure is built, you can enhance its appearance with decorative touches. These elements personalize your fire pit and make it a true focal point.
- Capstones and Edging: For stone or block fire pits, adding a layer of capstones on the top edge provides a smooth surface and a more finished look. These can be flat stones, concrete pavers, or specialized fire pit caps. They also help to protect the top course of blocks or stones from direct heat.
- Paint and Stencils: Concrete or cinder blocks can be painted with high-temperature paint to match your outdoor color scheme. Stencils can be used to add patterns or designs to the painted surface. This is a simple way to add personality.
- Mosaic Tiles: Heat-resistant mosaic tiles can be applied to the exterior of the fire pit. This allows for a wide range of colors and patterns, from simple geometric designs to elaborate images. Ensure you use a strong, heat-proof adhesive.
- Built-in Features: Consider adding small shelves or nooks around the base for storing kindling or decorative items. Some designs even incorporate small planters on the outer rim, adding greenery to the fire pit area.
The key is to use materials that are safe for use near heat and flame. Materials rated for high temperatures will withstand the elements and the heat of the fire better.
Firewood and Fuel Considerations
The type of wood you burn affects the heat, smell, and safety of your fire pit experience. Using the right fuel is important for performance and longevity.
- Best Woods for Burning: Hardwoods like oak, maple, hickory, and ash are excellent choices for fire pits. They burn longer, hotter, and produce fewer sparks and less creosote than softwoods. They also produce a pleasant aroma. Avoid treated lumber, particleboard, or painted wood, as they release toxic fumes.
- Seasoning Your Firewood: Firewood should be seasoned, meaning it has been dried for at least six to twelve months. Seasoned wood burns more efficiently, produces less smoke, and is easier to light. Look for wood with cracks at the ends and a grayish, weathered appearance. Wet or green wood will smoke excessively and burn poorly.
- Starting Your Fire: Use natural fire starters like kindling (small, dry twigs and branches) and newspaper. Avoid using accelerants like gasoline or lighter fluid, which are extremely dangerous and can cause flare-ups. Gradual ignition with progressively larger pieces of wood is the safest method.
Purchasing firewood from local sources can help prevent the spread of invasive insects that can harm forests.
Routine Maintenance and Safety Checks
Regular maintenance ensures your fire pit remains in good condition and continues to be a safe feature in your backyard.
- Cleaning Ash and Debris: After each use and once the fire pit has cooled completely, remove accumulated ash and debris. Ash can absorb moisture and, over time, can degrade the materials of your fire pit. Dispose of ashes properly in a metal container away from any flammable materials.
- Checking for Cracks and Damage: Periodically inspect your fire pit for any signs of cracking, shifting, or damage to the materials. For stone or brick pits, check for loose stones or crumbling mortar. For metal pits, look for rust or warping. Address any issues promptly to prevent them from worsening.
- Weather Protection: When not in use, especially during harsh weather seasons, consider covering your fire pit to protect it from rain, snow, and sun. A good quality fire pit cover can significantly extend its lifespan and maintain its appearance.
- Annual Deep Clean: Once a year, consider a more thorough cleaning. For stone or brick pits, you might use a stiff brush and a mild detergent. For metal pits, you might apply a high-temperature sealant or treatment to prevent rust.
A well-maintained fire pit not only looks better but also remains a safer focal point for your outdoor gatherings.
Creative Wood Burning Fire Pit Ideas for Backyard: Inspiration and Examples
Sometimes, seeing what others have done can spark your own imagination. This section provides inspiration and highlights real-world examples of creative fire pit designs that people have implemented in their backyards. These ideas showcase how a fire pit can be more than just functional; it can be a work of art.
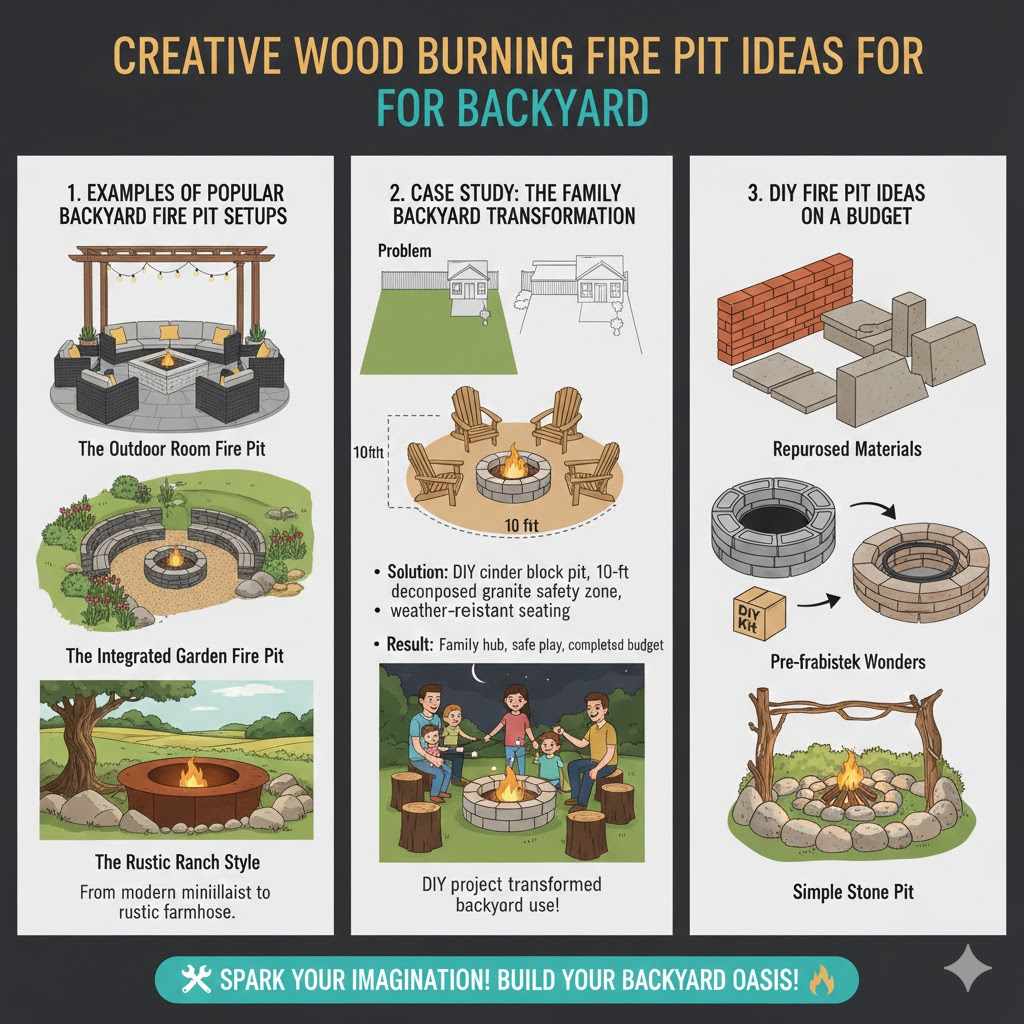
Examples of Popular Backyard Fire Pit Setups
People are transforming their outdoor spaces with diverse fire pit designs. These examples show creativity in material use, integration with landscaping, and overall aesthetic.
- The Outdoor Room Fire Pit: Many homeowners are creating dedicated “outdoor rooms” centered around a fire pit. This involves arranging comfortable seating, like outdoor sofas and chairs, in a circle around the pit. Often, these areas are further enhanced with outdoor rugs, lighting, and even overhead structures like pergolas to define the space. The fire pit becomes the hearth of this extended living area.
- The Integrated Garden Fire Pit: This approach blends the fire pit seamlessly into the landscape. Think of a fire pit nestled within a stone retaining wall, surrounded by flowering plants and decorative gravel. Or a sunken fire pit with built-in seating carved into a gentle slope, creating a cozy, natural amphitheater effect.
- The Portable Party Starter: For those who entertain frequently or have flexible backyard layouts, portable fire pits are a great solution. These can range from simple metal bowls on wheels to more elaborate, designer portable units. They allow you to move the warmth and ambiance wherever the party is happening, from a patio to a lawn.
- The Rustic Ranch Style: This style often features large, rough-hewn stones or thick steel fire pits with a weathered look. They are often paired with natural wood seating or rustic furniture, creating a warm, inviting, and grounded atmosphere. This look is perfect for larger properties or homes with a country aesthetic.
These setups demonstrate that a fire pit can be adapted to almost any style, from modern minimalist to rustic farmhouse.
Case Study: The Family Backyard Transformation
The Miller family wanted to create a more family-friendly and entertaining backyard space. They had a large, underutilized lawn area.
- The Problem: Their backyard was mostly open lawn with a small patio. They wanted a central gathering spot for family nights, roasting marshmallows, and entertaining friends. They were concerned about safety for their young children.
- The Solution: They decided on a DIY cinder block fire pit with a metal fire ring insert. They chose a location at a safe distance from the house and away from trees. They built a 3-foot diameter, two-layer high pit. To enhance safety and aesthetics, they created a 10-foot diameter circle of decomposed granite around the pit, making it a clear, non-combustible zone. They also added comfortable, weather-resistant seating around the perimeter.
- The Result: The fire pit became the heart of their backyard. Their children love roasting marshmallows, and they now host regular family evenings and gatherings with friends. The decomposed granite zone provides a safe play area and keeps the fire contained. The project was completed within their budget and took a weekend.
This case highlights how a relatively simple and inexpensive DIY project can significantly improve backyard usability and family enjoyment.
DIY Fire Pit Ideas on a Budget
Creating a beautiful fire pit doesn’t have to break the bank. Many clever and affordable options exist for resourceful homeowners.
- Repurposed Materials: Scavenge for usable materials like old bricks from a renovation, discarded concrete pieces, or even large metal bowls that can be safely adapted. Online marketplaces and salvage yards are great places to find affordable or free materials. Always ensure materials are heat-resistant.
- Cinder Block Wonders: As mentioned earlier, cinder blocks are one of the most budget-friendly options. Their low cost and ease of assembly make them ideal for a quick and cheap fire pit. Painting or adding inexpensive capstones can elevate their look.
- Pre-fabricated Kits: While some kits can be pricey, simpler DIY fire pit kits are available that often include the main components, making assembly straightforward and generally more affordable than custom-built options.
- Simple Stone Pit: Gathering local, free stones from your property or asking neighbors if they have any to spare can be a very low-cost approach. Focus on stability and safety rather than elaborate design for budget projects.
A budget-friendly fire pit can still be a stunning focal point with a little creativity and careful material selection.
Frequently Asked Questions
Question: What is the safest distance to place a fire pit from my house?
Answer: Generally, fire pits should be at least 10 to 25 feet away from your house, fences, trees, and any other combustible structures or materials. Always check your local building codes and fire department regulations, as these distances can vary.
Question: Can I use any type of wood in my fire pit?
Answer: It’s best to use seasoned hardwoods like oak, maple, or ash. These burn longer and cleaner. Avoid using treated lumber, painted wood, particleboard, or trash, as they can release toxic fumes and create dangerous sparks or creosote buildup.
Question: How do I prevent my fire pit from smoking too much?
Answer: Ensure you are using dry, seasoned firewood. Wet or green wood produces a lot of smoke. Also, consider the placement of your fire pit to take advantage of wind patterns, and ensure there is adequate airflow for combustion.
Question: What safety equipment should I have near my fire pit?
Answer: Always keep a fire extinguisher or a bucket of water and sand readily accessible when using your fire pit. A spark screen can also help prevent embers from escaping.
Question: How often should I clean out the ashes from my fire pit?
Answer: It’s best to clean out ashes after each use, once the fire pit has cooled completely. Accumulated ash can absorb moisture and degrade the fire pit materials over time. Dispose of ashes in a metal container.
Wrap Up
Creating a beautiful and functional wood burning fire pit for your backyard is an achievable and rewarding project. From simple cinder blocks to natural stone designs, numerous Creative Wood Burning Fire Pit Ideas for Backyard can suit your space and budget. Planning, safe placement, and proper materials are key.
You can easily build a warm gathering spot for friends and family.