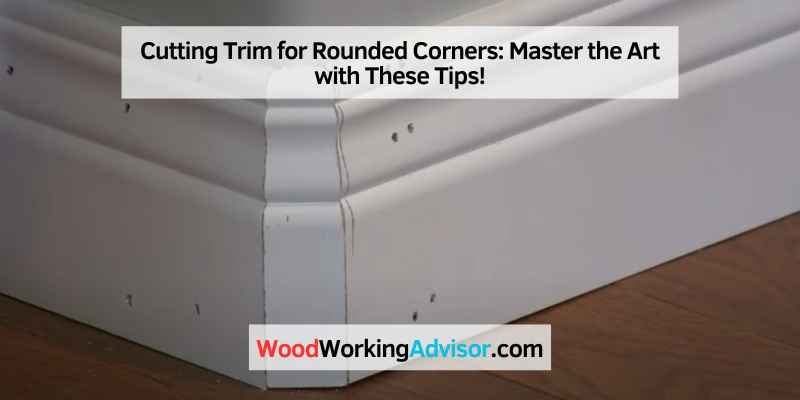
Cutting Trim for Rounded Corners: Master the Art with These Tips!
Cutting trim for rounded corners requires additional cuts at different angles and an additional center piece to wrap around the corner. It can be a challenge to get the measurements and angles right, but with the proper tools and technique, you can achieve a professional-looking finish.
We will walk you through the steps on how to cut trim for rounded corners, including how to make angled cuts and install the trim. By the end of this article, you will have the knowledge and confidence to tackle this DIY project on your own.
Understanding Rounded Corners
Cutting trim for rounded corners can be a bit tricky, but there are resources and tools available to help achieve a seamless finish. From measuring and marking the corners to making additional cuts at different angles, taking the time to properly cut the trim will result in a professional-looking installation.
Different Types Of Rounded Corners
If you want to give your walls a rounded edge, you might come across different types of rounded corners. Two popular types are bullnose corners and rounded corner beads. Bullnose corners have a rounded edge radius of about 0.5 to 1 inch, while rounded corner beads can vary in size and shape. Depending on the design of your space, one may work better than the other.
Challenges In Trimming Rounded Corners
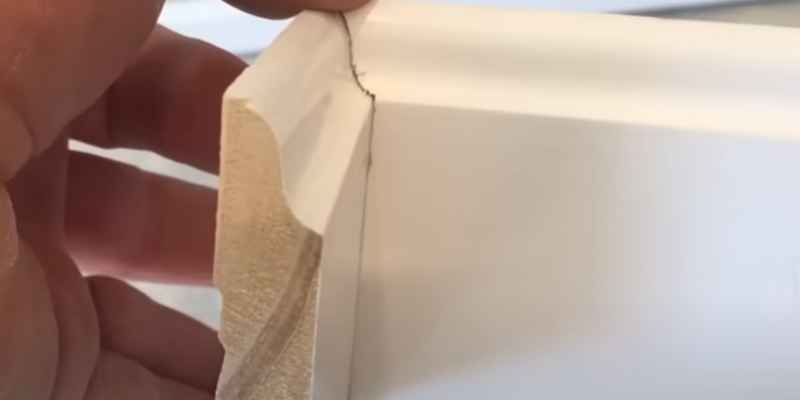
Trimming rounded corners can be a bit challenging because of their unique shape. Unlike straight corners, you cannot cut the trim pieces at a 45-degree angle and expect them to fit accurately. For a perfect fit, you need to understand how to cut trim for each type of corner.
The key to trimming rounded corners is to create a template of the curve and cut the trim accordingly. Without a template, it can be difficult to measure the exact length of the curve. Moreover, rounded corners require a minimum of three cuts for a perfect fit. So, it’s important to take your time and be patient while trimming rounded corners.
In conclusion, to get perfect trimming for rounded corners, understand the type of rounded corner and the challenges associated with each type. Once you have a clear perspective, cutting trim for rounded corners will be like a breeze.
Preparing For The Task
Preparing to cut trim for rounded corners involves making precise measurements and a little bit of planning. Before beginning, gather all necessary tools and materials, including a trim gauge and miter saw, and make a mock-up of the corner to ensure the trim fits perfectly.
Then, carefully mark, measure, and cut the trim at appropriate angles to achieve a professional-looking finished product.
Gathering The Necessary Tools
Before cutting the trim for rounded corners, it is necessary to gather all the necessary tools in one place. You will need a saw, preferably a miter saw or coping saw, measuring tape, pencil, paper, and sandpaper to smooth the edges of the trim. Do not forget to wear appropriate safety gear like gloves, goggles, and a dust mask to protect yourself against sawdust and cut-off pieces of trim.
Creating A Mock-up
To make accurate measurements for cutting the trim, it is always helpful to create a mock-up of the rounded corner. The mock-up serves as a blueprint, and it helps to visualize the corner’s shape and identify the exact areas that need trimming. You can use a piece of cardboard or paper to create the mock-up, and once you have created it, place it on the corner’s surface to check if the measurements are correct before moving on to cutting the actual trim.
Measurement Techniques
Measuring the rounded corners can be a bit tricky, especially when it comes to determining the angle. The angle of the corner depends on the radius of the curve and the thickness of the trim. The easiest way to determine the angle is to use a protractor or angle finder. Once you have found the exact angle, you can mark and measure the trim to the required length. To avoid any mistakes, it is essential to measure twice before cutting the trim.
In conclusion, preparing for the task of cutting trim for rounded corners involves gathering the necessary tools, creating a mock-up, and using accurate measurement techniques. With proper preparation, you can achieve perfectly trimmed and elegant looking rounded corners.
Cutting Trim For Bullnose Corners
Cutting trim for bullnose corners can be a challenge, but with proper technique, it can be done easily. Making additional cuts at different angles and using a center piece to wrap around the corner are effective methods for cutting trim for rounded corners.
Cutting trim around bullnose corners can be a challenge due to the precise measurements required. However, with the right tools and techniques, you can achieve a professional finish. When it comes to bullnose corners, the most important thing to consider is the angle at which you need to cut the trim. In this section, we will discuss the angle for bullnose corners, additional cuts and center piece, and tips to avoid mistakes.
Angle for Bullnose Corners
To achieve a perfect fit, you must cut the trim at a specific angle. For bullnose corners, the recommended angle is 22.5 degrees. You can achieve this angle by setting your miter saw to 11.25 degrees on each side. However, ensure that you do a few test cuts before trimming the actual piece to ensure the angle is perfect.
Additional Cuts and Center Piece
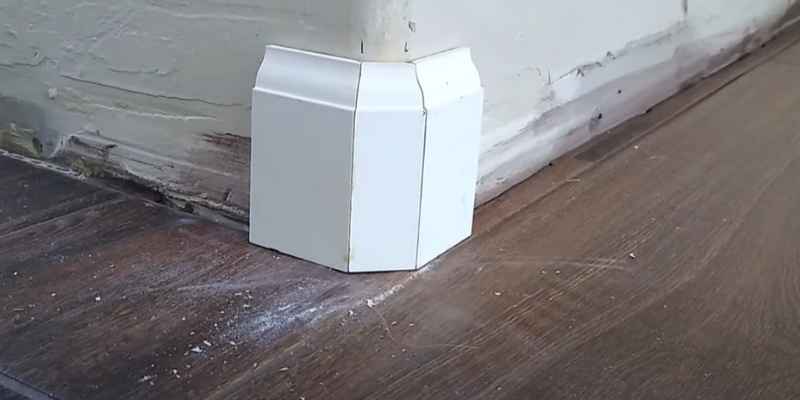
Cutting baseboard trim around bullnose corners involves additional cuts at different angles and an additional center piece to wrap around the corner. To make the additional cuts, you need to use a coping saw or a jigsaw to cut the trim at an angle of 22.5 degrees. Once you’ve made this cut, you can fit the trim around the corner, and the coping will create a seamless joint.
As for the center piece, you need to measure the distance between the bullnose corner and the adjacent wall. Cut this center piece to size and join it to the two pieces of the trim that you’ve already cut. Ensure that the center piece is cut to fit snugly against the wall to avoid gaps between the two.
Tips to Avoid Mistakes
To avoid mistakes when cutting trim for bullnose corners, you need to take note of these tips:
– Always measure twice before cutting to avoid any measurement errors.
– Cut your test pieces first to ensure that your miter saw is set correctly.
– Don’t forget to cut the center piece to measure precisely to avoid any gaps.
In conclusion, cutting trim for bullnose corners requires precision and attention to detail. With the right tools and techniques and these tips and tricks, you can achieve a perfect fit and a professional finish.
Trimming Baseboard For Rounded Corners
Cutting trim for rounded corners can be tricky, but with the right tools and technique, it can be done easily. Additional cuts at different angles and an extra center piece are needed to wrap around bullnose corners when cutting baseboard trim.
Cutting Process For Bullnose Corners
Trimming baseboard for rounded corners can be tricky, especially when it comes to bullnose corners. The process involves additional cuts at different angles and an additional center piece to wrap around the corner. To cut the baseboard for bullnose corners, follow these steps:
- Start by making a mock-up of the bullnose corner using scrap baseboard to understand the shape and size of the corner.
- Use the mock-up to mark the corner’s outline on the baseboard, making sure to include the appropriate angles.
- Measure the length of the baseboard required to cover the corner and make the necessary cuts.
- Fasten the baseboard to the wall, starting from one end and going around the corner.
- Create an additional center piece using scrap wood and attach it to the baseboard to wrap around the bullnose corner completely.
- Finish by trimming any excess and sanding the edges of the baseboard to ensure a smooth finish.
Installing Closet Inserts For Bullnose Corners
Closet inserts serve as useful additions, especially for bullnose corners, helping you maximize the storage space in the closet. Follow these steps to install closet inserts in bullnose corners:
- Determine the dimensions required for the closet insert based on the size of the closet and the bullnose corner.
- Cut the closet insert panels to size, taking into consideration the angle of the bullnose corner.
- Fasten the panels to the wall by securing them to the studs using screws or a nail gun.
- Install shelves, drawers, and rods inside the closet inserts using anchor brackets and screws.
- Finish by trimming any excess and sanding the edges to ensure a smooth finish.
When trimming baseboard for bullnose corners or installing closet inserts, it’s essential to take the necessary measurements and make accurate cuts to ensure a seamless finish. With these tips, you can easily tackle your next DIY project.
Installing Crown Molding For Rounded Corners
Installing crown molding for rounded corners can seem tricky, but it’s manageable with the right tools and techniques. When cutting trim for rounded corners, it’s important to make additional cuts at different angles and wrap around an additional center piece to fit the unique shapes of the space.
Techniques To Install Crown Molding
A well-installed crown molding can enhance the look and feel of your room. But when it comes to rounded corners, installing crown molding can be challenging. There are several cutting techniques and tools involved, and one must have a good understanding of them to install crown molding correctly.
Measuring And Cutting The Crown Molding
One important aspect of installing crown molding is measuring and cutting it properly. To accurately measure the crown molding for rounded corners, use a flexible tape measure or a contour gauge. The next step is to make a mock-up of the corner and use it to mark the measurements. Once you have the correct measurements, use a miter saw to cut the crown molding at the same angle as the corner.
To ensure that the cuts are precise and accurate, it is essential to use a quality saw blade. The circular blade should have 60 to 80 teeth with a sharp edge. Also, before making the cuts, ensure the crown molding is secured with a clamp.
Fastening The Crown Molding
To fasten the crown molding to the wall, use a combination of construction adhesive and nails. Apply the adhesive to the back of the crown molding and place it in position, pressing it firmly into place. Then, use finish nails to secure it further.
Now that you understand the techniques of installing crown molding for rounded corners, you can take up the challenge yourself. By following these simple guidelines and using the right tools, you can add a touch of elegance and personality to your rooms with rounded corners.
Tips And Tricks
Cutting trim for rounded corners can be challenging, but with the right technique, it can be done easily. Use a miter saw to make the cuts at different angles and create an additional center piece to wrap around the corners.
Utilize a bullnose trim gauge to mark where to cut accurately.
Cutting Trim for Rounded Corners
When it comes to installing trim around rounded corners, it can be a bit more tricky than straight corners. However, with these tips and tricks, you can achieve a professional-looking finish in no time.
Using a Bullnose Trim Gauge
One of the most useful tools when cutting trim for rounded corners is a bullnose trim gauge. This handy tool allows you to accurately measure the angle and length of the trim pieces needed for bullnose corners.
To use a bullnose trim gauge, hold the tool against the corner and adjust the gauge until it matches the angle of the corner. Then, use the gauge to mark the angle and length of the trim piece onto the actual trim board. Cut along the marked lines, and the resulting piece should fit snugly around the rounded corner.
Making a Jig for Rounded Corners
If you need to cut several pieces of trim for rounded corners, it may be helpful to create a jig. A jig is a tool that helps guide your saw blade as you make repeatable cuts.
To make a jig for rounded corners, start by cutting a piece of scrap wood to match the angle of the rounded corner. Then, attach the scrap piece to a larger piece of wood using screws or clamps. Use the scrap piece as a guide to make precise cuts on the larger piece of wood. When you need to cut trim for rounded corners, simply place the trim against the jig and make your cuts using the saw.
Avoiding Common Mistakes
When cutting trim for rounded corners, there are a few common mistakes that you should avoid. These include:
– Cutting the trim too short or too long: Always measure and mark the trim pieces before cutting to ensure they fit properly.
– Cutting the angle incorrectly: Make sure to accurately measure the angle of the rounded corner and adjust your saw blade accordingly.
– Not taking the thickness of the trim into account: If the trim is thick, you may need to make additional cuts to ensure a proper fit around the corner.
By following these tips and tricks, you can confidently cut and install trim around rounded corners with ease. Remember to take your time and measure twice, cut once for the best results.
Finishing Touches
When it comes to finishing touches for your home renovation, cutting trim for rounded corners can be a tricky task. But with the right techniques and tools, such as a bullnose trim gauge and a miter saw, you can achieve professional-looking results.
Check out resources like YouTube tutorials and Reddit forums for step-by-step guidance.
After cutting trim for rounded corners, the final step is finishing touches. This step includes sanding the edges of the trim smooth and filling any gaps or nail holes with paintable caulk. Achieving a seamless finish adds a professional touch to your project.
Paintable Caulk For Seamless Finish
Paintable caulk is a great option for filling any gaps or nail holes in the trim. This type of caulk is ideal for rounded corners because it can be molded and shaped to create a smooth, seamless finish. You can use a caulk gun to apply the caulk in a precise manner, ensuring that each gap is filled completely.
Achieving Professional Results
To achieve professional-looking results, it’s important to take your time during the finishing touches stage. Sand the edges of the trim smooth, and make sure the caulk is applied evenly. If any excess caulk is left behind, it can be removed with a damp sponge or cloth before it dries. Once the caulk is dry, it’s ready to be painted to match the color of the trim.
In summary, finishing touches are an essential part of cutting trim for rounded corners. Using paintable caulk and taking your time during the process can help create a seamless finish, ensuring that your project looks professional and polished.
Frequently Asked Questions For Cutting Trim For Rounded Corners
How Do You Cut Round Corners Trim?
To cut round corners trim, additional cuts at different angles and an additional center piece to wrap around the corner are needed. A helpful tool is a bullnose trim gauge for accurate markings. Making a mock-up, marking and measuring the corner, and fastening the corner are important steps.
Use a jig for making the round cuts needed. Set the crown in the saw upside down and mark where it sits properly for inside rounded corners.
What Angle Do You Cut Trim For Corners?
To cut trim for corners, it depends on the type of corner you have. For square corners, cut the trim at a 45-degree angle. For rounded corners or bullnose corners, extra cuts at different angles may be necessary. Use a bullnose trim gauge for accurate marks and measurements.
What Is The Angle For Bullnose Corners?
The angle for bullnose corners varies as it involves additional cuts at different angles and an additional center piece to wrap around the corner for baseboard trim. It is recommended to use a bullnose trim gauge to make accurate marks for cutting the trim.
How Do You Cut Baseboard Outside Corners?
To cut baseboard outside corners, you need to make additional cuts at different angles and use an additional center piece to wrap around the corner. It is recommended to use a bullnose trim gauge to make accurate marks and a saw to cut the trim.
Additionally, caulking can be used to fill any gaps.
Conclusion
Cutting trim for rounded corners can be a bit tricky, but with the right techniques and tools, it can be done easily. Taking the time to measure and cut accurately can make a big difference in the finished product. Whether you’re working with bullnose corners or rounded walls, there are methods available to achieve a professional-looking finish.
With the information presented in this post, you’ll be equipped with the knowledge to confidently tackle any rounded corner trim project.