DIY Maple Sap Evaporator: A Brilliant & Simple Design
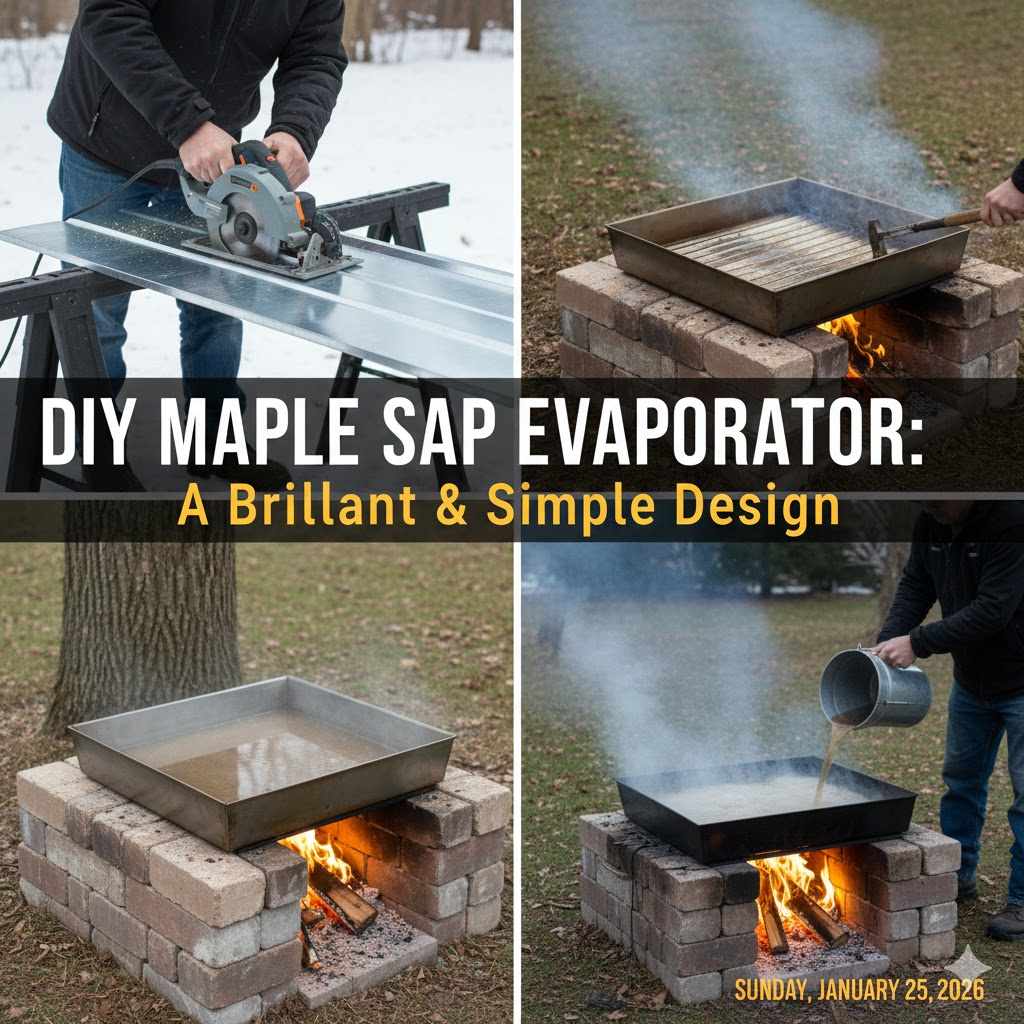
A DIY maple sap evaporator can be built easily using concrete cinder blocks to create a U-shaped arch. This simple design holds a fire underneath a stainless steel pan, allowing you to boil large amounts of sap efficiently outdoors. It’s a low-cost, effective solution for turning your maple sap into delicious homemade syrup.
Hello, friends! Md Meraj here. If you’ve ever tasted real maple syrup, you know it’s liquid gold. Tapping your own trees and making syrup at home is one of the most rewarding projects you can do. But many beginners face a big challenge: boiling the sap. It takes a lot of boiling to get a little syrup, and doing it indoors can steam up your entire house!
Don’t worry, there’s a simple, brilliant solution you can build yourself. This guide will show you, step-by-step, how to make an affordable and effective outdoor sap evaporator. You don’t need fancy tools or expert skills. I’ll walk you through everything, making it easy and fun. Let’s get started!
Why You Need a DIY Evaporator
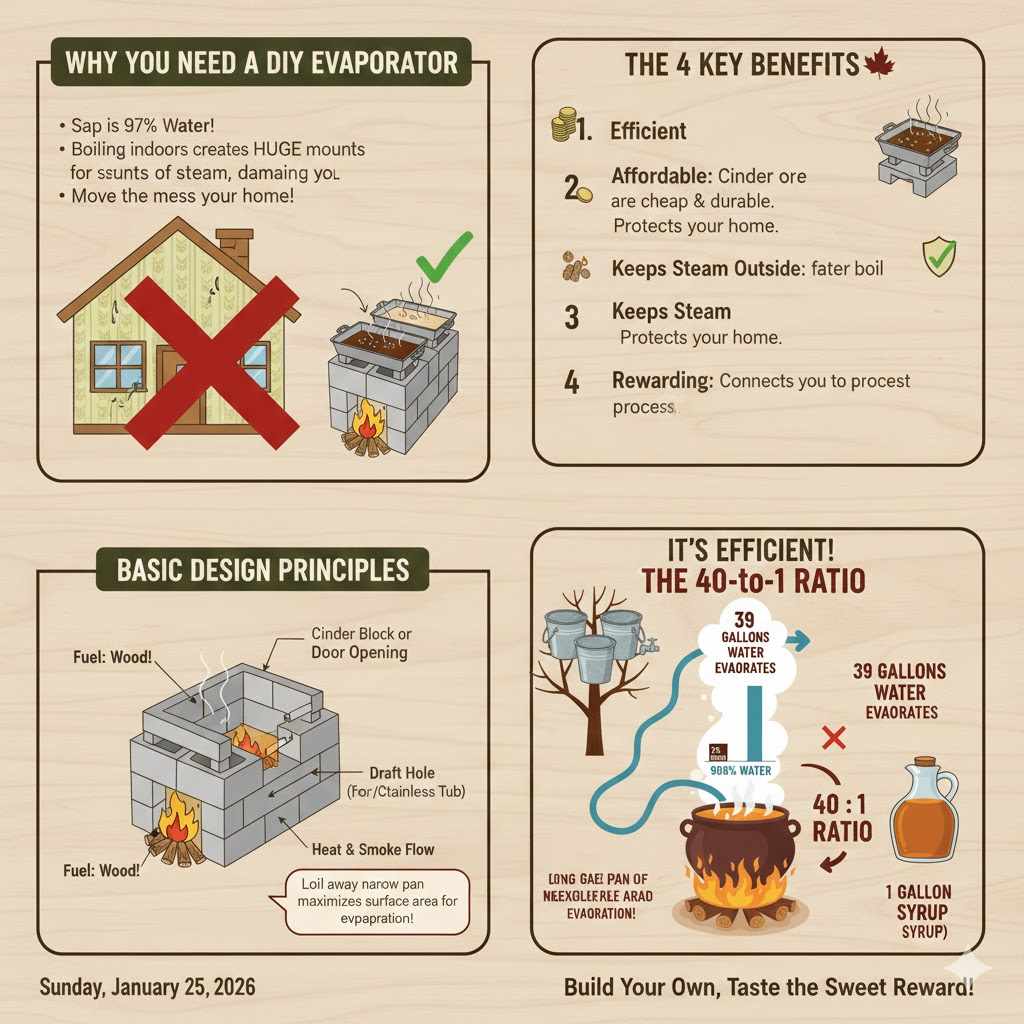
Making maple syrup is all about removing water from tree sap. Sap from a maple tree is only about 2-3% sugar. The rest is water. To turn it into syrup, you need to boil away that water until the sugar content reaches about 66%. This means for every 40 gallons of sap you collect, you’ll get about one gallon of syrup.
That is a huge amount of steam! Trying to boil that much sap on your kitchen stove is a big mistake. The steam can peel wallpaper, damage cabinets, and make your home feel like a sauna. An outdoor evaporator solves this problem completely.
Here are the key benefits of building your own:
- It’s Affordable: You can build a very effective evaporator for a fraction of the cost of a commercial one. Cinder blocks are inexpensive and durable.
- It’s Efficient: This design directs heat right to the bottom of your pan, making the boil faster and using less firewood.
- It Keeps Steam Outside: You protect your home from moisture damage by keeping the whole process outdoors where it belongs.
- It’s Rewarding: There is immense satisfaction in building the tool that helps you create something delicious from scratch. It connects you to the entire process.
The Brilliant & Simple Cinder Block Design
The best DIY maple sap evaporator for a beginner is the cinder block arch. An “arch” is just the structure that holds the fire and supports the evaporating pan. It’s wonderfully simple: you stack cinder blocks to create a long channel. You build a fire inside this channel, and your sap pan sits on top.
The U-shape of the blocks forces all the heat and smoke to travel under the length of the pan and out a chimney at the back. This maximizes heat transfer, giving you a strong, rolling boil. It’s a design that has been used for generations because it works so well and is incredibly easy to set up and take down.
Safety First: A Word of Caution
Before we grab a single cinder block, let’s talk about safety. We are working with a very hot fire and boiling liquids. A little bit of care goes a long way.
- Location is Key: Set up your evaporator on level ground, far away from your house, garage, shed, or any trees with low-hanging branches. Clear a 10-foot radius around the evaporator of any flammable materials like dry leaves or grass.
- Have a Fire Extinguisher Ready: Keep a fire extinguisher, a bucket of water, or a garden hose nearby at all times. You hope you never need it, but you’ll be glad you have it if you do.
- Never Leave it Unattended: A fire can get out of control quickly. Always have a responsible adult watching the evaporator when it is running.
- Wear Protective Gear: Use heavy-duty work gloves or welding gloves when adding wood to the fire. The blocks and metal pan will get extremely hot.
- Handle Hot Syrup Carefully: Boiling sap is hotter than boiling water. Be extremely careful when moving pans or transferring the near-syrup indoors.
Gathering Your Materials and Tools
The beauty of this project is its short and simple materials list. You can find most of these items at your local hardware or building supply store.
Materials List
| Item | Quantity | Notes |
|---|---|---|
| Standard Cinder Blocks | 24-30 | The 8x8x16 inch size works perfectly. Don’t use decorative or lightweight blocks. |
| Evaporator Pan | 1 or 2 | Stainless steel steam table pans (hotel pans) are a fantastic choice. They are food-safe, durable, and affordable. |
| Metal Stove Pipe | 4-6 feet | A 6-inch diameter pipe works well for the chimney. Get a cap to keep rain out. |
| Sturdy Metal Grate (Optional) | 1 | An old oven rack or a piece of heavy-duty metal mesh will lift the fire off the ground for better airflow. |
Tools You’ll Need
- Level
- Shovel or Rake
- Heavy-Duty Work Gloves
- Safety Glasses
That’s it! No power tools, no complicated cuts. Just simple stacking.
Step-by-Step: Building Your Cinder Block Evaporator
Alright, let’s get building! This should only take you about 30 minutes to an hour to assemble. Remember to wear your gloves and safety glasses.
Step 1: Choose and Prepare Your Location
Find a spot that is flat and clear of any flammable materials. A patch of dirt, gravel, or a patio area is ideal. Use your shovel or rake to clear the ground and make sure it is as level as possible. A solid, level base is crucial for stability, especially when your pan is full of hot sap.
Step 2: Lay the First Course of Blocks
Your goal is to create a long U-shaped channel that is slightly narrower than your evaporator pan. Your pan will need to rest on the edges of the blocks with a 1-inch overhang on each side.
Let’s say your pan is 20 inches wide. You will want the inside of your channel to be around 18 inches wide. Start by laying the blocks on their sides, with the holes facing up and down. Create two parallel rows. Check them with a level to ensure they are stable.
Step 3: Build Up the Walls
Now, stack a second layer of cinder blocks on top of the first. To make the structure strong, stagger the joints just like you would with bricks. This means the block on top will sit across the joint of the two blocks below it. Continue building until your walls are two blocks high. This height provides enough space for a good fire underneath your pan.
For more detailed information on proper masonry stacking techniques, you can check resources from established building organizations, though for this temporary structure, simple staggering is enough.
Step 4: Form the Back Wall and Chimney Base
At the back end of your two walls, place blocks to close off the “U” shape. This will be the base for your chimney stack. Leave a square opening in the center that is about the size of your stove pipe. You can do this by turning a block on its side or leaving a gap. This hole is where the smoke will exit.
Step 5: Add a Grate for Your Fire (Recommended)
This step is optional, but I highly recommend it. Laying a sturdy metal grate on the bottom of your firebox (the inside of the arch) does wonders for your fire. It lifts the wood off the ground, allowing air to get underneath. Better airflow means a hotter, cleaner, and more efficient fire. An old oven rack works great for this.
Step 6: Install the Chimney
Place your metal stove pipe over the hole you left in the back wall. You can use a few rocks or small pieces of metal to prop it up and keep it stable if needed. A chimney helps create a draft, which pulls air through the firebox and smoke out and away from you. A taller chimney (4-6 feet) creates a better draft.
Step 7: Place Your Pan and Seal the Gaps
Gently place your evaporator pan on top of the block walls. It should sit securely with a slight overhang on each side. You will notice small gaps between the pan and the blocks. It’s a good idea to seal these to prevent heat from escaping. You can use aluminum foil, wood ash, or a bit of dirt to plug these gaps. This forces all the heat to stay under the pan where it belongs.
Your brilliant and simple DIY maple sap evaporator is now complete! It’s ready for a test fire and its first batch of sap.
How to Use Your New Evaporator
Building it is half the fun—now it’s time to make some syrup. The process is straightforward but requires patience and attention.
The Evaporation Process at a Glance
- Start Your Fire: Build a fire in the firebox using dry, seasoned hardwood like oak, maple, or ash. Softwoods like pine will burn too fast and create a lot of smoke. Start small and gradually add larger pieces of wood until you have a nice bed of hot coals.
- Add Your Sap: Once the fire is going strong, fill your pan with about 2-3 inches of sap. Never put an empty pan over a hot fire, as this can damage or warp the metal.
- Maintain a Rolling Boil: Your goal is to keep the sap at a hard, rolling boil. This is what drives off the water vapor. Add wood to the fire as needed to maintain the heat. As the sap level drops, continue to add more sap. Try to pre-warm the sap you are adding by keeping it in a bucket near the evaporator. Adding cold sap can shock the boil and slow you down.
- Skim the Foam: As the sap boils, a light brown foam will form on the surface. This is made of natural minerals and proteins that you want to remove. Use a long-handled spoon or a skimmer to gently remove this foam. A clean boil makes for a cleaner, better-tasting syrup.
- Watch the Color and Bubbles: As more water evaporates, the sap will begin to change. It will darken in color, and the bubbles will get smaller, thicker, and stack up on each other. This is your sign that it’s getting close to becoming syrup.
- Finish the Syrup Indoors: This is a crucial step for quality control. Once the liquid in your pan has noticeably thickened and darkened, it’s time to take it off the big fire. Transfer the concentrated liquid to a smaller pot and bring it inside to finish on your kitchen stove. It’s much easier to control the temperature indoors and prevent scorching. You can learn more about finishing syrup from resources like the Penn State Extension, which offers excellent guides for beginners.
Use a candy thermometer to finish the syrup. Maple syrup is finished when it reaches 7 degrees Fahrenheit above the boiling point of water. Because water boils at different temperatures depending on your altitude, you should test your thermometer in a pot of plain boiling water first. For example, if water boils at 212°F at your location, syrup is done at 219°F.
Tips for Maple Sugaring Success
Here are a few extra tips to help you on your first boil:
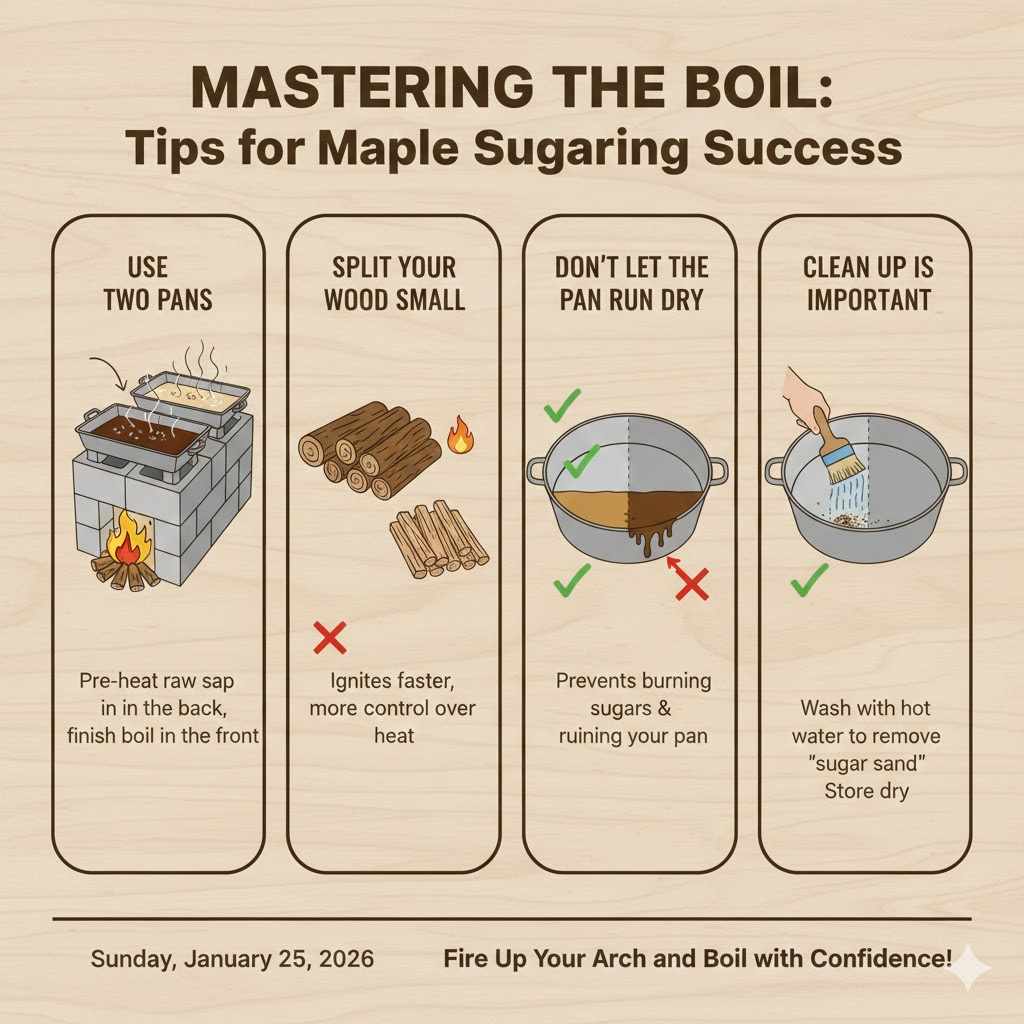
- Use Two Pans: Many people use a two-pan system. The back pan is for pre-heating the raw sap, and the front pan (closest to the firebox opening) is for the main boil. You can then transfer the warm sap from the back to the front.
- Split Your Wood Small: Smaller splits of wood will catch fire faster and give you more control over the heat.
- Don’t Let the Pan Run Dry: If the sap level gets too low, the sugars will burn, and you’ll ruin your pan and your syrup. Always keep an eye on the sap level.
- Clean Up is Important: Once your pan has cooled completely, wash it thoroughly with hot water. Any leftover sugar residue, known as “sugar sand,” should be scrubbed out before your next use.
Frequently Asked Questions (FAQ)
How much sap does it take to make one gallon of syrup?
The general rule is that it takes about 40 gallons of maple sap to produce one gallon of finished maple syrup. This 40:1 ratio can vary depending on the sugar content of your sap, which changes based on the type of tree, the weather, and the time of the season.
What kind of wood is best for the fire?
Use dense, seasoned hardwoods for your fire. Woods like oak, maple, hickory, or ash burn hot and create long-lasting coals. Avoid softwoods like pine or spruce, as they burn too quickly and can leave a resinous taste in the syrup.
Can I use any metal pan for boiling?
You should only use food-grade stainless steel pans. Do not use aluminum, as the acidic sap can react with the metal. Galvanized pans are dangerous, as the coating can release toxic fumes when heated. Stainless steel steam table pans, also called hotel pans, are perfect because they are safe, affordable, and conduct heat well.
How do I know when the syrup is done?
The most accurate way is to use a thermometer. Syrup is finished when it reaches a temperature of 7°F (or about 4°C) above the boiling point of water. You can also look at how the liquid “sheets” off a spoon. When it drips off in a wide sheet rather than individual drops, it’s very close.
Is it safe to use cinder blocks for a fire?
Standard, heavy-duty cinder blocks (concrete masonry units) are generally safe for a temporary structure like this. However, you should be aware that repeated, intense heating and cooling can eventually cause them to crack or degrade over time. Never use lightweight or decorative blocks, as they may not withstand the heat. Always inspect your blocks before each season.
Can I leave my evaporator running overnight?
Absolutely not. You must never leave an active fire unattended. The risk of fire spreading is too great. Plan your boiling days so you can be present from start to finish. If you need to stop, you can let the fire die down and cover your sap to continue the next day.
A Sweet and Satisfying Project
There you have it—a complete guide to building and using your very own DIY maple sap evaporator. This simple cinder block design is the perfect starting point for any backyard sugarmaker. It’s proof that you don’t need expensive equipment to participate in this wonderful tradition. You just need a bit of creativity, some hard work, and a love for that sweet, golden syrup.
Building this evaporator is more than just a project; it’s about creating an experience. The smell of woodsmoke in the crisp late-winter air, the sound of the bubbling sap, and the joy of tasting the first batch of syrup you made with your own hands—it’s truly special. I hope this guide gives you the confidence to get out there and start your own sugaring adventure. Happy boiling!