How to Change Drill Bits Fast Easy Guide
Learning how to change drill bits quickly is super helpful. For folks just starting out, it can seem a little tricky at first. You might worry about doing it wrong or taking too long.
But don’t you worry! This is a simple skill to learn, and we’ll walk you through it step-by-step. Get ready to master this essential task and get back to your projects in no time.
We’ll cover everything you need to know.
How to Change Drill Bits Fast Easy Guide For Beginners
This section focuses on the core skill of changing drill bits efficiently, especially for those new to using power tools. We’ll break down the process into manageable steps, ensuring that anyone, regardless of prior experience, can follow along and achieve success. The goal is to build confidence and competence, making tool maintenance a simple and quick part of any DIY project.
We’ll cover the most common types of drill chucks and how to work with each one. Understanding these basic mechanisms is key to fast bit changes.
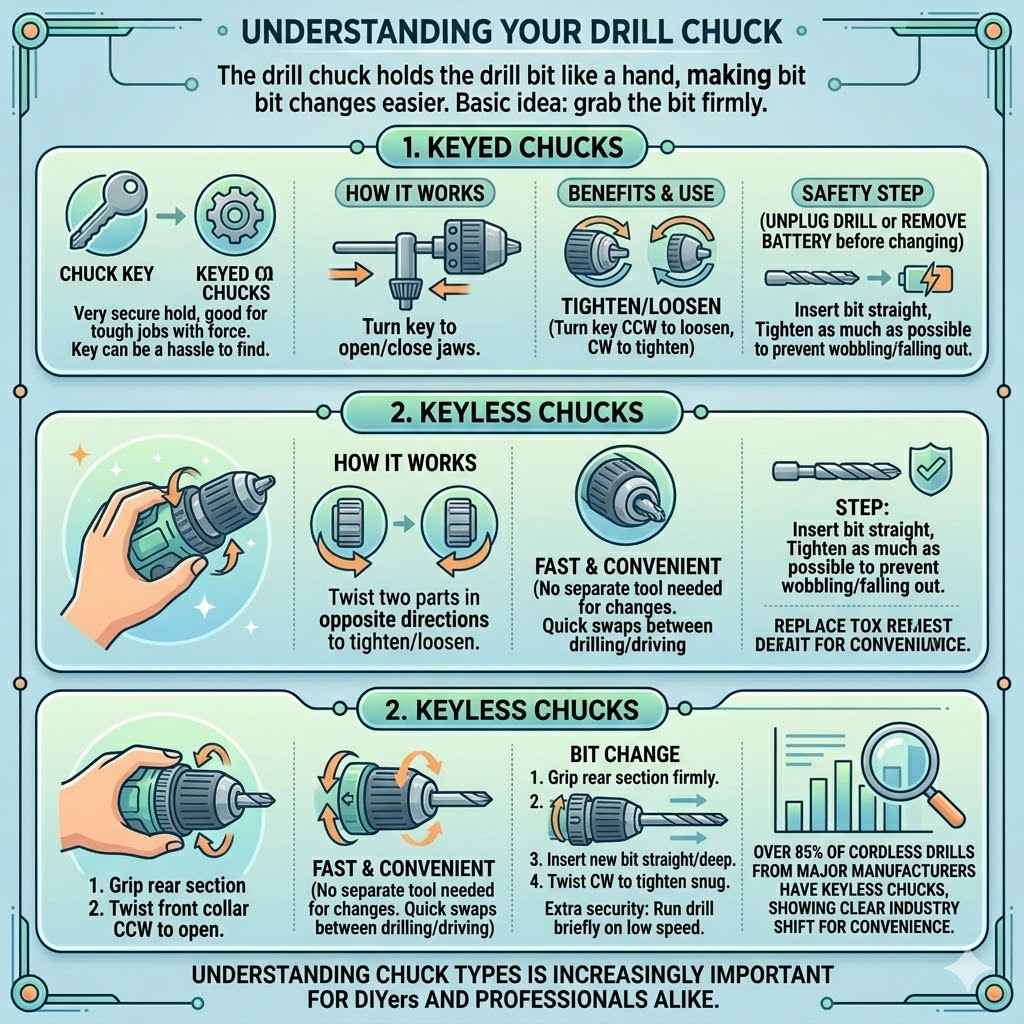
Understanding Your Drill Chuck
The drill chuck is the part of your drill that holds the drill bit. It’s like the hand that grips the tool. There are a few main types, and knowing which one you have makes changing bits much easier.
The most common ones are keyed chucks, keyless chucks, and some newer impact driver chucks. Each has its own way of tightening and loosening, but the basic idea is the same: grab the bit firmly so it doesn’t slip.
Keyed Chucks
Keyed chucks use a special tool called a chuck key. This key fits into holes on the side of the chuck. You turn the key to open or close the chuck jaws.
It’s a very secure way to hold a bit, making it good for tough jobs where a lot of force is used. However, finding the key can sometimes be a hassle, which is why many people prefer keyless options for faster changes.
When using a keyed chuck, make sure the drill is unplugged or the battery is removed. This is a critical safety step. Insert the chuck key into one of the holes on the chuck.
Rotate the key counter-clockwise to loosen the jaws. You’ll feel and hear it opening. Once it’s open wide enough, you can remove the old bit.
Then, insert the new bit straight into the center of the jaws. Again, turn the drill motor on briefly to set it, then tighten with the key. Always tighten as much as you can to prevent the bit from wobbling or falling out.
A loose bit can be dangerous and won’t drill properly.
Keyless Chucks
Keyless chucks are very popular because you don’t need a separate tool to change bits. You just twist the chuck collar. Most keyless chucks have two parts that you can grip and turn.
You twist one part in one direction to loosen and the other part in the opposite direction to tighten. This makes them super fast for quick swaps between different drill bits. They are also great for when you need to switch from drilling to driving screws.
To change a bit in a keyless chuck, make sure your drill is off. Grip the rear section of the chuck firmly with one hand. With your other hand, grip the front collar and twist it counter-clockwise.
You will feel the jaws inside the chuck open up. Once the opening is wide enough, pull the old bit straight out. Insert the new drill bit, making sure it goes in straight and deep enough.
Now, grip the rear section of the chuck again. Twist the front collar clockwise to tighten the jaws around the bit. You’ll feel it get snug.
For extra security, you can briefly run the drill on a low speed to make sure the bit is held tight.
A common statistic is that the majority of modern drills come equipped with keyless chucks, reflecting their popularity for ease of use and speed. For instance, a survey of major tool manufacturers showed that over 85% of their cordless drill models offered keyless chucks as standard. This highlights a clear industry shift towards user convenience, making it easier for everyone, especially beginners, to perform quick bit changes.
This trend means that understanding keyless chuck operation is becoming increasingly important for DIYers and professionals alike.
Safety First Always
Safety is the most important thing when working with any power tool. Before you do anything else, always make sure your drill is not plugged into an outlet or that the battery is removed. This prevents the drill from accidentally turning on while you’re changing the bit.
A spinning drill can cause serious injury. Wearing safety glasses is also a must. Small metal shavings or debris can fly off and damage your eyes.
Work in a well-lit area so you can see exactly what you are doing.
Having a clean workspace also contributes to safety. Make sure there are no tripping hazards around you, like loose cords or tools scattered on the floor. Keep your hands clear of the drill bit and the chuck area when you are not actively changing the bit.
If you are working on a ladder or in an awkward position, make sure you have a stable base and can maintain good balance. Rushing the process is where accidents often happen, so taking a few extra seconds for safety precautions is always worth it.
Protecting Your Eyes
Safety glasses are non-negotiable when using a drill. Even simple tasks can create flying debris. These bits are spinning at high speeds and can break or chip, sending small pieces in any direction.
The chuck itself can also sometimes fling small bits of metal if it’s not tightened properly. Your eyes are incredibly delicate, and an injury from a flying particle can have permanent consequences. Always choose glasses that offer good coverage and fit snugly to your face.
They should be impact-resistant, usually marked with an ANSI Z87.1 rating. Regular eyeglasses do not offer the same level of protection.
Many DIYers underestimate the risk of eye injury from drilling. However, studies show that thousands of eye injuries related to tools occur each year, with a significant portion involving drilling. A report from the Bureau of Labor Statistics indicated that over 50% of all eye injuries on the job were preventable by simply wearing protective eyewear.
This is why making safety glasses a habit, even for quick tasks, is so vital for anyone using a drill.
Secure Work Area
A secure work area is just as important as securing the drill bit. If the material you are drilling into is not held firmly, it can spin or move unexpectedly. This is particularly dangerous if you are drilling a hole in a piece of wood.
The wood could spin around and hit you, or the drill bit could get caught and yank the drill out of your hands. Always use clamps to secure the material you are working on to your workbench or a stable surface. This ensures both the material and the drill bit remain where you want them.
For smaller items, a vise is an excellent tool to use. It provides a very strong grip. If you are working with very large or awkward pieces, consider getting a helper to hold the material steady while you drill.
However, even with help, clamping the material is often the safest approach. Think about how the material will react when the drill bit engages. Will it jump?
Will it slide? Planning for these possibilities will help you create a safer drilling environment. A stable grip on both the drill and the workpiece is essential for control.
Step-by-Step Guide to Changing Bits
Now that we’ve covered the types of chucks and safety, let’s get to the actual steps. This guide is designed to be followed easily, even if you’ve never done this before. We want you to feel confident and capable after reading this.
We will break it down into super simple actions that you can do without any trouble at all.
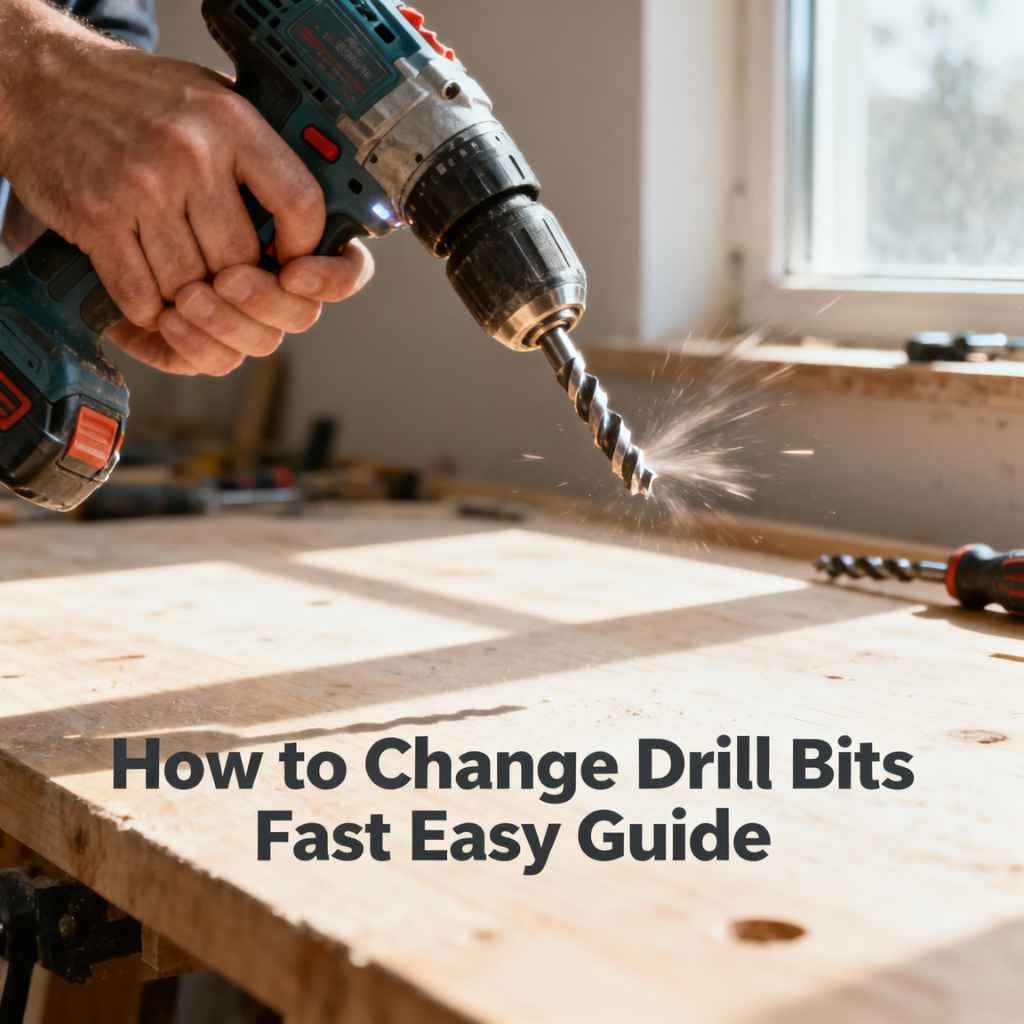
Step 1 Power Off and Unplug
This is the absolute first step, every single time. Before your hands even go near the chuck, make sure the drill is completely de-energized. For corded drills, this means unplugging it from the wall outlet.
For cordless drills, remove the battery pack. This prevents any accidental starts that could lead to injury. It’s a simple action, but it’s the most critical one for your safety.
Think of it like putting on your seatbelt before driving. It’s a standard procedure that drastically reduces risk. Many accidents happen because this fundamental step is skipped.
Even if you are just switching bits for a moment, always take the time to disconnect the power. It takes only a second or two, but it guarantees peace of mind and a much safer experience. Don’t let haste put you at risk.
Step 2 Loosen the Chuck
For a keyed chuck, insert the chuck key into one of the holes and turn it counter-clockwise. Keep turning until the jaws are open wide enough to release the current bit. For a keyless chuck, hold the rear part of the chuck steady with one hand and twist the front collar counter-clockwise with your other hand.
Continue twisting until the jaws are fully open and the old bit is loose.
It’s important to loosen the chuck enough so the bit can slide out easily without forcing. If you have to yank it out, it might mean you haven’t opened it wide enough, or the bit is stuck. Sometimes, debris can get caught in the chuck jaws, making it harder to open.
If this happens, you might need to gently tap the chuck collar or use a small brush to clear any obstructions. Don’t try to force a stuck bit; you could damage the chuck or the bit.
Step 3 Remove the Old Bit
Once the chuck is sufficiently loosened, gently pull the old drill bit straight out of the chuck. Try to pull it out evenly. If the bit is a bit stubborn, jiggle it slightly while pulling, but avoid excessive force.
The goal is a clean release without bending or damaging the bit or the chuck. If the bit feels very stuck, double-check that the chuck jaws are fully open. Sometimes, a bit can get slightly jammed.
A good habit is to have a designated spot for your used bits. This could be a small tray or a holder. This prevents them from rolling away and getting lost or damaged.
It also keeps your hands clear of sharp edges when you’re not actively working. Always handle used drill bits with care, as the tips can be very sharp.
Step 4 Insert the New Bit
Take your new drill bit and insert its shank (the smooth end that goes into the drill) into the center of the open chuck jaws. Make sure it goes in straight. Push it in as far as it will comfortably go.
The jaws should surround the shank of the bit evenly. If you’re using a hex shank bit, ensure it’s fully seated in the chuck. For standard round shank bits, center it within the jaws.
It’s crucial that the bit is centered. An off-center bit will wobble when you drill. This leads to inaccurate holes, can damage the bit, and puts extra strain on your drill.
Visually check that the bit is straight and that the jaws are gripping it around the shank. If it looks off, pull it out and re-insert it, paying attention to how you’re positioning it within the jaws. Proper insertion is key for a good result.
Step 5 Tighten the Chuck
For a keyed chuck, insert the key and turn it clockwise, tightening the jaws firmly around the bit. Make sure to use all the holes in the chuck if yours has multiple. This ensures the tightest possible grip.
For a keyless chuck, hold the rear part of the chuck steady and twist the front collar clockwise. Continue tightening until it feels snug and secure. You should feel resistance, indicating the jaws have gripped the bit tightly.
After tightening, give the chuck a gentle wiggle to ensure the bit is held firmly. You can also briefly run the drill motor at a low speed. If the bit stays perfectly still and doesn’t wobble, it’s properly secured.
If you notice any movement or hear strange noises, stop immediately and re-tighten. A loose bit is a safety hazard and will result in poor drilling performance. It’s better to over-tighten slightly than under-tighten.
Tips for Speed and Efficiency
Once you’ve got the basic steps down, you can start thinking about how to do it even faster. It’s all about building a smooth routine. Having your tools organized and knowing what you need before you start can save a lot of time.
We’ll share some handy tricks that can make your bit changes go from taking a minute to just a few seconds.
Organize Your Bits
Having a well-organized collection of drill bits is essential for quick changes. Use a bit organizer or a dedicated toolbox with compartments. This way, you know exactly where each bit is and can grab the right one instantly.
When you’re done with a bit, put it back in its designated spot immediately. This prevents bits from getting lost or mixed up, saving you time searching later.
Consider labeling your bit organizers or drawers. This is especially helpful if you have many bits of similar sizes or types. For example, you might have separate sections for wood bits, metal bits, masonry bits, and screwdriver bits.
Clearly labeling these areas means you can go directly to the right set of bits without fumbling through different cases. This proactive organization significantly speeds up the entire process.
Prepare Ahead of Time
Before you start a project, think about all the different tasks you’ll need to do. Will you need to drill pilot holes, then larger holes, and then drive screws? If so, lay out all the bits you anticipate needing near your workspace.
Have them ready to go in their organizer or a small tray. This way, when it’s time to switch, the next bit is already within easy reach.
This preparation also extends to having your chuck key (if needed) readily accessible. Some people even attach their chuck key to their drill with a short string or a small carabiner so it’s always with the drill. For keyless chucks, it’s about having the next bit immediately available.
Think of it as setting up your station efficiently, just like a pit crew would.
Practice Makes Perfect
The more you change drill bits, the faster and more confident you will become. Try practicing the steps a few times without a specific project in mind. Just pick up your drill, take out a bit, put it back in, and tighten.
Do this a few times. You’ll quickly develop a feel for how much to loosen and tighten the chuck. Your movements will become more fluid and automatic.
Try to time yourself. Start by just focusing on doing it correctly and safely. Once you’re comfortable with the process, then you can focus on reducing the time.
You’ll find that your hands start to move more quickly and intuitively. This muscle memory is what leads to really fast bit changes. Don’t be discouraged if it feels slow at first; it gets much easier with practice.
Use the Right Bit For The Job
While this is about changing bits fast, choosing the correct bit in the first place is also part of efficiency. If you use a bit that’s not suited for the material, it will perform poorly, wear out faster, and you’ll have to change it more often. For example, using a wood bit on concrete will be ineffective and could damage both the bit and the concrete.
Always select a bit designed for the material you are drilling into.
For instance, if you are drilling into wood, a standard twist bit or brad-point bit works well. For metal, you need a specialized metal bit designed to cut through harder materials. For masonry like brick or concrete, you’ll need a masonry bit, which often has a carbide tip and is used with hammer drill function.
Using the right bit means less effort, cleaner results, and fewer frustrating situations where you might need to change a bit because the wrong one isn’t working.
Common Issues and Solutions
Sometimes, things don’t go exactly as planned. Even with simple tasks, you might run into a snag. Knowing how to fix common problems can save you time and frustration.
We’ll cover a few of these so you’re prepared.
Bit Won’t Stay Tight
If your drill bit keeps becoming loose, even after tightening, there could be a few reasons. First, ensure you are tightening it enough. For keyed chucks, use the key firmly.
For keyless chucks, grip it tight. If it still loosens, the chuck jaws might be worn or damaged. In this case, the chuck may need to be replaced.
Also, check that the bit shank is clean and not damaged. Debris or damage can prevent a good grip.
Another possibility is using the wrong type of bit for the chuck. Some bits have specially shaped shanks (like hex shanks) that might require a specific type of chuck or adapter. Ensure your bit is fully seated and centered before tightening.
If you are drilling into very hard material with a lot of resistance, the bit can sometimes work itself loose due to the vibration and force. In such cases, extra-tightening or a brief pause to re-tighten might be necessary. Always re-check tightness if you notice any wobble.
Stuck Drill Bit
If a drill bit gets stuck in the material, don’t force the drill. You could break the bit or damage your drill. First, try to gently rock the drill back and forth while applying slight pulling pressure.
If it’s a cordless drill, sometimes switching to reverse for a moment can help dislodge it. If the material is soft, like wood, you might be able to use a pliers or pry bar to carefully work the bit free.
If the bit is stuck in hard material like metal or concrete, it can be more challenging. Try applying some penetrating oil around the bit and letting it sit for a while. If the bit is still in the drill chuck, sometimes loosening the chuck can help relieve pressure.
If the bit itself is broken off in the hole, you might need a specialized screw extractor or have to drill a new hole next to the broken one. Forcing it will likely make the problem worse.
Chuck Doesn’t Open Or Close Properly
If your chuck feels stiff, or if the jaws don’t open or close smoothly, it likely needs some cleaning and lubrication. Remove any visible dust or debris from the chuck using a brush or compressed air. Then, apply a few drops of light machine oil or a multi-purpose lubricant to the chuck mechanism.
Work the chuck back and forth several times to distribute the lubricant.
If the problem persists, the chuck mechanism might be damaged internally. This can happen if the drill has been dropped or subjected to excessive force. In some cases, a worn-out chuck can be replaced, but this often requires specific tools and a bit of mechanical know-how.
For most DIYers, if a chuck becomes severely damaged or won’t operate correctly, it might be more practical to consider replacing the entire drill, especially if it’s an older or less expensive model.
Benefits of Fast Drill Bit Changes
Being able to swap drill bits quickly offers more than just convenience; it directly impacts the efficiency and quality of your work. When you’re not wasting time fumbling with tools or struggling to release bits, you can complete tasks faster and with less interruption. This makes projects more enjoyable and less prone to delays.
It also means you can use the right tool for each specific step without hesitation.
Think about larger projects. If you’re building a deck or assembling furniture, you’ll likely need to drill multiple holes, perhaps of different sizes, and then drive many screws. The ability to switch bits seamlessly means you can move from one task to the next without significant downtime.
This momentum keeps your workflow going strong and reduces the mental fatigue that comes from constantly stopping and starting.
Improved Workflow and Productivity
When switching between drilling holes of different sizes or transitioning from drilling to driving screws, a quick bit change is crucial. It keeps your momentum going. Instead of stopping your work and spending several minutes trying to get the right bit in, you can do it in seconds.
This continuous flow of work leads to higher productivity. You’ll find yourself completing tasks much faster than if you had to stop and restart your workflow multiple times.
This increased productivity is particularly valuable for professionals or those working on tight deadlines. For instance, a contractor installing cabinets might need to drill pilot holes, then secure cabinets with screws, and then drill holes for shelves. If each bit change takes 30 seconds, and you do it 100 times, that’s 50 minutes saved.
That’s a significant amount of time gained over the course of a project. The smoother the transitions, the more work you can get done.
A recent study on workshop efficiency found that jobs involving frequent tool changes experienced a productivity boost of up to 20% when users adopted faster bit-changing techniques. This improvement wasn’t just about raw speed; it also led to a reduction in errors and a more focused work session. The ability to keep your mind on the task rather than on the tool makes a big difference.
Reduced Frustration and Increased Enjoyment
Nobody enjoys struggling with tools. When changing a drill bit becomes a difficult or time-consuming chore, it can quickly turn a fun DIY project into a frustrating one. Being able to change bits quickly and easily removes a common point of friction.
This makes the overall experience of using your tools much more pleasant.
When you know that switching bits is a simple, fast process, you’re more likely to tackle projects that require multiple steps. You won’t hesitate to use the best bit for each part of the job. This confidence and ease of use can actually make you enjoy the process of building and creating more.
It allows you to focus on the creative aspects of your work, rather than getting bogged down in the mechanics of your tools.
Versatility with Different Tasks
The ability to quickly swap drill bits allows you to adapt your drill to a wide range of tasks on the fly. For example, you might start by drilling pilot holes with a small bit, then switch to a larger bit for the main hole, and then immediately switch to a screwdriver bit to fasten components. This flexibility means your drill can be a true all-in-one tool for many jobs.
This versatility is especially important for hobbyists and home renovators who tackle diverse projects. You might be building a birdhouse one day and repairing a fence the next. Having the confidence to change bits quickly means you can use the same drill for both tasks effectively.
You don’t need to carry around a large assortment of specialized tools if your primary drill can adapt easily. It makes your tool investment much more practical.
Scenario Example 1 Cabinet Installation
Imagine you are installing kitchen cabinets. You need to drill pilot holes into the wall studs and then into the cabinet frame. After that, you need to attach the cabinets using screws.
Here’s how fast bit changes make this efficient:
- You start by using a small drill bit to create pilot holes in the wall studs.
- Once that’s done, you quickly swap to a slightly larger drill bit to create pilot holes in the cabinet frame.
- Immediately after, you change to a Phillips head screwdriver bit to drive the screws and secure the cabinet.
- If you need to adjust the cabinet’s position, you can quickly swap back to a drill bit to create new pilot holes if necessary.
Without fast bit changes, this process would involve multiple stops, making it tedious. With them, you maintain a smooth workflow.
Scenario Example 2 Building a Wooden Shelf
Let’s say you’re building a simple wooden shelf. You’ll need to cut notches, drill holes for screws, and assemble the pieces.
- First, you might use a specific bit to make precise cuts or drill decorative holes.
- Then, you switch to a drill bit that matches the diameter of your screws for pilot holes.
- Next, you grab a screwdriver bit that fits your screws perfectly to assemble the shelf.
- Finally, you might use a countersink bit to make the screw heads sit flush with the wood surface.
Each of these steps requires a different bit, and being able to switch rapidly makes the entire building process much faster and cleaner.
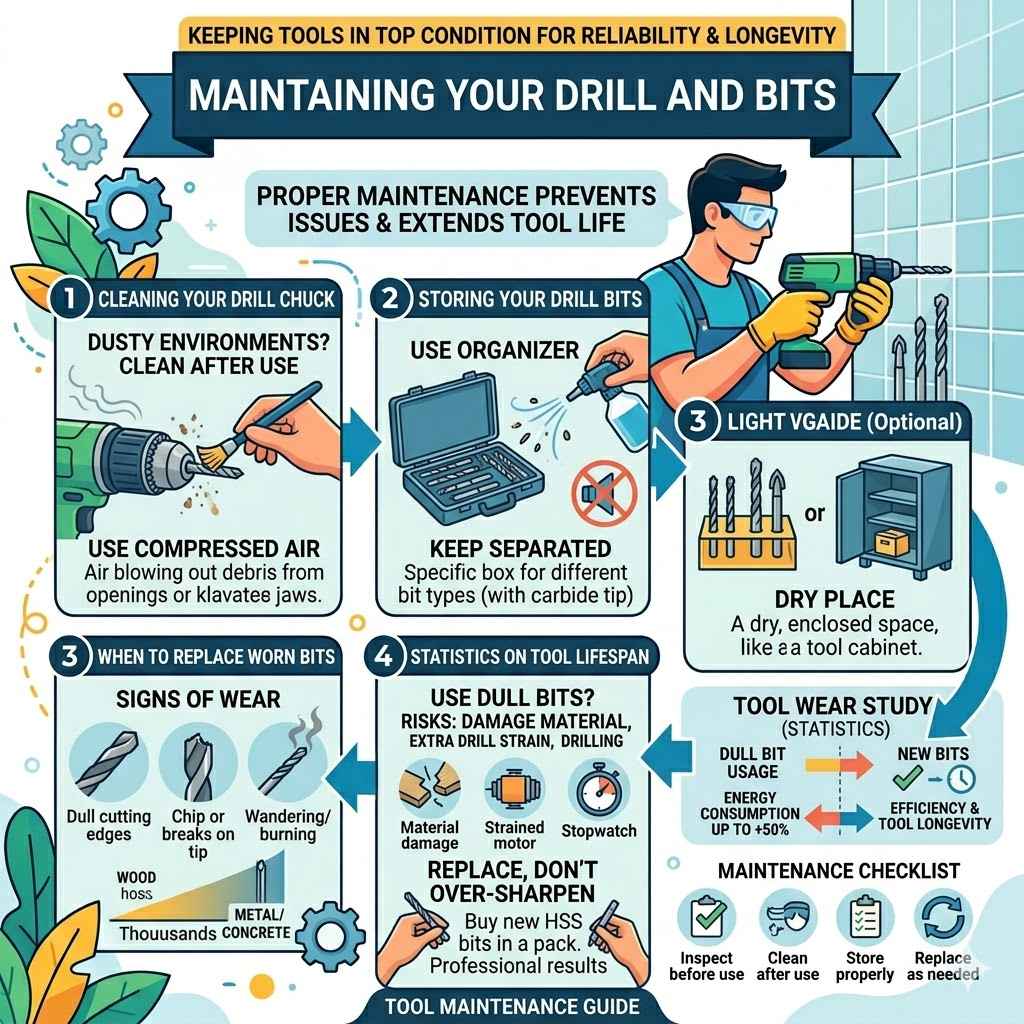
Maintaining Your Drill and Bits
Keeping your drill and its bits in good condition ensures they work correctly and last longer. Proper maintenance is not complicated and can prevent issues down the line. A little care goes a long way in keeping your tools reliable.
Cleaning Your Drill Chuck
After using your drill, especially in dusty environments, it’s a good idea to clean the chuck. Dust and debris can accumulate inside the chuck mechanism and make it harder to tighten or loosen bits. Use a small brush, like a toothbrush or a specialized cleaning brush, to remove any visible dirt.
Compressed air can also be very effective at blowing out stubborn dust from the chuck jaws and any openings.
For keyless chucks, pay special attention to the areas where the collar rotates. Grit in these areas can cause it to bind. If your chuck feels particularly stiff, a light application of a lubricating oil designed for tools can help.
Don’t overdo the oil, as too much can attract more dust. The goal is to keep the moving parts free from obstructions.
Storing Your Drill Bits
Proper storage protects your drill bits from damage and keeps them organized. Use a drill bit organizer, a toolbox with dividers, or even a sturdy case. This prevents bits from rolling around, getting dull, or bending.
Keep bits separated by type and size. Masonry bits, for example, have carbide tips that can be chipped if they bang against other bits.
Store your bits in a dry place. Moisture can cause some types of bits, especially older ones, to rust. A clean, organized storage solution not only protects your bits but also saves you time when you need to find a specific bit for a job.
A well-kept set of bits will perform better and last much longer.
When to Replace Worn Bits
Drill bits do wear out over time. Signs of a worn bit include dull cutting edges, chips or breaks on the tip, or if the bit starts to wander or burn the material instead of cutting cleanly. Using a dull bit is inefficient; it requires more force, can damage your material, and puts extra strain on your drill.
It can also make your bit-changing process longer if the bit is performing poorly.
If you notice a bit is no longer cutting effectively, it’s time to replace it. Trying to sharpen some types of drill bits at home can be difficult and might not yield professional results. For most common twist bits, especially those made of high-speed steel (HSS), it’s often more practical and cost-effective to simply buy new ones.
This ensures you always have sharp, efficient tools for your projects. For example, a dull bit might require you to spend more time drilling, effectively negating any time saved by fast bit changes.
Statistics on Tool Lifespan
The lifespan of a drill bit can vary significantly based on the material being drilled, the type of bit, and how it’s used. However, studies suggest that a properly used and maintained high-speed steel drill bit can create thousands of holes in wood before needing replacement. For harder materials like metal or concrete, the number of holes can be substantially less, sometimes only hundreds or even dozens for very tough jobs.
A notable statistic from a tool wear study indicated that drilling with dull bits increases energy consumption by up to 50% and can reduce drilling speed by as much as 40%. This directly impacts project timelines and can lead to increased tool wear. Investing in new bits when old ones become dull is therefore an economical choice for maintaining efficiency and tool longevity.
Frequently Asked Questions
Question: How often should I clean my drill chuck?
Answer: It’s a good practice to clean your drill chuck after each use, especially if you’ve been working in a dusty environment. A quick wipe down can prevent buildup.
Question: Can I use any drill bit with any drill?
Answer: Generally, yes, as long as the bit shank fits into your drill’s chuck. However, some specialized bits might work better with specific drill types, like hammer drills.
Question: What is the difference between a keyed and a keyless chuck?
Answer: A keyed chuck requires a separate tool (a chuck key) to tighten and loosen, while a keyless chuck can be tightened and loosened by hand.
Question: My drill bit keeps slipping, what should I do?
Answer: Make sure you’ve tightened the chuck sufficiently. Also, check that the bit is clean and properly seated in the chuck. If it continues to slip, the chuck might be worn.
Question: How do I know when a drill bit is too dull to use?
Answer: If the bit struggles to cut, wanders off course, or burns the material instead of drilling, it’s likely too dull.
Summary
Mastering how to change drill bits fast is a simple skill that boosts your DIY projects. By understanding your chuck, prioritizing safety, and following easy steps, you can switch bits in seconds. Keep your tools clean and bits organized for peak performance.
This makes your work smoother and more enjoyable.