How to Cook Maple Sap: The Ultimate, Essential Guide
To cook maple sap, you must boil it outdoors over a consistent heat source to evaporate the excess water. Use a wide, shallow pan for efficiency. Heat the sap to 219°F (104°C), or 7°F above water’s boiling point in your area. Skim off foam as it boils. Filter the finished syrup while hot and store it in clean, sealed containers.
Have you ever stood by a maple tree, watched that clear sap drip, and thought, “How does this become syrup?” It can feel like a secret art passed down through generations. Many folks feel a little intimidated by the process. They worry about burning the sap, making a huge mess, or just not knowing when it’s finally done. It’s a perfectly normal feeling when you’re starting something new and exciting.
But I’m here to tell you that you absolutely can do this. Making your own maple syrup is one of the most rewarding projects you can tackle. It connects you to nature and leaves you with a delicious, golden treasure. In this guide, I’ll walk you through every simple step, from the first boil to the final bottling. We’ll do it together, safely and successfully. Let’s get that liquid gold flowing!
Why Turn Sap into Syrup? The Sweet Science
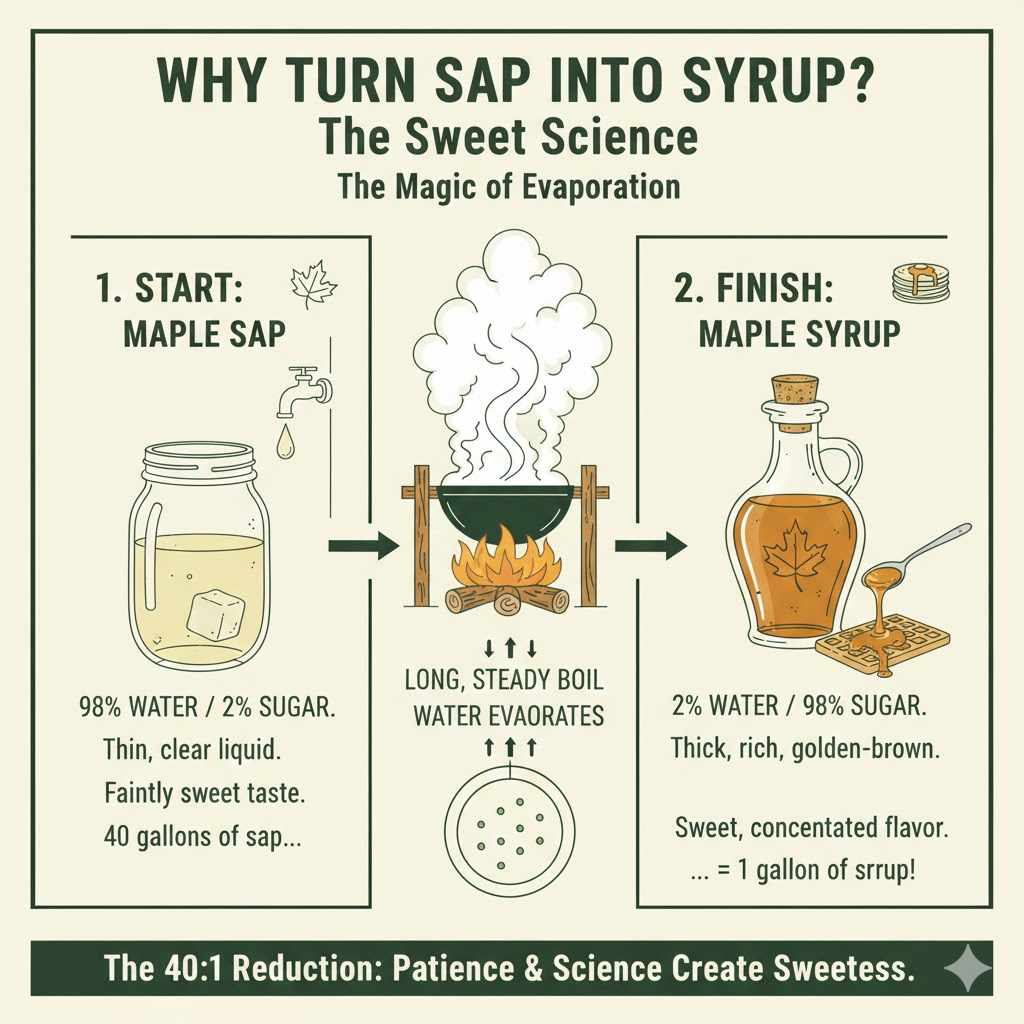
Maple sap straight from the tree is mostly water. In fact, it’s about 98% water and only about 2% sugar. It tastes like faintly sweet water, not the thick, rich syrup we love on our pancakes. The entire goal of cooking sap is to evaporate that enormous amount of water. As the water turns to steam, the sugar becomes more and more concentrated.
Think of it like this: you need to remove dozens of gallons of water to get just one gallon of syrup. The typical ratio is about 40 to 1. This means you need around 40 gallons of sap to produce a single gallon of finished maple syrup. This transformation from a clear, watery liquid into a thick, amber syrup is all done through a long, steady boil. It’s a simple process of reduction, but one that requires patience and a little bit of attention to detail.
Safety First! Critical Precautions for Boiling Sap
Before we even light a fire, let’s talk about safety. This is the most important step. Cooking sap produces a tremendous amount of steam. This isn’t like boiling a small pot of water for pasta; we’re talking about gallons and gallons of water vapor. Your safety and the safety of your home are top priorities.
- Never Boil Large Amounts Indoors: This is the golden rule. Boiling large quantities of sap inside can create so much steam that it peels wallpaper, damages drywall, and creates a thick, sticky film on every single surface in your home. It’s a mess you do not want to clean up. For any amount over a gallon or two, you must cook outdoors.
- Ensure Proper Ventilation: If you must finish a small batch indoors on the stove, open windows, turn on the range hood vent, and use fans to direct steam outside. But again, the vast majority of the boiling must happen outside.
- Use a Stable Heat Source: Make sure your fire pit, propane burner, or evaporator is on level, solid ground. You don’t want a huge pan of boiling, sticky liquid to tip over. This is both a safety hazard and a heartbreaking loss of hard-earned sap.
- Wear Protective Gear: Hot syrup can cause serious burns. Use heat-resistant gloves when handling hot pans. Wear sturdy, closed-toe shoes and be mindful of splashes.
- Keep an Eye on the Boil: Never leave a boiling pan of sap unattended, especially as it gets closer to becoming syrup. It can foam up and boil over very quickly, and it can scorch in an instant once the sugar concentration gets high.
- Have a Fire Extinguisher Nearby: If you’re using a wood fire, this is a must. Keep a fire extinguisher or at least a bucket of water or sand close at hand, just in case.
Gathering Your Gear: The Essential Toolkit
You don’t need a professional sugarhouse to make great syrup, but having the right tools makes the job much easier and more enjoyable. Here’s a breakdown of what you’ll need.
Must-Have Equipment
- An Outdoor Heat Source: This could be a propane turkey fryer burner, a backyard fire pit with a sturdy grill grate, or a simple evaporator made from cinder blocks and a stainless steel pan. Consistency is key, so choose something that allows you to maintain a steady boil.
- A Boiling Pan: The best pans are wide and shallow. This creates a larger surface area, which helps water evaporate much faster. Stainless steel is the ideal material because it’s easy to clean and won’t impart any flavor to your syrup. Avoid aluminum if possible.
- Filters: You’ll need to filter the sap before you boil and the syrup after you finish. A pre-filter (like cheesecloth) gets out big debris like bark and insects. A thick, felt-like syrup filter is needed for the final product to remove fine “sugar sand.”
- A Thermometer: A good candy thermometer or a digital probe thermometer is essential for knowing exactly when your syrup is done. This is the most reliable tool in your arsenal.
- Long-Handled Utensils: A long-handled spoon or skimmer is perfect for stirring and skimming off the foam that forms on top of the boiling sap.
- Storage Containers: You’ll need clean, heat-proof jars or bottles for your finished syrup. Canning jars work perfectly.
Nice-to-Have Gear
- A Hydrometer and Test Cup: This tool measures the sugar density of your syrup, giving you the most accurate reading of when it’s officially done. It’s a step up from a thermometer but not strictly necessary for your first few batches.
- A Finishing Pot: A smaller, heavy-bottomed pot to finish the last stage of boiling indoors on your stove. This gives you more precise temperature control at the most critical moment.
Setting Up Your Outdoor Kitchen: Location is Everything
Your boiling station should be in a safe, open area away from your house, garage, or any other buildings. Choose a spot that is sheltered from strong winds, as wind can make it difficult to maintain a consistent boil and can blow smoke and ash into your pan. Remember, you’ll be spending several hours here, so make sure the ground is level and you have easy access to your sap supply and equipment.
A simple and effective setup for beginners is using cinder blocks to build a temporary arch or firebox. You can build two parallel walls with the blocks, leaving an opening at one end to feed the fire. Your boiling pan then rests on top of the blocks. This channels the heat directly to the bottom of your pan for an efficient boil.
How to Cook Maple Sap: A Step-by-Step Guide
Alright, you’ve collected your sap, gathered your gear, and set up your space. It’s time for the magic. Follow these steps, and you’ll be well on your way to delicious homemade syrup.
Step 1: Filter Your Raw Sap
Before you add any heat, pour your collected sap through a pre-filter like clean cheesecloth or a dedicated sap filter. This will remove any bits of bark, dirt, or stray insects that might have found their way into your collection buckets. Starting with clean sap makes for a cleaner final product.
Step 2: Fire Up Your Heat Source
Get your fire going or light your propane burner. You want to achieve a strong, rolling boil, so you need a good amount of consistent heat. If using wood, aim for a bed of hot coals that you can feed steadily with dry, seasoned hardwood.
Step 3: Begin the Boil
Fill your boiling pan about two-thirds full with the filtered sap and place it on your heat source. Don’t fill it to the very top, as it will foam up and could boil over. Your goal now is simple: get it to a rolling boil.
Step 4: Maintain the Boil and Add More Sap
As the water evaporates, the sap level in your pan will drop. Gently add more filtered sap to maintain the level. Try to pre-warm the sap you’re adding (by keeping it near the fire) so it doesn’t kill your boil. While it boils, you’ll notice a light-colored foam forming on the surface. Use your skimmer to remove this foam and discard it. This helps create a cleaner, clearer syrup.
Step 5: Monitor the Temperature Religiously
For most of the boil, the temperature of the sap will stay around the boiling point of water, which is 212°F (100°C) at sea level. However, as the water evaporates and the sugar concentration increases, the boiling point will begin to rise. This is the sign that you’re getting close! The magic number you are looking for is 7°F (or about 4°C) above the boiling point of water. At sea level, this is 219°F (104°C).
Step 6: The Final Finish (Bringing It Indoors)
Once the temperature starts climbing past 215-216°F, the process speeds up dramatically. At this point, many people prefer to transfer the concentrated liquid to a smaller pot to finish on a kitchen stove. This gives you much better heat control and reduces the risk of scorching your precious, nearly-finished syrup. Be very careful during this transfer—the liquid is extremely hot.
Step 7: The Final, Crucial Filter
As soon as your syrup reaches the target temperature, remove it from the heat immediately. It needs to be filtered one last time while it’s still very hot. This final filtering removes “sugar sand,” or niter, which are natural minerals that precipitate out during the boiling process. Pour the hot syrup through a clean, pre-wetted, cone-shaped syrup filter. This step is what gives you that beautiful, crystal-clear syrup.
Step 8: Hot Pack and Store Your Liquid Gold
Pour the filtered, still-hot syrup (aim for about 180°F or 82°C) into sterilized canning jars or bottles. Seal them immediately. This “hot packing” method ensures your syrup will be shelf-stable. Once opened, store it in the refrigerator. Now, stand back and admire your work!
The Magic Moment: How to Know When It’s Syrup
Knowing exactly when to stop boiling is the most critical part of the process. If you stop too soon, your syrup will be thin and watery. If you go too long, you’ll end up with maple sugar or scorched crystals. Luckily, there are a few reliable ways to tell when your sap has officially become syrup.
| Method | Description | Pros | Cons |
|---|---|---|---|
| Temperature | Syrup is finished when its boiling point reaches 7°F (4°C) above the boiling point of water. For most people at sea level, this is 219°F (104°C). Note: water’s boiling point changes with elevation and barometric pressure, so test it first! | Reliable, easy for beginners, requires only a good thermometer. | Requires you to know the exact boiling point of water in your location on that specific day. |
| Hydrometer | A syrup hydrometer measures the density (Brix scale) of the liquid. You float the hydrometer in a sample of hot syrup. Official maple syrup has a density of 66% to 68% Brix. | Extremely accurate, the method used by professionals. | Requires special equipment (hydrometer and test cup). The syrup must be tested at a specific temperature. |
| The Spoon Test | Dip a spoon into the boiling liquid and lift it out. When the liquid drips off, watch it closely. If it forms a single drop, it’s not ready. When it forms a sheet or an “apron” that drips off in a wide sheet, it’s done. | No special equipment needed, a traditional method. | Subjective and takes practice to learn. Not recommended for beginners as the primary method. |
For beginners, the thermometer is the most trusted friend. To learn more about the science behind syrup density, check out this excellent resource from the University of New Hampshire Extension.
Understanding the Sap-to-Syrup Ratio
The amount of sap you need to produce a gallon of syrup depends on the sugar content of your sap, which can vary by tree species, location, and even the time of the sugaring season. Sugar maples have the highest sugar content, usually between 2% and 3%. Red maples are a bit lower. The 40:1 ratio is a good general estimate to keep in mind.
| Desired Amount of Syrup | Estimated Sap Needed (at 2% Sugar) |
|---|---|
| 1 Quart | ~10 Gallons |
| 1/2 Gallon | ~20 Gallons |
| 1 Gallon | ~40 Gallons |
| 5 Gallons | ~200 Gallons |
Don’t be discouraged by these large numbers! Even a small batch of 5-10 gallons of sap will yield a pint or two of delicious syrup, which is a fantastic achievement for your first time.
Common Beginner Mistakes (and How to Avoid Them)
We all make mistakes, but you can learn from some of the most common ones right here. Watch out for these pitfalls on your syrup-making journey:
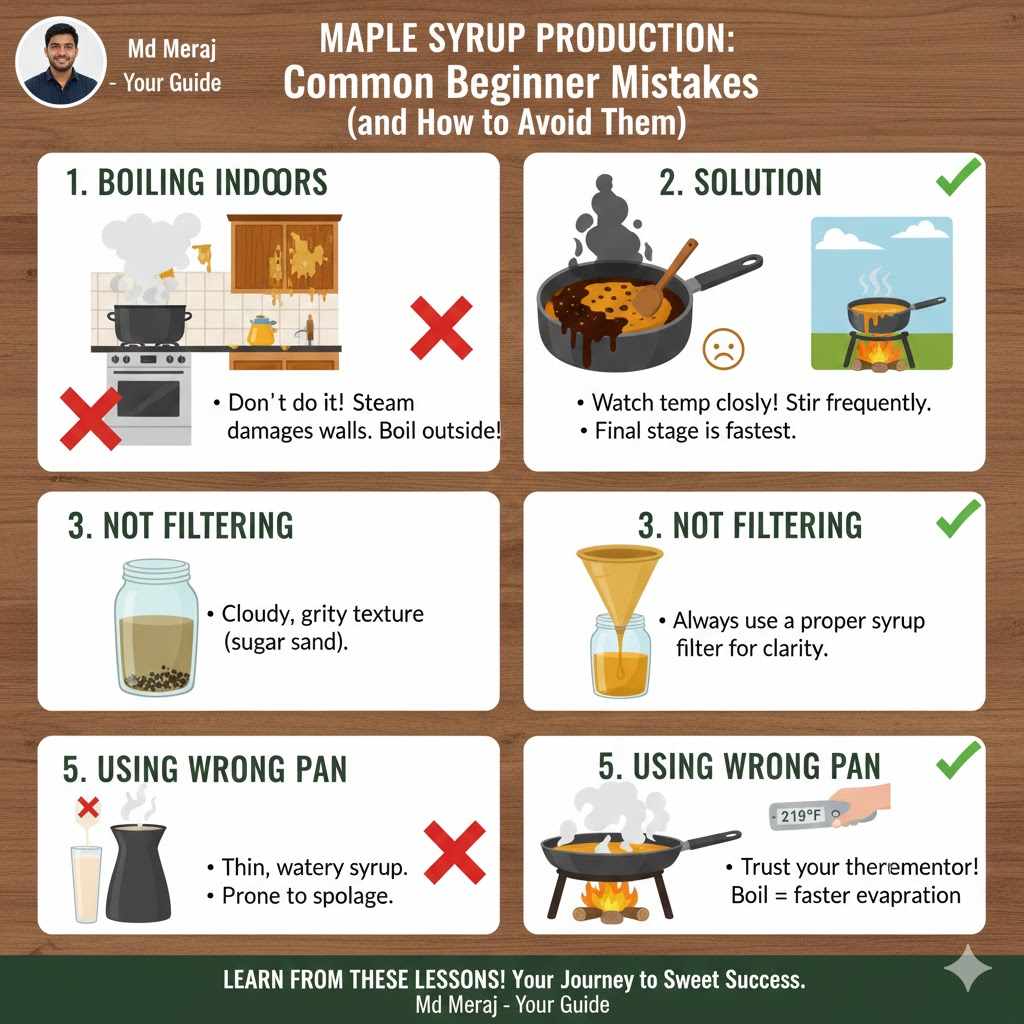
- Boiling Indoors: We’ve said it before, but it’s worth repeating. Don’t do it! The steam will make every surface in your home sticky and can cause damage to walls and ceilings.
- Scorching the Syrup: This happens in the final minutes when the liquid is thick and the temperature is rising fast. Keep a close eye on your finishing pot and stir frequently. A scorched batch is heartbreaking.
- Not Filtering Properly: Skipping the final filter will result in cloudy syrup with a gritty texture from the sugar sand. Always use a proper syrup filter for a professional-quality product.
- Stopping the Boil Too Soon: This results in thin, watery syrup that is more likely to spoil. Trust your thermometer! Wait until it hits that magic number of 219°F.
- Using the Wrong Pan: A deep, narrow pot will take forever to boil off the water. A wide, shallow pan is your best friend for efficient evaporation.
Frequently Asked Questions (FAQ)
How long does it take to cook maple sap?
The time it takes depends on your heat source, pan size, and the amount of sap. As a general rule, a good setup can evaporate about 2-3 gallons of water per hour. To turn 40 gallons of sap into one gallon of syrup, you can expect it to take a full day of boiling.
Can I cook maple sap on my kitchen stove?
You should not boil large amounts of sap indoors. However, it is a common and recommended practice to do the “finishing”—the very last stage of boiling—on your kitchen stove. This allows for precise temperature control when the syrup is close to being done and at risk of burning.
What color should maple sap be?
Fresh maple sap should be crystal clear, just like water. If your sap looks cloudy, yellow, or smells off, it may have started to spoil from being stored too long or in warm temperatures. Only boil clear, fresh-smelling sap.
Do I have to filter the syrup?
Yes, for the best quality syrup. Filtering removes “sugar sand,” which are natural minerals that form during boiling. Without filtering, your syrup will be cloudy and have a slightly gritty texture. The final filtering step is what gives you a beautiful, clear final product.
What is “sugar sand” or niter?
Sugar sand, also called niter, is a precipitate of natural salts and minerals (mostly calcium malate) that are present in maple sap. As water is boiled away, these minerals become concentrated and form a fine sediment. It is harmless but unpleasant in finished syrup.
How should I store my homemade maple syrup?
For long-term storage, pour the hot (180°F) syrup into sterilized glass jars and seal them immediately. Unopened, this syrup will last for years in a cool, dark place. Once you open a jar, you must keep it in the refrigerator to prevent mold from growing.
Can I stop boiling and start again later?
Yes, you can. You can boil for a few hours, then let the partially cooked sap cool and store it in a cold place (like you would fresh sap) overnight. You can then resume boiling the next day. This is a common practice when you don’t have a full day to dedicate to the process.
Conclusion: Enjoying Your Homemade Treasure
There is nothing quite like the feeling of pouring your very own homemade maple syrup over a stack of fluffy pancakes. Every drop is a sweet reward for your patience and hard work. You’ve taken a gift from nature—that clear, watery sap—and transformed it into something truly special. It’s a project that connects you to the seasons and gives you a skill you can be proud of for years to come.
Remember that every sugar maker starts somewhere. Your first batch might not be perfect, but it will be yours. So get out there, embrace the process, stay safe, and have fun. The sweet success waiting for you at the end is absolutely worth it.