
How to Cut Angles on a Table Saw (Miter, Bevel & Compound Cuts)
A table saw cuts angles two ways: swing the miter gauge for a flat-angle cut, or tilt the blade for a bevel, and combine both for a compound cut. Most blades only tilt to 45°, but steeper bevels need the 90-minus-angle trick with a mitered reference block, not force. This guide covers miter gauge setup, bevels past 45°, compound cuts, and a full angle chart for hexagons, octagons, and picture frames.

Why Angle Cuts Increase Kickback Risk on a Table Saw
Angled and beveled cuts carry more kickback risk than a straight rip because the workpiece contacts the blade at a shifted angle, which makes it easier for the offcut to bind between the blade and the fence or gauge. Keeping the blade at its lowest safe height, using a sharp bevel-cut blade, and never freehanding an angled workpiece without a miter gauge, sled, or jig are the three habits that prevent most angle-cut kickback incidents.
- Keep the blade raised no more than 1/4 inch above the workpiece — less blade exposed means less surface area to grab an offcut.
- Never remove the riving knife or blade guard for an angle cut; a tilted blade still needs the anti-kickback pawls doing their job.
- Use a zero-clearance insert cut for your specific bevel angle — the stock insert’s wider slot lets thin offcuts drop and jam under the blade at an angle.
- Stand slightly to one side of the blade’s cutting line, never directly behind it, in case of kickback.
Miter Gauge vs. Blade Tilt: The Two Ways to Cut an Angle
A miter cut uses the miter gauge or a crosscut sled to angle the workpiece against a stationary, vertical blade — the face of the board stays flat and the angle shows on the end grain. A bevel cut tilts the blade itself while the workpiece runs straight along the fence — the angle shows along the edge of the board. Combining a miter setting and a bevel setting in the same pass produces a compound cut, the method crown molding and angled picture frames both require. If you’re setting up a miter saw instead of a table saw for these same angles, the miter/bevel controls work the same way but the workpiece stays still while the blade head pivots.
Setting Up the Table Saw for Accurate Angle Cuts
Before cutting any angle, calibrate the miter gauge to a true 90° and confirm the bevel scale reads 0° at square. Skipping this step is the single biggest cause of angle cuts that are consistently off by a degree or two.
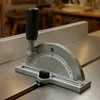
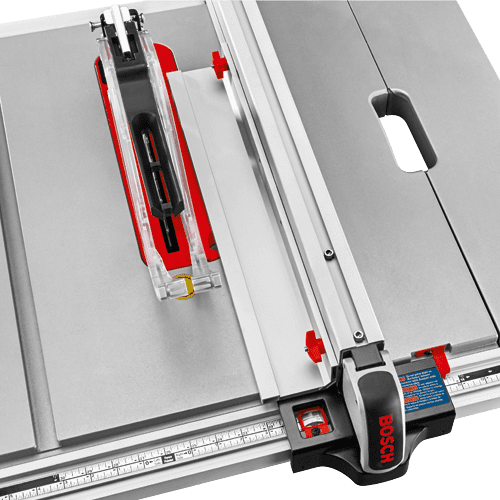
Calibrating the Miter Gauge
- Loosen the lock: Release the miter gauge’s locking knob so the head can pivot.
- Square it to the blade: Set the gauge to its 0° detent, then confirm true square against the blade body (not a tooth) with a combination square.
- Adjust and re-lock: Nudge the gauge until the square shows no gap, then tighten the lock and re-check.
- Dial in the target angle: Loosen again, rotate to the marked angle, and lock down before cutting a test piece.
Adjusting the Bevel (Blade Tilt)
- Unlock the bevel: Release the tilt lock, usually a handwheel or lever at the front of the saw.
- Set the angle: Tilt to the marked angle on the bevel scale, or better, verify it with a digital angle gauge.
- Lock and verify: Tighten the bevel lock, then re-check the angle — tightening the lock can shift the blade slightly on some saws.
- Test cut first: Run a scrap piece before committing your project stock.
“On one of our shop table saws, the factory bevel scale drifted almost a full degree after a year of sawdust working into the trunnion — enough to leave a visible gap on a picture-frame corner. We stopped trusting the printed scale for anything beyond a rough setting and now confirm every bevel angle with a digital gauge or a test cut before touching good stock.”
Best Angle-Verification Pick
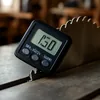
Magnetic Digital Angle Gauge
Reads the actual blade angle to a tenth of a degree, independent of the saw’s printed bevel scale.
- Best for: verifying bevel angles beyond 45° and catching scale drift
- Why we picked it: the printed bevel scale is the first thing to lose accuracy as sawdust builds up in the trunnion
- Main drawback: needs a flat spot on the blade body to seat the magnetic base accurately
Compare more angle-cutting accessories
 Option 1 Precision Miter Gauge with Telescoping Fence
|
 Option 2 Crosscut Sled with Telescoping Fence
|
 Option 3 Handheld Digital Protractor
|
As an Amazon Associate we earn from qualifying purchases.
Cutting Bevels Beyond 45 Degrees: The Complement-Angle Trick
Most table saws physically stop tilting at 45°, but plenty of projects call for a steeper bevel. The fix is to subtract your target angle from 90° and set the blade to that complement instead of forcing the tilt mechanism past its stop. For a 50° bevel, set the blade to 40° (90 − 50) and stand the workpiece on edge against a tall auxiliary fence so the cut still lands at the true 50° angle relative to the face.
- Do the subtraction: 90° minus your target angle gives the blade tilt to actually set.
- Cut a reference block: Miter a scrap piece at your target angle and use it to double-check the blade against a protractor, since the bevel scale is the least trustworthy part of the setup at extreme tilts.
- Support the workpiece vertically: Screw or clamp it to a tall scrap “sled” so it stands upright against the fence instead of trying to balance it freehand.
- Feed slowly: Keep the fence-to-blade gap equal to the scrap sled’s thickness so the blade never touches the sled itself.
Making Compound Angle Cuts (Miter + Bevel Together)
A compound cut sets both the miter gauge angle and the blade’s bevel angle at the same time, which is exactly what crown molding and angled picture-frame corners require. Draw the joint on paper first, set the miter angle, set the bevel angle, then run a test cut on scrap — compound settings are unforgiving of skipped verification because two variables can each be slightly wrong in ways that cancel out on paper but not on the actual joint.
📊 For 45° spring-angle crown molding cut flat against a square (90°) corner, the standard compound settings are 35.3° miter and 30° bevel. Source: published crown molding miter-and-bevel angle charts (flat-cutting method).
Table Saw Angle Reference Chart for Common Shapes
Multi-sided frames, boxes, and 60-degree layouts all follow the same geometry rule: the miter gauge angle equals 180° divided by the number of sides. Use this table to go straight to the saw setting instead of doing the math mid-project.
| Shape (Number of Sides) | Miter Gauge Angle |
|---|---|
| Triangle (3) | 60.0° |
| Square / Picture Frame (4) | 45.0° |
| Pentagon (5) | 36.0° |
| Hexagon (6) | 30.0° |
| Heptagon (7) | 25.7° |
| Octagon (8) | 22.5° |
| Decagon (10) | 18.0° |
| Dodecagon (12) | 15.0° |

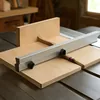
Using a Crosscut Sled or Angle Jig for Repeat Cuts
A crosscut sled or a shop-made angle jig supports the full width of the workpiece, which matters most on wide panels or when a project calls for the same angle cut a dozen times. Build the sled’s runners to fit your saw’s miter slots exactly — play in the runners is the most common reason a “correct” angle setting still produces inconsistent cuts piece to piece. If you’re breaking down long boards on the same table saw, extend the sled’s fence or add outfeed support so the far end of the board doesn’t tip and shift the angle mid-cut.
Best Practices for Safety and Precision
- Secure grip and posture: feet shoulder-width apart, hands never in line with the blade’s path, and no leaning across the table.
- Clear workspace: clear sawdust and offcuts from the miter slots and fence rail before every cut — grit is what throws off gauge and sled accuracy over time.
- Featherboards and push sticks: a featherboard on the fence keeps the workpiece from drifting off its angle mid-cut, and a push stick keeps your hand well clear on narrow pieces.
Frequently Asked Questions
What is the best way to cut a 45-degree angle on a table saw?
Set the miter gauge to its 45° detent for a flat miter, or tilt the blade to 45° for a bevel — both are within a standard table saw’s normal range. Verify the setting against a combination square or digital angle gauge and run a test cut on scrap before cutting your project piece.
Can a table saw cut bevels steeper than 45 degrees?
Not directly — most blades physically stop tilting at 45°. Subtract your target angle from 90° and set the blade to that complement instead, then stand the workpiece on edge against a tall auxiliary fence so the resulting cut still lands at the angle you actually need.
Can you cut a miter and a bevel at the same time on a table saw?
Yes — that’s a compound cut, and it’s exactly how crown molding and angled picture-frame corners are made. Set the miter gauge angle and the blade’s bevel angle together, then confirm both on a scrap test piece, since a small error in either setting compounds into a visibly open joint.
Why does cutting angles on a table saw increase the risk of kickback?
An angled or beveled cut meets the blade at a shifted angle, which makes it easier for the offcut to bind between the blade and the fence or gauge and get thrown back toward the operator. A zero-clearance insert cut for the specific angle, a sharp blade, and a miter gauge or sled to guide the workpiece all reduce that risk.
What is a zero-clearance insert, and does it matter for angle cuts?
A zero-clearance insert is a table saw throat plate with a slot cut to match your blade’s exact width and angle, instead of the wider factory opening. On angle cuts it matters more than on straight rips because the tilted blade otherwise leaves a wider gap that lets thin offcuts and splinters drop and catch under the blade.
What miter gauge angle do I use to cut a hexagon or octagon?
Divide 180° by the number of sides: a hexagon needs a 30° miter gauge angle and an octagon needs 22.5°, since six or eight identical miters have to add up to a full 360° frame. See the reference chart above for the full list of common shapes.
Whether you’re cutting a simple 45° miter or a full compound joint, the accuracy comes from the same habits: calibrate before you cut, verify the angle independently of the saw’s printed scale, and always run a test piece first. Bookmark the table saw hub for more setup and technique guides as you take on more angle-heavy projects.


![What Is A Splitter On A Table Saw? [Know Everything Today]](https://cdn.woodworkingadvisor.com/2023/01/What-Is-A-Splitter-On-A-Table-Saw-Know-Everything-Today-768x384.webp)