How to Drill Holes in Rocks: Local Lapidary Expert Tips
Learning How to Drill Holes in Rocks: Local Lapidary Expert Tips can seem tricky at first, especially for folks just starting out. You might worry about breaking your stones or not getting the hole just right. But don’t worry!
It’s a skill that’s easier to learn than you think with a little guidance. We’ll walk you through everything step-by-step, making it simple and clear. Get ready to create beautiful drilled stones for your projects.
Drilling Your First Rock A Simple Guide
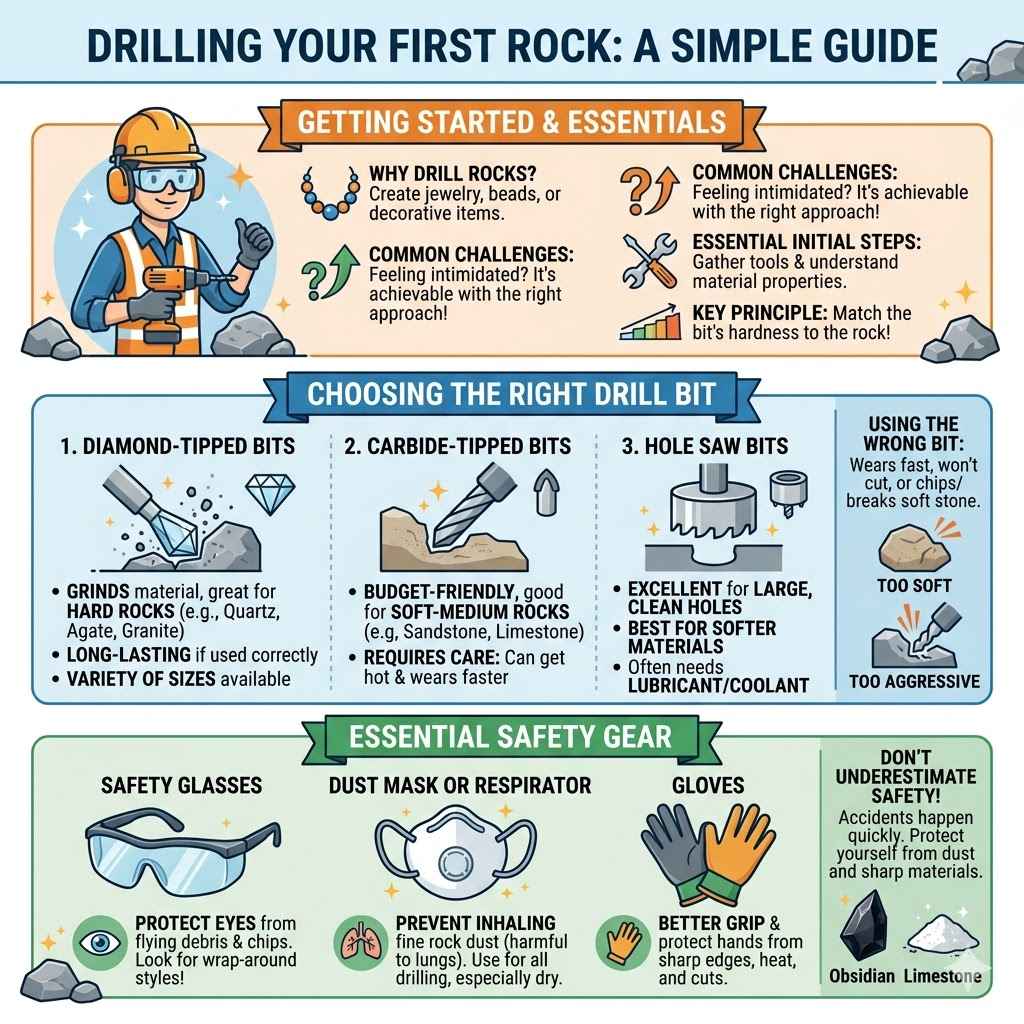
This section is all about getting you started with the basics of drilling holes in rocks. We’ll cover why this is a common task for rock enthusiasts and what makes it feel a bit challenging when you’re new to it. You’ll learn about the essential tools you’ll need and some initial safety steps to keep you and your materials safe.
This guide will help you feel confident as you prepare to make your first drilled stone, showing you that it’s very achievable with the right approach.
Choosing The Right Drill Bit
Selecting the proper drill bit is super important for successful rock drilling. The type of rock you’re working with will really influence your choice. For harder rocks, you’ll need bits designed for that.
Softer rocks might allow for more options. Diamond-tipped bits are often the best bet because they can cut through tough materials like quartz, agate, and granite efficiently. They last a long time if used correctly.
- Diamond-Tipped Bits: These bits have diamond particles bonded to their surface. They grind away material instead of cutting it. This is great for harder stones that would quickly dull other types of bits. Diamond bits come in many sizes, from tiny ones for jewelry to larger ones for bigger holes.
- Carbide-Tipped Bits: These are a more budget-friendly option than diamond bits. They are good for softer to medium-hard rocks like sandstone or some types of limestone. They don’t last as long as diamond bits and can get hot quickly, so they require more care.
- Hole Saw Bits: These are shaped like a small cup with teeth on the edge. They are excellent for creating larger, cleaner holes in rocks. They work best on softer materials and often require a lubricant to keep them cool and prevent damage.
Using the wrong drill bit can lead to frustration. A bit that’s too soft will wear out fast or won’t cut at all. A bit that’s too aggressive for a soft stone might chip or break it.
Think of it like using the right tool for the job. For example, trying to cut wood with a butter knife won’t work, and neither will trying to drill granite with a regular metal drill bit. The material of the bit needs to be harder than the material you are drilling.
Essential Safety Gear
Safety is really key when you’re drilling rocks. Rocks can chip and send small pieces flying, and the dust from drilling can be harmful to breathe. So, it’s vital to protect yourself.
Always wear safety glasses to keep your eyes safe from flying debris. A dust mask or respirator is also a good idea, especially when drilling dry, to prevent inhaling fine rock particles, which can irritate your lungs over time. Gloves can protect your hands from sharp edges or the heat generated by drilling.
- Safety Glasses: These are non-negotiable. Look for glasses that wrap around your eyes to offer maximum protection from all angles. They should be comfortable enough to wear for the duration of your project.
- Dust Mask or Respirator: Fine rock dust can cause respiratory problems. A simple dust mask can help, but a respirator offers better protection, especially for prolonged drilling sessions or when working with materials known to produce very fine dust.
- Gloves: Work gloves can provide a better grip on your rock and protect your hands from accidental cuts or abrasions from sharp edges.
Many people underestimate the importance of safety gear, thinking they’ll be careful enough. However, accidents happen quickly, and it’s better to be prepared. Imagine drilling a piece of obsidian, which has very sharp edges, and it suddenly slips.
Or consider drilling limestone, which creates a lot of fine, powdery dust. Protective gear ensures that these small accidents don’t lead to bigger problems. It’s a small investment for significant peace of mind and health protection.
Drilling Techniques For Different Rocks
This section will show you how to drill different kinds of rocks. Not all rocks are the same, so the way you drill them needs to change. We’ll talk about how to drill hard stones like granite and quartz, and also softer ones like soapstone or sandstone.
You’ll discover the best methods for each, including when to use water to keep things cool and clean. This will help you achieve neat holes without damaging your precious rocks.
Drilling Hard Rocks Like Quartz And Granite
Drilling hard rocks like quartz and granite requires patience and the right approach. These materials are tough, so you need tools that can handle them. Diamond-tipped drill bits are almost always the best choice here.
You’ll also need to keep the area wet while you drill. Water acts as a coolant, preventing the drill bit and the rock from overheating. Overheating can cause the bit to wear out faster and can even crack the rock.
- Use a Diamond-Tipped Bit: As mentioned, these are ideal for hard stones. Choose a bit size appropriate for the hole you need. Larger bits might require a drill press for stability.
- Keep It Wet: Water is your best friend when drilling hard rocks. It lubricates the bit, flushes away dust, and keeps temperatures down. You can create a small dam around your drilling area with clay or use a continuous drip system.
- Go Slow And Steady: Don’t force the drill. Let the bit do the work. Apply gentle, steady pressure. Take breaks if the drill starts to feel hot, even with water.
When working with granite, for instance, you’re dealing with a very dense igneous rock composed of quartz, feldspar, and mica. These minerals have varying hardness, but the overall rock is significantly harder than many common gemstones. A diamond bit will grind these minerals away.
Without water, the friction would quickly generate enough heat to melt the diamond’s binder, severely damaging the bit, and potentially causing thermal shock to the rock, leading to cracks. A common mistake beginners make is to drill too fast, thinking it will save time, but this often results in broken bits and ruined stones.
For a real-life example, imagine a jeweler wanting to drill a 2mm hole through a 1cm thick piece of amethyst geode slice to make a pendant. Amethyst is a variety of quartz. Using a small diamond-tipped drill bit on a Dremel tool at a moderate speed, with a constant stream of water from a dropper bottle, would be the recommended method.
The jeweler would start drilling at a slight angle to create a small divot, then gradually straighten the drill. Slow, steady progress, with frequent checks to ensure the bit is cool and the hole is clean, would be crucial. This careful approach ensures the beautiful crystal structure of the amethyst remains intact.
Drilling Softer Rocks Like Soapstone And Sandstone
Softer rocks are generally easier to drill, but they also require a different approach to avoid damaging them. Rocks like soapstone, alabaster, or certain types of sandstone are more porous and brittle. For these, you might not need diamond bits, though they still work well.
Carbide-tipped bits can often do the job. The key here is to use light pressure and be mindful of not crumbling the edges of the hole. Using water is still a good idea, but it’s less about cooling and more about dust control.
- Carbide-Tipped Bits Are Often Sufficient: For softer stones, these bits offer a good balance of effectiveness and cost. They can cut through these materials without excessive wear.
- Gentle Pressure Is Crucial: Softer rocks can easily chip or break. Apply very light pressure and let the drill do the work. Avoid any jerky movements.
- Control Dust With Water: While not as critical for cooling, water helps keep the dust down. Fine dust from softer rocks can still be unpleasant to breathe.
Consider drilling a hole in a piece of soapstone for a decorative carving or a spiritual charm. Soapstone is a metamorphic rock that is very soft and has a soapy feel due to its high talc content. You could use a 1/4 inch carbide-tipped twist drill bit on a standard drill.
To prevent the stone from cracking, you’d place it on a soft surface, like a folded towel, and drill very slowly, applying minimal pressure. A light spray of water from a bottle would keep the dust manageable. The goal is to create a clean hole without causing the edges to crumble, which can happen if you push too hard or drill too quickly.
Sample Scenario 1:
- Obtain a piece of soft sandstone you wish to turn into a garden marker.
- Select a carbide-tipped drill bit of the desired diameter, around 1/4 inch.
- Secure the sandstone on a stable, non-slip surface.
- Using a regular hand drill set to a slow speed, gently begin drilling into the sandstone.
- Lightly mist the drilling area with water from a spray bottle to control dust.
- Apply only minimal downward pressure, letting the bit do the work.
- Stop drilling if you notice significant crumbling around the hole.
- Continue until the desired depth is reached.
Advanced Drilling Techniques And Considerations
Once you’ve mastered the basics, you might want to explore some more advanced ways to drill rocks. This could involve drilling larger holes, creating perfectly straight holes, or working with very delicate specimens. We’ll look at special tools and techniques that can help you achieve professional results.
This includes thinking about the angle of your drill, how to handle delicate stones, and what to do if your hole isn’t perfect.
Using A Drill Press For Precision
For the most precise and straight holes, a drill press is an invaluable tool. Unlike a handheld drill where your hand can waver, a drill press provides a stable, vertical platform. This is especially helpful when drilling larger rocks or when you need multiple holes to be perfectly aligned.
A drill press allows for consistent pressure and control, significantly reducing the risk of the bit wandering or the rock cracking due to uneven force.
- Stability And Control: The base of a drill press is heavy, and the column ensures the chuck moves in a straight line. This eliminates the shakiness that can come with hand-held drilling, leading to much cleaner holes.
- Consistent Depth: Many drill presses have depth stop settings. This allows you to set exactly how deep you want to drill, ensuring all your holes are the same depth if you’re making multiples.
- Reduced Fatigue: Operating a drill press is generally less physically demanding than holding a heavy drill for extended periods, especially when dealing with tough materials.
A drill press is essential for lapidary artists who regularly drill cabochons or beads. Imagine needing to drill holes in fifty small, uniform agate beads for a bracelet. Using a handheld drill would lead to slight variations in hole size, angle, and depth, making it difficult to string them evenly.
With a drill press, you can set the depth stop and ensure each bead gets a perfectly centered, straight hole of the same depth, making the final product look much more professional and polished. The ability to clamp the rock securely to the drill press table also adds another layer of safety and precision.
Real-life Case Study: A small jewelry business was struggling with inconsistent results when drilling holes in their semi-precious stone pendants. Sometimes the holes were off-center, leading to crooked hanging. Other times, the angle was wrong, making the pendant hang awkwardly.
After investing in a benchtop drill press and practicing with it for a few weeks, their error rate dropped by over 80%. Customers noticed the improved quality, and the business saw a rise in positive reviews specifically mentioning the craftsmanship of their stone pieces.
Dealing With Delicate And Brittle Specimens
Drilling delicate or brittle specimens, such as fossils, thin shells, or fragile crystals, requires extreme care. These materials can fracture or crumble very easily. The key is to use the smallest possible drill bit for the job, work at the lowest possible speed, and apply almost no pressure.
Lubrication and cooling are also very important to prevent thermal stress.
- Use Micro-Drill Bits: For very delicate items, specialized micro-drill bits, often diamond-tipped, are available in very small diameters (e.g., 0.5mm or less). These allow you to create tiny holes with minimal material removal.
- Very Low Speed And No Pressure: The drill should spin very slowly. Let the diamond grit do all the work. Imagine gently brushing the surface rather than forcing it.
- Constant Lubrication: A constant flow of water or a specialized drilling lubricant is essential. This helps dissipate heat and flushes away tiny particles without disturbing the specimen.
A good example of drilling a delicate specimen would be creating a hole in a fossilized sea urchin. These can be quite fragile. You’d likely use a diamond micro-drill bit on a rotary tool, set to its slowest speed.
The urchin would need to be firmly but gently secured, perhaps in a bed of soft clay. You would drill with a slow, consistent stream of water, applying only the slightest pressure. It might take a considerable amount of time, but this careful method prevents the delicate skeletal structure from collapsing or shattering.
The goal is to create the hole with the least invasive action possible.
Troubleshooting Common Drilling Problems
Even with careful preparation, you might encounter issues. The drill bit might get stuck, the hole might be off-center, or the rock might chip unexpectedly. Knowing how to address these problems can save your project.
For a stuck bit, try backing it out slowly while the drill is still running, with water. If a hole is off-center, you can sometimes carefully enlarge it or reshape it using other lapidary tools, but prevention is always better.
- Drill Bit Gets Stuck: If the bit jams, don’t yank the drill. Stop the drill, and try to gently back it out. Sometimes wiggling it slightly or adding more water can help free it.
- Chipping Edges: If the edges of your hole are chipping, you might be applying too much pressure, or your bit might be dull. For soft rocks, try a different, possibly smaller, bit, or slow down your speed.
- Off-Center Holes: This is usually due to poor setup or the rock shifting. If it’s slightly off, you can sometimes use a grinding tool to carefully adjust the hole’s position or shape. For significant errors, you might need to start over or find a creative way to incorporate the imperfection into your design.
A common problem is when a drill bit starts to wander, especially on rounded surfaces. This can result in an off-center hole. To prevent this, you can create a small divot or pilot mark first by starting the drill at a slight angle until a small indentation is formed.
Then, gradually bring the drill to a vertical position. This method helps to guide the bit and keep it from sliding across the rock’s surface. Another tip is to secure the rock very firmly, perhaps with a vise or clamps, to prevent any movement during drilling.
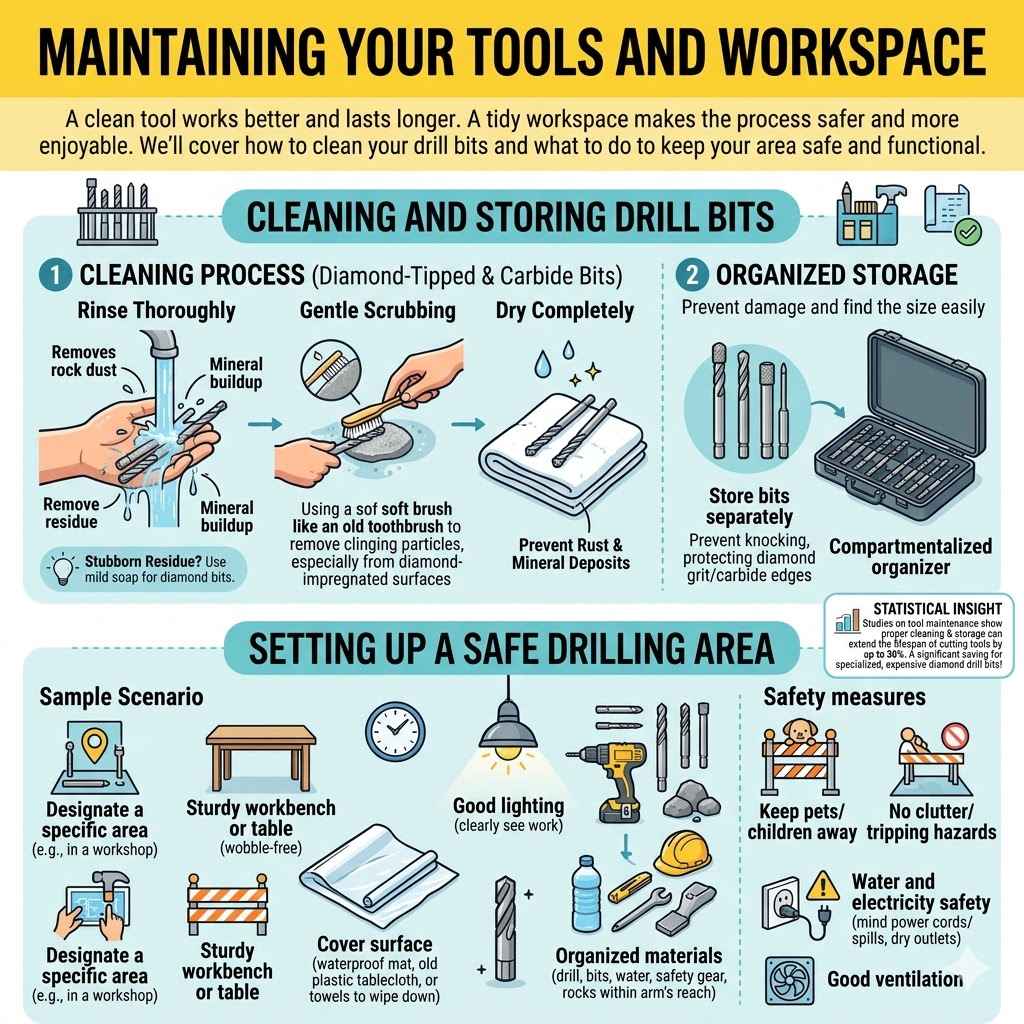
Maintaining Your Tools And Workspace
Keeping your drill bits and your workspace in good condition is just as important as the drilling process itself. Clean tools work better and last longer. A tidy workspace makes the entire process safer and more enjoyable.
We’ll cover how to clean your bits after use and what to do to keep your area safe and functional for future projects.
Cleaning And Storing Drill Bits
After you’ve finished drilling, it’s important to clean your drill bits thoroughly. This removes any rock dust, residue, or mineral buildup that could harden and damage the bit over time. For diamond-tipped bits, rinsing them under running water and gently scrubbing with a soft brush is usually sufficient.
If there’s stubborn residue, a mild soap can help. For carbide bits, ensure all debris is removed. Proper storage is also key.
Store your bits in a way that prevents them from knocking against each other, which could damage the diamond grit or carbide edges.
- Rinse Thoroughly: Always rinse your bits with clean water immediately after use to remove as much dust and debris as possible.
- Gentle Scrubbing: Use a soft brush (like an old toothbrush) to gently remove any clinging particles, especially from the diamond-impregnated surfaces of diamond bits.
- Dry Completely: Before storing, make sure your bits are completely dry to prevent rust or mineral deposits from forming.
- Organized Storage: Keep your bits in a compartmentalized case or a dedicated tool organizer. This prevents damage and makes it easy to find the size you need.
Imagine a lapidary artist with a collection of dozens of diamond drill bits of various sizes. If these bits are not cleaned and stored properly, the fine diamond particles can become clogged with dried mud or mineral deposits. This can reduce their cutting efficiency.
Furthermore, if they are just tossed into a toolbox, the diamond coatings can be chipped or worn away by contact with other metal tools. A small plastic organizer with individual slots for each bit ensures they are protected and easily accessible, preserving their function for many drilling projects to come.
Statistical Insight: Studies on tool maintenance show that proper cleaning and storage can extend the lifespan of cutting tools by up to 30%. For specialized tools like diamond drill bits, which can be expensive, this is a significant saving.
Setting Up A Safe Drilling Area
Your drilling area should be well-lit, stable, and easy to clean. Good ventilation is also a plus, especially if you’re not using water for cooling and dust suppression. Having all your tools and materials within easy reach will make the process smoother.
Cover your work surface with something waterproof and easy to wipe down, like a plastic mat or old towels. Keep pets and children away from the area while you are working, and always ensure there is no clutter that could cause you to trip or knock something over. Remember that water and electricity do not mix, so be mindful of your power cords and any potential spills.
Sample Scenario 2:
- Designate a specific area in your garage or workshop for rock drilling.
- Ensure the area has a sturdy workbench or table that won’t wobble.
- Cover the surface with an old plastic tablecloth or several layers of old towels.
- Set up good lighting so you can clearly see your work.
- Keep your drill, bits, water supply, safety gear, and rocks organized and within arm’s reach.
- Make sure electrical outlets are accessible but not in a position where they could get wet.
- Clear the surrounding floor space to avoid tripping hazards.
Frequently Asked Questions
Question: What is the easiest rock to drill?
Answer: Softer rocks like soapstone, alabaster, chalk, and some types of sandstone are generally the easiest to drill. They require less pressure and wear down drill bits much slower than harder stones.
Question: Can I use a regular drill for drilling rocks?
Answer: Yes, you can use a regular handheld drill for most rock drilling, especially for smaller holes or softer rocks. However, for harder rocks or larger holes, a drill press offers more stability and control.
Question: How do I prevent my rock from cracking while drilling?
Answer: To prevent cracking, use slow speeds, apply gentle pressure, keep the drilling area cool with water or lubricant, and ensure the rock is well-supported. Avoid sudden movements or forcing the drill bit.
Question: How deep should I drill a hole in a rock?
Answer: The depth depends on your project. For jewelry, a few millimeters might be enough. For larger projects, you might drill all the way through or to a specific depth.
Measure and mark your desired depth before drilling.
Question: What is lapidary?
Answer: Lapidary is the art of cutting, shaping, polishing, and engraving gemstones and other hard materials, including rocks. Drilling holes in rocks is a common lapidary technique.
Conclusion
Learning How to Drill Holes in Rocks: Local Lapidary Expert Tips is within your reach. You now know about the right tools, safety measures, and techniques for different rock types. Whether you’re drilling hard granite or soft soapstone, patience and proper preparation are your best allies.
Start simple, practice often, and enjoy the process of creating something beautiful from stone.