How to Drill Into Concrete: Best Local Hammer Drill Tips
Drilling into concrete can seem tricky, especially if you’re new to it. You might worry about making holes the wrong size, damaging your drill, or not getting the right result. But don’t worry!
You can learn How to Drill Into Concrete: Best Local Hammer Drill Tips with a few easy steps. We’ll guide you through everything you need to know to get the job done right the first time. Let’s get started on making those holes perfectly.
Choosing the Right Hammer Drill For Concrete
How to Drill Into Concrete Best Hammer Drill Tips
Picking the correct hammer drill is the first step to successfully drilling into concrete. A hammer drill is not just any drill; it has a special mechanism that adds a hammering action to its rotation. This dual action is what allows it to chip away at hard materials like concrete and masonry with ease.
Without this feature, trying to drill into concrete with a regular drill would be very slow and could even damage your tool.
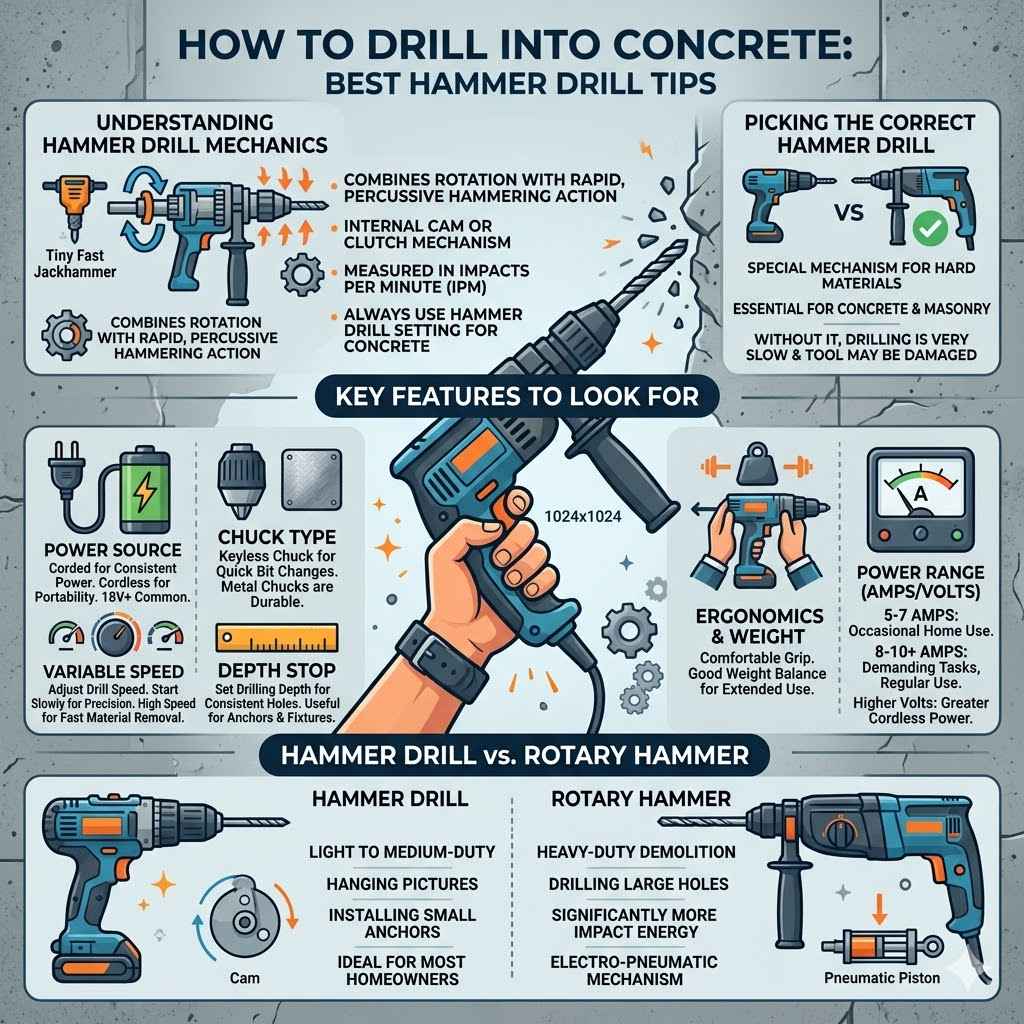
Understanding Hammer Drill Mechanics
A hammer drill works by combining a rotating motion with a rapid, percussive hammering action. This hammering is powered by a cam or clutch mechanism inside the drill. As the drill bit turns, an internal component strikes the back of the drill bit repeatedly.
Think of it like a tiny, fast jackhammer. This constant pounding, along with the spinning, breaks up the concrete material, allowing the drill bit to advance. The force of the hammer action is usually measured in impacts per minute (IPM).
The intensity of the hammering can often be adjusted. Some hammer drills offer different settings for standard drilling (just rotation) and hammer drilling. For concrete, you’ll always want to use the hammer drill setting.
It’s essential to choose a drill with enough power for the job. For occasional home use, a drill with around 5-7 amps might suffice. For more demanding tasks or regular use, a higher amperage drill, perhaps 8-10 amps or more, will provide better performance and longevity.
Key Features to Look For
- Power Source: Hammer drills come in corded and cordless versions. Corded drills offer consistent power but limit your range. Cordless drills provide portability, which is great for larger jobs or areas without easy access to an outlet. Battery life and voltage (18V is common for good cordless power) are key considerations for cordless models.
- Chuck Type: Look for a keyless chuck, which allows for quick and easy bit changes without a separate key. Metal chucks are generally more durable than plastic ones.
- Variable Speed Control: This feature lets you adjust the drill’s speed. Starting slowly helps with precision and prevents the bit from “walking” off your mark. Higher speeds are useful for faster material removal once you’re established in the concrete.
- Depth Stop: A depth stop allows you to set how deep you want to drill a hole. This is very handy for tasks where you need holes of a consistent depth, like mounting shelves or fixtures.
- Ergonomics and Weight: Hammer drills can be heavy, especially the more powerful ones. A comfortable grip and good weight balance can make a big difference, especially during extended use.
Hammer Drill vs. Rotary Hammer
It’s easy to confuse a hammer drill with a rotary hammer, but they are different tools designed for different levels of work. A standard hammer drill is great for light to medium-duty concrete drilling, like hanging pictures or installing small anchors. It’s what most homeowners will need.
A rotary hammer, on the other hand, is a much more powerful tool designed for heavy-duty demolition and drilling large holes in concrete. It uses a different mechanism, often electro-pneumatic, to deliver significantly more impact energy. For basic concrete drilling tasks, a hammer drill is the appropriate and more accessible choice.
Essential Drill Bits For Concrete
Using the right drill bit is just as important as having the right drill when you’re tackling concrete. These bits are specially designed to withstand the abrasive nature of concrete and the intense forces involved in drilling. Using the wrong type of bit can lead to rapid wear, broken bits, and poor results, making your job much harder than it needs to be.
For concrete, you’ll primarily want to use masonry bits.
Masonry Drill Bits Explained
Masonry drill bits are the go-to choice for drilling into concrete, brick, stone, and other hard, brittle materials. The key feature of a masonry bit is its tip. It’s typically made of a very hard material like carbide steel, often tungsten carbide.
This carbide tip is shaped to efficiently break through tough surfaces. The flutes (the spiral grooves on the bit) are designed to clear away the dust and debris created by the drilling process, which is crucial for preventing the bit from overheating and jamming.
Masonry bits come in various sizes, measured by diameter. You’ll need to select the correct diameter for the anchor, screw, or fastener you plan to use. For example, if you’re installing a 1/4-inch anchor, you’ll need a drill bit that creates a hole of approximately 1/4 inch.
Always check the specifications for your anchors or fasteners; they will tell you the exact drill bit size required. It’s also a good idea to have a range of common sizes on hand.
Types of Masonry Bits
- Carbide-Tipped Masonry Bits: These are the most common and versatile for home use. They feature a hard carbide tip brazed onto a steel shank. They work well with standard hammer drills.
- Masonry Screw Bits: These are designed to drill and tap holes for specific masonry screws in one go. They have a special cutting edge.
- SDS Bits: These are used with SDS (Slotted Drive System) hammer drills or rotary hammers. They have grooves on the shank that lock into the chuck, allowing for more efficient power transfer and faster drilling. SDS bits are typically used for more demanding jobs.
When buying masonry bits, look for reputable brands. Quality bits will last longer and perform better. For most DIY projects, a good set of carbide-tipped masonry bits will cover your needs.
Drill Bit Maintenance
Even the best drill bits can wear out if not properly maintained. After drilling into concrete, you’ll generate a lot of fine dust. It’s important to clean the flutes of your drill bit regularly.
You can do this with a stiff brush or compressed air. This helps prevent dust buildup that can hinder performance and cause overheating. If a bit seems to be dull or is not cutting effectively, it might be time to replace it.
You can try sharpening some masonry bits, but often, replacing them is more cost-effective and ensures optimal performance.
The Step-By-Step Process For Drilling Concrete
Now that you have the right drill and bits, let’s walk through the actual process of drilling into concrete. This step-by-step guide will help you achieve clean, accurate holes every time. It’s important to follow these steps carefully to ensure safety and the best results for your project.
Preparing Your Workspace and Safety First
Before you even think about drilling, safety is paramount. Concrete dust can be harmful to inhale, so wearing a dust mask is non-negotiable. Eye protection, like safety glasses or goggles, is also essential to prevent flying debris from entering your eyes.
Work gloves will protect your hands from rough surfaces and vibrations. Ensure the area you’re working in is well-lit and clear of any obstructions or tripping hazards. If you’re drilling indoors, consider covering furniture and floors with drop cloths to protect them from dust.
It’s also crucial to check for hidden utilities before drilling. If you’re drilling into a wall, use a stud finder that can also detect electrical wires or pipes. If you’re unsure, it’s best to avoid drilling in that area or consult a professional.
Ensure your power cord (if using a corded drill) is not in a position where it could be accidentally cut or damaged.
Marking Your Drilling Spot
Accuracy starts with a clear mark. Use a pencil or a permanent marker to mark the exact spot where you want to drill. For precise placement, especially for multiple holes, you can use a tape measure and a level.
If you’re using a larger masonry bit or drilling into very hard concrete, it can be helpful to create a small starter dimple with a center punch. This dimple will guide the drill bit and prevent it from “walking” or skidding across the surface when you start drilling.
A center punch is a sharp, pointed tool. You strike its blunt end with a hammer, creating a small indentation at your marked spot. This indentation acts as a guide for the tip of your drill bit, ensuring it starts exactly where you intend.
This is a simple but highly effective technique for improving accuracy.
Starting the Drill Hole
Begin by setting your drill to a low speed setting. Place the tip of the masonry bit directly on your marked spot or within the dimple you created with the center punch. Hold the drill firmly with both hands, keeping it perpendicular to the surface.
Apply steady, even pressure. Start the drill slowly, allowing the bit to create a small indentation. This initial slow speed is critical for control and preventing the bit from wandering.
Once you have a small hole formed, you can gradually increase the drill’s speed. Continue to apply consistent pressure. If you feel the drill struggling, ease up slightly on the pressure to avoid overheating the bit and motor.
Periodically pull the drill bit out of the hole while it’s still spinning slowly to clear out dust and debris. This also helps to cool the bit and the material.
Drilling Deeper Holes and Dust Management
As you drill deeper, continue to pull the bit out periodically to clear the hole of dust. This is very important because the dust acts as an abrasive and can cause the bit to overheat. It also makes it harder for the bit to cut effectively.
If you’re drilling multiple holes, it’s a good idea to let the drill and bit cool down between uses. A vacuum cleaner with a narrow attachment can also be helpful for sucking up dust as it’s created, especially if you have a helper.
For deeper holes, you might need to use an extension rod with your drill bit. Always ensure the extension is securely attached to both the bit and the drill. Continue the process of drilling, pulling out to clear dust, and re-engaging until you reach the desired depth.
For very deep holes, consider using a smaller pilot bit first to create a guide hole, then follow with the larger bit.
Finishing and Cleaning Up
Once you’ve reached the required depth, slowly withdraw the drill bit from the hole. You can then use a brush or the vacuum cleaner to clear any remaining dust from the hole. If you’re installing anchors, gently tap them into the hole with a rubber mallet or a hammer.
Ensure they are seated properly before proceeding with your project. After you’ve finished drilling, clean your tools and work area thoroughly. Proper cleanup ensures a safer environment and keeps your tools in good condition for future use.
Best Practices For Using Your Hammer Drill On Concrete
Beyond the basic steps, several best practices can significantly improve your experience and results when drilling into concrete. These tips focus on maximizing efficiency, extending the life of your tools, and ensuring a professional finish. Applying these techniques will make a noticeable difference in how smoothly your concrete drilling projects go.
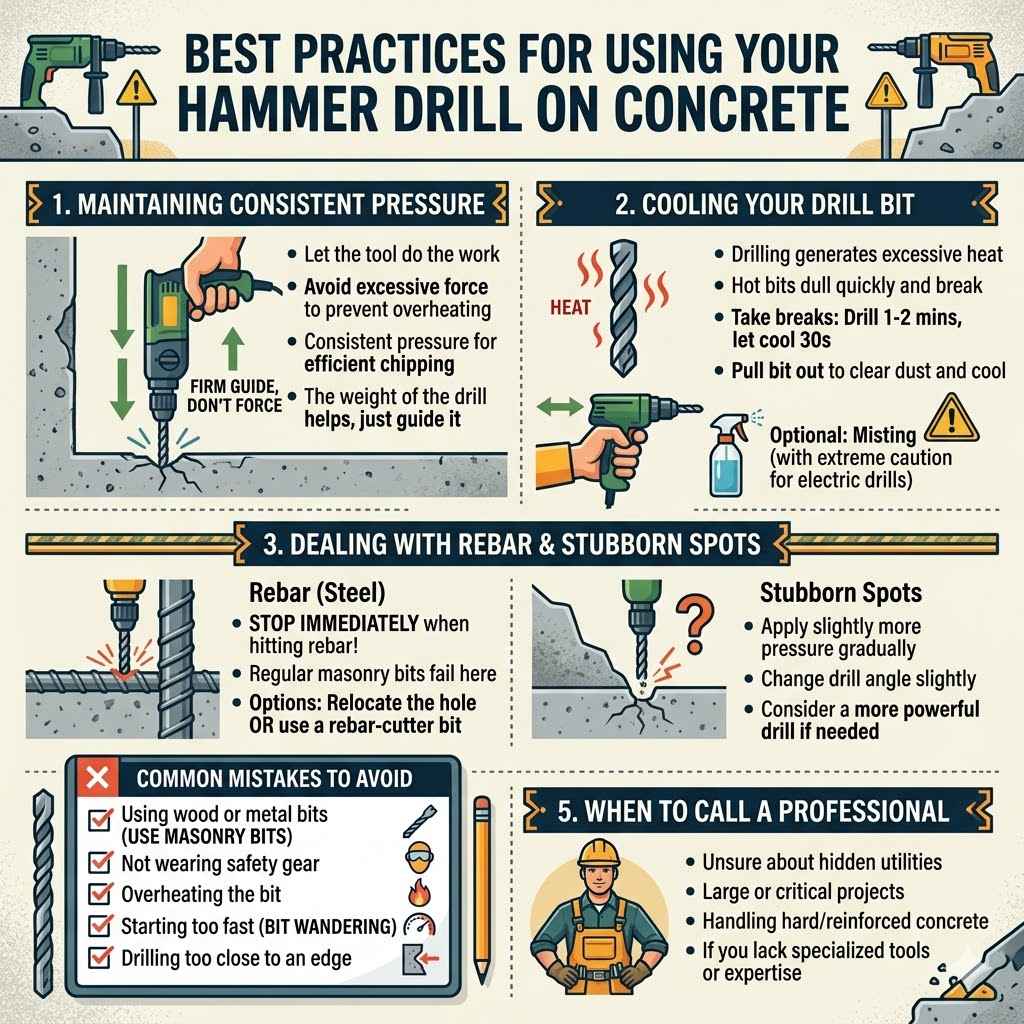
Maintaining Consistent Pressure
Applying consistent, firm pressure is key. However, this doesn’t mean forcing the drill. Let the tool do the work.
If you press too hard, you can overheat the drill bit and the motor, potentially damaging them. It can also cause the bit to bind. The hammering action of the drill is designed to chip away at the concrete, so allow that action to happen without excessive force.
If the drill starts to struggle or slow down significantly, ease up on the pressure, and make sure the dust is clearing properly.
The weight of the drill itself often provides enough downward force. You primarily need to guide the drill and maintain its position. Imagine you are guiding the drill bit through the concrete; you are not trying to ram it through.
This steady guidance, combined with the drill’s own power, is the most effective approach.
Cooling Your Drill Bit
Concrete drilling generates a lot of heat. A hot drill bit becomes dull faster, reducing its efficiency and increasing the risk of it breaking. As mentioned, pulling the bit out periodically to clear dust also helps cool it down.
Some professionals even use a spray bottle of water to lightly mist the drill bit and the hole as they work, though this can create a mess and should be done with caution, especially with electrical tools.
A more common and safer method for DIYers is simply to take breaks. Drill for a minute or two, then pull the bit out, let it cool for 30 seconds, and clear the dust. Repeat this process.
If you’re drilling many holes, let the bit and the drill cool down for several minutes between sections of work. This patience will save you money on replacement bits and prevent unexpected tool failure.
Dealing with Rebar or Stubborn Spots
Sometimes, you might encounter rebar (steel reinforcing bars) within the concrete, or a particularly hard patch. If you hit rebar, stop immediately. Continuing to drill into rebar with a standard masonry bit will likely damage your bit and potentially your drill.
If you hit rebar and it’s in the wrong spot, you may need to slightly adjust the location of your hole and start again. If the rebar is unavoidable and your project requires drilling through it, you will need a specialized rebar-cutting drill bit, often made of a much harder alloy.
For stubborn spots of concrete that are just harder than usual, try applying a bit more pressure gradually while ensuring the dust is clearing. Sometimes, a slight change in the angle of the drill can help the bit bite into a different part of the hard material. If it continues to be a struggle, consider if a larger or more powerful hammer drill might be needed, or if the spot is truly impenetrable with your current equipment.
Common Mistakes to Avoid
- Using the wrong drill bit: Always use a masonry bit designed for concrete. Regular wood or metal bits will dull and break very quickly.
- Not wearing safety gear: Concrete dust is dangerous. Always use a dust mask, safety glasses, and gloves.
- Overheating the bit: Don’t force the drill. Let the tool work and pull out periodically to clear dust and cool down.
- Starting too fast: Begin at a low speed to prevent the bit from wandering.
- Drilling too close to an edge: Concrete can spall (chip or break away) if you drill too close to an edge, especially in thinner concrete.
When to Call a Professional
While learning How to Drill Into Concrete: Best Local Hammer Drill Tips is achievable for most DIYers, there are times when calling a professional is the best course of action. If you’re unsure about hidden utilities, dealing with very hard or reinforced concrete that your tools can’t handle, or if you have a large or critical project, a professional contractor has the specialized tools and expertise to do the job safely and efficiently. It’s always better to be safe and seek expert help when needed.
Frequently Asked Questions
Question: What is the main difference between a hammer drill and a regular drill
Answer: A regular drill only spins, while a hammer drill spins and hammers rapidly at the same time. This hammering action is what allows it to break through hard materials like concrete.
Question: Do I need a special drill bit for concrete
Answer: Yes, you absolutely need masonry drill bits. These bits have a hard carbide tip designed to cut through concrete and other hard materials. Regular bits will not work.
Question: How deep can I drill into concrete
Answer: The depth you can drill depends on the length of your drill bit and the power of your hammer drill. Most standard bits and drills can handle holes several inches deep.
Question: What should I do if my drill bit gets stuck
Answer: If your drill bit gets stuck, stop drilling and try to gently twist it back and forth to loosen it. Ensure you’re not forcing it, and check that dust is clearing properly.
Question: Is concrete dust dangerous
Answer: Yes, concrete dust contains silica, which is harmful if inhaled. Always wear a dust mask, safety glasses, and gloves when drilling into concrete.
Summary
Learning How to Drill Into Concrete: Best Local Hammer Drill Tips involves selecting the right hammer drill and masonry bits. Follow a step-by-step process starting with safety, marking your spot, and drilling with consistent pressure. Remember to cool your bit, clear dust regularly, and avoid common mistakes.
You’ve got this!