How to Drill Out a Rivet A Simple Guide
Learning how to drill out a rivet can seem tricky at first, especially if you are new to working with metal. It is a common task in many repair and building projects, but getting it wrong can damage your materials. Don’t worry, though!
This guide will show you exactly how to do it step by step. We will cover everything you need to know, from picking the right tools to safely removing the rivet without causing any harm. Follow along, and you will master this skill in no time.
How To Drill Out A Rivet Professional Metalworking
This section is all about the fundamental skills and knowledge needed to successfully drill out a rivet. We will explore the basic principles behind this process, why it is an essential skill for metalworkers, and the common challenges beginners face. Understanding these basics is key to approaching any rivet removal job with confidence.
We will also touch upon the importance of safety and preparation before you even pick up a drill.
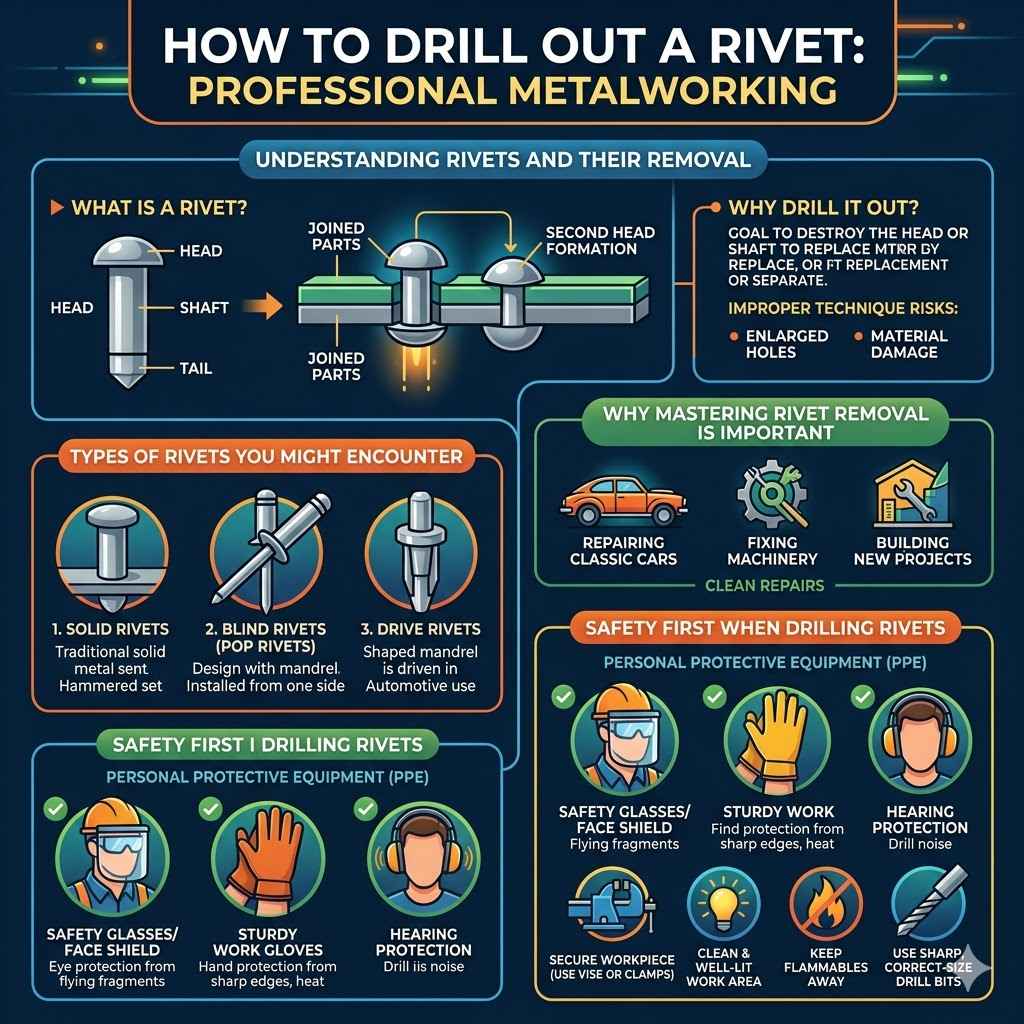
Understanding Rivets and Their Removal
A rivet is a permanent mechanical fastener. It is made of a smooth cylindrical shaft with a head on one end. The other end is called the tail.
When the rivet is inserted into a pre-drilled hole, the tail is hammered or pressed to form a second head, effectively clamping the two or more parts together. This makes them incredibly strong and reliable for joining materials, especially in structural applications.
Drilling out a rivet is the primary method for removing it when it needs to be replaced or when the joined materials need to be separated. The process involves using a drill bit to destroy the rivet head or shaft, allowing the joined parts to be separated. While it sounds simple, improper technique can lead to enlarging the hole, damaging the surrounding material, or creating unsafe conditions.
Types of Rivets You Might Encounter
- Solid Rivets: These are the most traditional type. They are made of solid metal and require a hammer and possibly a bucking bar to set. Removing them often involves drilling through the head.
- Blind Rivets (Pop Rivets): These are designed to be installed from one side only. They have a mandrel that is pulled through the rivet body. Drilling them out usually involves removing the head or the mandrel.
- Drive Rivets: These have a shaped mandrel that is driven in to expand the rivet body. They are common in some automotive applications.
Why Mastering Rivet Removal Is Important
Knowing how to drill out a rivet is a practical skill that comes up in many situations. Whether you are repairing a classic car, fixing a piece of machinery, or building something new, rivets are often part of the design. Being able to remove them cleanly means you can make repairs,
Safety First When Drilling Rivets
Safety is paramount when working with power tools and metal. Always wear appropriate personal protective equipment (PPE) to prevent injuries. This includes safety glasses or a face shield to protect your eyes from flying metal fragments and dust.
Wear sturdy work gloves to protect your hands from sharp edges and heat. Hearing protection is also recommended, as drills can be loud.
Ensure your work area is clean and well-lit. Keep flammable materials away from the drilling area. Secure the workpiece firmly so it does not move while you are drilling.
A vise or clamps are essential for this. Always ensure your drill bit is sharp and the correct size for the job. A dull bit can slip, overheat, and cause damage or injury.
Essential Tools For How To Drill Out A Rivet Professional Metalworking
To successfully drill out a rivet, having the right tools is critical. This section details the equipment you will need, explaining why each item is important and how it contributes to a clean and efficient removal process. We will cover everything from basic hand tools to specialized drill bits that make the job much easier and safer.
Choosing quality tools will ensure your work is precise and professional.
The Drill and Drill Bits
A good quality drill is your primary tool. A corded drill often provides more consistent power than a cordless one, which can be beneficial for longer jobs or tougher materials. However, a powerful cordless drill with a good battery can be very convenient.
Variable speed control is a must, allowing you to start slow and increase speed as needed.
The choice of drill bits is crucial. For drilling out rivets, you will typically use metal-cutting drill bits.
- High-Speed Steel (HSS) Bits: These are the most common and affordable. They are suitable for general metal drilling. For harder metals, consider HSS bits with a titanium coating (TiN). This coating adds a layer of hardness and lubricity, allowing the bit to cut more smoothly and last longer.
- Cobalt Bits: These are made from an alloy of steel and cobalt. They are harder and more heat-resistant than HSS bits, making them ideal for drilling into very hard metals like stainless steel or cast iron. They are more expensive but offer superior performance and durability.
- Carbide Bits: These are the hardest and most expensive drill bits. They are excellent for drilling extremely hard materials and can withstand high temperatures.
Center Punch and Hammer
Before drilling, you need to create a small indent on the center of the rivet head. This is done with a center punch and a hammer.
Center Punch: This is a pointed tool, usually made of hardened steel. Its purpose is to create a small dimple in the metal where the drill bit can start. This prevents the drill bit from wandering or slipping across the surface of the rivet head, ensuring a precise start to your drilling.
Hammer: A medium-sized ball-peen hammer or a claw hammer works well for striking the center punch. You do not need excessive force, just a firm tap to create a definite mark. Too much force could deform the rivet head or surrounding material.
Lubrication and Cooling
Drilling metal generates heat. This heat can dull your drill bits quickly, make them brittle, and damage the workpiece. Using a lubricant or coolant is essential to keep the drill bit cool and to help it cut more effectively.
- Drilling Oil or Cutting Fluid: These are specifically designed for metalworking. They help to lubricate the drill bit, reduce friction, and carry away heat and metal chips. Apply a small amount to the rivet head before you start drilling and reapply periodically as you drill.
- Wax or Soap: For softer metals, a bit of paraffin wax or even bar soap can act as a makeshift lubricant. It is not as effective as dedicated cutting fluids but can help prevent binding and overheating.
Other Useful Tools
- Safety Glasses: Absolutely non-negotiable. Protect your eyes from flying metal shavings.
- Work Gloves: Protect your hands from sharp edges.
- Clamps or Vise: To hold the workpiece securely.
- Wire Brush: To clean away metal chips and debris.
- Awl or Scriber: For marking.
- Measuring Tools: Like a ruler or caliper for precision.
How To Drill Out A Rivet The Step-By-Step Process
This section breaks down the entire process of drilling out a rivet into clear, manageable steps. We will guide you through each action, from preparation to the final removal of the rivet. Following these instructions carefully will help ensure a successful outcome and minimize the risk of errors.
Each step is designed for clarity and ease of execution, making How to Drill Out a Rivet: Professional Metalworking Guide achievable for everyone.
Step 1 Preparation and Safety Checks
Before you begin drilling, ensure you have gathered all the necessary tools and PPE. Put on your safety glasses and work gloves. Make sure your work area is clear and the workpiece is securely fastened.
Identify the type of rivet you are dealing with, if possible. This can help you anticipate how it might behave when drilled.
Ensure your drill is set to the correct rotation direction. For most drilling, you want the drill to rotate clockwise. Check the power source and ensure you have enough cable length or battery power for the job.
Step 2 Marking the Center
Take your center punch and place its tip directly on the center of the rivet head. Gently tap the end of the punch with your hammer. You do not need to hit it hard; a firm tap is enough to create a small, visible indentation.
This dimple serves as a guide for your drill bit.
A well-placed center punch mark is crucial. If the mark is off-center, your drill bit is more likely to wander, potentially damaging the surrounding material or creating an off-center hole. Precision here saves a lot of trouble later on.
Step 3 Selecting the Right Drill Bit Size
Choosing the correct drill bit size is vital. For most rivets, you want to use a drill bit that is slightly smaller than the diameter of the rivet head, but large enough to go through the entire head. A good starting point is to choose a bit that is about the same diameter as the rivet’s shank.
If you are unsure, it is better to start with a smaller bit and gradually increase the size. This is often referred to as “step drilling.” You can drill with a small bit, then move to a medium bit, and finally to a larger bit if needed. This method helps prevent the bit from grabbing or skipping.
Step 4 Drilling the Rivet Head
Place the tip of your chosen drill bit into the center punch mark. Set your drill to a low to medium speed. Apply steady, even pressure.
Let the drill bit do the work; do not force it. You want to drill through the head of the rivet.
As you drill, you will see metal shavings being produced. If you are using a lubricant, apply it now and as needed. If the drill bit starts to bind or overheat, stop, back it out, and let it cool.
You may need to reapply lubricant. The goal is to drill just through the head, enough so that it can be pried off.
Step 5 Removing the Head
Once you have drilled through the rivet head, it will likely become loose. You can often pry the head off with a flat-head screwdriver or a chisel. If it is stubborn, you might need to drill a little deeper, but be careful not to damage the material underneath.
Sometimes, drilling the head off is enough, and the rest of the rivet will fall out or can be pushed out. If the shank remains stuck in the hole, you may need to drill it out too.
Step 6 Removing the Rivet Shank
If the rivet shank is still in the hole after removing the head, you will need to drill it out. Use a drill bit that is the same size or slightly larger than the rivet shank diameter. Carefully center the drill bit on the remaining shank and drill through it.
This step requires precision. The aim is to drill out the shank without enlarging the original hole in the material you are joining. Once the shank is drilled out, you should be able to push out any remaining pieces.
Step 7 Cleaning Up
After the rivet is completely removed, use a wire brush to clean any metal debris or burrs from the hole and the surrounding area. Inspect the hole to ensure it is clean and free of any remnants of the rivet. If the hole needs to be reused, you might need to deburr its edges.
Now you have successfully drilled out a rivet! The hole is ready for a new rivet, a bolt, or whatever your project requires.
Troubleshooting Common Rivet Drilling Issues
Even with careful preparation, you might run into problems when drilling out rivets. This section addresses some of the most common issues faced by beginners and offers practical solutions. Knowing how to overcome these challenges will make your rivet removal experience smoother and more successful, building your confidence in your metalworking skills.
Drill Bit Slipping
This is a frequent problem, especially if you haven’t used a center punch. The drill bit skitters across the hard surface of the rivet head.
- Cause: Lack of a center punch mark or a dull drill bit.
- Solution: Always start with a center punch to create a stable starting point for the drill bit. If the bit is slipping despite the punch mark, ensure the bit is sharp and the correct type for metal. You can also try drilling a small pilot hole with a very small bit first.
Overheating Drill Bit
If you drill for too long without proper cooling, the drill bit can get very hot. This can dull the bit, make it brittle, or even cause it to break.
- Cause: Not using lubricant/coolant, drilling too fast, or applying too much pressure.
- Solution: Use a cutting fluid or oil regularly. Reduce your drilling speed and ease up on the pressure. Periodically withdraw the drill bit to allow air to cool it.
Drilling Through the Material
This happens when you accidentally drill too deep and go through the material you are trying to join.
- Cause: Lack of control over drill depth, using a bit that is too large for the shank.
- Solution: Be very mindful of how deep you are drilling. You can mark the drill bit with tape at the desired depth. For removing the shank, use a bit that is only slightly larger than the shank. Alternatively, consider using a drill stop on the bit.
Rivet Head Won’t Come Off
Sometimes, even after drilling, the rivet head remains attached or breaks off unevenly.
- Cause: Not drilling deep enough, or the rivet is damaged/deformed.
- Solution: Continue drilling slightly deeper, ensuring you are still centered on the head. If the head is severely deformed, you might need to use a cold chisel to break it away after drilling as much as possible.
Damaging the Surrounding Material
This can happen if the drill bit slips, or if the hole is enlarged too much.
- Cause: Poor centering, excessive force, or incorrect drill bit size.
- Solution: Always use a center punch. Apply steady, controlled pressure. If the hole is slightly enlarged, you might be able to use a slightly larger rivet or a backing washer to compensate. For critical applications, the damaged part might need to be replaced.
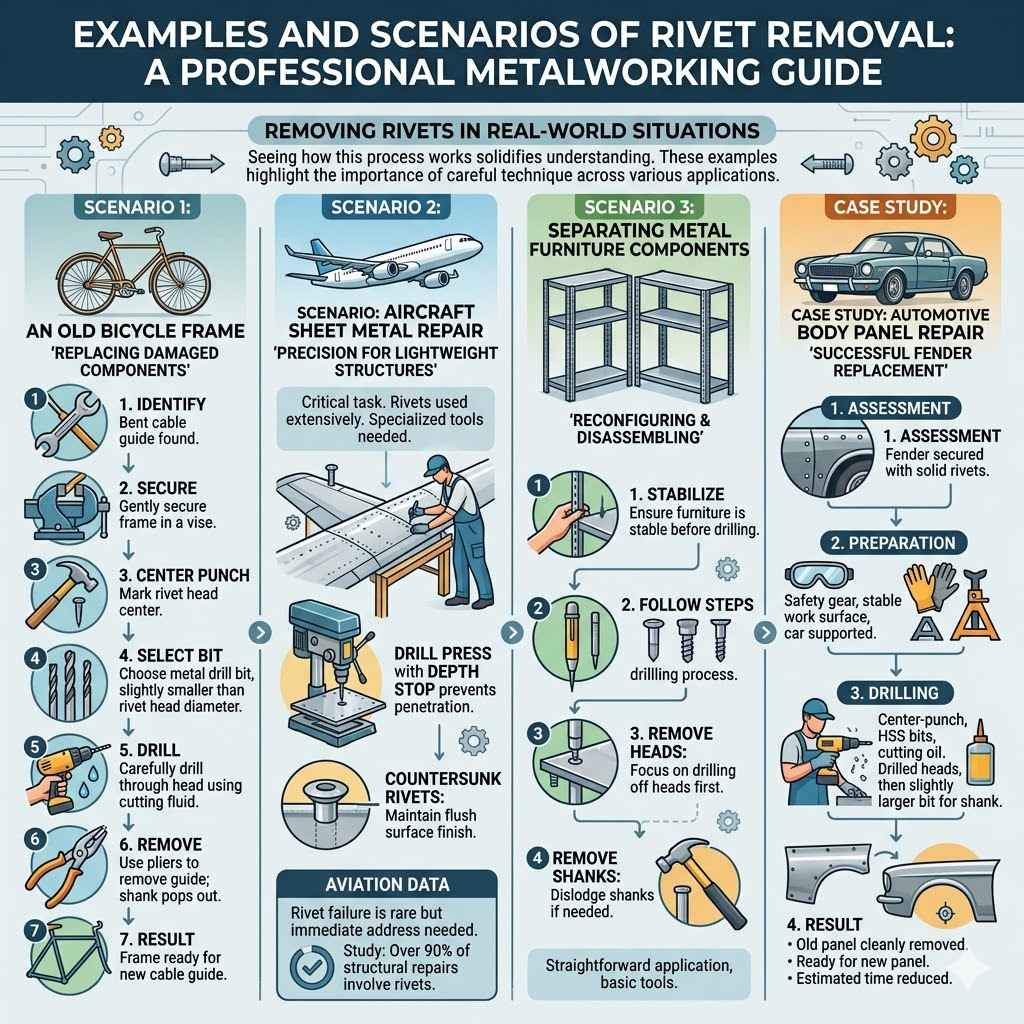
Examples and Scenarios of Rivet Removal
Seeing how this process works in real-world situations can solidify your understanding. This section provides practical examples and scenarios where drilling out rivets is a common and necessary task. These examples highlight the importance of careful technique and the various applications of How to Drill Out a Rivet: Professional Metalworking Guide.
Scenario 1 Restoring an Old Bicycle Frame
Imagine you are restoring a vintage bicycle. Many older frames use rivets for attaching components like cable guides or water bottle bosses. If a component is damaged or needs to be replaced, you will need to drill out the old rivets to remove it.
- You identify a bent cable guide that needs replacing.
- You secure the frame gently in a vise.
- You use a center punch to mark the center of the rivet head on the cable guide.
- You select a metal drill bit slightly smaller than the rivet head diameter.
- You carefully drill through the rivet head, using cutting fluid.
- Once the head is drilled off, you use pliers to remove the guide, and the rivet shank pops out.
- The frame is now ready for a new cable guide to be attached.
Scenario 2 Aircraft Sheet Metal Repair
In aircraft maintenance, rivets are used extensively to join lightweight sheet metal. If a section of the fuselage or wing skin is damaged, the damaged rivets must be removed to replace the sheet metal panel. This is a critical task where precision is paramount.
For aircraft rivets, technicians use specialized tools and techniques. They might use a drill press with a depth stop to ensure they do not penetrate the underlying structure. The types of rivets used in aircraft, like countersunk rivets, require careful drilling to maintain the flush surface finish.
Statistics show that in aviation, rivet failure is rare but must be addressed immediately. For instance, a study by the FAA noted that over 90% of structural repairs involve rivets.
Scenario 3 Separating Metal Furniture Components
You might have a metal shelving unit or a piece of furniture that is held together with rivets. If you need to move it or reconfigure it, you may need to disassemble it. Drilling out the rivets is the only way to separate the components.
This is a more straightforward application, often achievable with basic tools. The key is to ensure the furniture is stable before you start drilling. You would follow the same step-by-step process outlined earlier, focusing on removing the heads first, then the shanks if they remain lodged.
Case Study: Automotive Body Panel Repair
A classic car enthusiast needed to replace a rusted section of a fender. The fender was originally attached using rivets. The professional restorer followed this guide:
- Assessment: The restorer identified that the fender was secured with several solid rivets.
- Preparation: Safety glasses, gloves, and a stable work surface were ensured. The car was supported securely.
- Drilling: Using a drill with HSS drill bits and cutting oil, the restorer carefully center-punched and drilled out each rivet head. He opted for a slightly larger bit for the shank to ensure clean removal.
- Result: The old fender section was removed cleanly, allowing for the installation of a new metal panel using new rivets. The estimated time for rivet removal was significantly reduced due to the systematic approach.
Frequently Asked Questions
Question: What is the best drill bit to use for removing rivets
Answer: For most general-purpose rivets, a High-Speed Steel (HSS) drill bit is suitable. If you are working with harder metals like stainless steel, consider a Cobalt drill bit for better performance and longevity.
Question: How do I prevent the drill bit from slipping
Answer: Always use a center punch to create a small indentation on the center of the rivet head before drilling. This provides a stable starting point for the drill bit and prevents it from wandering.
Question: What if I accidentally drill too deep and damage the material
Answer: If the hole is slightly enlarged or damaged, you might need to repair it. For some applications, using a slightly larger rivet or a backing washer can compensate. In critical structural areas, the damaged part may need replacement.
Question: How do I know when to stop drilling
Answer: You should stop drilling once the rivet head has been completely removed or is loose enough to be pried off. For removing the shank, drill until the shank material is gone.
Question: Can I use a cordless drill for this
Answer: Yes, a cordless drill can be used, especially if it has good power and battery life. However, for extended or tougher jobs, a corded drill might offer more consistent power. Variable speed control is important for both types.
Summary
Mastering how to drill out a rivet is a key skill for metalworkers. By following these steps—preparation, precise centering, careful drilling with the right bits and lubrication, and controlled removal—you can efficiently take out rivets. This guide ensures you can tackle the task safely and effectively, leaving your work clean and ready for the next stage.