How to Install a Wood Stove Chimney: Step-by-Step Guide
Are you dreaming of cozy winter nights by a crackling fire in your home? Installing a wood stove can transform your living space into a warm and inviting retreat.
But before you can enjoy those flickering flames, you need to tackle one crucial step: installing the chimney through your roof. This might sound daunting, but don’t worry. With the right guidance, you can achieve it safely and efficiently. In this guide, we’ll walk you through the process step by step, ensuring your home stays safe and your stove works efficiently.
Ready to turn up the heat in your home? Let’s get started!
Choosing The Right Wood Stove
Picking a wood stoverequires careful thought. Size matters. A small stove heats small spaces. Large stoves are perfect for big rooms. Think about the typetoo. Freestanding or insert? Freestanding stoves are easy to move. Inserts fit into fireplaces. Each type has pros and cons.
Efficiency counts a lot. High-efficiency stoves save money. They burn less wood. Safety is crucial. Look for safety features. Automatic shut-off is helpful. Heat shields protect walls. These features keep your home safe. Make sure the stove meets safety standards. Certifications are important. They ensure safety and quality.
Planning Chimney Installation
Measure the room. Make sure there’s enough space. The chimney needs clearance from walls. Furniture should not be close. You need to think about the ceiling height. The chimney should go up easily. Safety is very important. Keep kids away from the chimney area. Fire hazards should be avoided.
Check local rules first. Building codes can vary. You might need permits. Local rules can tell you where to place the chimney. Smoke must be able to exit safely. Neighbors should not be disturbed. Fire safety rules are very important. A chimney should follow all safety guidelines.
Gathering Necessary Tools And Materials
Certain tools are needed for a smooth installation. A tape measure helps with accurate measurements. Power drill and drill bits make holes in the roof easily. Screwdriver tightens screws and bolts securely. Saw is useful for cutting wood pieces. Safety goggles protect your eyes from dust. Work gloves keep your hands safe from sharp objects.
Various materials are essential for chimney setup. Chimney pipe carries smoke outside. Roof flashing prevents leaks around the pipe. Chimney cap stops rain and debris from entering. Sealant ensures no water enters the home. Fireproof insulation keeps heat from escaping. Metal brackets hold the chimney pipe firmly.

Credit: www.tinywoodstove.com
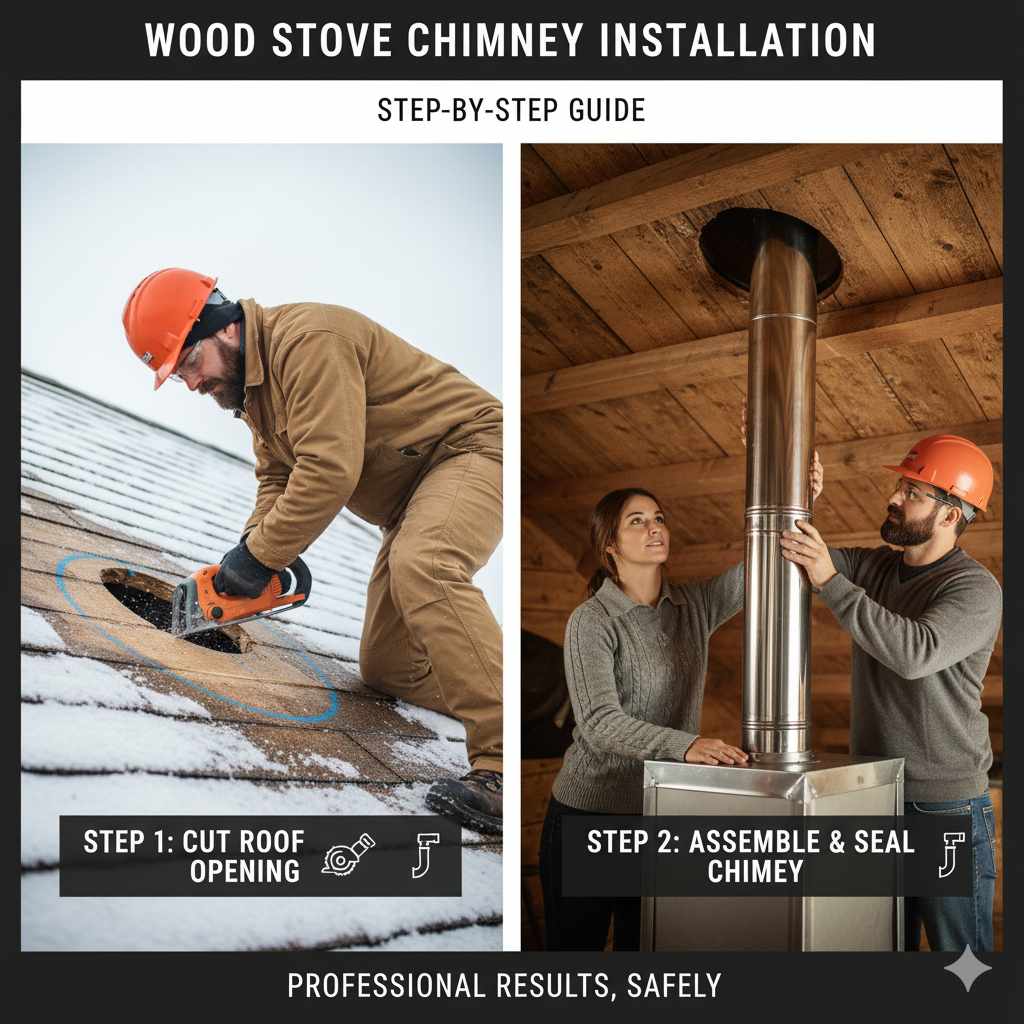
Preparing The Installation Site
Start by clearing the area for the wood stove chimney. Ensure the roof space is free of obstacles. Check the roof’s structure for stability before cutting.
Clearing And Measuring The Area
Start by removing all items from the area. This makes room for the stove. Measure the space for the chimney opening. Use a tape measure for accuracy. Make sure there are no obstacles above. This includes wires and beams. The roof must be clear for the chimney. Ensure the space is adequate for safety.
Setting Up Safety Precautions
Put on a hard hat and safety goggles. These protect from falling debris. Use a sturdy ladder to reach the roof. Make sure it’s on stable ground. Have a friend hold the ladder. This prevents accidents. Keep a fire extinguisher nearby. It’s important in case of a fire. Safety first!
Assembling The Chimney Components
Sectional Assembly Processinvolves fitting each chimney part together. Start with the bottom section. Align it properly. Then, connect the next piece. Make sure each piece fits snugly. This ensures stabilityand safety. Continue until all sections are in place. Remember, each piece should lock tightly.
Ensuring Proper Seals and Connectionsis vital for safety. Use sealant on each joint. This prevents smoke leaks. Check all connections. They must be tight. Loose connections can be dangerous. Inspect your work carefully. Make sure all seals are complete. This will keep your home safe.

Credit: belleflame.com
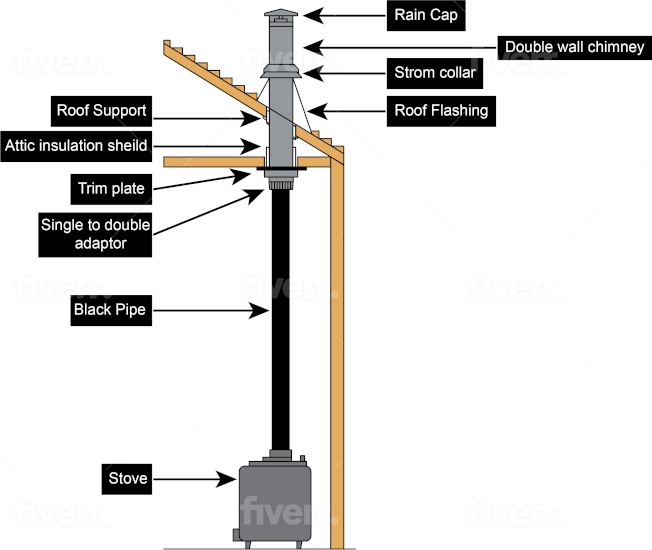
Installing The Chimney
Start by placing the chimney’s base on the roof. Make sure it is stable and won’t move. Use strong brackets to hold the base firmly. These brackets keep the chimney safe during windy days. Check each bracket to ensure it is tight. Once the base is secure, focus on the support. Use metal straps to strengthen the chimney. These straps add extra security. Make sure the straps are tightened properly. This prevents any wobbling or shifting.
Connect the chimney pipe to the stove’s outlet. Ensure the pipe fits snugly. This prevents smoke from escaping. Use a sealant around the joint. This seals any gaps. Tighten all clamps on the pipe. This keeps the connection firm. Check the pipe’s angle. Make sure it is straight. A crooked pipe affects smoke flow. Double-check each connection point. This ensures the chimney works efficiently.
Ventilation And Insulation
Installing a wood stove chimney through the roof requires careful planning for effective ventilation and insulation. Ensure a proper seal to prevent leaks and maintain energy efficiency. Follow safety guidelines to protect your home and enhance stove performance.
Ensuring Adequate Airflow
Good airflow keeps the wood stove safe. It prevents smoke build-up. Use a chimney cap for better airflow. It reduces rain and debris entering the chimney. Always check for blockages. Clean the chimney regularly to maintain airflow. Ventilation is crucial for safety.
Proper Insulation Techniques
Insulation helps keep the heat inside. It prevents cold air from entering. Use fire-resistant materials to insulate the chimney. Wrap the chimney pipe with insulation. Ensure the roof hole is sealed tightly. This stops air leaks. Insulation saves energy and keeps the house warm.
Testing The Wood Stove Chimney
Installing a wood stove chimney through the roof requires careful attention to safety and alignment. Ensure the chimney is properly sealed to prevent leaks. Regular testing helps maintain efficiency and ventilation, keeping your home warm and safe.
Initial Safety Checks
Check if the chimney is clean and clear. No leaves or debris should block it. Inspect the chimney cap. Make sure it fits well. A loose cap can cause problems. Look for cracks in the chimney. Cracks can be dangerous. Ensure all connections are tight. Loose parts can cause smoke leaks.
Check the stove pipe. It should be straight and strong. Examine the roof seal. Look for any gaps or damage. Water can leak through gaps. Test the draft. Light a small fire and see if smoke goes up. If smoke stays, there is a problem. Fix any issues before using your stove. Safety comes first.
Performance Evaluation
After ensuring safety, test the chimney’s performance. Light a small fire. Watch the smoke flow. Smoke should rise quickly. Check for leaks around joints. No smoke should escape. Feel the stove’s heat. It should be warm and even. Measure the draft strength. A strong draft pulls smoke up fast. Listen for strange sounds. Odd noises mean something is wrong. Fix problems to ensure safe and efficient use.
Maintenance Tips
Cleaning the chimney is very important. Soot and creosote can build up. These can cause fires. Use a brush to clean the chimney. Do this at least once a year. Wear a mask and gloves for safety.
Check the chimney for cracks. These can let in water. Water can damage your chimney. Look for rust on metal parts. Rust means the metal is weak. Fix these issues quickly. It keeps the chimney safe and strong.
Credit: smallwoodstoves.com
Frequently Asked Questions
How To Put A Flue Through A Roof?
Cut a hole in the roof matching the flue’s diameter. Install a flashing kit. Secure the flue pipe. Seal gaps with high-temperature silicone. Ensure proper clearance from combustibles.
What Is The 3 2 10 Rule For Chimneys?
The 3 2 10 rule for chimneys ensures safety and proper draft. Chimneys must extend at least 3 feet above the roof surface, be 2 feet higher than any roof structure within 10 feet horizontally, and adhere to local building codes.
This rule helps prevent fire hazards and ensures efficient ventilation.
Does A Wood Stove Have To Vent Through The Roof?
A wood stove typically vents through the roof for safety and efficiency. Horizontal venting is possible but less common. Proper installation by a professional ensures optimal performance and compliance with local building codes. Always prioritize safety and manufacturer guidelines when installing a wood stove.
How High Should A Wood Burning Stove Chimney Be Above The Roof?
A wood burning stove chimney should extend at least 3 feet above the roof and 2 feet higher than any part of the roof within 10 feet horizontally. This ensures proper draft and safety, reducing the risk of smoke backflow and chimney fires.
Conclusion
Installing a wood stove chimney through the roof requires careful planning. Safety first. Follow all safety guidelines and local building codes. Gather the right tools and materials before starting. Double-check measurements for accuracy. Ensure all seals are tight to prevent leaks.
Take your time to ensure a proper fit. Regular maintenance is crucial for long-term efficiency. Clean the chimney annually to avoid soot build-up. Enjoy the warmth and comfort your wood stove brings. With careful attention, your installation will be successful.
Stay warm and cozy through the cold months.