
How to Lay Tile Wood Planks: A Step-by-Step Guide
Laying tile wood planks involves starting with two rows and then running them from one end to the other of the room. Use a tile leveling system for a perfect flatness of each row.
Once the first rows are aligned and flat, complete one row at a time. When laying tile wood planks, it’s essential to pay attention to the orientation of the tiles. Taking care to ensure each row is perfectly flat, it’s important to start with two rows and then run them from one end to the other of the room.
Using a tile leveling system can help achieve this flatness. Additionally, when dealing with wooden floors, it’s important to consider adding a layer of board between the floorboards and the tiles to provide a flat, even surface that prevents cracking due to movement.
Pre-installation Preparation
Learn how to lay tile wood planks with these easy steps. Start by preparing your subfloor and ensuring it is level and in good condition. Use a tile leveling system to ensure each row is flat. Then, lay the tiles one row at a time, paying attention to the orientation for a seamless look.
Gathering Tools And Materials
Before starting the installation process, it is crucial to gather all the necessary tools and materials. The following items will be required:
- Wood plank tiles
- Tile adhesive
- Tile spacers
- Level
- Tape measure
Preparing The Subfloor
Prior to laying the wood plank tiles, it is essential to prepare the subfloor adequately. The steps involved in preparing the subfloor include:
- Ensuring the subfloor is clean and free of debris
- Checking for any protrusions or imperfections
- Repairing any cracks or damage
Installation Process
When laying tile wood planks, the installation process is crucial to achieving a professional finish.
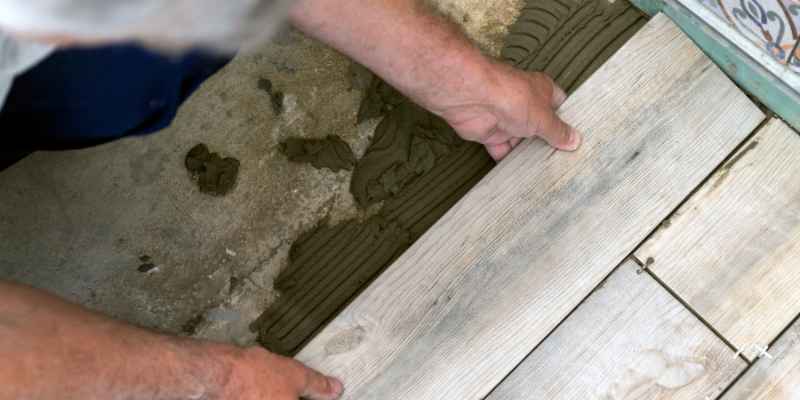
Applying Thin-set
- Prepare subfloor by ensuring it is clean and level.
- Spread thin-set mortar using a trowel in a consistent layer.
- Apply thin-set in small sections to avoid drying out.
Laying The Tiles
- Start by placing the first tile in the corner of the room.
- Use tile spacers to maintain uniform spacing between tiles.
- Continue laying tiles row by row, ensuring they are aligned.
Using Tile Leveling System
- Ensure each row is perfectly flat by using a tile leveling system.
- Start with two rows and run them from one end to the other of the room.
- Complete one row at a time for a consistent finish.
Key Considerations
Looking to lay tile wood planks? Start by paying attention to the orientation of the tiles and use a tile leveling system for a perfectly flat surface. Follow specific guidelines to tile directly on wood and ensure a proper installation for plank tiles.
Orientation Of The Tiles
When it comes to laying tile wood planks, the orientation of the tiles plays a crucial role in achieving a visually appealing and professional finish. It is important to pay attention to the orientation of the tiles to ensure a seamless look.
Start by laying two rows of tiles and then run them from one end of the room to the other. This method helps create a consistent pattern and prevents any noticeable transitions. Make sure to use a tile leveling system to ensure each row is perfectly flat.
Once you have aligned and flattened the first rows, you can proceed with the installation, completing one row at a time. This systematic approach ensures a smooth and uniform appearance throughout the floor.
Installing Tiles On Wooden Subfloors
If you have a wooden subfloor or an old hardwood floor, you may wonder if it is possible to install tiles directly on them. The answer is yes, but it is crucial to follow the appropriate guidelines to ensure a successful installation.
First, check if the hardwood floor is level and in good condition. If it meets these criteria, you can proceed with installing tiles over the surface. However, it is essential to treat the wooden subfloor the same way you would for any other suitable installation.
Prepare the wooden floor by ensuring it is clean and free from any debris. This step is crucial for achieving proper adhesion between the tiles and the subfloor. Additionally, it may be necessary to use a primer or an appropriate bonding agent to enhance the bond between the wooden subfloor and the tile adhesive.
By following these guidelines, you can confidently install tiles on wooden subfloors and achieve a beautiful and long-lasting result.
Challenges And Solutions
When installing tile wood planks, several challenges may arise during the process. However, with the proper solutions in place, you can overcome these obstacles seamlessly.
Dealing With Floor Movement
One common challenge when laying tile wood planks is dealing with floor movement. Uneven subfloors can cause tiles to crack over time. To mitigate this issue, ensure subfloor is leveled before tile installation.
Selecting The Right Tile Direction
Choosing the proper tile direction is crucial for achieving a seamless look. Start with two rows and run them from one end to the other to establish alignment. Utilize a tile leveling system for consistent flatness throughout the installation.
Professional Tips
Discover expert tips for laying tile wood planks to achieve a professional finish. Start by carefully planning the layout and using a tile leveling system for precision. Properly prepare the subfloor and pay attention to tile orientation for a flawless installation.
Running Wood-look Tile Across The Room
For a professional and polished look, it’s crucial to run wood-look tile across the room in a consistent and organized manner. Utilizing a tile leveling system is essential to ensure each row is perfectly flat, contributing to a seamless finish. Starting with two rows and carefully aligning and leveling them serves as a strong foundation to continue laying out the entire floor.
Starting With Two Rows
Commencing the installation process with two rows provides a stable base to progress from one end of the room to the other, ensuring a uniform and aesthetically pleasing result. By meticulously aligning and leveling the initial rows using a reputable tile leveling system, the subsequent rows can be completed with accuracy and precision, guaranteeing a professional finish.
Additional Resources
Learn how to lay tile wood planks with additional resources like video tutorials and expert tips on how to install and tile wooden floorboards. Discover proper installation and the use of tile leveling systems to ensure a flat and aligned finish.
Explore guides for tiling over wooden subfloors and old hardwood floors.
Blogs And Tutorials
If you want to learn more about laying tile wood planks, numerous blogs and tutorials are available to guide you through the process. From basic to advanced tips and tricks, these resources offer valuable insights to ensure a successful tile installation.
Expert Opinions And Insights
For expert opinions and insights on laying tile wood planks, consult professionals in the field. Their experience and knowledge can provide essential guidance to help you achieve the best results in your tiling project.
Frequently Asked Questions On How To Lay Tile Wood Planks
How Should Wood Tile Be Laid?
Wood tile should be laid starting with two rows and running them from one end to the other of the room. Use a tile leveling system to ensure alignment and flatness. Complete one row at a time, paying attention to the orientation of the tiles.
Avoid putting tiles edgewise and use a flat, even surface if tiling over wooden floors.
Can You Put Tile Directly On Wood?
Yes, you can tile directly over a wooden subfloor or old hardwood floor if it’s level and in good condition. Just make sure to follow the same rules as for any other suitable installation.
What Is The Proper Installation For Plank Tiles?
To install plank tiles properly, follow these steps:
1. Pay attention to the orientation of the tiles and start with two rows, running them from one end of the room to the other.
2. Use a tile leveling system to ensure each row is perfectly flat.
3. Make sure the first rows are aligned and flat before continuing with one row at a time.
4. If installing over wooden subfloors, add a layer of board in between for a flat surface.
5. It is possible to tile over old hardwood floors if they are level and in good condition.
(Note: Avoid starting sentences with the phrases “When it comes to” or “If you. ” Write in an active voice and keep sentences brief and precise. )
How Do You Tile Wooden Floor Boards?
To tile wooden floor boards, start by ensuring the floorboards are flat and in good condition. Then, add a layer of board between the floorboards and the tiles to provide a flat surface. Use a tile leveling system to ensure each row is flat and aligned.
Lay the tiles row by row, starting with two rows and working your way across the room. Follow the same installation rules as for any other suitable installation. Avoid putting the tiles edgewise.
Conclusion
Transform your space with wood look tile by following these easy installation steps. Start with proper subfloor prep and utilize a tile leveling system for a flawless finish. Pay attention to tile orientation and enjoy a beautifully laid wood plank floor that enhances your room’s aesthetic.
Happy tiling!