How to Make a Cheese Board from Wood: DIY Guide for Exquisite Charcuterie
To make a cheese board from wood, choose a non-porous hardwood like acacia wood, teak, rubberwood, or hard maple, and apply a food-safe wax or oil to seal it. This will protect the wood and make it more durable for repeated use.
A cheese board is the perfect accompaniment to any gathering or party. It’s a charcuterie board that can be used to serve appetizers, cheese, crackers, and fruits. Making a cheese board from wood is a simple DIY project that anyone can do.
We will discuss the best wood to use, how to treat the wood for optimal durability, and step-by-step instructions on how to make a cheese board from wood. Whether you’re a woodworking novice or an expert, making a cheese board from wood is an easy way to impress your guests and elevate your entertaining game.
Tools And Materials
Learn how to make a cheese board from wood with these helpful resources. Explore tips for choosing the best wood, cutting techniques, sanding and finishing tips to ensure your final product is food safe and beautiful. Create a custom cheese board perfect for entertaining guests or for adding a touch of elegance to your next charcuterie night.
Necessary Tools
To make a cheese board from wood, you’ll need some essential tools such as circular saw, Jigsaw, measuring tape, drill, sandpaper, clamps, and wood glue. Circular saw is used to create the rough shape of the board, followed by the utilization of the Jigsaw which is an excellent tool for making the intricate cuts. Measuring tape is used to measure the dimensions of the cheese board accurately, while the drill makes holes to attach the handles.
You also need a sandpaper to smoothen rough edges, clamps to hold the wooden pieces together and wood glue for bonding purposes. With these essential tools, you can make a beautiful cheese board that will be perfect for your next party or gathering.
Recommended Materials
When it comes to choosing the right material for your cheese board, there are many factors to consider, including food safety, durability, and appearance. Hardwoods such as acacia, teak, rubberwood, and hard maple are great choices for cheese boards as they are durable, non-porous, and long-lasting. You can also incorporate an inlay of an exotic wood species to add a unique look to your board and epoxy resin to give it a glossy finish.
Another way to create an attractive cheese board is to use live edge wood or to incorporate patterns like marbling or herringbone. When choosing the wood material, ensure that it is food-grade safe by avoiding woods treated with pesticides, formaldehyde, and other harmful chemicals.
Preparing The Wood
Before making a cheese board from wood, it’s important to prepare the wood to ensure it’s food safe. Start by choosing a non-porous hardwood such as acacia, teak, rubberwood or hard maple. Seal the board with a food-safe wax or oil, and oil it at least once a month to maintain its condition.
Before making a cheese board, it is crucial to prepare the wood properly. There are several crucial steps involved in this process that need to be followed to ensure the longevity of the cheese board. Preparing the wood involves cleaning it in the right way, applying a sealant to the surface, and sanding it. Let’s explore these steps in more detail and understand how proper preparation of the wood can make your cheese board last for years.
Cleaning the Wood:
The first step in preparing the wood is cleaning it correctly. It is essential to remove any dust, debris, or grime that may be present on the surface of the wood. To clean the wood, use a soft-bristled brush to remove any loose debris that may be present, followed by a damp cloth to eliminate any remaining dirt. Be sure to dry the wood properly to prevent any moisture from penetrating.
Applying a Sealant:
Once the wood is clean and dry, the next step is to apply a sealant to protect it from moisture and damage. The sealant can be in the form of food-grade mineral oil or beeswax. Ensure that the sealant is applied evenly across the entire surface of the wood, including the edges and sides. Applying a sealant will not only protect the wood from damage, but it also enhances the natural grain and color of the wood.
Sanding the Surface:
The final step in preparing the wood is sanding the surface. Sanding the wood with the correct grit sandpaper is essential in achieving an even and smooth surface that is suitable for food preparation. Start with a coarse grit sandpaper and gradually move to finer grit sandpaper to achieve a smooth surface. After sanding, ensure that all the dust and debris are removed from the surface of the wood.
In conclusion, preparing the wood is a crucial step in making a cheese board that will last for years. Proper cleaning, sealing, and sanding of the wood will not only make the cheese board more aesthetically pleasing, but it will also ensure that the board meets the necessary hygiene standards. Remember to use non-porous hardwoods such as acacia wood, hard maple, or teak for the best results.
Designing The Board
Learn how to make a cheese board from wood without any hassle. Follow a few simple steps such as cutting out the board, drilling the holes in the handle, sanding, finishing, and installing the suede cord. It is a great DIY project and can also be an excellent gift for your loved ones.
Choosing The Shape And Size
When designing a cheese board from wood, the shape and size are crucial elements to consider. A cheese board should be functional, aesthetically pleasing, and proportionate. A rectangular or oval shape is ideal for a cheese board since it can hold several varieties of cheese and their accompaniments. The size of the board should depend on the number of people you are planning to serve. For example, choose a small board for intimate gatherings and a large board for bigger events.
Adding Personal Touches
Adding personal touches to a cheese board can make it unique and memorable. You can customize your cheese board by engraving your initials or carving a design onto the surface. Another way to add a personal touch is by decorating the board with fresh herbs, fruits or flowers. These elements not only enhance the presentation but also add a natural fragrance to the board.
Creating Handles And Grooves
Creating handles and grooves on a cheese board is both functional and aesthetically pleasing. Handles on a cheese board make it easy to carry, while grooves keep cheese in place. To make handles, drill holes in the board on either side with a spade bit and attach leather or rope for a rustic touch. Grooves can be created by using a router with a groove bit. These grooves will add sophistication to the board and ensure the cheese stays in place.
In conclusion, designing a cheese board from wood is an excellent way to display and serve cheese and its accompaniments. By choosing the right shape and size, adding personal touches, and creating handles and grooves, you can elevate your cheese board to the next level. Remember that the type of wood used will also affect the outcome of the board, so choose carefully.
Adding The Finishing Touches
Learn how to make a stunning cheese board from wood with this step-by-step guide. From choosing the right wood to adding the finishing touches such as live edge, inlay, epoxy resin, and more, you’ll have everything you need to create a beautiful and functional charcuterie board for your next gathering.
Now that you have created your beautiful cheese board from wood and arranged your carefully chosen cheese and accompaniments, it’s time to add the finishing touches. These final touches will not only enhance the appearance of your board but will also ensure its longevity. In this section, we will discuss the three essential finishing touches that will make your cheese board stand out. Remember, using high-quality materials and products is key to preserving and maintaining the natural beauty of your cheese board.
Applying a Finishing Oil
Applying finishing oil to your cheese board provides a layer of protection against moisture and can help revive its natural beauty. The type of oil used will depend on the wood type used in creating the cheese board. Mineral oil is a popular choice and is food-safe, chemical-free, and odorless. The oil forms a protective barrier against water absorption, which prevents the wood from splitting or cracking.
The best time to apply finishing oil is after cleaning and drying the cheese board. Using a clean, dry cloth, apply the oil thinly and evenly over the entire surface of the board, including the edges and handle. Allow the oil to soak in for several hours before wiping off any excess oil using a dry cloth. A well-oiled cheese board is a long-lasting cheese board.
Polishing the Surface
Polishing the surface of your cheese board adds a professional-looking finish and can highlight the natural wood grain. Before polishing, clean and dry the cheese board. Use a fine-grit sandpaper to smooth out any splinters or rough surfaces gently. Then apply a layer of beeswax using a clean, lint-free cloth to protect and restore the wood’s natural luster. Rubbing the cheese board with the waxed cloth in a circular motion to create a polished finish. The wax will also make it easier to clean the cheese board in the future.
Adding Decorative Elements
Adding decorative elements to your cheese board can make it more attractive and create a memorable experience for your guests. Fresh herbs, edible flowers, and fruits can add pops of color and texture to your board. Consider placing your cheese board on an elegant wooden cheese board tray or a chiseled slate cheese board for a sophisticated, rustic look. You can also add decorative markers to label the types of cheese on the board, which can create an educational element and an enjoyable experience for your guests.
In conclusion, applying a finishing oil, polishing the surface, and adding decorative elements are crucial finishing touches in making a cheese board from wood. These finishing touches will not only preserve and maintain the integrity of your board, but it will also make your cheese board uniquely yours and attractive to your guests. Remember always to use high-quality materials and products and to have fun creating your one-of-a-kind cheese board.

Setting Up The Cheese Board
Learn how to make a beautiful cheese board from wood with these easy step-by-step guides. Discover trending ideas like live edge, inlay, epoxy resin, and edge wood, and explore the best wood types for charcuterie boards such as acacia wood, teak, rubberwood, and hard maple.
Plus, find out how to treat your cheese board to make it food safe with sealing, oiling, or waxing.
Whenever cheese boards come to mind, the word sophistication always comes to mind. They are an art form in their own right and can elevate the look of any event. Setting up a cheese board is not only about placing a variety of cheeses on a board; it involves considering those little details that result in a visually appealing and delicious experience. Let’s delve into the specific aspects of setting up a cheese board that will transform it into a beautiful work of art.
Choosing the Right Cheese
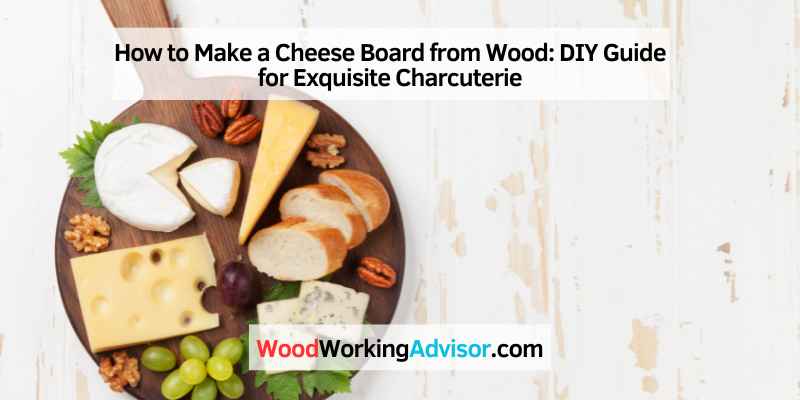
The foundation of any cheese board is the cheese, and selecting the right kind of cheese is important. The key idea is the contrast of flavor, texture, and color. Aim for at least three types of cheese to create variety. Choose soft, semi-soft, and hard types of cheese. For instance, Camembert or Brie will provide that creamy and mild flavor, a sharp cheddar, or a gouda gives that sharp and savory taste. Finally, consider a crumbly blue cheese like Roquefort or Gorgonzola. Bam! You have yourself a perfect combination of cheese.
Pairing with Accompaniments
Cheese boards go well with lots of sweet and savory accompaniments to balance the flavors of the cheese. Fresh or dried fruits like grapes, apples, figs, berries, and apricots are excellent options for adding an exciting texture. Nuts like almonds and walnuts provide a crunchy and earthy flavor that enhances the taste of cheese. Adding crackers, breadsticks, or sliced baguette is an easy way to provide guests with something to mix and match with.
How to Serve the Cheese Board
Serving the cheese board requires more than just placing cheese and accompaniments on a board. It should be visually appealing and inviting. Begin by arranging the cheese on the board in a manner that creates balance and symmetry. Consider the shape, size, and texture of the cheese when arranging them. When placing the accompaniments, ensure they complement the cheese and are positioned cleverly around it. And finally, labeling the cheese on a separate card or cutting board ensures that your guests will know what they are enjoying.
In conclusion, setting up a cheese board involves a combination of art and culinary. Selecting the right kind of cheese, pairing with the right accompaniments, and serving it in an appealing way will ensure you make a cheese board that is both visually satisfying and delicious. So, impress your guests with a cheese board that will leave a lasting impression.
Maintenance And Care
Learn how to make a beautiful cheese board from wood by using non-porous hardwoods such as acacia wood, teak, rubberwood or hard maple. Oiling and sealing the board is essential to keep it food-safe and maintain its quality. Follow these guidelines for a charcuterie board that is both functional and aesthetically pleasing.
To keep your wooden cheese board in top condition and prevent any deterioration, maintenance and care are crucial. Here are some tips on how to clean and store your board, how to re-seal the wood, and how to increase its longevity.
Cleaning and Storing the Board
Cleaning the board after each use is essential to keep it hygienic and to maintain its appearance. Avoid soaking the board in water or putting it in the dishwasher, as this can cause the wood to warp or split. Instead, use a damp cloth and mild soap to wipe down the surface. Dry it thoroughly with a clean cloth before storing it in a dry and cool place away from direct sunlight and heat.
Re-Sealing the Wood
To keep your wooden cheese board looking its best, re-sealing the wood periodically is essential. This will prevent the wood from drying out and reduce the risk of stains or odors. Use food-grade mineral oil or beeswax to seal the board. Pour a small amount of oil or wax onto the surface and use a clean cloth to apply it evenly. Let it soak in for a few hours or overnight before wiping off any excess with a clean cloth.
Tips for Longevity
To ensure the longevity of your wooden cheese board, avoid exposing it to extreme temperatures, moisture, or humidity. Do not use it as a cutting board, as this can damage the surface and increase the risk of bacterial contamination. Use a separate cutting board instead. Also, avoid using harsh detergents, scouring pads, or steel wool to clean the board, as this can scratch the surface. Instead, use a gentle cleaner and a soft cloth.
In conclusion, proper maintenance and care are crucial to keep your wooden cheese board looking and performing its best. By following these easy tips, you can ensure that your board lasts for many years and continues to provide a beautiful and functional surface for serving your favorite cheeses and accompaniments.
Frequently Asked Questions On How To Make A Cheese Board From Wood
What Is The Best Wood For A Cheese Board?
The best wood for a cheese board is non-porous hardwoods such as acacia wood, teak, rubberwood, and hard maple. These woods are often used to make furniture, flooring, and bowls and cups. It’s recommended to oil the cheese board monthly for maintenance and sealing purposes.
How Do You Make A Raw Wood Cheese Board?
To make a raw wood cheese board, start by selecting the type of wood, such as acacia, teak, rubberwood or hard maple. Cut the board to the desired size and shape, drill holes in the handles, sand the surface, and apply a food safe wax or oil to seal the wood.
Reapply the sealant once a month to protect the board.
How Do You Treat Wood For Cheese Boards?
To treat wood for cheese boards, it is recommended to use non-porous hardwoods like acacia, teak, rubberwood, or hard maple. Many suggest oiling the board at least once a month to seal it, using a combination of beeswax and mineral oil and letting it sit for a few hours or overnight.
Ensure the oil covers the entire surface and use a soft cloth to wipe or polish it.
How Do You Make A Wood Charcuterie Board Food Safe?
To make a wood charcuterie board food safe, sand the board’s surface, rub it with a food-safe wax or oil, and let it soak in. Some also recommend oiling the board once a month to seal the surface properly. Use non-porous hardwoods like acacia, teak, rubberwood, or hard maple for the best results.
Conclusion
When it comes to creating a perfect cheese board, using a wooden board is the ultimate choice. Not only is it stylish, but it also offers versatility in terms of customization. With the step-by-step guide provided in this blog post, making a cheese board from wood has never been easier.
The best part is that you can choose the type of wood you prefer, ensuring your board is unique and personalized. With practice, you can make a cheese board that not only looks great but also serves its purpose efficiently.
Start your DIY cheese board project today and impress your guests with your new skills!