How to Make Fire Starters With Wax And Wood: Easy DIY Guide
Imagine you’re out camping, the sun is setting, and the chill of the evening begins to creep in. You want to start a cozy campfire, but damp wood and a lack of kindling threaten to spoil your plans.
What if you had an easy, reliable solution right in your backpack? Creating your own fire starters with wax and wood shavings can be a game changer. It’s not only a practical skill but also a satisfying project that ensures you’ll never struggle with wet matches or stubborn logs again.
In this guide, you’ll discover the simple steps to make these effective fire starters. You’ll gain a handy tool for your outdoor adventures and also a touch of self-sufficiency that can transform any fire-lighting challenge into a breeze. Ready to ignite your curiosity and master this essential skill? Let’s dive in!
Materials Needed
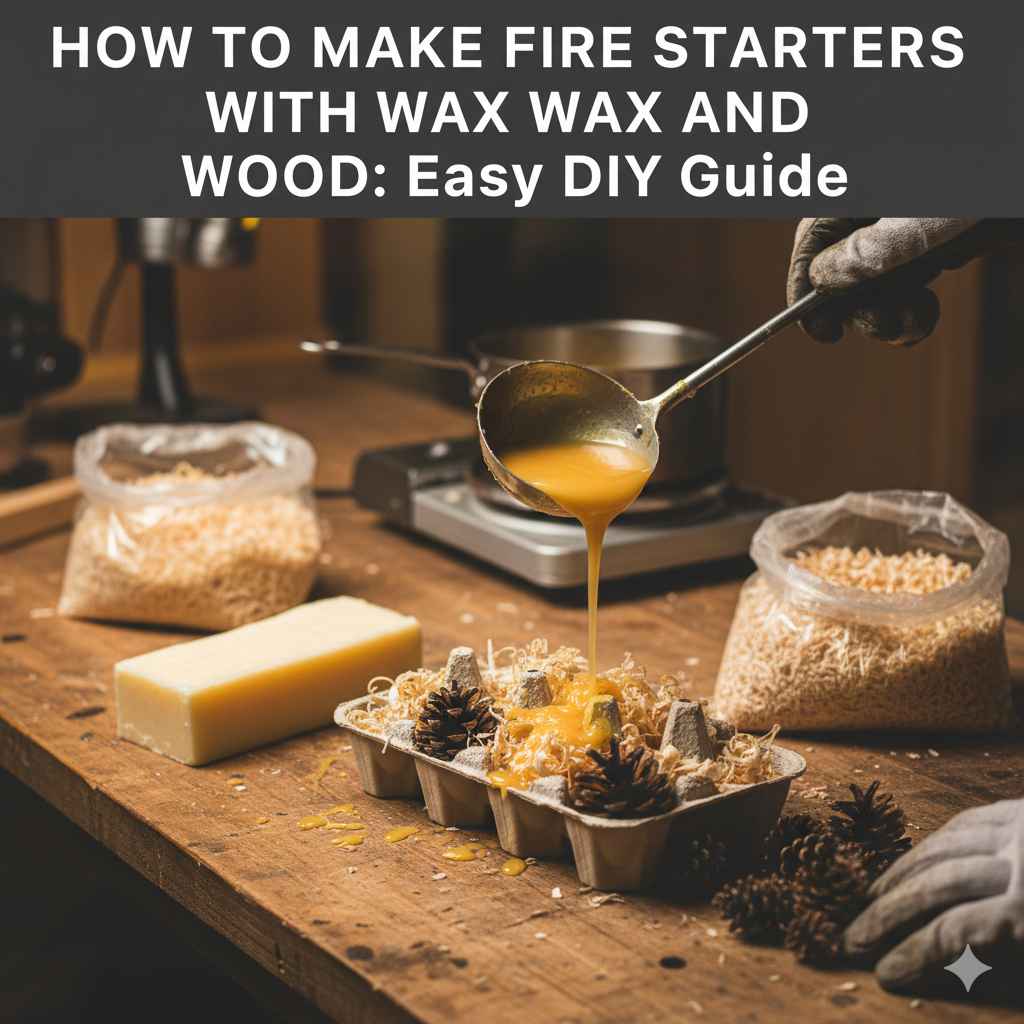
Paraffin wax is a popular choice. It’s easy to find and use. Soy wax is another option. It’s eco-friendly and burns clean. Beeswax can be used too. It smells nice and is natural.
Pine wood shavings work well. They catch fire easily. Cedar wood is another great choice. It has a pleasant aroma. Hardwood shavings take longer to burn but are more durable.
You need paper cups or egg cartons to hold the mix. A double boiler helps melt the wax safely. Old newspapers can catch drips and keep your space clean.
Preparation Steps
Collect the items first. You need wax and wood shavings. Get an old pot for melting wax. Use a muffin tin or egg carton for the mold. Gather some newspaper for easy cleanup. Keep some matches or a lighter handy. Safety first, so wear gloves. Find a spoon for stirring. That’s all you need.
Choose a safe spot. Use a kitchen counter or garage table. Cover the area with newspaper. It will catch spills. Keep kids and pets away. Ensure good ventilation in the room. This keeps the air fresh. Set up your materials nearby. Everything should be easy to reach. Now you’re ready to start.
Melting The Wax
Safe Melting Techniqueshelp keep everyone safe. Use a double boiler method. Place a pot with water on the stove. Put a smaller pot inside. This stops the wax from burning. Keep the heat low. Stir wax slowly. Never leave it alone. Wax can catch fire easily. Safety is important.
Temperature Controlis key to melting wax. Use a thermometer to check heat. Keep wax under 180°F. Too hot wax is dangerous. Handle with care. Wear gloves to protect hands. Wax can splash and burn skin. Always stay alert.

Credit: www.coltercousa.com
Combining Wax And Wood
Melt waxin a pot on the stove. Make sure the wax is not too hot. Dip the wood shavingsinto the melted wax. Use a spoon to cover all the shavings. Let the wax drip off. Repeat the dip for a thicker coating. Place the coated shavings on a tray to dry.
Stir the wax often to keep it smooth. Turn the shavings while dipping. Cover all sides with wax. Use a brush for hard-to-reach spots. Check for any dry patches. Add more wax if needed. Let the coated shavings cool completely.
Shaping And Molding
Use small containers or muffin tins for different shapes. Pour the hot wax and wood shavings mix into them. Let them cool and harden. Simple shapes work best. Try circles, squares, or even hearts. Kids can help with this step. Make sure the wax is not too hot. Always be careful. Let them enjoy the process of making shapes. Creativity is fun and safe.
Silicone molds are easy to use. They don’t stick to the wax. Fill them with the mixture and wait. Wait until the wax is hard. Then, pop the fire starters out. They should come out easily. Clean the molds after each use. You can reuse them many times. Using molds helps make neat fire starters. It’s an easy way to shape them quickly.

Credit: www.rebootedmom.com
Cooling And Solidifying
Melt wax and mix with wood shavings to create effective fire starters. Allow them to cool and solidify. These handy tools ignite quickly, perfect for camping or fireplaces.
Optimal Cooling Conditions
Place the fire starters in a cool, dry place. This helps them set properly. Keep them away from direct sunlight. The sun can melt the wax. A cool kitchen counter works well. Don’t rush the cooling. Let them sit for a few hours. Patience is key.
Avoiding Cracks And Imperfections
Move the starters gently. Rough handling causes cracks. Touch them only when necessary. Ensure the wax is evenly poured. Uneven wax leads to weak spots. Smooth out any bumps. A smooth surface prevents cracks. Watch out for air bubbles. Pop them gently with a pin. This helps the wax stay strong.
Storing Fire Starters
Create fire starters using wax and wood shavings for easy storage. Melt wax and mix with shavings. Pour into molds, let cool, and store in a dry place for future use.
Proper Storage Techniques
Fire starters need a cool, dry place. Moisture can ruin them. Use airtight containers to keep them safe. This prevents damp air from getting in. Label each container clearly. Know what’s inside. Keep them away from direct sunlight. Heat can melt the wax.
Shelf Life Considerations
Fire starters can last long if stored well. Check them often. Look for signs of damage. Cracks or discoloration mean trouble. Use damaged ones first. Rotate your stock regularly. Keep them fresh and ready.

Credit: 100things2do.ca
Using Fire Starters
Use a match or lighter to ignite the wax. Hold the flame close to the wax. The wax will melt and catch fire. Keep the fire starter at the base of the logs. This helps the fire grow stronger. Ensure the wood shavings are dry. Wet shavings make lighting hard. Watch the fire as it burns.
Always have water nearby. Water can stop a fire quickly. Never leave the fire unattended. Fires can spread fast. Keep flammable items away. This prevents accidental fires. Avoid lighting fires on windy days. Wind can spread fire. Teach kids to stay away from fires. Fires can be dangerous.
Frequently Asked Questions
How To Make Fire Starter With Wax And Wood Shavings?
Melt wax in a pot. Mix with wood shavings until coated. Pour into muffin tins or egg cartons. Let cool. Use as fire starters for camping or fireplaces. They’re efficient, easy to make, and burn longer. Perfect for outdoor enthusiasts seeking reliable ignition.
What Is The Best Homemade Fire Starter?
The best homemade fire starter combines cotton balls and petroleum jelly. Coat cotton balls with petroleum jelly for easy ignition. Store them in a waterproof container for convenience. This method is cost-effective, efficient, and reliable for starting fires in various conditions.
What Kind Of Wax Do You Use For Fire Starters?
Use paraffin wax or soy wax for fire starters. They ignite easily and burn steadily. Both options are effective and readily available. Paraffin is affordable, while soy is eco-friendly. Choose based on your preference for cost or sustainability.
What Is The Mixture For A Fire Starter?
A fire starter mixture typically includes sawdust, paraffin wax, and cotton balls. Melt wax, mix with sawdust, and shape into small balls. Let them cool for effective fire-starting.
Conclusion
Creating fire starters with wax and wood shavings is simple and effective. These homemade fire starters are perfect for camping or cozy nights. They light quickly and burn steadily. You’ll save money and resources by making them yourself. Plus, the process is fun and rewarding.
Gather your supplies and start crafting today. Your fires will start easily every time. Enjoy the warmth and convenience. Try this easy DIY project and see the benefits. Share your experience with friends and family. They might love the idea too.
Happy fire making!