How to Patch a Hole in Plywood: Quick & Easy Fixes
To patch a hole in plywood, you will need to gather the necessary materials such as plywood patch, wood glue, putty knife, sandpaper, and paint. Start by cleaning the area around the hole and removing any loose debris.
Apply wood glue to the edges of the hole and insert the plywood patch, pressing it firmly into place. Use a putty knife to smooth out any excess glue and let it dry completely. Once dry, sand the patched area until it is smooth and level with the surrounding plywood.
Finally, apply paint to match the color of the plywood for a seamless finish.
Introduction To Plywood Repair
Plywood is a versatile building material used in various construction and woodworking projects. However, over time, it can suffer from damage, including holes and cracks. Learning how to properly patch these imperfections is crucial for maintaining the structural integrity of the plywood and ensuring its longevity. In this guide, we will explore the reasons why plywood gets damaged, the importance of timely repairs, and the essential steps for patching holes in plywood.
Why Plywood Gets Damaged
Plywood can sustain damage due to various factors such as moisture exposure, impact from heavy objects, or general wear and tear. When moisture penetrates the layers of plywood, it can cause the material to swell and delaminate, leading to the formation of cracks and holes. Additionally, heavy loads or physical impact can create punctures and dents in the plywood surface. Understanding the root causes of plywood damage is essential for implementing effective repair solutions.
Importance Of Timely Repairs
Timely repairs are crucial for preventing further deterioration of the plywood. Addressing any holes or cracks promptly can help mitigate the risk of structural instability and potential safety hazards. Neglecting to repair damaged plywood in a timely manner can result in more extensive damage, ultimately requiring more complex and costly restoration efforts. By prioritizing timely repairs, you can prolong the lifespan of the plywood and maintain the integrity of your woodworking or construction projects.

Tools And Materials Needed
Before starting the process of patching a hole in plywood, it’s important to gather the necessary tools and materials. Here’s a breakdown of what you’ll need:
Basic Toolkit
Ensure you have the following basic tools on hand:
- Measuring tape
- Utility knife
- Sandpaper
- Putty knife
- Paintbrush
- Safety goggles
Selecting The Right Filler
Choosing the appropriate filler is crucial for a successful patch. Consider these options:
- Wood filler: Ideal for small to medium-sized holes
- Epoxy filler: Great for larger or deeper holes
- Wood glue: Suitable for minor cracks and splits
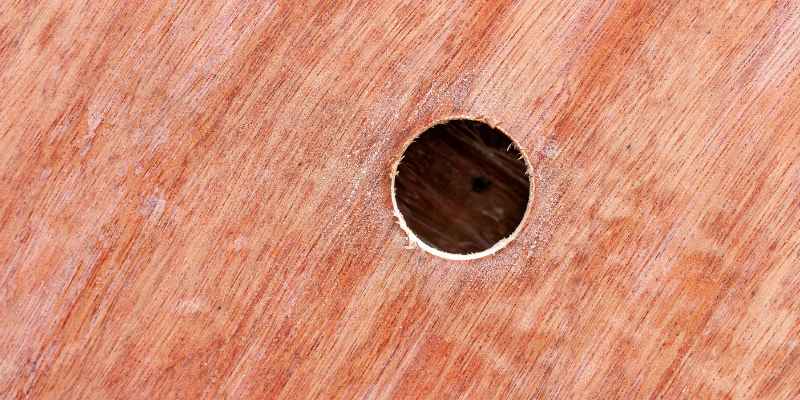
Assessing The Damage

Assessing the damage is the crucial first step when it comes to patching a hole in plywood. Before you can begin the repair process, you need to evaluate the size and depth of the hole, as well as the potential structural impact it may have.
Size And Depth
Measure the size of the hole in the plywood using a tape measure. Assess the depth by visually inspecting the extent of the damage. Consider whether the hole is a result of surface-level wear and tear or if it penetrates deeply into the plywood.
Considering Structural Impact
Determine if the hole has compromised the structural integrity of the plywood. Look for any signs of weakening or instability in the surrounding area. Check for any warping, sagging, or other indications that the hole has affected the overall strength of the plywood.
Preparing The Area
To patch a hole in plywood, start by preparing the area by removing any debris or loose material. Clean the surface thoroughly to ensure a smooth patching process. This step is crucial for a successful repair and will help the patch adhere securely to the plywood.
Cleaning The Surface
Begin by cleaning the surface of the plywood around the hole. Use a damp cloth or rag to wipe away any dust, debris, or loose particles. This helps create a clean surface for the patch to adhere to.
Removing Loose Fragments
Using a putty knife or sandpaper, remove any loose fragments or splinters around the hole. This step ensures that the patch will sit flush against the surface of the plywood and create a smooth finish.
Applying Masking Tape
To prevent any excess glue or filler from getting on the surrounding area, apply masking tape around the hole. This will create a barrier and make the patching process easier and less messy.
Choosing The Right Filler
Select a suitable filler for the size of the hole. For small holes, wood filler will suffice, while larger holes may require an epoxy filler. Ensure that the filler is compatible with plywood, and follow the manufacturer’s instructions for best results.
Applying The Filler
Fill the hole with the chosen filler, using a putty knife or a spatula. Spread the filler evenly, ensuring that it is level with the surface of the plywood. Allow the filler to dry completely before moving on to sanding and finishing.
Sanding The Patch
Once the filler has dried, sand the patch using sandpaper. Begin with a coarse grit and gradually move to a finer grit until the patch is smooth and level with the surrounding surface.
Finishing The Patch
To finish the patch, apply a coat of primer to the area, followed by paint or stain to match the surrounding plywood. Remove the masking tape and allow the finish to dry completely before using the repaired plywood.
By following these simple steps, you can easily patch a hole in plywood and restore it to its original condition. Remember to take your time and follow the manufacturer’s instructions for best results.
Patching Techniques
When dealing with holes in plywood, knowing the right patching techniques is crucial for a seamless repair.
For Small Holes
Small holes in plywood can be easily patched using wood filler or putty.
- Clean the area around the hole with a damp cloth.
- Apply the wood filler or putty to the hole using a putty knife.
- Smooth the surface with sandpaper once the filler is dry.
For Larger Damage
For larger holes or damage, a patching technique involving a plywood patch is more effective.
- Cut a piece of plywood slightly larger than the hole.
- Apply wood glue to the patch and insert it into the hole.
- Secure the patch with clamps until the glue dries completely.
Applying The Patch
When it comes to applying the patch on plywood, follow these steps for a seamless finish.
Mixing The Filler
Mix the wood filler according to the manufacturer’s instructions.
Ensure the consistency is smooth and free of lumps.
Filling The Hole
Fill the hole with the mixed filler using a putty knife.
- Press the filler firmly into the hole.
- Smooth out the surface with the knife.
Sanding And Finishing
To patch a hole in plywood, start by sanding the area around the hole. Then, apply wood filler and smooth it out before finishing with sanding for a seamless blend. This method helps achieve a professional-looking repair that blends well with the rest of the plywood surface.
After you have filled the hole in the plywood, sanding and finishing are necessary to achieve a smooth surface that matches the surrounding area. Here are the steps to follow:
Achieving A Smooth Surface
To achieve a smooth surface, start by sanding the patched area with a coarse-grit sandpaper. This will help level the surface and remove any excess filler. Then, switch to a finer-grit sandpaper and continue sanding until the surface is smooth to the touch. Be sure to sand in the direction of the wood grain to avoid creating scratches that will be visible after finishing.
Matching The Surrounding Area
To match the surrounding area, you need to blend the patched area with the rest of the plywood. One way to do this is by using a wood grain filler that matches the color and grain pattern of the surrounding area. Apply the filler to the patched area and let it dry according to the manufacturer’s instructions. Once dry, sand the surface with a fine-grit sandpaper until it is smooth and level with the surrounding area.
Another way to match the surrounding area is by applying a stain or finish that matches the existing plywood. This will help blend the patched area with the rest of the surface. Apply the stain or finish according to the manufacturer’s instructions and let it dry completely before sanding the surface with a fine-grit sandpaper.
Remember to wear protective gear such as gloves, goggles, and a dust mask when sanding and finishing plywood. This will protect you from inhaling dust and debris and prevent skin irritation from contact with the filler or stain.
Maintenance Tips
Learn how to patch a hole in plywood with these simple maintenance tips. Start by cleaning the area around the hole and measuring the size of the hole. Then, cut a patch to fit and glue it in place before sanding and finishing the surface.
With these steps, you can easily repair plywood and extend its lifespan.
Maintaining your plywood is crucial to keep it in good condition for a long time. Regular checks and preventive measures can help you avoid the need for major repairs. In this section, we’ll discuss some maintenance tips to help you patch a hole in plywood.
Regular Checks
Regularly inspecting your plywood for damage is essential to prevent small holes from turning into bigger ones. You should check your plywood at least once every six months to ensure it is in good condition. During your inspection, look for signs of wear and tear, such as cracks, splinters, and holes.
If you find any damage, it’s best to repair it as soon as possible. Ignoring small holes or cracks can lead to further damage and may require costly repairs in the future.
Preventive Measures
Preventive measures can help you avoid the need for patching holes in plywood altogether. Here are some preventive measures you can take to keep your plywood in good condition:
- Apply a coat of sealant or paint to protect the plywood from moisture and sunlight.
- Store your plywood in a dry and cool place to prevent warping and cracking.
- Use a saw blade with the appropriate number of teeth to prevent splintering while cutting.
- Avoid placing heavy objects on your plywood to prevent denting.
- Use a sanding block to smooth out rough edges or surfaces.
By taking these preventive measures, you can extend the life of your plywood and avoid the need for repairs.
In conclusion, maintaining your plywood is crucial to ensure it lasts for a long time. Regular checks and preventive measures can help you avoid the need for major repairs. By following the maintenance tips discussed in this section, you can patch a hole in plywood and keep it in good condition for years to come.
Frequently Asked Questions
How Can I Patch A Small Hole In Plywood?
To patch a small hole in plywood, fill it with wood filler, sand it smooth, and repaint or stain to match the surrounding area.
What Tools Do I Need To Patch A Hole In Plywood?
You will need wood filler, sandpaper, putty knife, and paint or stain for patching a hole in plywood.
Is It Necessary To Sand The Patched Plywood?
Yes, sanding the patched plywood smoothens the surface and helps the patch blend seamlessly with the rest of the plywood.
Can I Paint Over The Patched Plywood?
Yes, once the patched area is smooth and dry, you can paint or stain over it to match the rest of the plywood surface.
Conclusion
To conclude, patching a hole in plywood doesn’t have to be a daunting task. By following the step-by-step guide outlined in this blog post, you can easily repair any damage to your plywood surface. Remember to gather the necessary materials, clean the area, and apply the patch with precision.
With a little patience and care, your plywood will be restored to its former glory in no time. Happy patching!