How To Repaint MDF: Essential Guide
Repainting MDF is straightforward with proper preparation. This guide covers cleaning, sanding, priming, and painting MDF for a smooth, durable finish, ensuring your projects look professionally done.
MDF, or medium-density fiberboard, is a fantastic material for all sorts of DIY projects. It’s smooth, easy to work with, and cost-effective. But sometimes, you might want to change its look or refresh an older piece. Repainting MDF might seem tricky because it’s so absorbent, but don’t worry! I’m here to walk you through it, step by step. We’ll make sure your repainted MDF looks amazing, just like it came fresh from the store.
You’ve probably seen MDF in furniture, cabinet doors, or decorative trim. When it’s time for a makeover, a fresh coat of paint can completely transform it. The good news is that with a few simple techniques and the right materials, you can achieve a professional-looking finish that lasts. So, grab your supplies, and let’s get started on giving your MDF pieces a beautiful new life!
Why Repaint MDF?
There are many reasons why you might want to repaint MDF. Perhaps you’ve bought a second-hand furniture piece made of MDF and want to match it to your current decor. Maybe you’ve completed a DIY project and the original finish isn’t quite right, or it’s gotten scratched and worn over time. MDF can be easily painted to:
- Update the Style: Change the color to match a new interior design theme.
- Refresh Worn Surfaces: Cover up scuffs, scratches, and minor damage.
- Achieve a Custom Look: Create unique color combinations or finishes not available pre-painted.
- Protect the Material: A good paint job adds a layer of protection against moisture and wear.
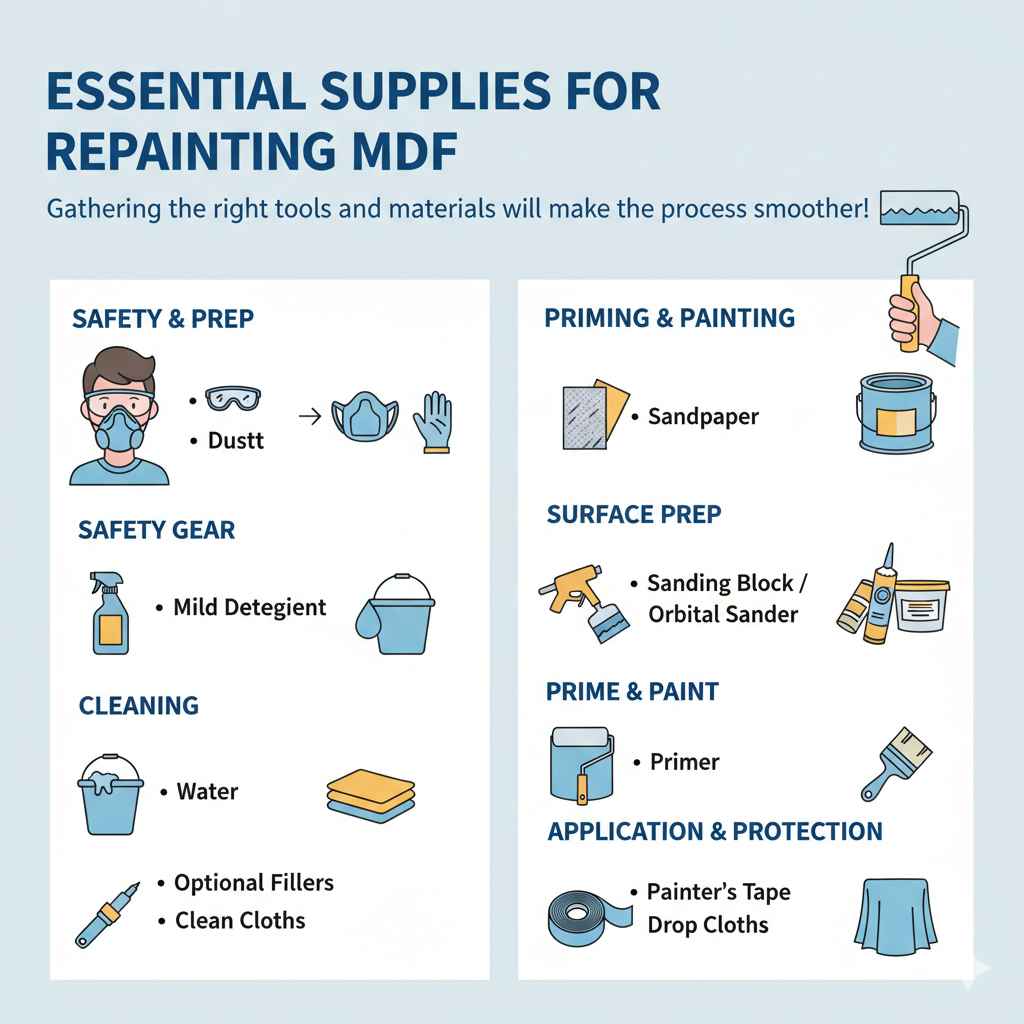
Essential Supplies for Repainting MDF
Gathering the right tools and materials before you start will make the process much smoother. Here’s what you’ll need:
- Safety Gear: Safety glasses, a dust mask (especially for sanding), and gloves.
- Cleaning Supplies: Mild detergent, water, clean cloths or sponges.
- Sandpaper: Medium-grit (120-150) and fine-grit (180-220).
- Sanding Block or Orbital Sander: For even sanding. You can find helpful guides on proper sanding techniques from resources like Popular Mechanics on sanding.
- Primer: A high-quality MDF primer or a good shellac-based primer.
- Paint: Your chosen paint type (latex enamel, oil-based, or spray paint).
- Applicators: High-density foam rollers, good quality paint brushes (angled sash brush is great for edges), or spray paint.
- Painter’s Tape: For masking off areas you don’t want to paint.
- Drop Cloths or Plastic Sheeting: To protect your work area.
- Caulk (Optional): For filling any gaps or seams.
- Spackling Compound or Wood Filler (Optional): For deeper imperfections.
Step-by-Step Guide to Repainting MDF
Repainting MDF is all about preparation. Taking your time with each step will ensure a beautiful, lasting finish. Let’s break it down.
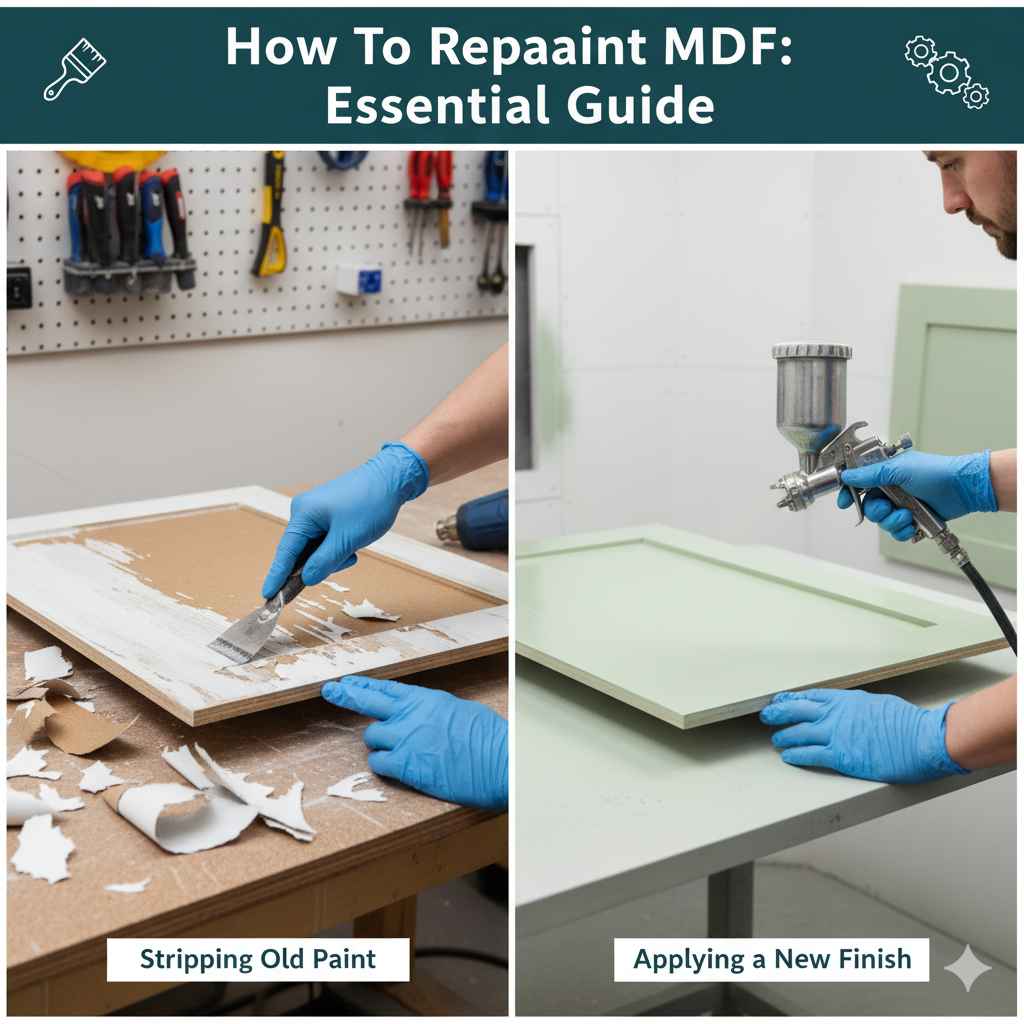
Step 1: Clean the MDF Thoroughly
First things first, you need a clean surface. Any dust, grease, or grime will prevent the paint from adhering properly and can ruin your finish.
- Wipe Down: Use a damp cloth with a bit of mild detergent and water to wipe down the entire surface of the MDF.
- Rinse: Follow up with a clean, damp cloth to remove any soap residue.
- Dry Completely: Let the MDF air dry thoroughly. You can speed this up with a fan or a hairdryer on a cool setting. Ensure there’s no moisture left before moving to the next step.
Step 2: Lightly Sand the Surface
MDF has a smooth surface, but a light sanding can help the primer and paint grip better. This is crucial for a durable finish.
- Start with Medium Grit: Use 120-150 grit sandpaper to scuff up the entire surface. You don’t need to press hard; you’re just creating a slightly rougher texture.
- Smooth with Fine Grit: Once you’ve gone over the whole piece with medium grit, switch to 180-220 grit sandpaper. This removes any deeper scratches from the first sanding and leaves a nice, smooth finish.
- Clean Off Dust: After sanding, wipe down the MDF with a tack cloth or a slightly damp microfiber cloth to remove all the dust. This step is vital! Dust left behind will be visible in your paint job.
Step 3: Address Imperfections (Optional but Recommended)
If your MDF has dents, scratches, or any rough edges, now is the time to fix them. This is where a smooth finish really comes from.
- Fill Holes: For any small holes or dents, use a small amount of spackling compound or wood filler. Apply it with a putty knife, pressing it into the imperfection.
- Smooth Edges: If the edges of the MDF seem a bit rough or fuzzy, you can lightly sand them smooth or even apply a thin bead of latex caulk along the edges. Caulk can create a more finished, professional edge by covering up the fibrous nature of the MDF.
- Sand and Clean Again: Once any filler or caulk is completely dry (follow product instructions for drying times), lightly sand the filled areas smooth with fine-grit sandpaper. Then, wipe down again with a tack cloth or damp cloth to remove all dust.
Step 4: Apply Primer
Primer is your best friend when painting MDF. MDF is very porous and can soak up paint like a sponge, leading to an uneven finish and potentially requiring many coats of paint. Primer seals the surface and provides a uniform base for your paint.
- Choose the Right Primer: A high-quality MDF primer is ideal. Alternatively, a shellac-based primer is excellent for sealing MDF, especially if there are any stains or tannins you want to block. Latex primers can also work if they are specifically formulated for dense materials.
- Apply the First Coat: Using a high-density foam roller or a good quality brush, apply a thin, even coat of primer. If you’re using a roller, use long, even strokes. If brushing, work in the direction of the wood grain (even though MDF doesn’t have real grain, mimicing this motion can help).
- Avoid Pooling: Be careful not to let primer pool in any areas.
- Drying Time: Allow the primer to dry completely according to the manufacturer’s instructions. This is crucial!
- Light Sanding: Once dry, lightly sand the primed surface with 220-grit sandpaper. This very light sanding smooths out any raised wood fibers and creates an even surface for the paint.
- Clean Again: Wipe down with a tack cloth or damp cloth to remove all sanding dust.
Step 5: Apply Paint
Now for the fun part – painting! The type of paint you choose will affect the finish and durability.
- Choose Your Paint: For durability and a smooth finish, a good quality enamel paint (latex or oil-based) is recommended. Latex paints are easier to clean up, while oil-based paints often provide a harder, more durable finish. Spray paint designed for furniture is also a great, fast option if you have good ventilation.
- First Coat of Paint: Apply your first coat of paint. Use the same application method as with the primer – a foam roller for large areas and a brush for edges and details. Apply thin, even coats.
- Drying Time: Allow the first coat to dry completely. This is essential for a good finish; rushing this step can lead to peeling or an uneven surface. Real-world drying and recoat times can vary based on humidity and temperature, so always check the paint can.
- Light Sanding (Optional but Recommended): After the first coat is dry, you can very lightly sand the surface with your fine-grit (220-grit) sandpaper. This helps to knock down any tiny imperfections or fibers that may have risen.
- Clean Dust: Again, wipe away all dust with a tack cloth or damp cloth.
- Second Coat and Beyond: Apply a second coat of paint. Depending on your paint color and the coverage, you might need a third coat. Always allow adequate drying time between coats.
Step 6: Finishing Touches
Once your final coat of paint is dry, you’re almost done!
- Remove Tape: Carefully remove any painter’s tape. It’s best to do this while the paint is still slightly soft or fully cured, depending on the paint type. Pull it off slowly at an angle.
- Inspect: Check for any missed spots or drips. Small touch-ups can be done carefully with a fine brush.
- Curing Time: Be aware that paint takes time to fully harden and cure, often several days or even weeks. During this time, try to be gentle with the painted surface to avoid scratches or damage.
Painting Methods for MDF
The method you choose for painting can significantly impact the final look and ease of application. Here’s a look at common methods:
| Method | Pros | Cons | Best For |
|---|---|---|---|
| Brush & Roller | Control over application, less overspray, good for intricate parts. | Can leave brush marks or roller texture if not careful, can be slower. | Furniture, cabinets, trim, detailed pieces. |
| Spray Painting | Very smooth, even finish, fast application, reaches all areas smoothly. | Requires good ventilation, masking is essential, potential for drips if applied too heavily, needs practice. | Large flat surfaces, detailed items, achieving a factory-like finish. Look for tips on proper spray painting technique online, like those found on Woodsmith’s guide to spray finishing. |
Choosing the Right Paint for MDF
The paint you select is critical for both appearance and durability. Here’s a breakdown of popular options:
- Latex Enamel: This is a water-based paint. It’s a popular choice for DIYers because it’s easy to clean up with soap and water, has low VOCs (volatile organic compounds), and dries relatively quickly. It provides a durable finish suitable for furniture and cabinetry.
- Oil-Based Enamel: These paints offer a very hard, durable, and smooth finish. They are known for their excellent adhesion and leveling properties, meaning they tend to smooth out brush strokes better. However, they have stronger fumes, require mineral spirits for cleanup, and take longer to dry.
- Spray Paint: Specifically formulated spray paints for furniture or cabinets can offer a quick and professional-looking finish. They come in various sheens and colors. It’s important to use them in a well-ventilated area and apply multiple thin coats for the best results.
Tips for a Flawless Finish
Achieving a smooth, professional finish on MDF is all about attention to detail. Here are some extra tips to help you succeed:
- Work in a Well-Lit Area: Good lighting helps you see imperfections and ensure even coverage.
- Use High-Quality Tools: Cheap brushes and rollers can leave streaks and shed bristles, ruining your finish. Invest in good quality tools.
- Thin Coats are Best: It’s always better to apply multiple thin coats rather than one thick coat. Thin coats dry faster, adhere better, and reduce the risk of drips.
- Proper Drying Times: Never rush the drying process. Always allow adequate time between coats and before using the painted item.
- Ventilation: Ensure good ventilation, especially when using oil-based paints or spray paints, to protect your health and help paint dry properly. The CDC offers resources on indoor air quality which is important when working with paints and finishes.
- Consider a Topcoat: For extra durability, especially on high-traffic items like tabletops or drawer fronts, consider a clear topcoat or polyurethane after the paint has fully cured.
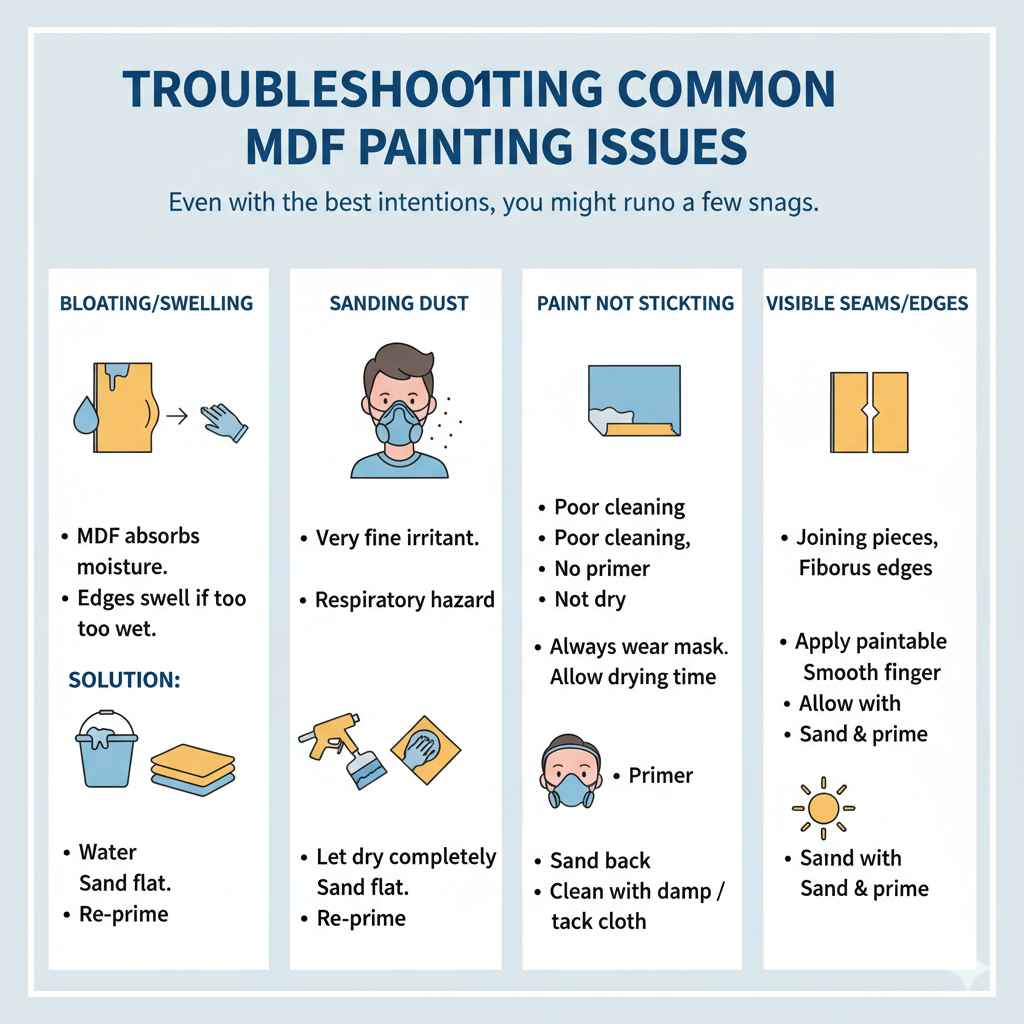
Troubleshooting Common MDF Painting Issues
Even with the best intentions, you might run into a few snags. Here are some common problems and how to fix them:
- Bloating/Swelling: MDF can swell if it absorbs too much moisture, especially at edges or if it gets too wet during cleaning. This is why priming is so important. If swelling occurs, let it dry completely, sand it down flat, and re-prime if necessary.
- Sanding Dust: MDF dust is very fine and can be a respiratory irritant. Always wear a dust mask. Ensure you clean up all dust thoroughly with a damp cloth or tack cloth before painting.
- Paint Not Sticking: This usually means the surface wasn’t properly cleaned or primed, or the primer/paint wasn’t dry when the next coat was applied. You might need to sand back and re-prime.
- Visible Seams or Edges: If you’re joining two pieces of MDF or have a visibly fibrous edge, caulk can help. Apply a thin bead of paintable caulk along the seam or edge, smooth it with a damp finger or tool, let it dry, then sand and prime.
Frequently Asked Questions About Repainting MDF
Can I paint directly onto MDF without primer?
While you technically can, it’s highly not recommended. MDF is very porous and will absorb paint unevenly, leading to a patchy finish and requiring many coats. Primer seals the surface, ensuring a smooth, even finish and better paint adhesion.
What kind of primer is best for MDF?
A high-quality MDF primer or a shellac-based primer is usually best. These provide excellent sealing properties. A good quality latex primer can also work if it’s recommended for dense materials.
How many coats of paint do I need on MDF?
Typically, you’ll need at least two coats of paint after priming. Depending on the paint color (darker colors might need more), the application method, and the primer, you might need a third coat for full, even coverage.
Will painting MDF make it waterproof?
Painting MDF will make it more resistant to moisture and spills, but it does not make it waterproof. MDF is essentially compressed wood fibers and will still be damaged by prolonged exposure to water.
How do I get a smooth finish on MDF edges?
MDF edges can be fibrous. Sand them smooth with fine-grit sandpaper. For an even smoother, more finished look, you can apply a thin bead of paintable caulk along the edge, smooth it, let it dry, sand lightly, and prime. This hides the fibrous texture.
Can I spray paint MDF?
Yes, absolutely! Spray painting MDF can yield excellent, smooth results. Ensure you have good ventilation, mask off surrounding areas thoroughly, and apply multiple thin coats for the best finish without drips.
Conclusion
Repainting MDF is a rewarding project that can dramatically transform your furniture and decor. By following these steps—cleaning, preparing, priming, and painting carefully—you can achieve a beautiful, durable finish that rivals professional work. Remember, patience and attention to detail are key. Don’t skip the preparation steps, especially cleaning and priming, as they are the foundation of a great paint job. With a little effort, your MDF pieces will look brand new and perfectly styled to suit your home.