
How to Two Tone Wood: Master Dual-Shade Techniques
To two-tone wood, first sand the surface to prepare it. Then apply a base coat, followed by a contrasting color for the second tone.
Two-tone wood finishes add depth and character to furniture, cabinetry, and decor. This technique enhances natural wood grain while introducing visual interest. Homeowners and DIY enthusiasts often choose two-tone designs to create a personalized look. Whether you aim for a rustic charm or a modern aesthetic, two-tone wood can elevate your space.
Selecting the right color combinations is essential for achieving a cohesive appearance. With the right tools and techniques, transforming plain wood into a stunning two-tone masterpiece is easier than you think. Discover the joy of creativity and craftsmanship by experimenting with different shades and finishes for your next project.
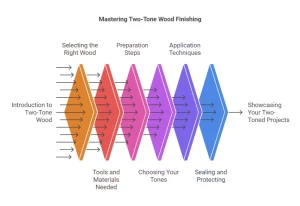
Introduction To Two-tone Wood Finishing
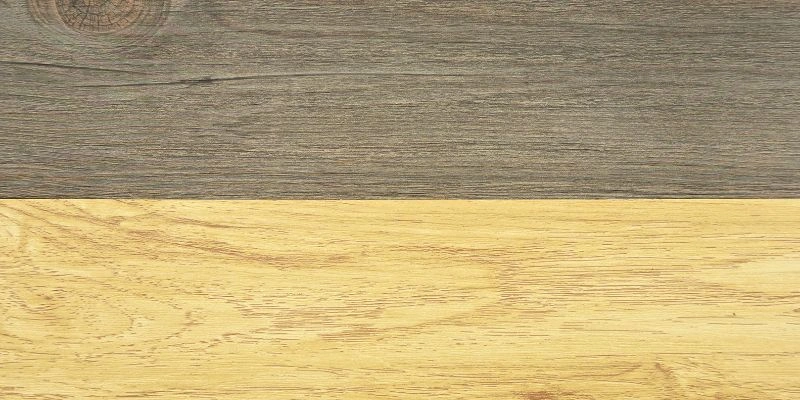
Two-tone wood finishing creates a unique and stylish look. This technique uses two different colors or shades. It can enhance the beauty of furniture and decor.
The appeal of dual shades lies in their ability to add depth. Combining light and dark colors creates contrast. This contrast catches the eye and adds interest.
Basics of two-toning include choosing complementary colors. Select shades that work well together. Prep the wood by sanding and cleaning it. Apply the first color evenly. Once dry, add the second color carefully.
Experimenting with patterns can create stunning results. Try stripes, chevrons, or blocks for fun designs. Always finish with a protective coat to ensure durability.
Selecting The Right Wood
Choosing the right wood is essential for two-toning. Common types include <strong{oak< strong=””>, maple, and cherry. Each type has unique features.</strong{oak<>
Oak is durable and has a strong grain. Maple is smooth and offers a light color. Cherry darkens with age, giving a rich look.
Understanding wood grains helps in two-toning. Straight grains create a clean finish. Curly grains add depth and character.
Textures also play a role. Smooth surfaces allow for easy application of color. Rough textures can absorb more stain, creating a different effect.
Tools And Materials Needed
To successfully create a two-tone wood finish, gather essential tools and supplies. Key items include:
- Sandpaper in various grits for smooth surfaces.
- Paintbrushes or foam brushes for even application.
- Wood stain in two different colors.
- Clear sealant to protect the finish.
- Rags for wiping excess stain.
Always wear safety gear like gloves and goggles. This keeps you safe while working. Follow best practices for a clean workspace. Keep tools organized and clean to avoid accidents.
Preparation Steps
Cleaning the wood is the first step. Use a damp cloth to remove dust. Ensure the surface is free from grime. Allow the wood to dry completely. Next, sanding is essential. Use medium-grit sandpaper for a smooth finish. Sand with the grain to avoid scratches.
After sanding, wipe off the dust again. This will prepare the surface for the base coat. Choose a quality wood primer for best results. Apply a thin layer evenly across the wood. Let it dry as per the instructions on the can.
Once dry, check for any rough spots. A light sand may be needed again. This will ensure a smooth application of the next coat.
Choosing Your Tones
Choosing the right tones is important for a beautiful two-tone wood finish. Contrasting colors create a bold look, while complementary colors offer a softer appearance. Think about how the colors will work together.
Testing stains and finishes is essential. Try samples on small wood pieces. This helps you see how the colors blend. Note how the wood grain shows through the finish. Different finishes can change the look of the stain.
| Color Type | Effect |
|---|---|
| Contrasting | Bold and striking appearance |
| Complementary | Soft and harmonious look |
Application Techniques
To achieve a two-tone effect, start with a clean wood surface. Apply the first stain color evenly. Use a brush or cloth to spread the stain. Allow it to dry completely before applying the second color.
For sharp lines between colors, use painter’s tape. Place the tape where you want the color change. Press down firmly to prevent bleed-through. After staining, carefully remove the tape while the stain is still wet.
For blends, use a damp cloth. Lightly rub the edges where colors meet. This technique creates a smooth transition between shades. Practice on scrap wood to perfect your method.
Sealing And Protecting Your Work
Sealants protect wood from damage and enhance its beauty. Common types of sealants include:
| Sealant Type | Features |
|---|---|
| Polyurethane | Durable and water-resistant |
| Varnish | Provides a glossy finish |
| Oil-based Sealants | Penetrates wood deeply |
| Water-based Sealants | Low odor and easy to clean |
For the best results, apply sealants carefully. Use a brush or roller to spread the sealant evenly. Allow the first coat to dry before adding more layers. This helps create a strong barrier. Regular maintenance increases durability. Check for wear and reapply sealant as needed.
Troubleshooting Common Issues
Bleed-through can ruin your two-tone wood project. To fix it, use a fine-grit sandpaper. Lightly sand the area until the bleed-through fades. After sanding, clean the surface with a damp cloth. Let it dry completely before applying more stain.
For uneven tones, start by applying a stain conditioner. This helps the wood absorb the stain evenly. Apply the stain in thin layers. Wipe away any excess stain quickly. If needed, repeat the process until the color looks right.
Advanced Two-toning Methods
Incorporating inlays and marquetry can enhance the beauty of two-tone wood. Use different woods for a stunning contrast. Add intricate designs for a unique look. This method requires precision and patience.
Experimenting with distressing techniques adds character to your project. Use sandpaper to create worn edges. Apply heat or water for a rustic finish. Try varying pressure for different effects.
| Technique | Description |
|---|---|
| Inlays | Insert decorative pieces into the wood. |
| Marquetry | Create images with different wood types. |
| Distressing | Make wood look aged or weathered. |
Maintenance And Care
Regular cleaning keeps your two-tone wood looking great. Use a soft cloth for dusting. Avoid harsh chemicals that can damage the finish. A mix of warm water and mild soap works well. Always dry the wood after cleaning.
For touch-ups, use a matching wood stain. Test it on a hidden area first. Apply the stain with a small brush. Blend it carefully with surrounding wood. Allow it to dry completely before applying a finish.
Showcasing Your Two-toned Projects
Two-toned wood projects can stand out beautifully. Use contrasting colors to create visual interest. Consider different finishes to highlight each tone. A matte finish can work well with a glossy one.
For display ideas, arrange your pieces on simple backgrounds. This helps the colors pop. Natural light enhances the beauty of your work. Try taking photos in various settings for unique effects.
When photographing your projects, focus on details. Close-ups can show texture and color depth. Use a tripod for steady shots. Experiment with angles to find the best view.
| Tip | Description |
|---|---|
| Natural Light | Use daylight for the best color representation. |
| Simple Backgrounds | Keep backgrounds clean to avoid distractions. |
| Variety of Angles | Different angles can highlight features uniquely. |
Frequently Asked Questions
What Is Two-tone Wood Finishing?
Two-tone wood finishing involves using two different colors or stains on wood surfaces. This technique enhances the visual appeal and adds depth to furniture or cabinetry. It allows for creative expression and can highlight unique wood grain patterns. It’s popular for both modern and traditional designs.
How Do I Prepare Wood For Two-tone Finishing?
Start by sanding the wood surface to remove any imperfections. Clean the surface with a damp cloth to eliminate dust. Apply a primer if necessary to ensure an even finish. Make sure the wood is completely dry before proceeding with the staining process for optimal results.
What Stains Work Best For Two-tone Wood?
The best stains for two-tone wood are oil-based or water-based varieties. Oil-based stains provide rich color and depth, while water-based stains offer quick drying times. Choose colors that complement each other for a harmonious look. Testing the stains on a scrap piece is always recommended before applying.
Can I Use Paint For Two-tone Wood Effects?
Yes, paint can be used for two-tone wood effects. This method allows for vibrant colors and unique finishes. Use painter’s tape to create clean lines between colors. Ensure the base coat is completely dry before applying the second color for the best results.
Conclusion
Two-tone wood projects can transform any space with style and creativity. By following the steps outlined, you can achieve stunning results. Whether for furniture or decor, this technique adds depth and character. Embrace your creativity and enjoy the process of bringing your vision to life.
Happy crafting!