How to Water Pop Wood: A Step-by-Step Guide
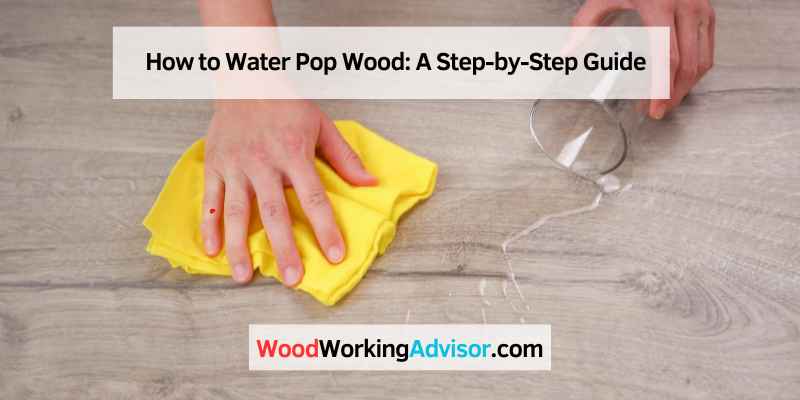
To water pop wood, thoroughly wet the surface with clean water to raise the grain before staining. Water popping involves introducing water to unfinished wood to open the grain for a richer finish.
This technique is commonly used in woodworking to enhance the appearance of wood by swelling the fibers with water. By understanding the process of water popping, you can achieve a deeper stain and bring out the natural beauty of the wood.
Whether you are a beginner or an experienced woodworker, mastering the art of water popping can elevate the quality of your projects and create stunning, long-lasting results. This guide will provide you with valuable insights on how to effectively water pop wood and achieve professional-looking finishes.
Materials And Tools
When it comes to water popping wood, having the right materials and tools is crucial for achieving a successful outcome. Here are the essential items you will need:
Water Sprayer
A quality garden-type water sprayer is ideal for applying water evenly across the wood surface.
Clean Sponge Or Cloth
Use a clean sponge or cloth to ensure precise and controlled application of water during the process.
Preparing The Wood Surface
To water-pop wood, thoroughly wet the surface with clean water to open wood grain for a richer stain. Apply water evenly using a sponge or sprayer for best results. Allow the wood to dry completely before applying any finishing products.
Sanding
To prepare the wood surface for water popping, start by sanding the wood. Sanding helps to smooth out any rough patches or imperfections on the surface, ensuring an even and consistent result. Use a fine-grit sandpaper to gently sand the wood, following the grain of the wood. This will create a smooth, receptive surface for the water popping process.
Cleaning The Surface
Once the sanding is complete, it’s important to clean the wood surface thoroughly. Any dust or debris left from sanding can affect the water popping process and the final result. Using a damp cloth or sponge, wipe down the entire surface to remove any loose particles. Make sure to dry the surface completely before proceeding with the water popping step. This will ensure that the wood absorbs the water evenly and allows for optimal penetration of the stain.
Additionally, if there are any stubborn stains or residue on the wood, it may be necessary to use a mild wood cleaner or detergent. Apply the cleaner to a cloth or sponge and gently scrub the affected area. Rinse the surface with clean water and dry it thoroughly before moving on.
Important tip: For best results, always work with a clean and dry wood surface before water popping.
Water Popping Process
Water popping, also known as “grain-popping,” is a simple yet crucial step in enhancing the beauty of wood. By introducing clean water to an unfinished wood surface, the goal is to open up or “pop” the wood grain, allowing for a deeper and richer stain absorption. This process creates a more pronounced and vibrant wood grain appearance.
Even Application Of Water
An even application of water is imperative for a successful water popping technique. Professionals often utilize a quality garden-type sprayer for larger areas, while an old-fashioned bucket and clean sponge can yield excellent results for small projects. The goal is to ensure that every inch of the wood surface receives an equal amount of water saturation.
Allowing For Wood Fibers To Absorb Water
After applying water to the wood surface, it is essential to allow sufficient time for the wood fibers to absorb the water. This waiting period enables the wood to swell, making the grain more accessible for staining. The duration can vary depending on factors such as the type of wood and environmental conditions.
During this waiting period, it is crucial to maintain a stable moisture level in the wood. To prevent excessive drying or moisture loss, it is advisable to cover the water-popped wood with plastic sheets or a damp cloth. This protective layer helps to retain moisture and ensures optimal stain absorption.
Once the wood fibers have adequately absorbed the water, you can proceed with the staining process. The open grain of the wood allows for deeper penetration of the stain, resulting in a more vibrant and pronounced wood grain appearance.
In conclusion, water popping is a simple but effective technique to enhance the beauty of wood. By following the correct process of applying water evenly and allowing sufficient time for absorption, you can achieve stunning results. The open grain created through water popping allows for a deeper and more vibrant stain, elevating the overall aesthetic of your wood project.
Drying Time And Techniques
To achieve the water-popped wood effect, it’s essential to let the wood dry thoroughly after applying water. It’s recommended to towel-dry the wood and then use absorbent materials like sawdust or baking soda to draw out any remaining moisture before allowing it to dry completely.
How Long To Let Wood Dry After Water Popping?
Once you have successfully water popped your wood, the next crucial step is to allow it to dry properly. The drying time plays a significant role in achieving the desired results and ensuring that the wood is ready for further treatments.
The drying time after water popping can vary depending on several factors such as the type of wood, ambient humidity levels, and temperature. On average, it is recommended to let the wood dry for at least 24 to 48 hours. However, some hardwoods may require even longer drying periods.
During this drying time, it is essential to maintain the ideal conditions for the wood to dry effectively. Ensure that the area is well-ventilated to allow air circulation and promote evaporation. You can use fans or open windows to speed up the drying process.
Removing Extra Moisture From Wood
To ensure the wood is completely dried after water popping, it is crucial to remove any excess moisture that may still be trapped within the fibers. Here are some effective techniques to remove extra moisture from wood:
1. Towel Drying: Start by thoroughly towel drying the surface of the wood after water popping. This will help remove the initial layer of moisture and prevent it from seeping further into the wood.
2. Absorbent Materials: After towel drying, apply absorbent materials like sawdust, baking soda, or kitty litter to the affected area. Spread a generous amount of the material over the wood and let it sit overnight. These absorbent materials will draw out any remaining moisture from the wood.
3. Air Circulation: Promote air circulation around the wood by using fans or opening windows. This will help speed up the drying process by allowing the moisture to evaporate.
Remember, the key to achieving optimal results after water popping is to ensure that the wood is completely dry before proceeding with any further treatments such as staining or sealing. Taking the necessary time to let the wood dry will ensure a beautiful and long-lasting finish.
By following these drying time and techniques, you can ensure that your water popped wood is ready for the next steps in the woodworking process.
Next Steps
After water-popping the wood, the next crucial steps involve applying stain and optionally sanding the wood surface. The water-popping process has effectively opened the wood’s grain, making it ready to absorb the stain deeply and evenly.
Applying Stain
Before staining, ensure the wood surface is completely dry. Use a clean cloth or brush to apply the stain evenly along the grain of the wood. Allow the stain to penetrate for a few minutes, and then use a clean cloth to wipe off any excess stain. Let the wood dry completely before applying a protective finish.
Optional: Sanding
While sanding after water-popping may seem counterintuitive, it is essential to consider the wood’s condition. If the wood surface feels rough or raised after water-popping, sanding with fine-grit sandpaper may be necessary to achieve a smooth finish. However, be cautious not to sand too aggressively and close the wood’s grain, as it defeats the purpose of water-popping.
Common Questions And Concerns
To achieve a richer and deeper stain on wood, water popping is a crucial step. After thoroughly drying the floor, applying absorbent materials like sawdust or baking soda can help draw out any remaining moisture, making it easier to dry.
Sanding after water popping defeats the purpose, as it closes the grain, making it crucial to avoid sanding at this stage.
Should I Sand After Water Popping?
Sanding after water popping defeats the purpose of water popping. It would be sanding the grain back down to a closed grain. The purpose of water popping is to get a richer and deeper stain into the opened grain.
How To Get Wood Grain To Pop
Raising Wood Grain with Water – YouTube organic_result Water-Popping Guide at Bona.com states that an even application of water on the entire floor is key for a successful water pop. To achieve this, using an old-fashioned bucket and clean sponge or a quality garden-type sprayer can yield great results when water-popping wood floors.
Water-popping or grain-popping consists of introducing clean water to an unfinished wood surface to open or “pop” the smooth and closed wood. It is essential to ensure an even application of water to achieve the desired wood grain popping effect.
Tips And Troubleshooting
In order to achieve the best results when water popping wood, follow these essential tips:
- Use clean water: Ensure that the water you use is clean to prevent any unwanted residues on the wood.
- Apply water evenly: Make sure to distribute the water uniformly across the wood surface for consistent results.
- Allow adequate drying time: Let the wood dry properly after water popping to ensure the stain adheres effectively.
- Consider professional tools: Using a quality garden sprayer can help achieve a more even application of water.
If you encounter any problems during the water popping process, here are some common issues and how to troubleshoot them:
- Mottled appearance: If the wood surface appears uneven after water popping, try reapplying water evenly and allowing proper drying time.
- Excessive water absorption: In case the wood absorbs too much water, gently dab the surface with a clean cloth to remove excess moisture.
- Inadequate stain penetration: If the wood does not achieve the desired color intensity, consider applying a second coat of water and allowing it to dry thoroughly before staining.
- Uneven drying: To ensure uniform drying, check for any areas that may be retaining moisture and use a fan to facilitate the drying process.
Frequently Asked Questions Of How To Water Pop Wood
How Long To Let Wood Dry After Water Popping?
After water popping wood, let it dry for 24-48 hours to fully absorb moisture and prepare for staining.
How Do You Get Moisture Out Of Wood?
To remove moisture from wood, towel dry the area and then spread absorbent materials like sawdust or baking soda over it. Let it sit overnight to draw out the remaining moisture from the wood. This method makes it easier to dry the wood.
Should I Sand After Water Popping?
Sanding after water popping defeats the purpose. Water popping opens the grain for deeper stain.
How Do You Get Wood Grain To Pop?
To make wood grain pop, apply water to the surface before staining to open up the wood pores.
Conclusion
Water popping is a crucial step that enhances the richness of wood finishes. By opening the wood grain, this technique allows for deeper stain penetration. Remember to allow adequate drying time, and avoid sanding immediately after water popping to maximize its benefits.
Elevate your woodworking projects with water popping!