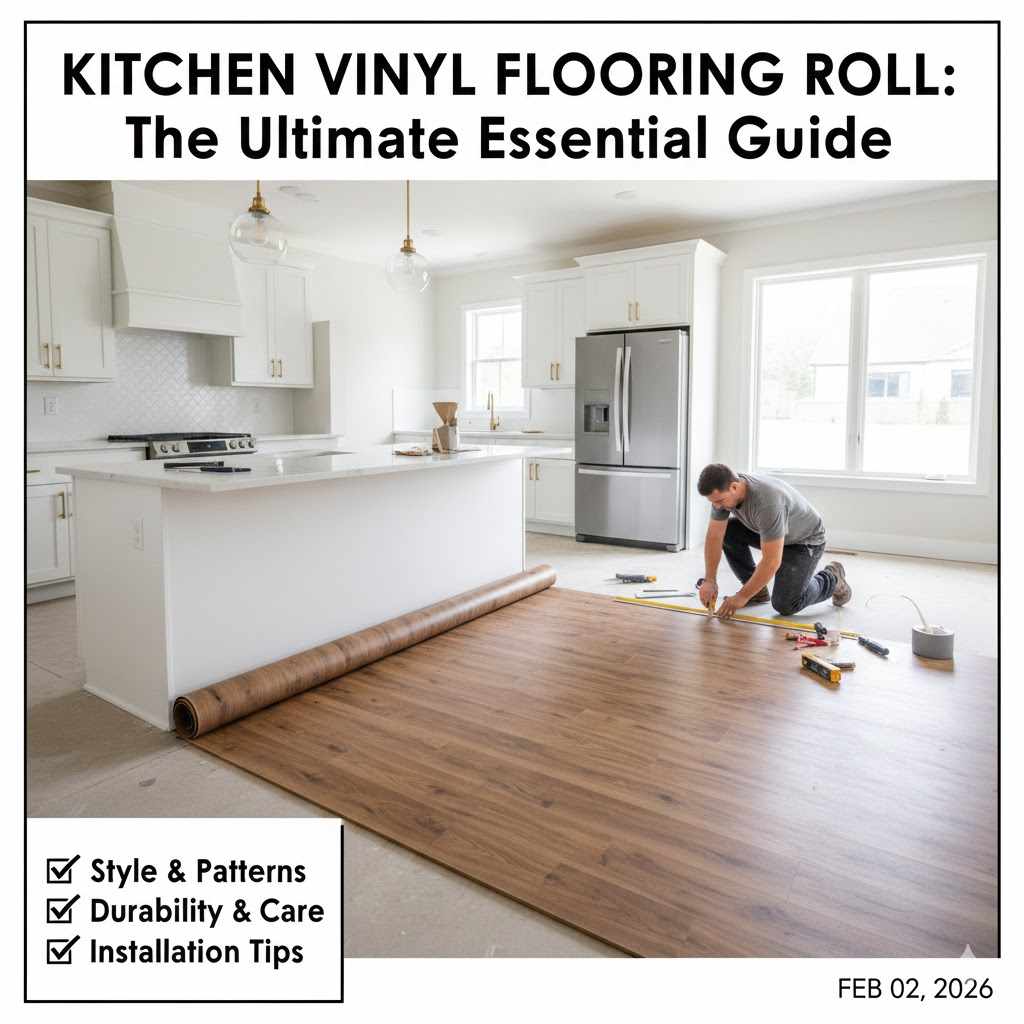
Kitchen Vinyl Flooring Roll: The Ultimate Essential Guide
A kitchen vinyl flooring roll, also known as sheet vinyl, is a durable, water-resistant, and budget-friendly flooring option. It comes in a single large sheet, creating a seamless surface perfect for busy kitchens. It is easy to clean and comfortable underfoot, making it an excellent choice for a DIY home upgrade.
Thinking about a new kitchen floor? It can feel like a big job. You want something that looks great, handles spills, and doesn’t break your budget. You have come to the right place. A kitchen vinyl flooring roll might just be the perfect answer for your home.
Many homeowners feel overwhelmed by all the choices out there. It’s easy to get lost in the details. But don’t worry. I’m here to make it simple. This guide will walk you through everything, from choosing the right roll to laying it down like a pro. We’ll do it together, one step at a time. Let’s get crafting!
What Exactly is a Kitchen Vinyl Flooring Roll?
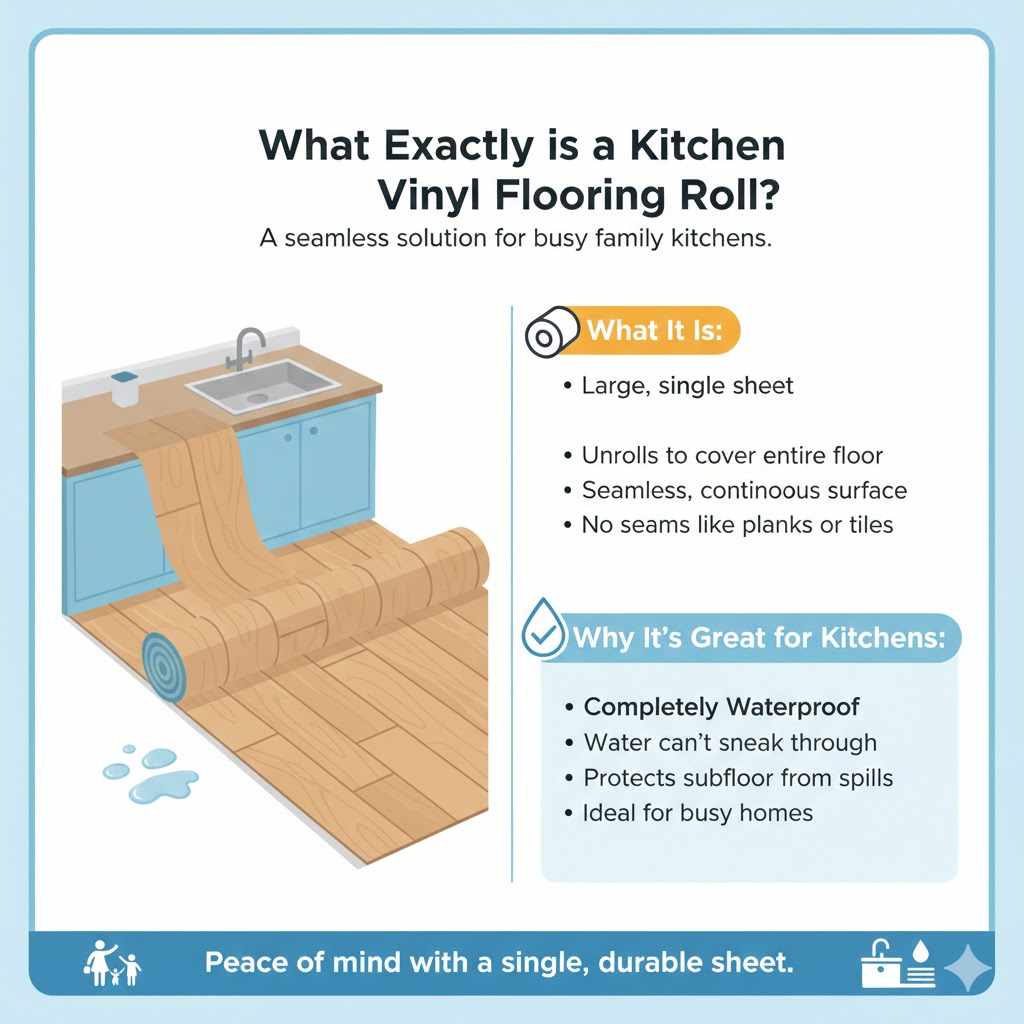
First things first, let’s clear up what we’re talking about. A vinyl flooring roll, often called sheet vinyl, is exactly what it sounds like. It’s a large, single sheet of vinyl flooring that you unroll to cover your entire floor. Unlike vinyl planks or tiles, which come in small pieces, a roll provides a seamless, continuous surface.
Imagine laying down a giant, durable, and beautiful mat that fits your kitchen perfectly. That’s the idea! Because there are very few (or no) seams, it’s fantastic for rooms where spills are common, like the kitchen. Water has nowhere to sneak through and cause damage to your subfloor. This simple feature makes it a top choice for busy family homes.
Why a Vinyl Roll is a Great Choice for Your Kitchen
When you’re upgrading your kitchen, you need a floor that works as hard as you do. A vinyl flooring roll has some amazing benefits that make it ideal for this high-traffic area. Let’s break down the pros and cons.
The Advantages of Sheet Vinyl
- Excellent Water Resistance: This is the number one reason people choose it for kitchens. With no seams for water to seep through, spills from cooking or the sink aren’t a problem. Just wipe them up, and you’re good to go.
- Very Budget-Friendly: Compared to hardwood, ceramic tile, or even luxury vinyl plank (LVP), sheet vinyl is one of the most affordable flooring options on the market. You get a great look without a huge price tag.
- Comfort Underfoot: Vinyl has a slight cushioning effect that makes it softer and warmer to stand on than hard tiles. This is a big plus when you spend a lot of time on your feet cooking or washing dishes.
- Incredibly Low Maintenance: Cleaning is a breeze. Regular sweeping and occasional mopping with a gentle cleaner are all it takes to keep your vinyl floor looking new. No special waxes or polishes needed.
- Durability for Busy Homes: Modern vinyl flooring is built to last. A quality sheet with a good wear layer can handle pets, kids, and daily kitchen chaos for years.
- Endless Style Options: You can find vinyl rolls that mimic the look of expensive hardwood, natural stone, or intricate ceramic tiles. The design possibilities are virtually endless, so you can find the perfect match for your kitchen decor.
A Few Things to Keep in Mind
No material is perfect, and it’s good to know the downsides, too. Being prepared helps you make the best choice.
- Repairs Can Be Tricky: Because it’s one solid sheet, repairing a deep gouge or a large tear can be difficult. Unlike planks, you can’t just replace one small piece. Patching is possible, but it may be visible.
- Can Be Dented or Torn: Heavy furniture or sharp objects can dent or even tear the vinyl. It’s a good idea to use furniture pads under your table and chairs to protect the surface.
- Subfloor Prep is Crucial: Any imperfections in the floor underneath, like bumps or old glue residue, will eventually show through the vinyl. This is called “telegraphing.” Taking the time to get the subfloor perfectly smooth is a step you cannot skip.
Here is a quick table to help you see the pros and cons at a glance:
| Feature | Pro (The Good Stuff) | Con (What to Watch For) |
|---|---|---|
| Water Resistance | Seamless surface makes it nearly waterproof. Excellent for spills. | Damage to the surface could compromise water resistance. |
| Cost | One of the most affordable flooring options available. | Very cheap options may be thin and less durable. |
| Installation | Can be a quick DIY project, especially in small rooms. | Large, awkward rolls can be hard to handle alone. |
| Repairability | Minor scuffs can be hidden. | Deep cuts or gouges are difficult to repair seamlessly. |
| Durability | Resists stains and is easy to clean. | Can be dented by heavy furniture or torn by sharp objects. |
Choosing the Right Type of Vinyl Flooring Roll
When you start shopping, you’ll notice a few different types of vinyl rolls. Understanding them will help you pick the best one for your kitchen. The main differences are in the backing and the top wear layer.
Backing Material: Fiberglass vs. Felt
- Fiberglass-Backed Vinyl: This is the more modern option. It lays flat very easily and doesn’t shrink or expand. This means you can often install it without using a full-spread adhesive, which makes the job simpler. It’s also more resistant to mold and mildew.
- Felt-Backed Vinyl: This is the traditional type. It’s a bit softer but requires glue across the entire subfloor to secure it properly. It can also be more susceptible to water damage if moisture gets underneath. For a DIY project, fiberglass is usually the easier choice.
The All-Important Wear Layer
The wear layer is a clear, protective coating on the very top of the vinyl. Its thickness is measured in mils (not millimeters). For a busy area like a kitchen, the thicker the wear layer, the better.
- Light Traffic (e.g., bedrooms): 6-10 mil wear layer
- Moderate Traffic (e.g., living rooms): 12-15 mil wear layer
- Heavy Traffic (Kitchens, hallways): 20 mil or higher is ideal
A thicker wear layer will do a much better job of protecting the floor from scratches, scuffs, and stains. It’s one of the most important factors for the longevity of your kitchen floor.
Tools and Materials You’ll Need
Getting everything ready before you start is the key to a smooth project. Nothing is more frustrating than having to stop and run to the hardware store. Here’s a simple checklist of what you’ll need.
For Measuring & Cutting:
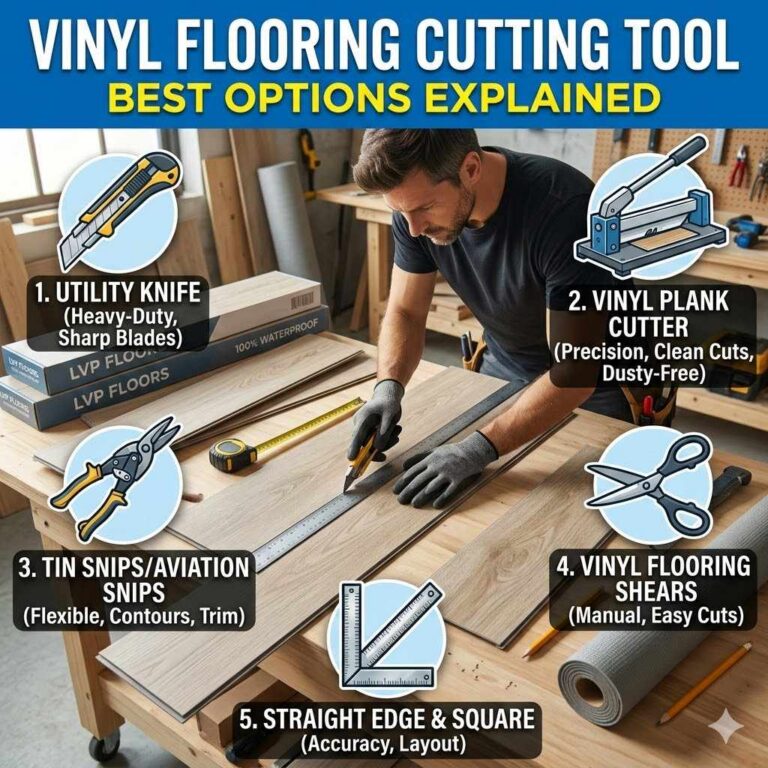
- Measuring Tape
- Utility Knife (with plenty of sharp, new blades)
- Straightedge or Framing Square
- Pencil
- Large roll of craft paper or rosin paper (for making a template)
- Scissors
For Subfloor Preparation:
- Floor Scraper (to remove old glue or debris)
- Shop-Vac or Broom and Dustpan
- Spackle or Floor Leveling Compound
- Putty Knife
- Sander (if needed to smooth patches)
For Installation:
- The vinyl flooring roll
- Flooring Adhesive (if required for your type of vinyl)
- Notched Trowel (if using adhesive)
- Double-sided flooring tape (for loose-lay installations)
- 100-lb Floor Roller (you can usually rent one)
- Pry bar and hammer (for removing baseboards)
For Safety:
- Knee Pads (your knees will thank you!)
- Safety Glasses
- Work Gloves
How to Install Your Kitchen Vinyl Flooring Roll: Step-by-Step Guide
Alright, you’ve chosen your beautiful new floor and gathered your tools. Now for the fun part! I’ll guide you through the installation step by step. Just take your time, and remember: measure twice, cut once.
Step 1: Get the Room Ready
First, you need a completely empty room. Remove all furniture, appliances, and even the toilet if you’re working in a bathroom. Next, carefully remove the baseboards or shoe molding. Use a pry bar with a thin piece of wood behind it to protect your walls. Label the back of each piece of molding so you know exactly where it goes later.
Step 2: Prepare the Subfloor (The Most Important Step!)
I can’t say this enough: your new floor will only look as good as the surface underneath it. We need it to be perfectly clean, flat, and dry. For a deeper dive into subfloor requirements, check out the Floor Covering Institute’s guidelines.
- Clean It: Scrape off any old adhesive, paint drips, or gunk. Then, sweep and vacuum thoroughly. There should be no dust or debris left.
- Make It Flat: Look for any cracks, holes, or low spots. Fill them with a floor leveling compound, following the product instructions. Feather the edges smoothly with your putty knife. Sand down any high spots or ridges. Run your hand over the surface—it should feel smooth.
- Make Sure It’s Dry: The subfloor must be completely dry before you move on.
Step 3: Acclimate the Vinyl
Vinyl flooring needs to get used to the temperature and humidity of your home. Bring the roll into the kitchen at least 48 hours before you plan to install it. Just leave it in the room, still rolled up. This prevents it from shrinking or expanding after it’s installed.
Step 4: Make a Perfect Template
Here’s a pro tip that makes everything easier: don’t try to cut the giant roll of vinyl inside your kitchen. Instead, make a paper template. This method is much more forgiving.
- Roll out your craft paper and tape pieces together to create a “paper floor” that covers the entire kitchen.
- Press the paper tightly into all corners and along all walls.
- Carefully cut the paper to fit the exact shape of your room, including any doorways or tricky corners around cabinets.
- When you’re done, you should have a perfect paper pattern of your kitchen floor.
Step 5: Cut the Vinyl Roll
Now, find a large, clean, flat area to work, like a garage or a living room. Unroll your vinyl flooring with the decorative side facing up. Lay your paper template on top of it. Secure the template with some painter’s tape so it doesn’t shift.
Using a sharp utility knife and a straightedge, carefully cut the vinyl, using your template as a guide. Remember to always pull the knife towards you for better control and safety. Changing your blade often will give you cleaner cuts.
Step 6: Lay and Secure the Flooring
Carefully roll up your newly cut piece of vinyl and bring it into the kitchen. Gently unroll it and position it on the floor. Nudge it into place until it fits perfectly. There are two main ways to secure the floor:
- Loose-Lay Method: For smaller rooms and fiberglass-backed vinyl, you might not need glue everywhere. You can secure the perimeter and any seams with double-sided flooring tape. This is the simplest method for beginners.
- Full-Spread Adhesive Method: For larger rooms or felt-backed vinyl, you’ll need to use adhesive. Carefully roll back one half of the floor. Spread the recommended vinyl flooring adhesive on the exposed subfloor with a notched trowel. Wait the time specified on the adhesive can (this is called “open time”). Then, carefully roll the vinyl back into the glue. Repeat for the other half.
Once the floor is down, use a 100-lb roller to press the vinyl firmly into the adhesive and push out any air bubbles. Work from the center of the room outwards. You can usually rent these rollers from home improvement stores.
Step 7: The Finishing Touches
Your floor is down! Great job. Now for the final steps that make it look professional.
- Final Trims: Check all the edges. If any are a bit too long, use your utility knife to carefully trim them for a perfect fit.
- Reinstall Baseboards: Nail your baseboards and shoe molding back into place. This will cover the small gap you left along the walls and give your floor a clean, finished edge.
- Stay Off: Check your adhesive instructions for curing time. It’s best to stay off the floor for at least 24 hours to let everything set properly.
Caring For Your New Vinyl Floor
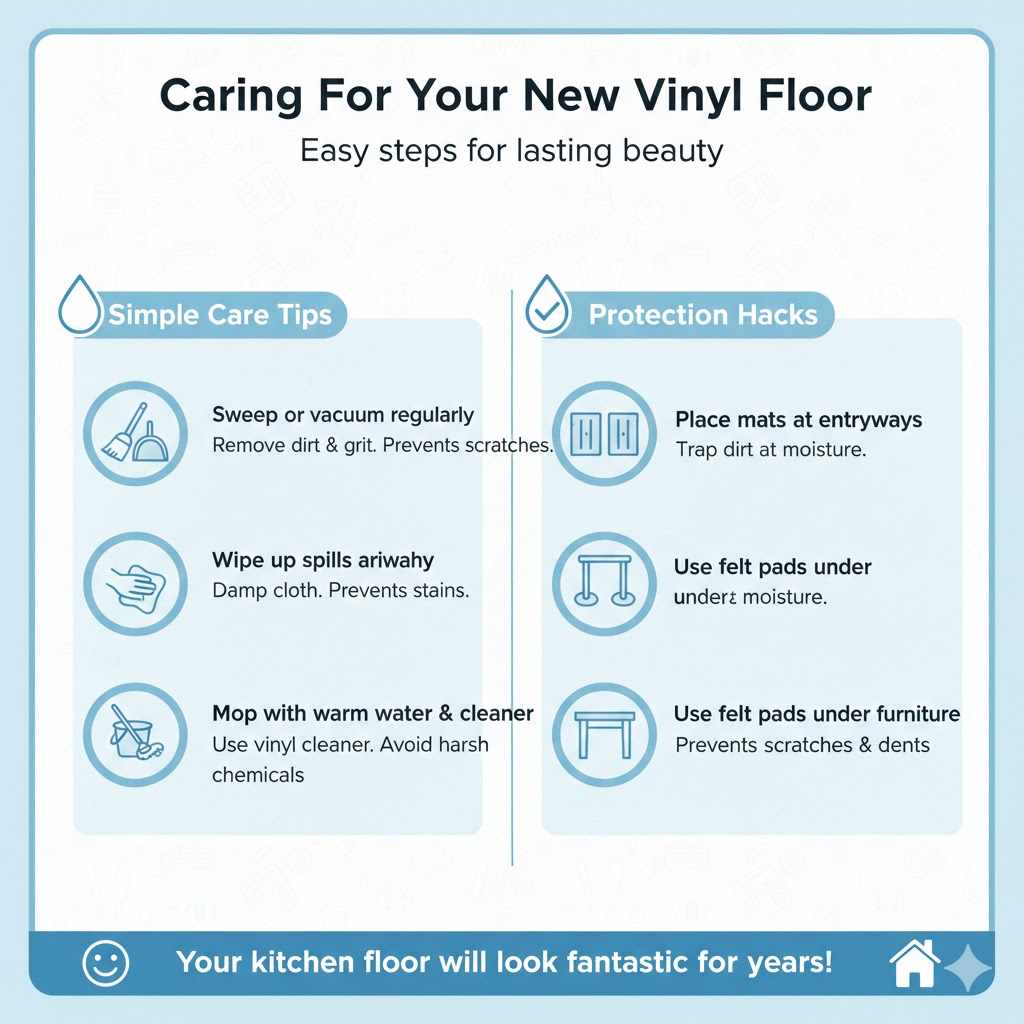
You did it! Now, keeping your floor looking beautiful is easy. A little regular care will go a long way.
- Sweep or vacuum regularly to remove dirt and grit.
- Wipe up spills right away with a damp cloth.
- For a deeper clean, mop with warm water and a small amount of cleaner made for vinyl floors. Avoid harsh detergents or abrasive scrubbers.
- Place mats at entryways to catch dirt before it gets on the floor.
- Use felt pads under furniture legs to prevent scratches and dents.
With proper care, your new kitchen vinyl floor will look fantastic for many years to come.
Frequently Asked Questions (FAQ)
1. Can I install a kitchen vinyl flooring roll over my existing floor?
Sometimes, yes! You can often lay vinyl over a single layer of existing vinyl or linoleum, as long as it is smooth, flat, and well-adhered. However, you should not install it over soft floors like carpet or heavily cushioned vinyl. You should also avoid installing over tile, as the grout lines can “telegraph” through. When in doubt, removing the old floor is always the safest bet.
2. Is sheet vinyl flooring completely waterproof?
The material itself is waterproof. The big advantage of a vinyl roll is its seamless nature, which makes the surface highly resistant to water getting through to the subfloor. As long as the edges are sealed and there are no cuts or holes, it offers excellent protection against everyday spills.
3. How long does a vinyl flooring roll last in a kitchen?
The lifespan depends on the quality of the vinyl, especially the thickness of its wear layer. A good quality sheet vinyl with a 20 mil wear layer or more can last anywhere from 10 to 20 years with proper care and maintenance in a busy kitchen.
4. What’s the best way to clean my new vinyl floor?
Simple is best. For daily cleaning, a broom or a vacuum (with the beater bar turned off) is perfect. For messes, use a cloth with plain water or a pH-neutral floor cleaner. Avoid using abrasive tools, detergents, or “mop and shine” products, which can leave a dull film.
5. Do I have to use glue to install my vinyl floor?
Not always. Many modern fiberglass-backed vinyl floors can be installed using a “loose-lay” method, secured only at the edges with double-sided tape. However, for very large rooms or with older, felt-backed vinyl, a full-spread adhesive is recommended for a secure, long-lasting installation.
6. What tools are absolutely essential for this project?
At a minimum, you will need a sharp utility knife, a straightedge, and a measuring tape. I also highly recommend making a paper template—it takes extra time but dramatically reduces the chance of a costly cutting error.
7. What if I make a mistake and cut the vinyl too short?
This is why we measure twice! But if it happens, don’t panic. If the gap is small (less than 1/4 inch), your baseboard or shoe molding will likely cover it. For a larger gap, you may need to get creative with wider trim or, in the worst-case scenario, purchase a new piece of vinyl.
You Can Do This!
Choosing and installing a kitchen vinyl flooring roll is one of the most rewarding DIY projects you can tackle. It completely transforms a room, and it’s something you can be proud of every time you walk into your kitchen. It’s affordable, practical, and with the right steps, absolutely achievable for a beginner.
Just take it one step at a time, from preparing your subfloor to making that final trim. Remember to prioritize safety and enjoy the process of creating something beautiful for your home. You’ve got this!