Laminate Floor Cutting Tool: The Must-Have Essential
For most DIYers, the best laminate floor cutting tool is a dedicated laminate flooring cutter. This manual tool works like a guillotine, providing clean, quiet, and dust-free cuts with minimal effort. It is the simplest and safest option for making straight, 90-degree cuts on your planks, making your project faster and cleaner.
Hello there, my friend! So, you’re ready to lay down a beautiful new laminate floor. That’s wonderful news! It’s one of those projects that can totally transform a room. But I bet there’s one part that might seem a little daunting: cutting the planks. A wavy cut or a chipped edge can be so frustrating, and nobody wants to waste a good piece of flooring.
Please don’t worry about that for a second. Making perfect cuts is much easier than you think when you have the right tool in your hands. I’m here to guide you through the best options, explain why they work, and help you choose the perfect one for your project. Together, we’ll make sure you have the confidence to get this job done right. Let’s dive in and find your new favorite tool!
Why Choosing the Right Tool Matters
You might be thinking, “Can’t I just use whatever saw I have in the garage?” While that’s a tempting thought, using the wrong tool can cause a lot of headaches. Laminate flooring has a tough, protective top layer that can easily chip or splinter if cut incorrectly. This is called “tear-out,” and it can ruin the look of your brand-new floor.
Choosing the right laminate floor cutting tool does a few amazing things for you:
- Ensures Clean Cuts: The right tool will slice through the laminate without chipping the surface, giving you crisp, professional-looking edges.
- Saves Time and Energy: A tool designed for the job works efficiently. You’ll spend less time fighting with each cut and more time laying down your beautiful floor.
- Improves Safety: Using a tool meant for the task at hand is always safer. It reduces the risk of kickback, slips, or other accidents.
- Reduces Mess: Some tools, especially manual ones, create almost no dust. This means less cleanup and better air quality in your home while you work.
Taking a moment to pick the right tool isn’t just an extra step; it’s the foundation of a successful and stress-free project. It’s the difference between a floor that looks okay and a floor that looks absolutely stunning.

The Top 3 Laminate Floor Cutting Tools for Beginners
When you walk into a hardware store, the options can feel overwhelming. Let’s simplify things. For a beginner, there are really three main choices, each with its own strengths. I’ll break them down for you in simple terms.
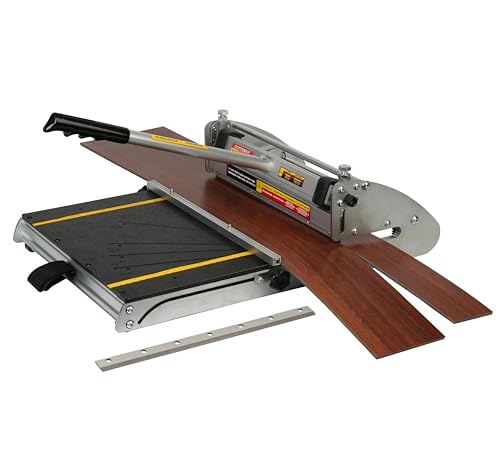
1. The Laminate Flooring Cutter (The Guillotine)
This is my top recommendation for most beginners. A laminate cutter is a manual tool designed specifically for this job. It has a long handle that you press down, forcing a sharp, heavy blade through the plank. Think of it like a giant paper cutter, but for flooring.
There’s no motor, no noise, and no dust. You just position your plank, pull the handle, and snap—a perfectly clean cut. Because it shears the plank instead of sawing it, there’s virtually no risk of chipping the top layer.
Pros:
- Completely Dust-Free: You can use it right in the room you’re working in without making a mess.
- Quiet Operation: No loud motor to disturb your family or neighbors.
- Simple and Safe: Very few moving parts and a straightforward operation make it extremely safe for beginners.
- Portable: It’s lightweight and doesn’t need electricity, so you can take it anywhere.
Cons:
- Limited Cut Types: It can only make straight cross-cuts (90 degrees). You can’t use it for long rip cuts or curved cuts.
- Plank Width Limit: Most cutters have a limit on how wide a plank they can cut, typically around 8 to 13 inches.
Best for: Anyone doing a standard room with mostly straight cuts. It’s the cleanest, quietest, and easiest way to get the job done.
2. The Jigsaw (The Versatile Choice)
A jigsaw is a small, portable power saw with a reciprocating blade that moves up and down. Its biggest advantage is its ability to make intricate cuts. If you need to cut a curve to fit around a pipe, a notch for a door jamb, or an L-shape for a corner, the jigsaw is your best friend.
To cut laminate, you’ll want to equip your jigsaw with a special blade. Look for a fine-tooth, “laminate” or “reverse-tooth” blade. A reverse-tooth blade cuts on the downstroke, which helps prevent chipping on the visible surface of the plank.
Pros:
- Incredibly Versatile: It can make straight, curved, L-shaped, and U-shaped cuts. It’s the problem-solver tool.
- Affordable: A good jigsaw is relatively inexpensive and useful for many other DIY projects.
- Easy to Maneuver: Its small size makes it easy to handle and control for detailed work.
Cons:
- Can Cause Chipping: You need the right blade and technique to get a clean cut.
- Slower for Straight Cuts: Making long, straight cuts can be slower and harder to keep perfectly straight compared to other saws.
- Creates Dust: Like all power saws, it will create sawdust.
Best for: Making those tricky, non-straight cuts around obstacles. It’s an essential companion to a laminate cutter or miter saw.
3. The Miter Saw (The Powerhouse)
A miter saw, also called a chop saw, is a powerful tool that excels at making perfectly straight and angled cross-cuts. You pull a spinning circular blade down onto the plank. It’s incredibly fast, accurate, and satisfying to use. If you need to cut a plank to fit against a wall that isn’t perfectly square, a miter saw can make that angled cut with ease.
Just like with a jigsaw, the blade is key. You’ll need a fine-tooth blade (80 teeth or more) designed for laminate or fine woodworking to get a chip-free cut. A standard construction blade will tear up the surface.
Pros:
- Fast and Precise: Makes perfect straight and angled (mitered) cuts in seconds.
- Highly Repeatable: Once you set an angle, you can make the same cut over and over again perfectly.
- Powerful: It cuts through thick laminate planks without any effort.
Cons:
- Creates a Lot of Dust: You’ll definitely want to use this tool outside or in a garage with a dust collection system.
- Loud and Intimidating: The noise and power can be a bit much for a first-time user.
- Expensive and Bulky: This is a bigger investment and takes up more storage space than the other options.
Best for: Homeowners who plan to do a lot of DIY projects (like trim or decking) and need a tool for fast, repetitive, and angled cuts.
Comparing Your Options: A Simple Guide
Sometimes seeing it all laid out makes the choice clearer. Here’s a simple table to help you compare these three fantastic tools.
| Tool | Best For | Cleanliness | Noise Level | Beginner Friendliness |
|---|---|---|---|---|
| Laminate Cutter | Straight cuts | Dust-Free | Very Quiet | Excellent |
| Jigsaw | Curved & intricate cuts | Some Dust | Moderate | Very Good |
| Miter Saw | Fast, straight & angled cuts | Very Dusty | Very Loud | Good (with practice) |
Safety First: Essential Tips for Cutting Laminate
No matter which tool you choose, your safety is the most important thing. Woodworking should be enjoyable, not dangerous. Please take a moment to review these simple safety rules before you make your first cut.
- Wear Safety Glasses: This is non-negotiable. Always protect your eyes from flying debris, especially when using power saws. Even a manual cutter can send a small chip flying. For more information, the Occupational Safety and Health Administration (OSHA) has great resources on eye protection.
- Use Hearing Protection: If you’re using a miter saw or other loud power tool, protect your hearing with earplugs or earmuffs.
- Mark Your Lines Clearly: Use a pencil and a speed square to draw a clear, straight line. A good line is your roadmap to a good cut.
- Secure Your Workpiece: Make sure the plank is held firmly in place before you cut. For power saws, use clamps to secure it to a workbench. Never hold a small piece with your hands close to the blade.
- Keep Your Fingers Away: This sounds obvious, but always be aware of where your hands are in relation to the blade or cutting mechanism.
- Disconnect Power: When changing blades on a power saw, always unplug it from the wall first. Safety first, always!
Step-by-Step Guide: How to Make a Perfect Cut
Ready to try it out? Let’s walk through making a simple, straight cut using the tool I recommend most for beginners: the laminate cutter. The process is so simple and rewarding!
Step 1: Measure and Mark Your Plank
Measure the space where your plank needs to go. Remember the golden rule: “Measure twice, cut once.” Transfer that measurement to your laminate plank. Use a combination square or speed square and a sharp pencil to draw a perfectly straight line across the finished side of the plank.
Step 2: Position the Plank in the Cutter
Lift the handle of the laminate cutter. Slide your plank onto the cutter’s bed, finished side up. Carefully align the pencil line on your plank directly under the cutting blade. Most cutters have a guide to help you line it up perfectly.
Step 3: Make the Cut
Hold the plank steady with one hand (away from the blade, of course). With your other hand, press down firmly and smoothly on the long handle. You will feel a satisfying “snap” as the blade shears through the plank. The cut should be clean and precise.
Step 4: Check Your Work
Take your newly cut piece and admire your work! The edge should be clean and sharp. You can gently smooth any minor roughness with a piece of fine-grit sandpaper if needed, but it’s often perfect right from the cutter. Now, it’s ready to be installed!
Pro Tips for a Flawless Finish
Once you’ve got the basics down, a few little tricks can take your work from “good” to “great.” Here are some of my favorite tips I’ve learned over the years:
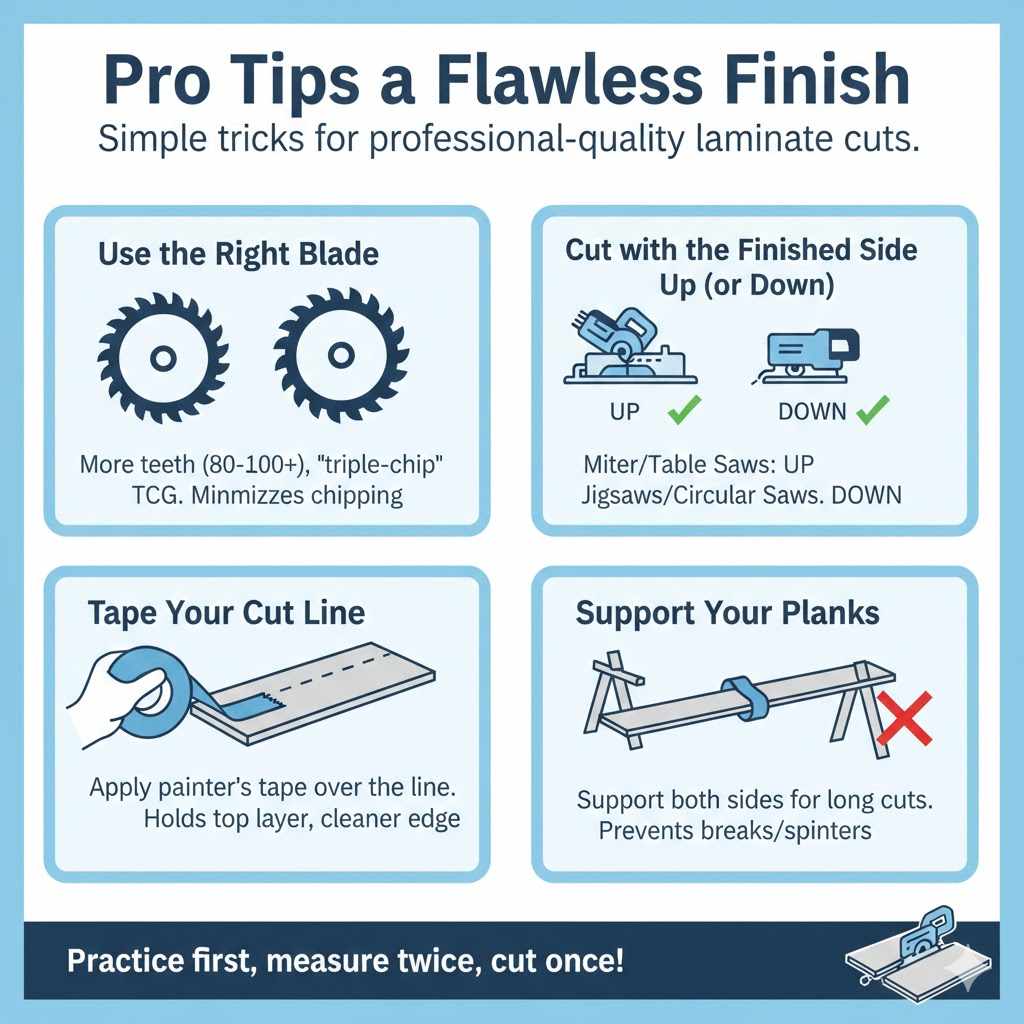
- Use the Right Blade: If you use a power saw, this is critical. A blade with more teeth (80-100+) and a “triple-chip grind” (TCG) design is made for cutting laminate smoothly. Reputable manufacturers like Pergo often recommend specific blade types.
- Cut with the Finished Side Up (or Down): This depends on your saw. For miter saws and table saws, cut with the finished side UP. For jigsaws and circular saws, cut with the finished side DOWN. This places the blade’s exit point on the back of the plank, minimizing chipping on the visible surface.
- Tape Your Cut Line: For extra protection against chipping with power saws, apply a strip of painter’s tape over your cut line before you mark it. The tape helps hold the top layer together and gives you an even cleaner edge.
- Practice on a Scrap Piece: Before cutting a full-length plank, make a few practice cuts on a piece of scrap. This helps you get a feel for the tool and check if your blade is producing a clean edge.
- Support Your Planks: When making long cuts, make sure both sides of the plank are well-supported. Letting a long piece hang off the end can cause it to break or splinter near the end of the cut.
Frequently Asked Questions (FAQ)
What’s the best tool for a beginner cutting laminate flooring?
For most beginners, a manual laminate flooring cutter (the “guillotine” style) is the best choice. It’s incredibly safe, makes no dust, is quiet, and produces perfectly clean straight cuts with very little effort.
Can I use a circular saw to cut laminate flooring?
Yes, you can use a circular saw, but you must use a fine-tooth blade designed for laminate or plywood (60-100 teeth). To avoid chipping, place the plank with the finished side facing down and consider putting painter’s tape along your cut line.
How do I avoid chipping the laminate when cutting?
The best way is to use a dedicated laminate cutter. If using a power saw, the keys are: use a sharp, fine-tooth blade, cut with the finished side positioned correctly (up for a miter saw, down for a jigsaw/circular saw), and apply painter’s tape over the cut line.
Do I need a special blade for my saw?
Absolutely. A standard wood-cutting blade will shred the top layer of laminate. You need a blade with a high tooth count (80+) and carbide tips, specifically designed for cutting laminate, melamine, or for fine-finishing work.
Is a laminate cutter loud or messy?
Not at all! This is its biggest advantage. A manual laminate cutter is almost silent and creates zero sawdust. This means you can work right inside the house without a big cleanup afterward.
How do I make L-shaped cuts for corners or vents?
A jigsaw is the perfect tool for L-shaped cuts. Mark your lines clearly, then carefully guide the jigsaw along each line to cut out the notch. It’s also great for cutting around pipes or other odd shapes.
Can I rent a laminate floor cutting tool?
Yes, many tool rental shops at large home improvement stores rent out laminate cutters and miter saws. This can be a great, cost-effective option if you’re only doing one project and don’t want to buy the tool outright.
Conclusion: Your Next Step to a Beautiful Floor
There you have it! Choosing the right laminate floor cutting tool doesn’t have to be complicated. For most projects, a simple laminate cutter will handle all your straight cuts beautifully, while a jigsaw can be your hero for the tricky spots. By picking the tool that matches your needs and remembering a few simple safety rules, you are more than ready to tackle this project.
Installing your own flooring is such a satisfying achievement. Every time you walk into that room, you’ll feel a sense of pride knowing you did it yourself. You’ve got the knowledge, and you’ve got the ability. Now, go pick out your tool, take a deep breath, and get ready to create a floor you’ll love for years to come. I know you can do it!