Should You Stain Butcher Block? Expert Guide
Deciding whether to stain your butcher block can seem tricky, especially for those new to DIY projects. You might wonder if staining protects your beautiful wood or if it’s even a good idea. This guide makes it easy.
We’ll walk you through everything step-by-step so you can feel confident about your butcher block.
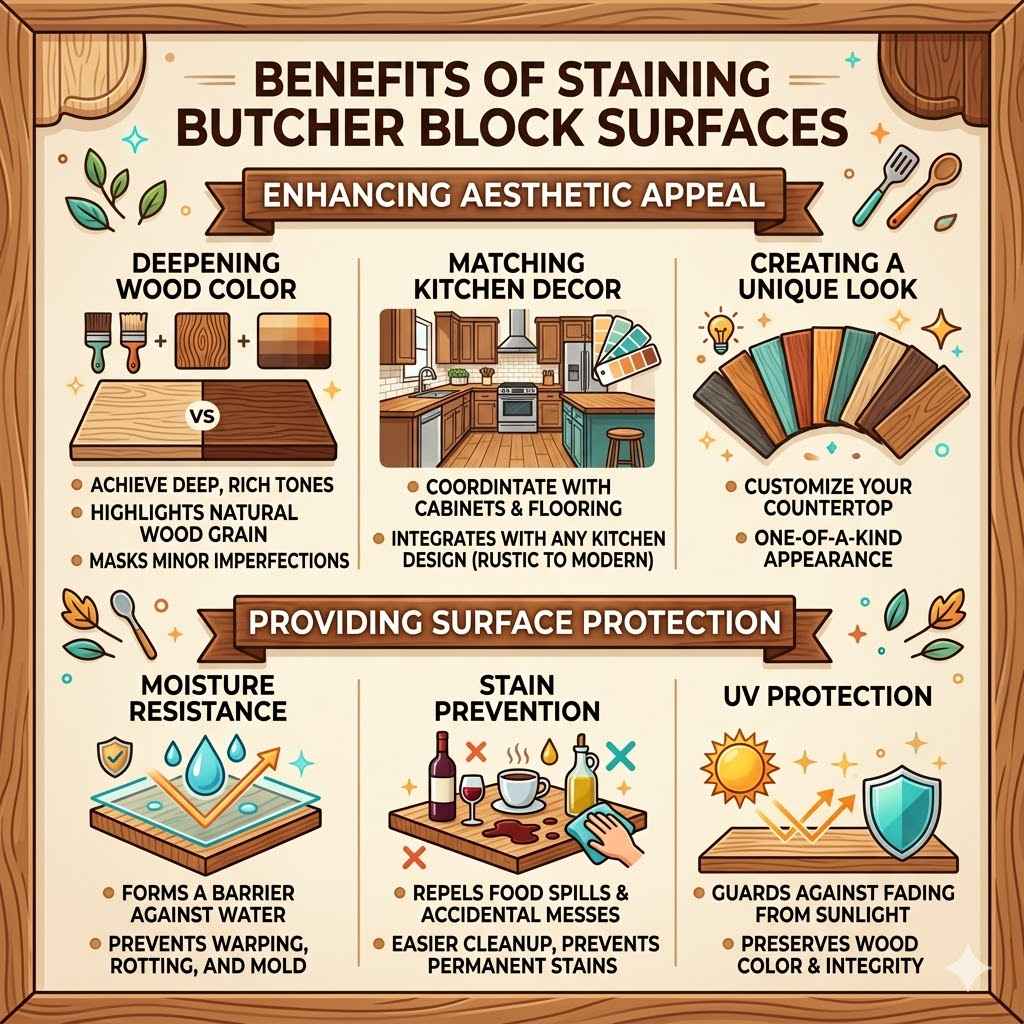
Benefits of Staining Butcher Block Surfaces
Staining butcher block is a popular choice for homeowners looking to enhance its appearance and provide a layer of protection. It’s not just about adding color; staining can significantly impact the durability and longevity of your kitchen workspace. Many people choose to stain their butcher block to achieve a specific aesthetic, making it match their kitchen cabinets or overall decor. This process can transform a plain wooden surface into a stunning focal point.
Beyond looks, the right stain can also help prevent moisture absorption and stains from spills, which is especially important in a busy kitchen environment. Understanding the advantages helps you make an informed decision for your home.
Enhancing Aesthetic Appeal
Staining allows you to completely customize the look of your butcher block. You can go for a light, natural tone to highlight the wood’s grain, a rich, dark color for a dramatic effect, or even a vibrant hue to add a pop of personality. This flexibility means your butcher block can seamlessly integrate into any kitchen design, from modern minimalist to rustic farmhouse. The stain penetrates the wood, giving it a deep, consistent color that can be difficult to achieve with other finishes.
- Deepening Wood Color. Stains work by adding pigments to the wood’s surface. This process can make lighter woods appear richer and more substantial, bringing out natural variations in the grain pattern. A deep stain can hide minor imperfections, giving the wood a more uniform and polished appearance.
- Matching Kitchen Decor. When renovating or redecorating, the ability to match your butcher block to existing cabinets, flooring, or other countertops is invaluable. Stains come in a vast array of colors, allowing for precise color matching to achieve a cohesive look.
- Creating a Unique Look. Staining opens up creative possibilities. You can experiment with different wood types and stain combinations to create a truly one-of-a-kind surface. This personalization makes your kitchen feel more special and reflective of your personal style.
Providing Surface Protection
While butcher block is inherently durable, staining adds an extra layer of defense against everyday wear and tear. The pigments in the stain, combined with a protective topcoat, can help shield the wood from water, food spills, and UV light. This protection is vital for maintaining the beauty and integrity of the butcher block over time. A well-stained and sealed butcher block is easier to clean and less prone to damage from daily use.
- Moisture Resistance. Untreated butcher block can absorb liquids, leading to water stains, warping, or even rot over time. Stains, when properly applied with a good sealant, create a barrier that repels water, keeping the wood dry and healthy. This is especially important for surfaces near sinks or in high-traffic cooking areas.
- Stain Prevention. Kitchens are prone to spills from wine, oil, coffee, and other staining agents. A stained and sealed surface makes it much harder for these liquids to penetrate the wood. This means accidental spills can be wiped away quickly without leaving permanent marks, keeping your butcher block looking fresh.
- UV Protection. Direct sunlight can fade and degrade wood over time, especially lighter-colored woods. Many stains contain UV inhibitors that help protect the wood from sun damage, preserving its color and preventing it from becoming brittle or discolored.
Factors to Consider Before Staining Butcher Block
Before you grab a brush and can of stain, it’s wise to think about a few important things. Your choice of wood, how you plan to use the surface, and the type of stain you pick all play a big role. This planning ensures you get the best results and a beautiful, long-lasting finish. Let’s explore what to keep in mind so your butcher block project turns out great.
Wood Type and Grain
Different wood species react to stains in unique ways. Some woods, like pine, are very porous and can absorb stain unevenly, leading to a blotchy appearance. Others, like maple or oak, have a tighter grain and accept stain more predictably. Understanding your wood type is key to choosing the right stain and application method. The grain pattern itself also influences how the stain will look. A prominent grain can make a bold statement with dark stains, while a finer grain might be best enhanced with a lighter, more subtle shade.
- Pine Wood Characteristics. Pine is a softwood that is relatively inexpensive and widely available. Its open grain structure means it readily absorbs stain, but often unevenly. This can result in dark patches and light streaks, known as blotching. To combat this, pre-stain wood conditioners are highly recommended for pine.
- Maple Wood Characteristics. Maple is a hardwood with a very fine, dense grain. It tends to be more resistant to stain absorption, which can make achieving deep colors more challenging. However, it also means maple is less prone to blotching and provides a smooth, even finish. Maple is an excellent choice for a uniform color.
- Oak Wood Characteristics. Oak, both red and white, has a distinct, open grain pattern. This grain is very receptive to stains, especially darker ones, which can highlight its natural beauty and texture. Oak is a popular choice for staining because its grain provides visual interest and accepts color well.
Intended Use of the Butcher Block
How you use your butcher block significantly impacts the type of finish you should apply. If it’s a primary food preparation surface, you’ll need a food-safe stain and finish. For decorative elements or surfaces that won’t directly touch food, your options are more open. Consider whether the surface will be exposed to a lot of moisture, heat, or heavy use.
- Food Preparation Surfaces. When staining butcher block that will be used for chopping or as a direct food contact surface, safety is paramount. You must use stains and finishes that are certified food-safe. Many common stains and sealants are not safe for direct food contact, so research is crucial here. A food-safe oil finish is often a better alternative for direct food prep areas, as it can be easily renewed.
- Decorative or Non-Food Surfaces. If your butcher block is used for a desk, a bookshelf top, or a decorative accent piece, you have more freedom. You can use a wider range of stain colors and durable finishes like polyurethane or varnish. These finishes offer greater protection against scratches and wear, but may not be suitable for direct food contact.
- Moisture and Heat Exposure. Butcher block countertops, especially those near sinks or stovetops, will face moisture and heat. Choosing a stain and topcoat that can withstand these conditions is vital. Water-based finishes may be more susceptible to damage from constant moisture than oil-based or specialized countertop sealants.
Stain Types and Application Methods
There are several types of wood stains, each with its own characteristics and best uses. Oil-based stains are traditional, offering deep penetration and rich color, but they can be slow to dry. Water-based stains dry faster and have lower VOCs but may not penetrate as deeply. Gel stains are thicker and sit more on the surface, making them good for blotch-prone woods and for achieving intense colors. The application method also matters, from brushing and wiping to spraying.
- Oil-Based Stains. These stains use mineral spirits or other petroleum distillates as the solvent. They penetrate the wood deeply, providing rich, long-lasting color. Oil-based stains are known for their ability to bring out the natural beauty of wood grain. They typically require a longer drying time, often 24-48 hours, and need mineral spirits for cleanup.
- Water-Based Stains. Water-based stains use water as the solvent. They dry much faster than oil-based stains, sometimes within an hour. This quick drying time can be advantageous for busy projects, but it also means less working time. Water-based stains are generally easier to clean up with soap and water.
- Gel Stains. Gel stains have a thick, jelly-like consistency. They sit more on the surface of the wood rather than penetrating deeply. This makes them excellent for woods prone to blotching, like pine, and for achieving opaque, vibrant colors. They can also be used over existing finishes.
- Wipe-On Stains. These stains are formulated to be applied with a cloth and wiped off excess. They offer more control over the color intensity, allowing you to build up the shade gradually. Wipe-on stains are user-friendly and great for beginners, providing an even application.
The Staining Process Step-by-Step
Applying stain to your butcher block can be a rewarding DIY project. Following these steps carefully will help you achieve a smooth, beautiful, and durable finish for your wood. It’s all about preparation, careful application, and proper drying.
Preparation is Key
Proper preparation is the most crucial step for any staining project. It ensures the stain adheres well and the final finish looks professional. This involves cleaning, sanding, and potentially conditioning the wood.
- Clean the Butcher Block. Start by thoroughly cleaning the butcher block. Use a mild soap and water solution, and ensure it’s completely dry before proceeding. Any dirt, grease, or old finish will prevent the stain from penetrating evenly.
- Sand the Surface Smooth. Sand the butcher block with medium-grit sandpaper (around 120-150 grit) to remove any imperfections or old finishes. Follow up with fine-grit sandpaper (220 grit) for a silky-smooth surface. Always sand in the direction of the wood grain.
- Wipe Away Dust. After sanding, use a tack cloth or a damp cloth to remove all dust particles. Dust left on the surface will cause an uneven stain and a rough finish. Ensure the wood is completely dry after wiping.
- Apply a Pre-Stain Wood Conditioner (if needed). For porous woods like pine or cherry, a pre-stain wood conditioner is highly recommended. This product helps the wood absorb the stain more evenly, preventing blotchiness. Apply it according to the manufacturer’s instructions and let it penetrate for the recommended time.
Applying the Stain
With the butcher block prepped, it’s time to apply the stain. Work in a well-ventilated area and wear protective gear. Applying the stain evenly is key to a beautiful outcome.
- Stir the Stain Well. Open the can of stain and stir it thoroughly. Do not shake the can, as this can introduce air bubbles that might transfer to your wood. Ensure all the pigment is mixed evenly throughout the liquid.
- Apply the Stain Evenly. Using a good quality brush, foam applicator, or lint-free cloth, apply the stain generously to the wood. Work in sections, applying the stain in the direction of the wood grain. Avoid letting the stain pool or drip.
- Wipe Off Excess Stain. After letting the stain penetrate for the amount of time recommended by the manufacturer (usually 5-15 minutes), wipe off the excess with a clean, lint-free cloth. Wipe in the direction of the wood grain. The longer you let the stain sit, the deeper the color will be.
- Allow to Dry Completely. Let the stained surface dry completely. Drying times vary depending on the type of stain and humidity, but typically range from 24 to 72 hours. Do not rush this step, as applying a topcoat too soon can cause issues with the finish.
Applying Protective Topcoats
After the stain has dried and you are happy with the color, it’s time to apply a protective topcoat. This layer seals the stain, protects the wood, and makes the surface durable and easy to clean.
- Choose the Right Topcoat. Select a durable topcoat suitable for your butcher block’s intended use. For food prep areas, a food-safe mineral oil or beeswax blend is best. For other surfaces, polyurethane, polycrylic, or a varnish offers excellent protection.
- Apply Thin, Even Coats. Apply the topcoat in thin, even layers using a high-quality brush or roller. Avoid applying too much at once, which can lead to drips and an uneven finish. Work in the direction of the wood grain.
- Sand Lightly Between Coats. After each coat of topcoat has dried, lightly sand the surface with very fine-grit sandpaper (320-400 grit). This helps to smooth out any imperfections and ensures better adhesion for the next coat. Wipe away dust with a tack cloth.
- Apply Multiple Coats for Durability. For optimal protection, apply at least three coats of topcoat. More coats may be necessary for high-traffic areas or surfaces exposed to significant wear. Allow adequate drying time between each coat as per the product instructions.
Maintaining Your Stained Butcher Block
Keeping your stained butcher block looking its best involves simple, regular care. Proper maintenance will ensure your beautiful surface lasts for years to come, resisting wear and tear.
Regular Cleaning Practices
Cleaning your butcher block is straightforward, but it requires using the right methods to avoid damaging the finish. Gentle cleaning is the best approach.
- Wipe Up Spills Immediately. The most important rule for butcher block care is to wipe up spills as soon as they happen. Liquids left to sit can seep into the wood and cause stains or damage, even through a protective finish.
- Use Mild Cleaning Agents. For everyday cleaning, use a soft cloth dampened with water and a small amount of mild dish soap. Avoid abrasive cleaners or harsh chemicals, as they can strip the finish or damage the wood.
- Avoid Excessive Water. Never soak your butcher block. While some finishes offer good water resistance, prolonged exposure to standing water is detrimental to wood. Always dry the surface thoroughly with a clean towel after cleaning.
Periodic Re-Oiling or Re-Sealing
Depending on the type of finish you used and how heavily the butcher block is used, you may need to reapply oil or sealant periodically. This is especially true for food-safe oil finishes.
- Re-Oiling Food-Safe Surfaces. If you used a food-safe oil like mineral oil or a beeswax blend, you’ll need to reapply it regularly. How often depends on use, but you’ll notice the wood starting to look dry or feel less smooth. Apply a fresh coat, let it soak in, and wipe off any excess.
- Re-Sealing Protective Finishes. For finishes like polyurethane or varnish, re-sealing is less frequent. You’ll typically only need to do this if the finish starts to show signs of wear, such as dulling, scratching, or peeling. Light sanding and application of a new coat will restore its protection.
- Checking for Wear and Tear. Regularly inspect your butcher block for any signs of damage, such as deep scratches, dents, or fading. Addressing these issues promptly can prevent them from worsening and prolong the life of your butcher block.
Tips for Preventing Damage
Taking preventative measures can help keep your stained butcher block in excellent condition. Simple habits can make a big difference.
- Use Trivets and Hot Pads. Always use trivets or hot pads under hot pots and pans. Direct heat can scorch, warp, or crack the wood, even with a protective finish.
- Use Cutting Boards. While some butcher blocks are designed for light chopping, it’s best to use a separate cutting board for heavy-duty tasks. This protects the stained surface from deep knife marks and preserves its appearance.
- Avoid Dragging Heavy Objects. When moving appliances or heavy items across the butcher block, lift them instead of dragging. Dragging can cause scratches and gouges that can compromise the finish and the wood itself.
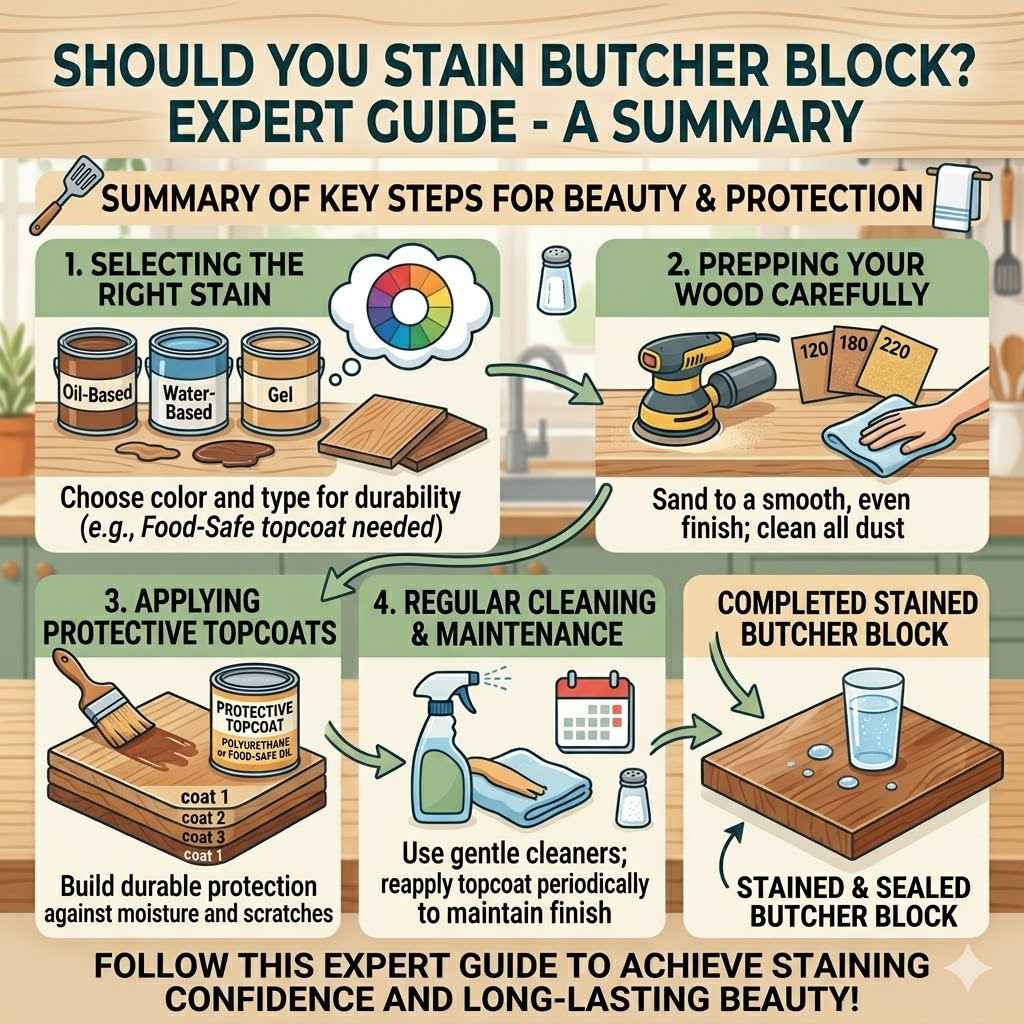
Should You Stain Butcher Block? Expert Guide – A Summary
Considering staining your butcher block is a great way to add beauty and protection. The process involves selecting the right stain, prepping your wood carefully, and applying protective topcoats. Regular cleaning and maintenance will keep your butcher block looking its best for years. This guide has provided a clear path to staining your butcher block with confidence.
Frequently Asked Questions
Question: Can I stain butcher block that is already installed?
Answer: Yes, you can stain butcher block that is already installed. However, it requires careful preparation, including protecting surrounding areas from drips and ensuring good ventilation. You’ll need to clean it thoroughly, sand it smooth, and apply stain and topcoats with care.
Question: What is the best stain for butcher block countertops?
Answer: For butcher block countertops used for food preparation, it’s best to use a food-safe stain or, more commonly, a food-safe oil finish like mineral oil or a beeswax blend. If the butcher block is not for food contact, durable options like oil-based polyurethane or polycrylic are excellent choices.
Question: How do I prevent blotchiness when staining butcher block?
Answer: To prevent blotchiness, especially on porous woods like pine, always use a pre-stain wood conditioner. Sanding thoroughly and evenly, and applying the stain consistently with a wipe-on technique can also help achieve a uniform color.
Question: How many coats of stain should I apply?
Answer: Typically, one or two coats of stain are sufficient to achieve the desired color depth. It’s best to apply one coat, allow it to dry, and then assess the color. You can apply a second coat if a darker shade is desired.
Always wipe off excess stain after each application.
Question: Is it safe to cut directly on stained butcher block?
Answer: It is generally not recommended to cut directly on stained butcher block if you used a standard stain and topcoat, as these are not usually food-safe and can be scratched or damaged. For direct food contact, use a food-safe oil finish, and even then, using a separate cutting board is best for longevity.
Final Thoughts
Staining your butcher block offers a fantastic way to personalize your space and enhance its durability. This expert guide breaks down the process into manageable steps, from choosing the right materials to applying the stain and protecting the finish. With careful preparation and application, you can achieve beautiful, long-lasting results that you’ll love. Start your project with confidence knowing you have the knowledge to make your butcher block shine.