A Fun Way to Make Stairs Look Great with Stair Nose for Laminate Flooring
I remember my first home project—turning an old, creaky staircase into a beautiful feature with stair nose for laminate flooring. My stairs were worn out, and I wanted a simple, affordable fix. After some research, I found that stair nosing could make my laminate floors look neat and safe. This article will show you what stair nosing is, how to use it, and why it’s awesome for your home. Whether you’re new to DIY or a pro, I’ll share easy tips and tricks to make your stairs shine!
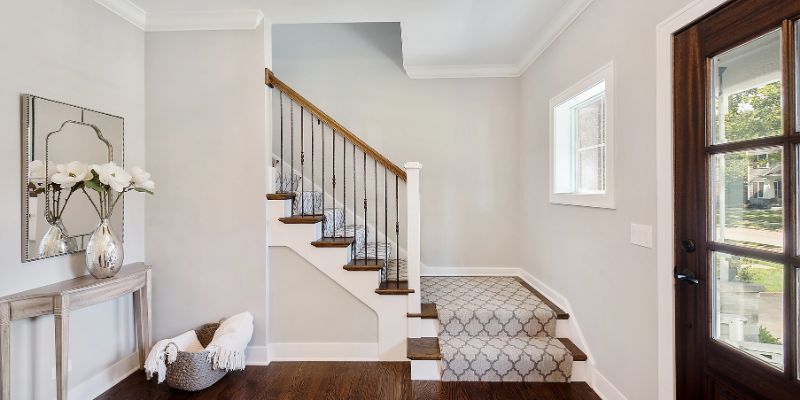
What Is a Stair Nose for Laminate Flooring?
A stair nose for laminate flooring is a special piece that covers the edge of each stair step. It makes your stairs look finished and keeps them safe. Imagine a little cap that protects the front of your step where your foot lands. It stops the laminate from chipping and makes stairs less slippery. I learned this when my kids kept tripping on our uneven stair edges!
Why Do You Need Stair Nosing?
Stair nosing does three big things:
- Safety: It adds grip to prevent slips.
- Protection: It guards the stair edge from wear.
- Looks: It gives your stairs a clean, polished look.
Without nosing, your laminate might crack or look messy where it meets the stair edge. I saw this in my friend’s house, where bare edges started peeling after a year.
Types of Stair Nosing for Laminate Flooring
There are a few types of stair nosing, and each works for different stairs. Here’s what I found:
Overlap Nosing
This type sits on top of the laminate. It’s easy to install and great for beginners. I used overlap nosing in my living room stairs because it was quick to glue down.
Flush Nosing
Flush nosing sits even with the laminate for a smooth look. It’s trickier to install but looks super modern. I saw this in a fancy hotel and loved how sleek it was.
Metal or Vinyl Nosing
Some nosing is made of aluminum or vinyl instead of laminate. These are tough and great for busy homes. My neighbor used metal nosing for her dog-heavy household, and it’s held up great.
Here’s a simple table to compare:
| Type | Best For | Ease of Install | Cost |
|---|---|---|---|
| Overlap Nosing | Beginners, quick projects | Easy | $10–$20 per piece |
| Flush Nosing | Modern look, skilled DIYers | Medium | $15–$25 per piece |
| Metal/Vinyl Nosing | High-traffic stairs, durability | Easy | $12–$30 per piece |
| Table 1: Comparing Types of Stair Nosing for Laminate Flooring |
How to Install Stair Nose for Laminate Flooring
Installing stair nosing is fun if you follow simple steps. I did this myself last summer, and it took one weekend. Here’s how you can do it:
Tools and Materials You Need
You don’t need fancy tools. I used:
- Measuring tape: To measure each step.
- Saw: A hand saw or miter saw to cut nosing.
- Adhesive: Construction glue for laminate.
- Screws or nails: For extra hold (optional).
- Level: To make sure everything’s straight.
- Laminate stair nosing: Match your floor’s color.
Visual Idea: A diagram showing a stair with labeled parts (tread, riser, nosing) would help beginners see where nosing goes.
Step-by-Step Installation Guide
- Measure Your Stairs: Measure the width of each step. My stairs were 36 inches wide, so I cut nosing to fit.
- Cut the Nosing: Use a saw to cut the nosing to the right length. I marked mine with a pencil first.
- Prepare the Stair: Clean the step and remove old nosing if needed. I used a chisel to pry off old pieces.
- Apply Adhesive: Put glue on the back of the nosing. I used a zigzag pattern for a strong hold.
- Place the Nosing: Press it firmly on the stair edge. Use a level to check it’s straight.
- Secure It: Add screws or nails for extra strength. I skipped this for overlap nosing but used screws for flush nosing.
- Let It Dry: Wait 24 hours before walking on it. I put a “Do Not Step” sign for my kids!
Visual Idea: A step-by-step photo guide showing cutting, gluing, and placing nosing would be great for DIYers.
Common Mistakes to Avoid
- Wrong Size: Measure twice to avoid short pieces. I cut one too short and had to buy more.
- Skipping Glue: Always use adhesive for a strong hold.
- Uneven Edges: Check with a level to keep it neat.
Benefits and Drawbacks of Stair Nosing
Stair nosing has lots of perks, but it’s not perfect. Here’s what I learned:
Benefits
- Safer Stairs: Nosing adds grip, which helped my clumsy dog avoid slips.
- Longer-Lasting Floors: It protects edges from wear. My stairs still look new after two years.
- Pretty Look: It makes stairs match your laminate floor perfectly.
Drawbacks
- Cost: Nosing can be pricey, about $10–$30 per step. I saved by buying in bulk.
- Installation Time: It takes a weekend for beginners.
- Color Matching: Finding the exact shade can be hard. I ordered samples first.
Here’s a table comparing costs:
| Item | Average Cost | Where to Buy |
|---|---|---|
| Laminate Stair Nosing | $10–$30 per piece | Home Depot, Flooring Superstore |
| Adhesive | $5–$10 per tube | Local hardware stores |
| Tools (saw, level, etc.) | $20–$50 total | Borrow or buy at Lowe’s, Home Depot |
| Table 2: Cost Breakdown for Stair Nosing Project |
Alternatives to Stair Nosing
If nosing feels too hard, try these options:
- Solid Wood Treads: Use wood instead of laminate for a sturdy, classic look. My uncle did this, and it’s gorgeous.
- Carpet Stairs: Carpet is softer and quieter but harder to clean. I tried this in my basement.
- Vinyl Nosing: Cheaper and durable but less fancy. Good for rentals.
My Top Tips for a Great Stair Nosing Project
Here are my favorite tips from doing this myself:
- Order Samples: Get nosing samples to match your floor. I wasted $50 on the wrong color once.
- Check Building Codes: Some areas require non-slip nosing. I checked my local rules at NFPA.org.
- Use Anti-Slip Tape: Add tape under nosing for extra grip. It saved my toddler from a fall.
- Clean First: Dust-free stairs make glue stick better. I vacuumed twice before starting.
Visual Idea: A simple sketch of a stair with anti-slip tape and nosing placement would help readers visualize safety features.
Where to Buy Stair Nosing
You can find stair nosing at:
- Home Depot: Great for overlap and flush nosing. [www.homedepot.com]
- Flooring Superstore: Offers lots of colors and types. [www.flooringsuperstore.com]
- Lumber Liquidators: Good for budget options. [www.lumberliquidators.com]
I bought mine at Home Depot because they had free shipping on bulk orders. Compare prices to save money!
Frequently Asked Questions
What Is a Stair Nose for Laminate Flooring?
A stair nose is a piece that covers the front edge of a stair step. It protects the laminate and makes stairs safer. It also looks neat, matching your floor. I used it to fix my worn-out stairs, and it made them look brand new.
Can I Install Stair Nosing Myself?
Yes, it’s a fun DIY project! You need a saw, glue, and a level. Follow my steps above, and you’ll do great. I did it with no experience, and my stairs look amazing. Just measure carefully to avoid mistakes.
How Much Does Stair Nosing Cost?
It costs $10–$30 per step, depending on the type. Overlap nosing is cheaper, while flush nosing costs more. I saved by buying in bulk and borrowing tools. Check Home Depot or Flooring Superstore for deals.
Is Stair Nosing Safe for Kids and Pets?
Yes, it adds grip to prevent slips. I added anti-slip tape under mine for extra safety. My kids and dog run up and down without tripping now. Check local safety rules at NFPA.org.
Can I Use Stair Nosing with Carpet?
Yes, some nosing works with carpeted stairs. It covers the edge where laminate meets carpet. I saw this in a friend’s house, and it looked super tidy. Look for “laminate to carpet” nosing online.
How Do I Match Nosing to My Floor?
Order samples to find the right color. I got three samples from Flooring Superstore to match my oak laminate. Take your time to avoid buying the wrong shade, like I did once!
Do I Need a Professional to Install Nosing?
Not usually! Beginners can do it with simple tools. But if your stairs are curved or tricky, a pro might help. I did mine alone, but I called a friend for advice on one uneven step.
Conclusion
Using a stair nose for laminate flooring is a great way to make your stairs safe and pretty. It’s easy to install, protects your floors, and looks awesome. My stairs went from dull to dazzling with this simple project. Try it yourself—it’s fun and saves money! Share your stair project ideas in the comments or ask me for tips. Let’s make your home shine!