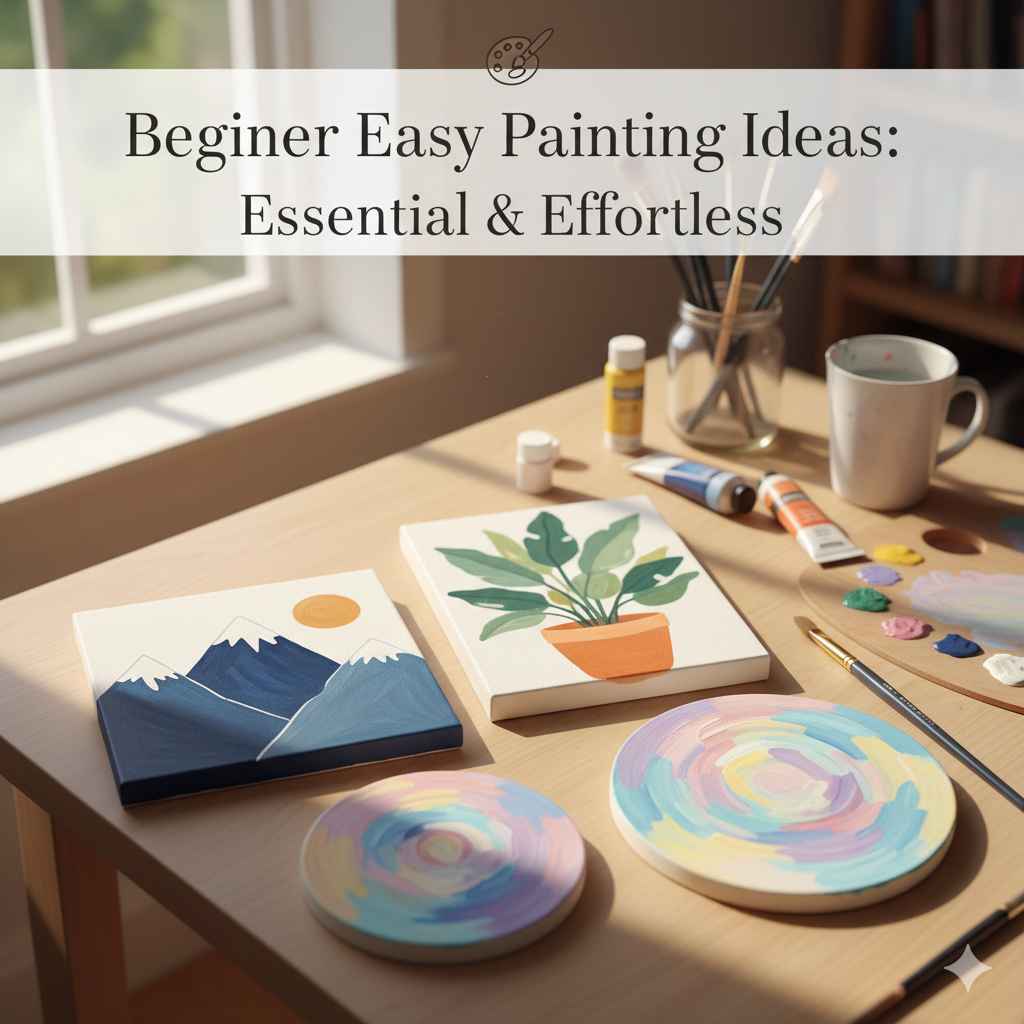
Beginner Easy Painting Ideas: Essential & Effortless
Yes! Discover simple, fun painting ideas perfect for beginners. Learn essential techniques and gather affordable supplies to create beautiful art with confidence, even without prior experience.
Feeling a bit intimidated by the idea of painting? You look at beautiful artwork and think, “That’s just not for me.” Many of us feel that way! The world of art can seem complex, but it doesn’t have to be. Getting started with painting is really about embracing the process and having a little fun. It’s less about perfect strokes and more about discovering your own creative voice. This guide is here to show you that beginner painting is absolutely achievable and incredibly rewarding. We’ll break down easy concepts and show you just how effortless it can be to create something you’ll be proud of. Ready to dip your brush in? Let’s dive into some truly beginner-friendly painting ideas that will spark your creativity without the stress.
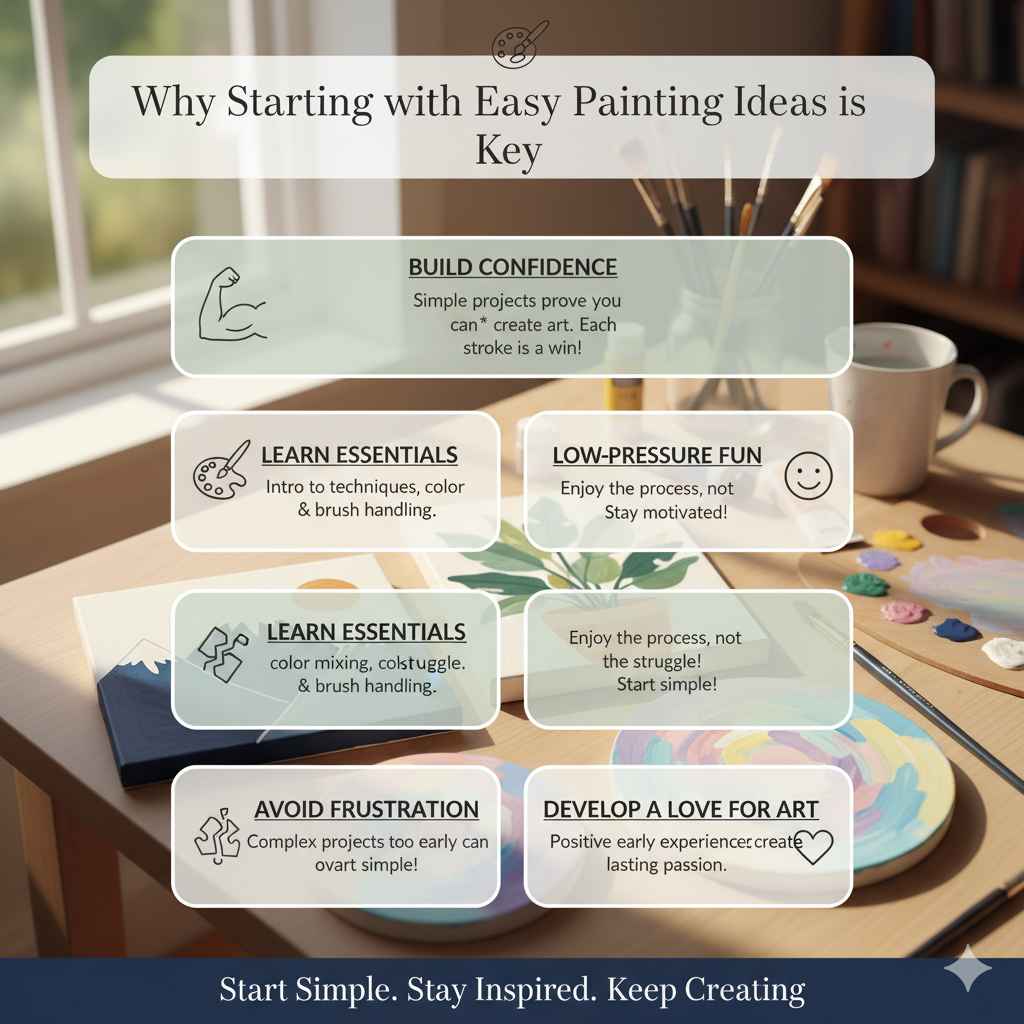
Why Starting with Easy Painting Ideas is Key
Embarking on your painting journey with simple, accessible ideas is like learning to walk before you run. Trying overly complex projects right away can lead to frustration and a feeling of being overwhelmed, which is the last thing we want! Beginner painting ideas are designed to introduce you to essential techniques, color mixing, and brush handling in a low-pressure, enjoyable way. They build your confidence with each stroke, proving that you can create art. Focusing on ease and effortlessness means you’ll spend more time enjoying the creative process and less time struggling. This positive start is crucial for developing a lasting love for painting.
Essential Supplies for Your Beginner Painting Adventure
Before we jump into the fun projects, let’s talk about what you’ll need. Don’t worry, you don’t need a professional studio’s worth of supplies! The beauty of starting with easy painting ideas is that you can begin with a very basic, affordable kit.
Here’s a rundown of the must-haves:
Paints:
Acrylic Paints: These are fantastic for beginners. They dry quickly, are water-soluble (easy cleanup!), and can be used on various surfaces. A basic set with primary colors (red, blue, yellow), black, and white is a great starting point.
Watercolors: If you prefer a more fluid, transparent look, watercolors are a good option. They require less cleanup than oils but can take a little practice to control.
Brushes: You don’t need a huge variety. A few key brushes will do:
One flat brush (about ½ inch) for broader strokes.
One round brush (medium size) for details and lines.
A smaller round brush for fine details.
Synthetic bristles are usually a good and affordable choice for acrylics and watercolors.
Surface:
Canvas Panels or Boards: These are affordable and pre-primed, meaning you can paint on them right away. Perfect for practice and smaller projects.
Watercolor Paper: If you’re using watercolors, use paper specifically designed for them. It’s thicker and won’t buckle when wet.
Thick Paper: For acrylics, very thick paper (like cardstock or bristol board) can also work for smaller studies.
Palette: This is where you’ll mix your paints.
Disposable palette paper pads are convenient.
A ceramic tile or a plastic plate can also work great.
Water Container: Two old jars or cups work perfectly—one for rinsing brushes and one for clean water.
Paper Towels or Rags: For wiping brushes and cleaning up spills.
Easel (Optional): A small tabletop easel can help you work at a comfortable angle, but it’s not essential to start.
Let’s look at a quick comparison to help you choose:
| Paint Type | Pros for Beginners | Cons for Beginners | Best For |
|---|---|---|---|
| Acrylics | Dries fast, easy cleanup, versatile, forgiving errors | Can be harder to blend smoothly due to fast drying | Experimenting, bold colors, various surfaces |
| Watercolors | Beautiful translucent effects, portable, minimal cleanup | Requires learning water control, less forgiving of mistakes | Lighter palettes, nature scenes, soft washes |
Beginner Easy Painting Ideas: Get Your Brush Moving!
Now for the fun part! These ideas are chosen because they are forgiving, allow for exploration, and can yield beautiful results with minimal technique.
1. Monochromatic Landscapes
This is a fantastic exercise for understanding values (how light or dark a color is) and composition without worrying about color matching.
What you’ll need:
A single color of paint (e.g., a deep blue, a forest green, or a sepia brown)
White paint
Canvas panel or thick paper
Brushes
How to do it:
1. Mix your base: Decide on your main color. Mix a good portion of it with white to create a lighter tint. This will be your lightest value.
2. Sketch lightly: Lightly sketch a simple landscape scene – think mountains, a tree, or a rolling hill. Don’t worry about detail.
3. Block in shadows: Use your darkest shade of the single color (the pure color or mixed with a tiny bit of black if you dare, but better to stick to just the color and white for this exercise) to block in the darkest areas.
4. Build up mid-tones: Use your pre-mixed lighter tint for the middle values.
5. Add highlights (optional): If you want to add a touch of light, mix your base color with more white, or even a tiny bit of white mixed with a touch of yellow to create a very pale, warm highlight.
6. Keep it simple: Focus on the shapes and the contrast between light and dark. The limited color palette makes it easy to manage and creates a cohesive, moody feel.
2. Abstract Color Blocks
Abstract art is wonderfully liberating for beginners. It’s all about experimenting with color and shape.
What you’ll need:
A few colors of acrylic paint (e.g., a bright red, a sunny yellow, a cool blue, black, and white)
Canvas panel or thick paper
Brushes (flat brushes work well here)
Painter’s tape (optional, for clean lines)
How to do it:
1. Lay out your canvas: Decide if you want to use painter’s tape to create crisp edges for your blocks. If so, tape off sections of your canvas. You can create squares, rectangles, or even diagonal lines.
2. Choose your colors: Select a few colors that you think will look good together. Don’t overthink it! Look up basic color theory for inspiration if you like – for example, analogous colors (next to each other on the color wheel) often work well, or bold complementary colors (opposite each other) can create high contrast. Resources like Canva’s Color Wheel guide can offer some ideas.
3. Paint your blocks: Fill in your taped sections with your chosen colors. Use a flat brush for smooth coverage.
4. Peel the tape (if used): Once the paint is dry, carefully peel off the painter’s tape to reveal clean lines.
5. Embrace the happy accidents: Don’t worry if colors bleed a little or shapes aren’t perfect. The beauty of abstract art is in its freedom. You can even add splatters or simple lines over the top later if you like.
3. Simple Silhouette Art
Silhouettes are striking and rely on contrast, making them perfect for beginners.
What you’ll need:
A background color paint (e.g., sunset colors if painting a desert scene, or a starry night)
Black paint
Canvas panel or thick paper
Brushes
How to do it:
1. Paint your background: Create a simple background. For a sunset, blend yellows, oranges, and reds. For a night sky, use blues and purples, adding white for stars. Let it dry completely.
2. Identify your silhouette subject: Think of simple shapes: a single tree, a cat sitting, a lone mountain, a park bench, or even a row of simple houses.
3. Sketch lightly: Lightly sketch the outline of your silhouette onto the dried background. Keep it clear and distinct.
4. Paint the silhouette: Using your black paint and a confident hand, carefully paint within the lines of your sketch. Ensure you cover the shape completely and get clean edges against the background.
5. Less is more: The simplicity of the silhouette against a detailed or blended background creates a powerful visual.
4. Dot Art / Pointillism (Simplified)
This technique involves creating an image using dots of color. You can simplify it by using fewer dots and larger ones.
What you’ll need:
Multiple colors of paint (acrylics work well)
Canvas panel or thick paper
The end of a brush handle, cotton swabs, or a fine-tipped marker for dotting
Reference image (optional)
How to do it:
1. Choose a simple subject: A flower, a basic animal shape, or even just a pattern can work.
2. Lightly sketch the shape: Draw a basic outline of your subject on the canvas.
3. Start dotting: Dip the end of your brush handle (or a cotton swab) into one color and make dots within the outline. Try to place them close together to fill the shape.
4. Build form and color: Use different colors to create shading or texture. For instance, if you’re making a red apple, you might use darker red dots for shadows and lighter dots for highlights.
5. Focus on coverage: The goal is to cover the area with dots. Don’t worry about perfect dot placement; a slightly organic look is part of the charm. This method is very forgiving.
The Tate defines Pointillism as a technique of painting in which small, distinct dots of pure color are applied in patterns to form an image. Your beginner version will be less strict but use the same principle!
5. Simple Water Texture Study
This is a great exercise for watercolor beginners, focusing on washes and how colors blend.
What you’ll need:
Watercolor paints
Watercolor paper (important!)
Round brush
Water
Paper towels
Masking fluid (optional, for preserving white areas)
How to do it:
1. Wet the paper: Lightly dampen a section of your watercolor paper with clean water. You can use a wide brush or a spray bottle. The paper should be shiny but not puddled.
2. Drop in colors: Dip your brush into a color (e.g., blue, green, or purple for a water feel) and gently touch it to the wet paper. Watch how the color blooms and spreads.
3. Add more colors: Introduce other colors next to or over the first. They will blend softly on the wet surface.
4. Tilt and move: Gently tilt your paper to encourage the colors to flow and merge.
5. Control the water: Use a paper towel to gently lift out areas of color for highlights, or to absorb excess water.
6. Experiment with edges: Try painting on dry paper to see how the edges of your colors remain sharp. Then try on very wet paper for maximum diffusion. This helps you understand water control.
6. Textured Backgrounds with Sponges and Salt
This idea uses simple household items to create interesting textures that can serve as backgrounds for future paintings or stand alone.
What you’ll need:
Acrylic paints
Canvas panel or thick paper
Sponge (sea sponge or kitchen sponge)
Table salt
Spray bottle with water (optional)
How to do it (Sponge Technique):
1. Apply paint thinly: Put a small amount of paint onto your palette.
2. Dab the sponge: Lightly dip a dry sponge into the paint. Don’t saturate it.
3. Blot onto canvas: Gently dab the sponge onto your canvas. You can overlap areas or use different colors.
4. Vary pressure: Experiment with how hard you press to get different textures.
5. Build layers: Once dry, you can add more layers or colors if desired.
How to do it (Salt Technique – best with watercolors):
1. Paint a wash: Apply a wet wash of color to your watercolor paper. It should be wet enough for salt to adhere.
2. Sprinkle salt: While the paint is still very wet, sprinkle table salt over the area. Different grain sizes of salt will produce different effects.
3. Let it dry completely: As the water evaporates, the salt crystals will draw the moisture and pigment out, creating starburst-like patterns.
4. Brush off salt: Once bone dry, gently brush off the salt to reveal the textured pattern.
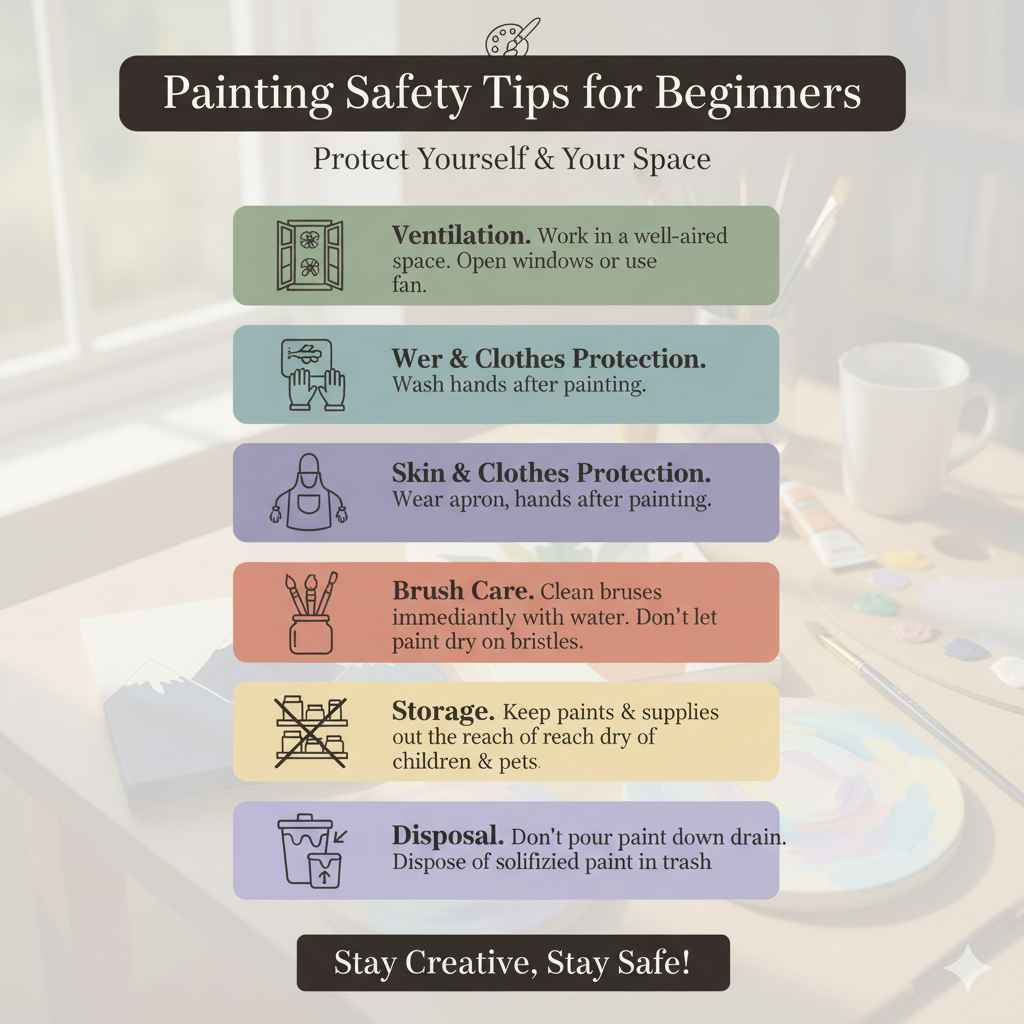
Painting Safety Tips for Beginners
As a mentor who values safe practices, I always recommend keeping safety in mind, even for simple projects.
Ventilation: Work in a well-ventilated area, especially when using acrylics or any solvent-based mediums. Open a window or use a fan.
Skin Protection: While acrylics and watercolors are generally non-toxic, it’s wise to wear an apron or old clothes to protect your garments from stains. Wash your hands thoroughly after painting.
Brush Care: Clean your brushes properly after each use. Acrylics and watercolors dry hard and can ruin brushes if left uncleaned. For acrylics, rinse thoroughly with water. For watercolors, rinse with water.
Storage: Store your paints and supplies out of reach of children and pets.
Disposal: Dispose of paint water responsibly. Don’t pour large amounts of paint down the drain. Allow water to settle, then discard the solidified paint in the trash.
You can find more comprehensive safety guidelines on proper art supply handling from organizations like the Agency for Toxic Substances and Disease Registry (ATSDR), a division of the CDC, which provides information on various substances that might be found in craft materials.
FAQ: Your Painting Questions Answered
Common Questions About Beginner Painting
Q1: What’s the absolute easiest painting to start with?
The easiest painting to start with is usually an abstract concept like color blocks or a simple silhouette. These rely on basic shapes and color application rather than detailed rendering, making them very forgiving and rewarding for beginners.
Q2: Do I need expensive art supplies to begin?
No, absolutely not! You can start with very affordable student-grade acrylic paints, a few basic brushes, and canvas panels or thick paper. The ideas discussed are all designed to work with minimal, budget-friendly supplies.
Q3: How long does it take for acrylic paint to dry?
Acrylic paints dry quite quickly, typically within 10-20 minutes for a thin layer. This is great for layering and faster project completion, but it also means you need to work relatively swiftly if you want to blend colors on the canvas.
Q4: Can I paint over a mistake I made?
Yes, especially with acrylics! They are very forgiving. If you make a mistake, you can simply wait for the paint to dry and then paint directly over it. This makes them ideal for beginners who are still learning.
Q5: What is the best surface for beginner acrylic painting?
Canvas panels or stretched canvases are excellent choices for beginners using acrylics. They are pre-primed, providing a good surface for the paint to adhere to. Thick paper or watercolor paper (if using very little water with acrylics) can also work for practice pieces.
Q6: How should I clean my brushes after using acrylics?
Clean your brushes immediately after use with warm water and soap until all paint is removed. Swish the brush in soapy water, rinse, and repeat. Avoid letting acrylic paint dry in your brushes, as it can permanently damage them.
Q7: What is white space or negative space in painting?
White space, or negative space, refers to the areas of the painting that are left empty or unpainted. It’s just as important as the subject itself, as it helps to define the subject, create balance, and guide the viewer’s eye within the composition.
Conclusion: Your Creative Journey Begins Now!
You’ve seen that diving into the world of painting doesn’t require years of training or a massive investment in supplies. The key is to start with beginner easy painting ideas that build confidence and foster enjoyment. Whether you’re creating monochromatic landscapes, vibrant color blocks, or striking silhouettes, each brushstroke is a step forward. Remember to embrace imperfections – they are part of the learning process and often add unique character to your work.
With these simple techniques and a few essential, affordable supplies, you’re well-equipped to start your painting adventure. Don’t be afraid to experiment, mix colors, and try different approaches. The most beautiful outcomes often come from unexpected places.