
Can I Paint Drop Ceiling Tiles? The Essential Secrets
Yes, you can absolutely paint drop ceiling tiles. With the right preparation and materials, painting is an affordable and effective way to refresh your ceiling. The key is to use a stain-blocking primer to prevent old stains from showing through and a flat latex paint to ensure a smooth, professional-looking finish.
Have you ever looked up at your drop ceiling and felt… uninspired? Those standard, often discolored tiles can make a room feel dated or just plain dull. It’s a common frustration for many homeowners. You might think your only option is a costly, complicated replacement. Well, I’m here to tell you there’s a much simpler, budget-friendly secret to transforming that ceiling. You can paint it!
Painting drop ceiling tiles is one of the most satisfying DIY projects you can tackle. It instantly brightens a room and gives it a clean, modern look. In this guide, I’ll walk you through every step, from picking the right paint to getting a flawless finish. We’ll do it together, the right way.
Why Paint Your Drop Ceiling? The Surprising Benefits
Before we grab our rollers, let’s talk about why this project is such a great idea. It’s about more than just a new color. A freshly painted drop ceiling can completely change the feel of a room, and it’s one of the most rewarding updates you can make.
- Save Money: Replacing an entire drop ceiling system can be expensive. Painting the tiles you already have costs a fraction of the price, giving you a brand-new look without the brand-new price tag.
- Instant Transformation: There are few projects that offer this much visual impact for a weekend’s worth of work. It can make a dark basement feel bright and welcoming or a tired office space look crisp and professional.
- Hide Imperfections: Over time, ceiling tiles can develop water spots, yellowing, or other stains. A good quality primer and paint will cover these blemishes and make your ceiling look uniform and clean.
- Customize Your Space: You’re no longer stuck with standard off-white. You can choose any color you like! A bright white can make the room feel larger, while a subtle color can add warmth and character.

Important: When You Should NOT Paint Your Ceiling Tiles
As much as I love this project, it’s not the right solution for every situation. Your safety and the health of your home always come first. Before you start, check for these critical issues. Painting over them can lead to much bigger problems down the road.
1. Water Damage and Mold
If you see stains on your tiles, the first step is to figure out where they came from. Is it a leaky pipe or a roof issue? If the tile feels damp, soft, or crumbly, it must be replaced. Painting over a wet or moldy tile is a major health hazard. Mold will continue to grow under the paint and can release harmful spores into the air. Always fix the source of the leak before doing any cosmetic work.
2. Damaged or Sagging Tiles
A ceiling tile that is broken, cracked, or sagging has lost its structural integrity. The extra weight of the paint, even if it’s minimal, can cause it to break or fall. These tiles are unsafe and should be replaced with new ones. Don’t try to paint over a structural problem.
3. Fire Safety Ratings
Many commercial-grade ceiling tiles have a specific fire rating, which is crucial for safety, especially in basements or commercial spaces. Applying a standard layer of paint can potentially alter this rating. If you are working in a space where building codes are a concern, check with your local fire department or a building inspector. As noted by the National Fire Protection Association (NFPA), altering building materials can have serious implications, so it’s always best to be sure.
Understanding Your Ceiling Tile Type
Not all ceiling tiles are created equal. Knowing what your tiles are made of will help you choose the correct primer and paint for the job. Most residential drop ceilings use mineral fiber tiles, but it’s good to be certain.
| Tile Type | Can You Paint It? | Best Paint & Primer | Key Things to Know |
|---|---|---|---|
| Mineral Fiber / Fiberglass | Yes (Most Common) | Stain-blocking primer + Flat latex (acrylic) paint | These are very porous and will soak up paint. Primer is not optional—it seals the tile and prevents stains from bleeding through. |
| PVC / Vinyl / Plastic | Yes | Primer for plastic surfaces + Latex paint | These tiles are smooth and non-porous. You need a special primer that will grip the slick surface, otherwise the paint may peel off easily. |
| Tin / Metal | Yes | Rust-inhibiting metal primer + Oil-based or latex paint | Properly prepping and priming metal is key to preventing rust and ensuring the paint adheres well. The finish looks fantastic on these. |
Choosing the Right Paint and Tools for the Job
Success in this project comes down to using the right materials. Skimping on primer or using the wrong paint finish can lead to a disappointing result. Let’s make sure you have exactly what you need.
Primer is Your Best Friend
I can’t stress this enough: for standard mineral fiber tiles, a stain-blocking primer is absolutely essential. Old tiles, especially in basements or kitchens, often have hidden water stains, grease, or nicotine discoloration. Without a powerful primer like Zinsser B-I-N or Kilz Original, those stains will slowly seep through your beautiful new paint job, leaving yellow or brown blotches. You need just one good coat to seal the tile and provide a perfect base for your paint.
The Best Paint Finish
For ceilings, you almost always want a flat or matte finish. Why? Because ceilings are large, flat surfaces that get a lot of light. Any paint with a sheen (like eggshell, satin, or semi-gloss) will reflect light and highlight every tiny imperfection, roller mark, and surface flaw. A flat latex (or acrylic) paint provides a smooth, non-reflective finish that looks professional and helps hide any minor texture issues on the tiles.
Application Method: Sprayer vs. Roller
How you apply the paint is a big decision. Both methods work well, but they have different strengths. Here’s a quick breakdown to help you decide what’s best for your project.
| Method | Pros | Cons |
|---|---|---|
| Paint Sprayer |
|
|
| Paint Roller |
|
|
For most beginners doing a standard room, I recommend using a roller. It’s more forgiving and requires less prep work. Just be gentle!
Your Complete Tools and Materials Checklist
Nothing stalls a project faster than having to run to the store halfway through. Gather everything you need before you start so you can stay focused and efficient.
Safety Gear:
- Safety glasses or goggles
- Dust mask (a P95 or N95 is great for dust and paint fumes)
- Gloves
Prep & Painting Supplies:
- Drop cloths or plastic sheeting to cover floors and furniture
- A sturdy stepladder
- Stiff-bristled brush or a shop vacuum with a brush attachment
- High-quality stain-blocking primer
- High-quality interior latex paint (flat/matte finish)
- Paint tray and liners
- A low-nap roller (3/8” nap is usually perfect) and roller frame
- A small brush or foam roller for painting the metal grid
- Clean, lint-free rags
- Painter’s tape (if painting the grid in place)
Step-by-Step Guide: How to Paint Your Drop Ceiling Tiles
Alright, we’re ready to go! Follow these steps carefully, and you’ll have a ceiling that looks professionally done. Remember to work patiently and safely.
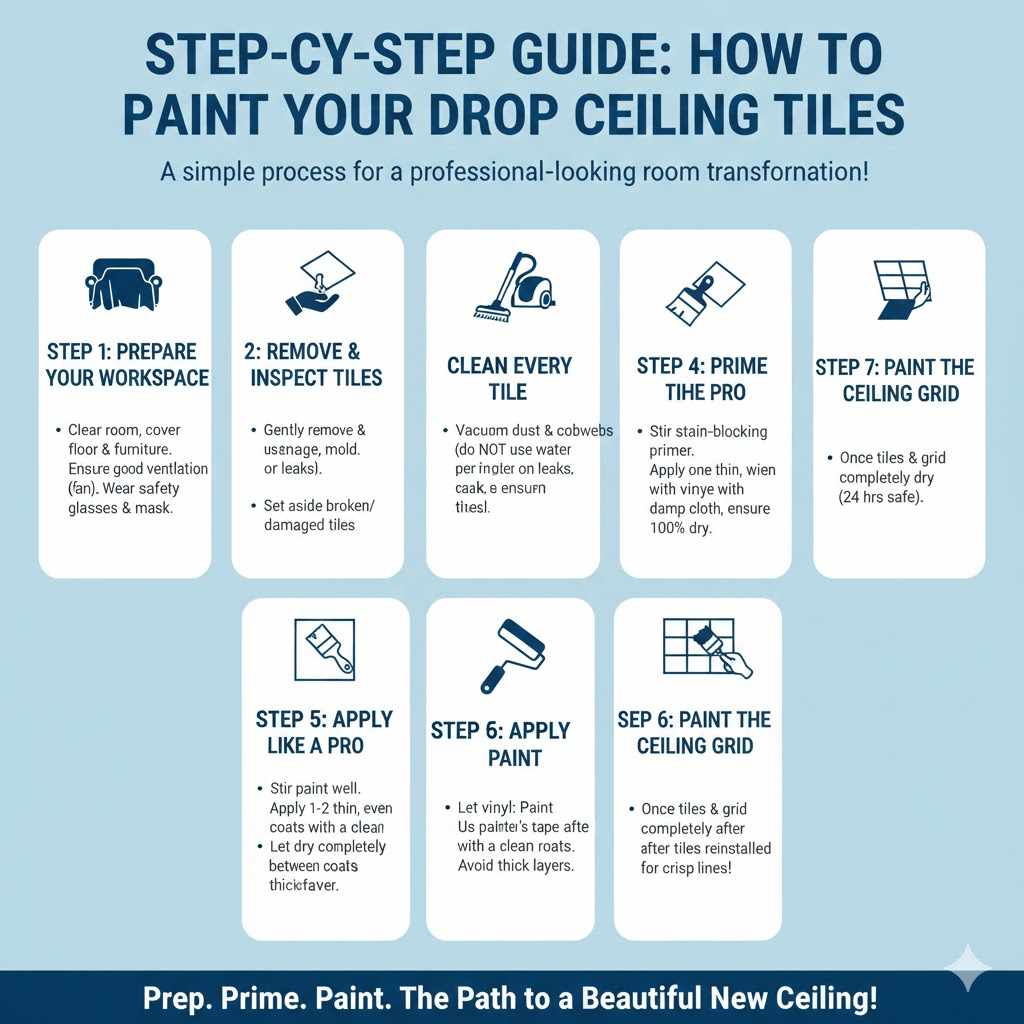
Step 1: Prepare Your Workspace
This is the most important step for a clean, hassle-free project. Remove as much furniture from the room as possible. Cover whatever is left, and the entire floor, with drop cloths. Good ventilation is key, so open windows and use a fan to circulate the air. Put on your safety glasses and mask before you do anything else.
Step 2: Carefully Remove and Inspect the Tiles
Wearing your gloves, get on the ladder and gently push up on a ceiling tile. Tilt it at an angle and carefully guide it down through the grid opening. Find a clean, covered space (like a garage floor or basement area) where you can lay out all the tiles flat. As you remove each tile, inspect it. Set aside any that are broken, sagging, or show signs of mold. This is also a great time to check for hidden plumbing leaks above the grid.
Step 3: Clean Every Tile
Ceiling tiles collect a surprising amount of dust and cobwebs. You cannot paint over dust! The paint won’t stick properly. For porous mineral fiber tiles, do not use water. A damp tile can warp or fall apart. Instead, use a shop vacuum with a soft brush attachment to gently vacuum each tile. If you don’t have a vacuum, a dry, stiff-bristled brush will also work. For vinyl or metal tiles, you can wipe them down with a damp cloth and a mild degreasing cleaner if needed, but make sure they are 100% dry before priming.
Step 4: Prime Like a Pro
Lay your clean tiles face up on your drop cloth. Stir your stain-blocking primer thoroughly. Pour some into your paint tray and load your roller. Apply one thin, even coat of primer to each tile. Don’t press too hard—let the roller do the work. The goal is complete coverage, not a thick layer. Let the primer dry completely according to the manufacturer’s instructions (this can take a few hours).
Step 5: Apply the Paint
Once the primer is fully cured, it’s time for the color. Stir your paint well. Using a clean roller, apply your first coat of paint. Just like with the primer, use light, even strokes. Thin coats are always better than one thick, heavy coat, which can cause sagging and fill the tile’s texture. Let the first coat dry completely. Most drop ceiling tiles will only need one coat of paint over the primer, but if the color looks uneven, apply a second light coat after the first one is dry.
Step 6: Paint the Ceiling Grid
A fresh white ceiling with a dirty, yellowed grid doesn’t look finished. You have two options for painting the grid:
- While the tiles are out: This is the easiest way. Use a small foam roller or brush to carefully paint the grid. It prevents getting paint on your newly finished tiles.
- With painter’s tape: If you’d rather wait, reinstall the tiles first and then carefully apply painter’s tape to the edges of the tiles where they meet the grid. Then, paint the grid. This method is more tedious but offers crisp lines.
Step 7: Reinstall Your Beautiful Tiles
This is the best part! Once the tiles and grid are completely dry (I recommend waiting at least 24 hours to be safe), you can reinstall them. Handle the tiles carefully by their edges to avoid leaving fingerprints on the fresh paint. Gently lift each one back into place, and you’re done! Stand back and admire your brand-new ceiling.
Frequently Asked Questions (FAQ)
Can I paint ceiling tiles while they are still in the ceiling?
I strongly advise against it. It’s incredibly difficult to get even coverage, you’ll likely get paint on the grid, and the paint can “glue” the tiles to the grid, making them impossible to remove later for access. Taking them down is the only way to get a professional result.
Will painting my ceiling tiles affect their acoustic (sound-dampening) properties?
Yes, it can. Heavy coats of paint can fill in the small pores in acoustic tiles that help absorb sound. If you use a thin coat of flat paint as recommended, the effect will be minimal. However, if sound absorption is critical for your space (like a home theater or music room), you may want to consider buying tiles that are already the color you want or using a special acoustic-friendly paint.
What’s the best color to paint a drop ceiling?
Bright white or a very light off-white are the most popular choices because they make a room feel taller, brighter, and larger. They reflect light well, which is especially helpful in basements. However, a light gray or even a dark, dramatic color can look fantastic in the right setting. It’s all up to your personal style!
Will the weight of the paint make my ceiling tiles sag?
If you use thin, even coats of primer and latex paint, the added weight is negligible and will not cause a tile in good condition to sag. Sagging is caused by moisture damage or age. If a tile is already sagging, paint will only make it worse, and the tile should be replaced.
How do I clean painted drop ceiling tiles?
Once painted and fully cured, you can gently dust the tiles with a soft brush attachment on a vacuum or a feather duster. If you have to spot-clean, use a slightly damp cloth and blot the area gently. Avoid scrubbing, as this can damage the paint finish.
Is it cheaper to paint or replace drop ceiling tiles?
Painting is significantly cheaper. A new, basic ceiling tile can cost anywhere from $2 to $10+ per square foot. A gallon of primer and a gallon of paint can cover a very large area (around 400 square feet) for a fraction of that cost, making painting the far more budget-friendly option for tiles that are still in good shape.
A Fresh Look Is Just a Weekend Away
There you have it—everything you need to know to confidently paint your drop ceiling. It’s a project that might seem intimidating at first, but by breaking it down into simple, manageable steps, you can achieve a truly professional-looking result. You don’t need expensive tools or years of experience. All you need is a little patience and the right materials.
So don’t let that old, stained ceiling bring down your room any longer. This weekend, you can give your space the bright, clean, and modern update it deserves. You’ve got this!