Can I Paint Drywall Without Plastering The Genius Easy Way
Yes, you can absolutely paint drywall without a full plaster skim coat. The secret is in the preparation. As long as your drywall seams and screw holes are properly taped and mudded (finished), you just need to clean the surface, patch any imperfections, sand smooth, and apply a quality primer before painting for a great-looking, durable finish.
Hello there, fellow creators! It’s your friend in the workshop, Md Meraj. I see this question pop up all the time: “Do I really have to go through the messy, time-consuming process of plastering a whole wall just to paint it?” It’s a great question! The thought of mixing up plaster and trying to get a perfectly smooth coat can feel intimidating, especially for a weekend DIY project.
Well, I have some fantastic news for you. In most cases, you can get a beautiful, professional-looking paint job without plastering the entire surface. The key isn’t about adding more layers; it’s about perfectly preparing the surface you already have. Today, I’m going to walk you through the genius easy way to do it. We’ll break it down into simple, manageable steps that will save you time, mess, and a whole lot of stress. Let’s get those walls ready for a fresh new look!
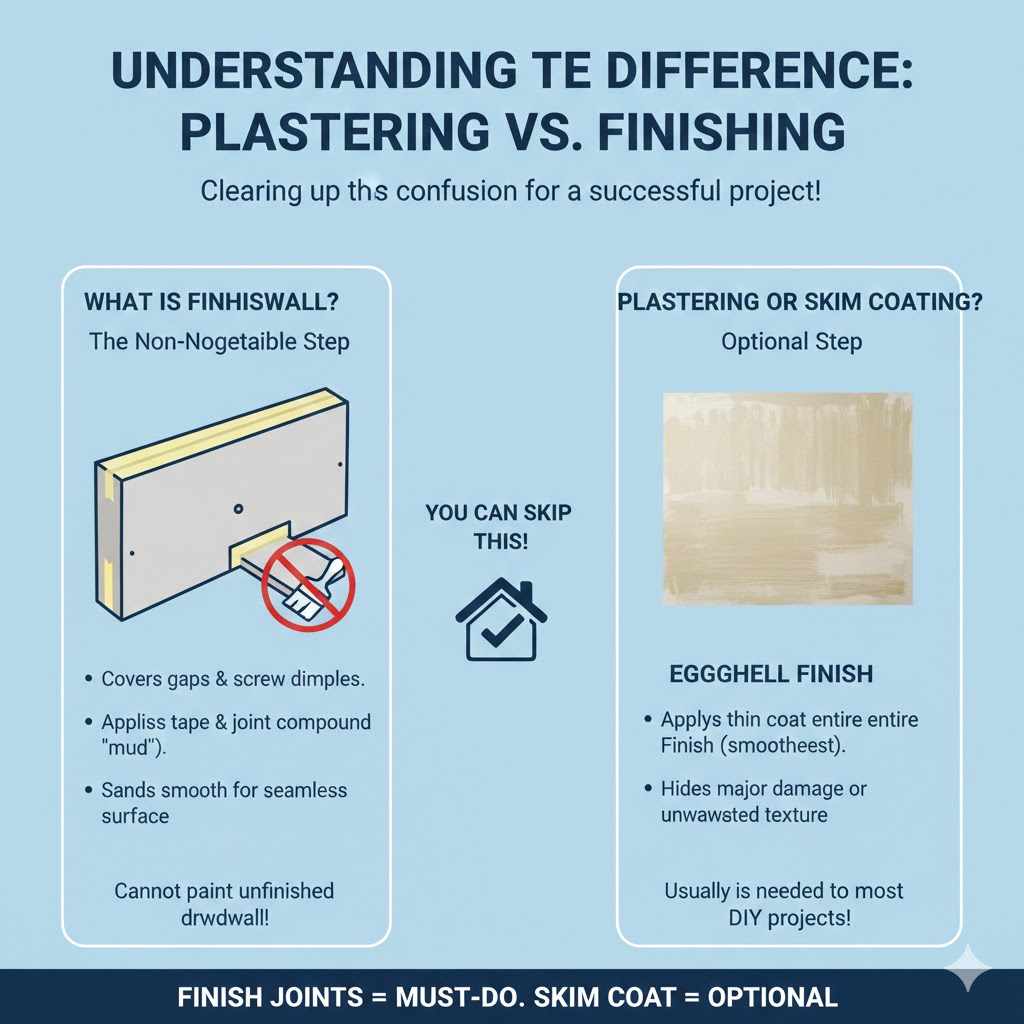
Understanding the Difference: Plastering vs. Finishing
First things first, let’s clear up some common confusion. When people talk about “plastering,” they can mean two different things. It’s important to know which one we’re trying to skip.
What is Finishing Drywall? (The Non-Negotiable Step)
When new drywall sheets are hung, you have gaps between the panels and little dimples where the screws are. “Finishing” is the essential process of covering these up. This involves:
- Applying paper or mesh tape over the seams.
- Spreading layers of joint compound (often called “mud”) over the tape and screw holes.
- Sanding each layer smooth once it’s dry.
This process creates a flat, seamless surface. You absolutely cannot paint bare, unfinished drywall. The paint would look terrible, and the seams would stick out like a sore thumb. So, finishing the joints is a must-do step.
What is Plastering or Skim Coating? (The Optional Step)
Plastering, or more accurately, “skim coating,” is a more advanced technique. This involves applying a very thin layer of joint compound over the entire surface of the drywall, not just the seams. It’s done to achieve a few specific goals:
- Create a Level 5 Finish: This is the smoothest possible finish, often used in high-end homes where light might hit the walls at an angle, revealing tiny imperfections.
- Hide Major Damage: If a wall is covered in nicks, gouges, or the remnants of old wallpaper, a skim coat can make it look brand new.
- Cover Unwanted Texture: A skim coat can smooth over heavy, dated wall textures like “popcorn” or “knockdown.”
So, the good news is you’re not trying to skip the essential finishing part. You’re looking to avoid the optional, and much bigger, job of skim coating the whole wall. And for most DIY projects, you can!
When You Can Safely Skip the Skim Coat
You can confidently skip the full skim coat and move straight to priming and painting in these common situations:
- Newly Installed and Finished Drywall: If the seams and screw holes have been properly taped, mudded, and sanded, the wall is ready for prep and paint. The drywall finisher has already done the hard part for you.
- Existing Walls in Good Shape: Is your current painted wall mostly smooth, with just a few small nail holes or minor scuffs? Perfect! You don’t need to resurface the whole thing. A little spot-patching is all it takes.
- After Minor Repairs: If you’ve patched a small hole from a doorknob or fixed a hairline crack, you only need to treat that specific area, not the entire wall.
The Genius Easy Way: Step-by-Step Guide to a Flawless Finish
Alright, let’s get down to business. Follow these steps carefully, and I promise you’ll be proud of the result. The magic is all in the prep work. Don’t rush it!
Step 1: Gather Your Tools and Materials
Having everything ready before you start makes the process so much smoother. It’s like setting out your ingredients before you cook. Here’s what you’ll need:
- For Cleaning: A bucket, a sponge, mild soap or Trisodium Phosphate (TSP), and clean rags.
- For Patching: Lightweight spackling compound for small holes, and all-purpose joint compound for larger dings or cracks. A flexible putty knife is essential.
- For Sanding: A sanding sponge or sanding block, and 120-grit or 150-grit sandpaper.
- For Priming: A high-quality drywall primer (PVA primer is excellent and affordable for new drywall).
- For Painting: Your chosen paint color, a paint tray, a 2-inch angled brush for cutting in, and a 9-inch roller with the appropriate nap (usually 3/8-inch is great for smooth walls).
- For Protection: Drop cloths, painter’s tape, a dust mask, and safety glasses. Safety first, always!
Step 2: Inspect and Thoroughly Clean the Walls
You wouldn’t paint a dirty car, so don’t paint a dirty wall! Dust, cobwebs, and grime can prevent primer and paint from sticking properly, leading to peeling down the road.
- Look closely: Run your hand over the wall. Do you feel any bumps, ridges, or craters? Circle any imperfections lightly with a pencil so you don’t miss them in the next step.
- Dust the walls: Use a duster or a soft-bristled broom to wipe down the walls from top to bottom. Pay special attention to corners and along the baseboards.
- Wash them down: For most walls, a simple mixture of mild dish soap and warm water is enough. If the walls are greasy (like in a kitchen), a cleaner like TSP is more effective. Dip your sponge, wring it out well, and wash the walls. Follow up with a rag dampened with clean water to rinse away any soap residue.
- Let it dry completely: Give the walls at least a few hours to air dry before you move on. Painting on a damp surface is a recipe for disaster.
If you’re working in a home built before 1978, be mindful of potential lead paint. The U.S. Environmental Protection Agency (EPA) provides crucial guidance for homeowners on how to work safely.
Step 3: Fill Every Imperfection
This is where you make your wall perfectly smooth. Take your time here; every minute spent patching is a minute saved from frustration later.
For small nail holes or tiny dings, use lightweight spackling. It dries quickly and barely shrinks.
- Scoop a small amount onto your putty knife.
- Press it firmly into the hole.
- Swipe across the hole in a clean motion, leaving the patch slightly raised above the wall surface. This is important because it will shrink a little as it dries.
For slightly larger cracks or dents, all-purpose joint compound is better. Apply it in thin layers, letting each layer dry completely before adding the next if needed.
| Problem Area | Best Solution | Pro Tip |
|---|---|---|
| Small nail holes, pinholes | Lightweight Spackling | Apply with one clean swipe. A second swipe can pull the product back out. |
| Dents or scratches (up to 1/4-inch deep) | All-Purpose Joint Compound | Apply a thin coat, let it dry, and apply a second if needed to fill the void. |
| Nail or screw pops | Reset the screw/nail, then Joint Compound | Drive a new drywall screw an inch above or below the popped one to re-secure the board. |
| Stress cracks (in corners) | Flexible, paintable caulk | Compound can re-crack here. Caulk will flex with the house’s movement. |
Step 4: Sand it Silky Smooth
Once your patches are bone dry (check the product’s instructions for drying times), it’s time to sand. The goal is to make the patched area perfectly level with the surrounding wall.
- Wear a mask: Drywall dust is no fun to breathe in. Put on your dust mask.
- Use a light touch: Wrap your sandpaper around a sanding block. This gives you better control than just using your hand.
- Feather the edges: Sand the patched area using gentle, circular motions. Focus on blending the edges of the patch into the wall. You should not be able to feel a transition when you run your hand over it.
- Check your work: Close your eyes and run your fingertips over the patch. Your sense of touch is more reliable than your eyes for finding high or low spots. If you feel a bump, sand a little more. If you feel a dip, you may need another thin coat of compound.
Step 5: Clean Up All the Dust
This step is critical and often skipped! Any fine dust left on the wall will mix with your primer, creating a gritty, rough texture. It’s the #1 enemy of a smooth finish.
- Vacuum first: Use a shop vac with a brush attachment to vacuum the walls, baseboards, and floor.
- Wipe it down: Use a tack cloth or a slightly damp microfiber cloth to wipe down the entire wall surface, especially the areas you sanded. You’ll be amazed at how much fine white powder comes off. Let the wall dry completely again if you used a damp cloth.
Step 6: Prime, Prime, and Prime Again! (The Most Important Step)
If you take away only one thing from this guide, let it be this: Do not skip the primer! Primer does a few magical things:
- It seals the surface: Drywall paper and joint compound are very porous. They will soak up paint like a sponge. Primer creates a uniform, sealed base.
- It prevents “flashing”: Without primer, the patched areas and the original wall will absorb paint differently, creating shiny or dull spots in the final finish. This is called “flashing,” and it looks very unprofessional.
- It ensures true color: Primer provides a neutral white base, so your final paint color looks exactly like it did on the paint chip.
Apply one even coat of a good quality drywall primer over the entire wall, from corner to corner. Don’t just spot-prime the patches. Priming the whole wall ensures a perfectly even final coat. Let the primer dry completely according to the manufacturer’s instructions.
| Primer Type | Best For | Why It Works |
|---|---|---|
| PVA (Polyvinyl Acetate) Primer | New, unpainted drywall that has been finished. | It’s affordable and specifically designed to seal porous drywall paper and new joint compound. |
| All-Purpose/Latex Primer | Previously painted walls with some patches. | A versatile workhorse that adheres well to existing paint while also sealing new patches. |
| Stain-Blocking (Shellac-Based) Primer | Walls with water stains, smoke damage, or permanent marker. | Creates a powerful barrier that stops tough stains from bleeding through your new paint. |
Step 7: Apply Your Beautiful Paint
You’ve made it! The hard work is done. Painting is the fun, rewarding part.
- Cut in the edges: Using your 2-inch angled brush, carefully paint along the ceiling line, corners, and around trim. This creates a clean border that your roller can’t reach.
- Roll the walls: Load your roller with paint from the tray, making sure it’s evenly coated but not dripping. Start rolling the wall in a large “W” or “N” pattern. This helps spread the paint evenly. Then, fill in the “W” with straight, overlapping strokes from top to bottom.
- Apply a second coat: Let the first coat dry for the time recommended on the can (usually 2-4 hours). A second coat will provide a much richer, more even color and a more durable finish.
Once you’ve finished, carefully remove your painter’s tape while the paint is still slightly wet to get the cleanest lines. Then stand back and admire your work. You did it!
Frequently Asked Questions (FAQ)
1. What happens if I paint drywall without priming it?
If you paint directly over unprimed drywall and joint compound, the paint will absorb unevenly. The areas with compound will look duller or have a different texture than the rest of the wall (this is called “flashing”). Your paint job may also require more coats to get full coverage, and it won’t be as durable over time.
2. Can I just use a “paint and primer in one” product?
For previously painted walls in good condition, a paint-and-primer combo can work well. However, for new drywall or walls with significant patching, I always recommend using a dedicated PVA or drywall primer first. These primers are specifically formulated to seal porous surfaces, a job that combo products don’t do as effectively.
3. How do I fix a drywall screw that has “popped” out?
A “popped” screw is one that has pushed the joint compound out, creating a small bump. To fix it, drive a new drywall screw about 1 inch above or below the popped one to re-secure the drywall to the stud. Then, either remove the old screw or use a drill to sink it slightly below the drywall surface. Cover both screw heads with a couple of thin coats of joint compound, sand smooth, and prime.
4. What’s the real difference between spackle and joint compound?
Think of spackle as the go-to for quick, small fixes like nail holes. It’s thicker, dries faster, and shrinks very little. Joint compound (“mud”) is better for larger jobs like taping seams or filling larger dents. It’s thinner, dries slower, and is designed to be sanded to a feather-fine edge.
5. How long does joint compound need to dry before I can sand and paint?
Drying time depends on the product, the thickness of the application, and the humidity in your room. Lightweight spackling can be ready to sand in under an hour. All-purpose joint compound can take anywhere from 8 to 24 hours to fully cure. Always follow the manufacturer’s instructions on the container. If it feels cool to the touch, it’s likely still damp inside.
6. Do I have to sand the entire wall or just the patched spots?
You only need to sand the areas you patched with spackle or joint compound. The goal is just to make those spots flush with the rest of the wall. There is no need to sand the existing painted surface unless it is glossy, in which case a light scuff-sanding will help the new primer and paint adhere better.
Conclusion: Your Walls, Your Masterpiece
So, can you paint drywall without plastering? You bet you can. As we’ve seen, it’s not about skipping steps—it’s about focusing on the right steps. By meticulously cleaning your walls, carefully patching every little flaw, sanding those patches until they vanish, and applying a quality primer, you are doing the real work that guarantees a fantastic result.
You don’t need to be a professional plasterer to get walls that look smooth, beautiful, and expertly painted. All it takes is a little patience and a commitment to proper preparation. The feeling of transforming a room with your own two hands is incredibly rewarding. So go ahead, grab your tools, put on some music, and give your walls the fresh start they deserve. You’ve got this!