Can MDF Be Planed? Expert Tips for a Smooth Finish
Yes, MDF can be planed. But it needs a careful approach.
MDF, or Medium Density Fiberboard, is a popular material in woodworking. It is dense and smooth, ideal for many projects. But when it comes to planing, there are some considerations. MDF can wear down blades quickly. Its fine particles can clog tools.
Proper techniques and sharp tools are essential. This blog will explore the process of planing MDF. You’ll learn how to do it effectively and safely. We will discuss the best tools to use and tips to get the best results. By the end, you will know how to handle MDF for your projects. Let’s dive in.
What Is MDF?
MDF, or Medium Density Fiberboard, is a type of engineered wood product. It can be planed smoothly.
MDF, or Medium Density Fiberboard, is a popular wood product. It is engineered from wood fibers, wax, and resin. These components are pressed into flat panels. The process creates a strong, dense board. MDF is often used in furniture and construction.
Composition And Characteristics
MDF is made from recycled wood fibers. These fibers are bonded with a resin adhesive. The mix is then compressed under high pressure. This results in a smooth, even surface. MDF is denser than plywood. It has no grain, making it easy to cut and shape. It also has a consistent texture and strength.
Common Uses
MDF is versatile. It is used in many applications. Furniture is a common use. Cabinets, shelves, and drawers often use MDF. It is also used for interior paneling. You might find it in wainscoting or wall paneling. MDF is great for decorative projects too. It can be easily painted or veneered. This makes it ideal for intricate designs.

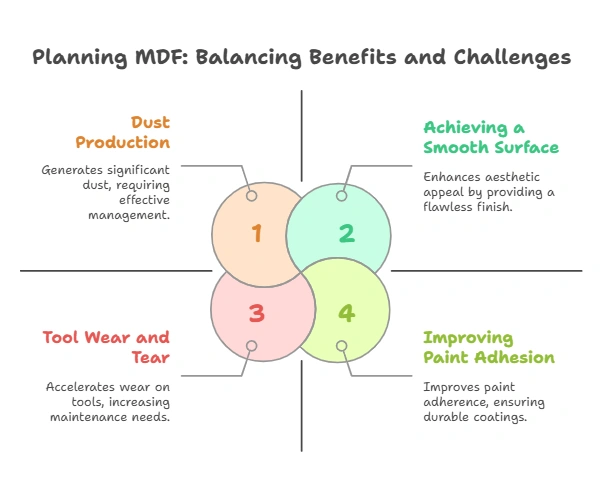
Benefits Of Planing MDF
Medium Density Fiberboard (MDF) is a popular choice for many woodworking projects due to its affordability and smooth finish. However, sometimes it needs a little extra touch to achieve the best results. One way to enhance MDF is by planing it. Let’s dive into the benefits of planing MDF and see how it can improve your projects.
Achieving A Smooth Surface
When you plane MDF, you create a super smooth surface. This is especially important if you want a professional-looking finish. Think of it as giving your project a facelift. With a smooth surface, the final product looks much better and feels amazing to the touch.
Imagine building a piece of furniture with rough edges versus one with a silky smooth finish. Which one would you prefer to showcase in your home? Exactly! Planing MDF can help you get that showroom-quality finish.
Improving Paint Adhesion
Have you ever painted something and noticed the paint just wouldn’t stick right? Frustrating, isn’t it? Planing MDF can solve this problem. By planing the surface, you remove any rough patches and create an even base for the paint to adhere to.
Here’s a little secret: paint loves smooth surfaces. When the surface is smooth, the paint goes on evenly and dries beautifully. It’s like giving your project a perfect canvas. So, if you want your paint job to look flawless and last longer, planing MDF is the way to go.
Challenges Of Planing MDF
Planing MDF presents unique challenges that woodworkers should consider. MDF, or Medium-Density Fiberboard, is different from natural wood. Its composite structure can complicate the planing process. Understanding these challenges can help in achieving better results.
Dust Production
MDF produces a lot of dust during planing. This dust is finer than sawdust from natural wood. It can quickly fill the air and settle on surfaces. Proper ventilation and dust collection systems are necessary. Wearing a dust mask can also protect your health.
Tool Wear And Tear
Planing MDF can cause significant wear on tools. The fibers and adhesives in MDF are abrasive. This can dull blades faster than natural wood. Regular maintenance and sharpening of tools are essential. Using carbide-tipped blades can extend tool life.
Essential Tools For Planing MDF
Planing MDF (Medium-Density Fiberboard) can be quite the task if you don’t have the right tools in your arsenal. Whether you’re a seasoned woodworker or a DIY enthusiast, understanding the essential tools for planing MDF is crucial. In this section, we’ll cover the key tools you’ll need to get the job done smoothly and efficiently. Let’s dive in!
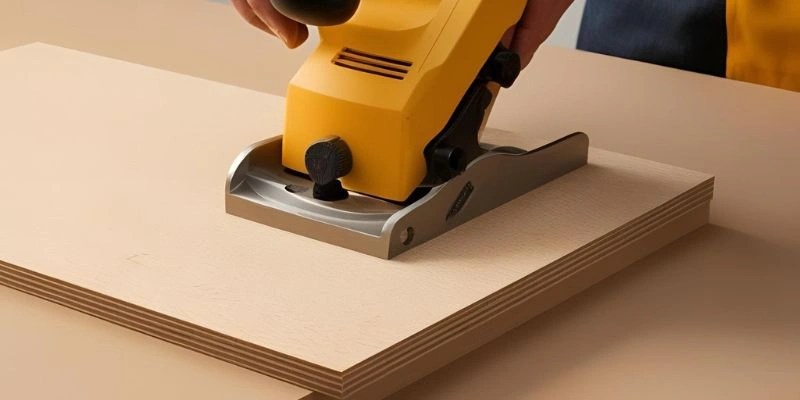
Planers And Blades
When it comes to planing MDF, having a reliable planer is non-negotiable. Planers come in various types, such as hand planers, electric planers, and benchtop planers. Each type has its own set of advantages, but for MDF, electric and benchtop planers are often preferred due to their power and precision.
- Electric Planers: These are perfect for quick, small projects. They are lightweight and easy to maneuver.
- Benchtop Planers: Ideal for larger projects, offering more stability and depth control.
Alongside the planer, having the right blades is equally important. MDF can dull blades quickly, so using carbide-tipped blades is recommended. They stay sharp longer and can handle the density of MDF without wearing out too quickly.
Dust Collection Systems
Planing MDF generates a significant amount of fine dust, which can be harmful if inhaled and messy to clean up. Investing in a good dust collection system is a game-changer. Here’s why:
- Health Safety: MDF dust contains formaldehyde, a harmful substance. A dust collection system helps reduce exposure.
- Clean Workspace: Keeps your workspace tidy, making it easier to focus on your project.
- Tool Longevity: Prevents dust from clogging and damaging your tools.
When choosing a dust collection system, consider the size of your workshop and the type of tools you use. Portable dust collectors are great for smaller spaces, while larger, stationary systems are better for extensive setups.
In conclusion, having the right planers, blades, and dust collection systems can make all the difference when working with MDF. Remember, preparation is key – so gear up with these essential tools, and you’ll be planing MDF like a pro in no time!
Step-by-step Planing Guide
Planing MDF (Medium Density Fiberboard) can be a bit of a challenge, especially if you’re new to woodworking. But don’t worry! With the right tools and a step-by-step plan, you can achieve a smooth finish. In this guide, we’ll walk you through the process of planing MDF, ensuring you get the best results.
Preparation
Before you start planing MDF, it’s important to prepare your workspace and gather all necessary tools. Here’s what you’ll need:
- A planer (hand or electric)
- Safety gear (gloves, goggles, mask)
- Clamps to secure the MDF
- Sandpaper for finishing
First, ensure your workspace is clean and well-ventilated. MDF produces a lot of dust, which can be harmful if inhaled. Wear a mask and safety goggles to protect yourself. Next, secure the MDF board using clamps to prevent it from moving during the planing process. Trust me, a moving board can lead to accidents or uneven surfaces. Also, make sure your planer blades are sharp and clean.
Planing Process
Now that you’re all set, let’s dive into the planing process:
- Adjust the Planer: Set the planer to remove a small amount of material initially. This helps in avoiding deep cuts and ensures a smooth finish. Aim for a depth of around 1/64 inch (0.4 mm).
- Start Planing: Place the planer at one end of the MDF and push it evenly across the surface. Keep a steady pace and apply even pressure. If using an electric planer, let the machine do the work; don’t force it.
- Check the Surface: After a few passes, check the surface for smoothness. If there are still rough spots, adjust the planer slightly and make more passes. Repeat this process until the entire surface is smooth.
- Final Touch: Once you’re satisfied with the planed surface, use fine-grit sandpaper to smooth out any remaining imperfections. A quick tip: sand in the direction of the wood fibers to avoid scratches.
Remember, patience is key. Rushing through the planing process can result in uneven surfaces or damage to the MDF.
There you have it! With these simple steps, you can achieve a perfectly planed MDF board. Happy woodworking!
Safety Precautions
When working with MDF (Medium-Density Fiberboard), taking the right safety precautions is important. This helps you avoid health risks and accidents. Below are some key areas to focus on.
Protective Gear
Always wear safety goggles to shield your eyes from dust particles. MDF produces a lot of fine dust. This dust can irritate your eyes. Wear a dust mask or respirator. This keeps you from inhaling harmful particles. Gloves will protect your hands from splinters and cuts. Consider ear protection too. Power tools can be very noisy.
Ventilation
Ensure your workspace is well-ventilated. MDF dust can be harmful if inhaled. Open windows and use fans to keep the air fresh. If possible, work outdoors. Use a dust collection system with your tools. This minimizes airborne particles. A clean workspace is a safe workspace.
Post-planing Tips
Planing MDF (Medium Density Fiberboard) can help achieve a smooth and even surface for your woodworking projects. However, once you’ve planed your MDF, there are a few crucial steps to follow to ensure your workpiece is ready for the next stage. In this section, we’ll cover some essential post-planing tips. These tips include sanding and sealing edges, which will help you get the most out of your planed MDF.
Sanding
After planing, the surface of the MDF might still have some rough patches or minor imperfections. Here’s where sanding comes into play. Use a fine-grit sandpaper (around 220-grit) to gently sand the surface. This will help smooth out any remaining roughness. Be sure to sand in a circular motion and apply even pressure to avoid uneven spots. A sanding block can be quite handy to maintain a uniform surface. Remember, patience is key. Rushing through the sanding process could lead to a less than perfect finish.
Sealing Edges
One of the biggest challenges with MDF is its edges. Unlike the surface, the edges of MDF are more porous and can absorb moisture easily, leading to swelling and damage. To prevent this, sealing the edges is a must. You can use a sealant like PVA glue or a commercial edge sealer. Apply a thin layer of the sealant using a brush, making sure to cover all the edges thoroughly. Allow it to dry completely before moving on to painting or finishing.
| Step | Description |
|---|---|
| Sanding | Use 220-grit sandpaper to smooth the surface. |
| Sealing Edges | Apply PVA glue or edge sealer to prevent moisture absorption. |
By following these post-planing tips, you can ensure your MDF projects have a professional finish. Sanding provides a smooth base, while sealing the edges protects against future damage. So, next time you find yourself planing MDF, remember these simple yet effective steps to keep your projects looking their best. Happy woodworking!
Common Mistakes To Avoid
Planning MDF (Medium Density Fiberboard) can be tricky. Many people make common mistakes that can ruin their project. Avoid these mistakes to ensure a smooth and successful process.
Over-planing
Over-planing MDF can cause problems. This material is not as strong as solid wood. Removing too much material weakens it. It can lead to cracks and breaks. Always be gentle and remove only a thin layer at a time.
Ignoring Dust Management
MDF produces a lot of dust. This dust is very fine and can be harmful. Ignoring dust management can affect your health. It can also make your workspace dirty and hard to work in. Use proper dust collection systems. Wear a mask to protect yourself.
Frequently Asked Questions
Does Mdf Plane Well?
Yes, MDF planes well due to its smooth and uniform composition. Use sharp tools for best results.
Can Mdf Be Planes?
Yes, MDF can be planed. Use sharp tools to prevent chipping. Ensure proper ventilation due to dust.
Can You Plane The Edges Of Mdf?
Yes, you can plane the edges of MDF. Use sharp tools for smooth results to avoid chipping.
How To Shave Down Mdf?
Use a hand planer or electric sander to shave down MDF. Wear a mask to avoid inhaling dust.
Conclusion
Planing MDF can be challenging but possible with the right tools. Always use sharp blades to avoid damage. Work slowly and steadily for the best results. Proper ventilation is crucial due to the dust MDF creates. Wear protective gear to ensure safety.
Experiment on scraps before working on your main project. With patience, MDF can be planed successfully. Remember, practice makes perfect. Planing MDF opens up new possibilities for your woodworking projects. Happy woodworking!