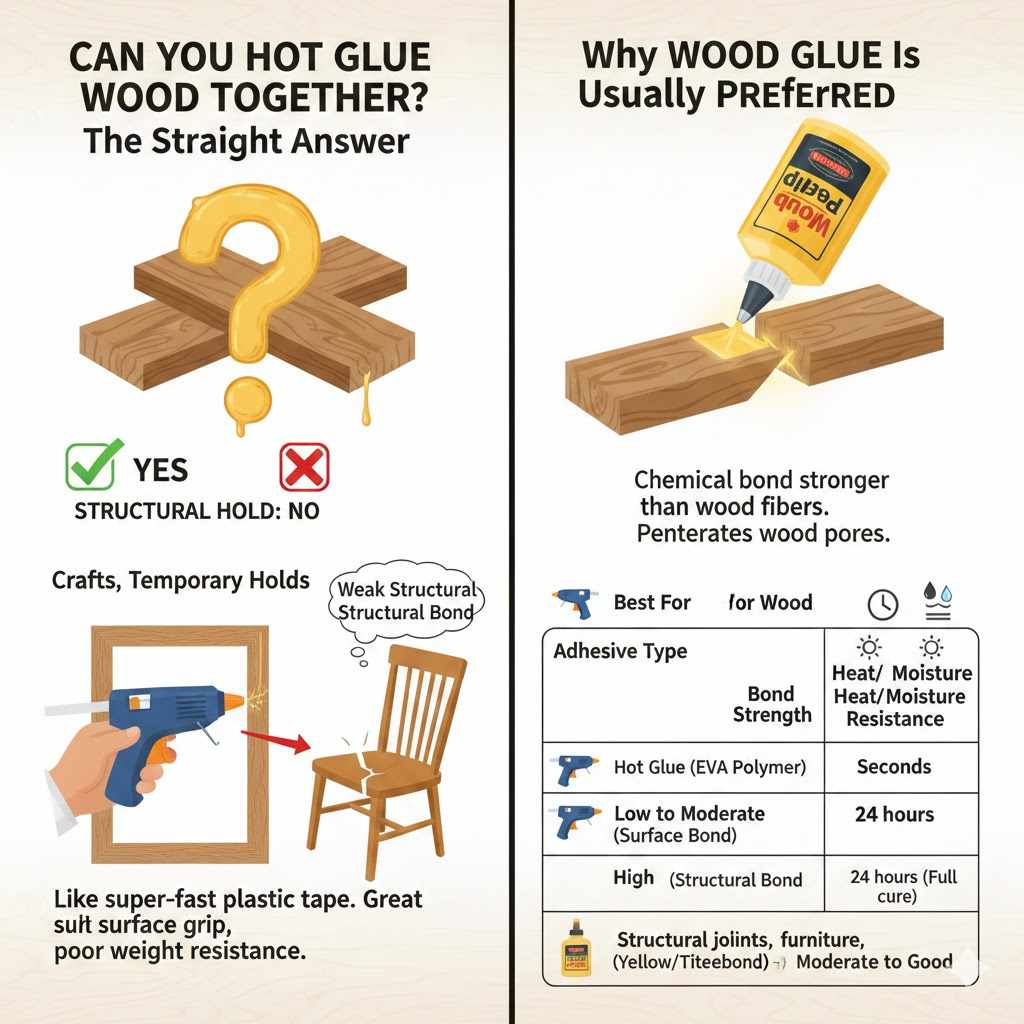
Can You Hot Glue Wood Together? Proven Essential Guide
Yes, you absolutely can use hot glue to join wood, but it is best suited for temporary hold, quick fixes, crafts, or lightweight, non-structural joints. For serious furniture or structural needs, always opt for wood glue (PVA) or mechanical fasteners. This guide breaks down when and how to use hot glue effectively for wood projects.
Welcome to the workshop! If you’re holding two pieces of wood and reaching for that trusty hot glue gun, you’ve likely wondered if this fast-drying adhesive is strong enough for the job. Many beginners feel unsure when mixing woodworking with craft supplies. Don’t worry; it’s a very common question. Woodworking involves picking the right glue for the right task. Hot glue offers speed, which is fantastic, but it has limitations. We are going to cut through the confusion today. I’ll show you exactly where hot glue shines with wood and when you need to put the gun down and grab the yellow bottle. Let’s start building confidence right now by understanding the pros and cons of using hot glue on wood.
Can You Hot Glue Wood Together? The Straight Answer
The short answer is yes, you can glue wood with hot glue. But here is the essential truth every woodworker learns: Hot glue creates a strong surface bond but a very weak structural bond on wood.
Think of hot glue like super-fast plastic tape. It grips the surface well and sets almost instantly, which is a massive time-saver. However, its flexibility and lower resistance to heat and shear stress mean it fails much faster than traditional wood glue.
For simple craft projects, like gluing trim onto a picture frame, attaching small decorative pieces, or holding parts in place while screws set, hot glue is perfect. For something that needs to bear weight, like a shelf, a chair, or a heavy box, hot glue is a definite no-go.
Why Wood Glue Is Usually Preferred Over Hot Glue
Understanding why traditional wood glue (like PVA or hide glue) works better helps explain hot glue’s limitations. Traditional wood glues are designed to absorb moisture from the wood itself. They create a chemical bond that is actually stronger than the wood fibers (a true wood-to-wood structural bond). Hot glue does not penetrate the wood pores effectively.
Here is a quick comparison to show you what I mean:
| Adhesive Type | Best For Wood | Bond Strength | Drying Time | Heat/Moisture Resistance |
|---|---|---|---|---|
| Hot Glue (EVA Polymer) | Crafts, temporary hold, filling gaps | Low to Moderate (Surface Bond) | Seconds | Poor |
| PVA Wood Glue (Yellow/Titebond) | Structural joints, furniture, load-bearing | High (Structural Bond) | 24 hours (Full cure) | Moderate to Good |
When to Use Hot Glue on Wood: The Green Lights
As your DIY mentor, I want you to use the right tool for the job every time. There are several situations where hot glue is the superior, faster choice for woodworking. These projects usually involve minimal stress and focus more on aesthetics or temporary setup.
1. Quick Fixturing and Clamping Substitute
This is one of the best uses for hot glue. When assembling two pieces and you don’t want to wrestle with clamps immediately, a dab of hot glue can temporarily hold everything perfectly square while you drive in a screw or nail.
It sets instantly, preventing pieces from shifting.
It’s easy to break apart later if you need to reposition things (if you’re careful).
2. Crafts and Decorative Elements
Are you making seasonal decorations, holiday crafts, or simple sensory boards for kids? Hot glue excels here because it’s forgiving and fast.
Attaching beads, small dowels, or fabric elements to wood bases.
Assembling lightweight wooden models or dollhouse trim.
Attaching veneers or edging that won’t be subject to wear.
3. Filling Small Gaps or Imperfections (as a Filler)
If you have a tiny, cosmetic gap where two pieces of wood meet, hot glue can act as a quick, malleable filler. It’s easy to apply and sand lightly once cool, though it sands poorly compared to wood filler.
4. Woodworking Templates and Jigs
When building specialized jigs for your shop (like fences for a table saw or routing templates), hot glue is perfect for temporarily affixing sacrificial pieces or featherboards down to a base board. They hold firm during the cut but peel off cleanly when the work is done.
When NOT to Use Hot Glue on Wood: The Red Flags
This is just as important as knowing when to use it. Using hot glue in these scenarios will lead to a project failure, frustration, and wasted time. Never rely on hot glue for the following:
Structural Joints: Any joint that supports weight, like chair legs, table frames, or shelving units.
Areas Prone to Movement or Vibration: Tools or shop fixtures that vibrate will cause the hot glue bond to loosen over time.
High-Temperature Environments: Since the primary component is plastic (EVA polymer), hot glue softens significantly when exposed to heat. A piece left in a sunny car dashboard or near a heat vent will often fail.
Joints That Require Sanding or Finishing: Hot glue smears when sanded and is difficult to remove completely, which interferes with stain or paint penetration.
Preparing Wood for the Strongest Hot Glue Bond
Even when using hot glue for crafts, preparation is key to making that surface bond last. If you skip these steps, the glue will often peel right off the wood surface!
Step 1: Surface Selection and Inspection
Hot glue sticks best to wood that is clean, dry, and untreated.
Avoid Oily Woods: Woods naturally high in resin or oil (like cedar or some pines) can repel the glue. You may need to wipe these down first.
Check Porosity: Highly porous woods need priming (see below). Very dense hardwoods are also tricky because the glue can’t mechanically lock into the surface.
Step 2: Cleaning the Surface (Crucial Step!)
Dust is the number one enemy of any adhesive.
1. Wipe both surfaces thoroughly with a tack cloth to remove all sanding dust.
2. For best results, wipe the wood surfaces with Isopropyl Alcohol (rubbing alcohol) on a clean rag. This removes surface oils and waxes left from milling or handling. Let the alcohol evaporate completely.
Step 3: The Abrasion Technique
Hot glue likes a rough profile to grab onto—think of it like Velcro for adhesives.
Lightly scuff the areas where the glue will touch with 100 or 120-grit sandpaper. This creates tiny physical “tooth” for the plastic to lock into.
Step 4: Priming for Non-Porous Surfaces (Optional but Helpful)
If you are gluing very slick wood or have trouble getting a bond, a specialized primer can help, though this moves you slightly outside simple DIY territory. For a quick fix, some users find that applying a thin, transparent coat of traditional wood glue (PVA) first, letting it dry, and then applying the hot glue can significantly boost the surface adhesion. (Wait for the PVA to dry fully!)
How to Hot Glue Wood Together: A Step-by-Step Guide
Once you have your materials ready, applying the glue correctly ensures maximum hold for the appropriate application.
Tools and Materials Needed:
Hot glue gun (a high-temp gun often provides a stronger initial melt)
High-quality, thick glue sticks (clear or wood-toned)
Safety gloves or finger protectors (to prevent burns)
Wood pieces to be joined
Tack cloth or rubbing alcohol
The Application Process:
1. Heat the Gun Fully: Allow your glue gun to preheat for the full recommended time, usually 3–5 minutes. A fully heated gun applies hotter, more fluid glue, leading to a better flow and set.
2. Prepare Your Pieces: Have both wood pieces perfectly positioned. Since hot glue sets so fast, you will have very little working time. Clamp the pieces lightly or set up a jig to hold them in place if necessary.
3. Apply Glue Sparingly: Apply the hot glue only to one of the two surfaces being joined. Use controlled dots or a thin bead around the edge. Do not glob it on, as excessive glue takes longer to cool and might weaken the bond where it cools too slowly.
4. Bring Surfaces Together Immediately: As soon as the glue is applied, bring the two pieces firmly together.
5. Apply Pressure and Hold: Apply firm, consistent pressure directly across the joint. Because this is not structural, you usually only need to hold it manually for about 15 to 30 seconds until the glue has stiffened completely.
6. Inspect the Seam: Once set, check the joint. Hot glue bonds are visible. If you see large air gaps or the pieces wiggle, the bond has failed, likely due to insufficient surface preparation or cooling too fast.
Tip from the Shop: Understanding Working Time
Hot glue’s working time is usually only 10–30 seconds. This means you must act fast. If you try to reposition the wood after 45 seconds, you risk pulling the soft glue off the wood fibers entirely, ruining the connection. Always aim for one clean placement.
Understanding Hot Glue Limitations: Heat, Shear, and Moisture
As a trusted mentor, I must stress the weak points. Understanding these failures ensures your projects last longer. These limitations are why specialized adhesives exist for construction applications, like those reviewed by engineering resources such as those from the U.S. Forest Service concerning wood product engineering standards.
Heat Sensitivity
This is the biggest downfall of EVA hot glue. It has a low softening point, often below 150°F (65°C). If the temperature rises significantly, the glue softens, allowing the joint to slide apart under any minor load. This makes it unsuitable for items stored outdoors or near radiators.
Shear Strength
Shear strength refers to the glue’s ability to resist two surfaces sliding past each other (like cutting a piece of paper glued together). Hot glue performs poorly under shear stress. If you hang a small sign on the wall using only hot glue tabs, the weight of the sign pulling downward can eventually cause the glue to sheer away from the wall.
Moisture Absorption
While standard wood glue needs moisture to cure correctly, hot glue reacts poorly to excess water or high humidity over long periods. While it won’t immediately dissolve like sugar, consistent exposure can cause the glue to lose its grip, leading to premature failure of the joint.
Alternative Adhesives for When Hot Glue Isn’t Enough
If your project is more demanding than a simple craft, you need to graduate to better woodworking glues. Don’t worry; these options are still beginner-friendly!
1. PVA Wood Glue (Yellow Wood Glue)
This is the gold standard for woodworking beginners. It creates a bond that is typically stronger than the wood itself when clamped properly.
Best Use: Any joint that will bear weight, be handled frequently, or assembled in climate-controlled environments (indoors).
How it Works: It cures chemically by absorbing water from the wood fibers, creating deep, permanent mechanical interlocking.
Requirement: Requires clamping for the full curing time (usually 1–2 hours minimum, 24 hours for full strength).
2. Polyurethane Glue (Gorilla Glue or similar)
Polyurethane glues are amazing gap-fillers and work on almost any surface, including wood, metal, and stone. They require moisture (from the air or the wood) to expand and cure.
Best Use: Exterior projects (excellent moisture resistance once cured) or bonding slightly mismatched or gapped pieces of wood.
Cautions: It expands significantly when curing, so use clamps judiciously, and it cleans up best with moisture before it cures, as dried polyurethane is very difficult to remove.
3. Epoxy Resin (Two-Part)
Epoxy uses two parts—a resin and a hardener—that mix to create an incredibly strong bond.
Best Use: Bonding dissimilar materials (wood to metal, wood to plastic), filling very large voids, or making extremely high-strength structural repairs.
Cautions: It sets based on time and temperature, often requiring more skill to manage than a simple squeeze bottle.
Choosing the Right Adhesive at a Glance
Here’s a simple decision chart to guide you through your next DIY project:
| Project Type | Recommended Glue | Why? |
|---|---|---|
| Decorating a wooden sign with twine/small items | Hot Glue Gun | Speed and ease for lightweight attachments |
| Assembling a simple storage box carcass | PVA Wood Glue | Requires structural strength to hold stored items |
| Fixing a loose veneer strip on a shelf edge | Hot Glue Gun (Temporary Hold) | Quick fix while using CA glue or PVA underneath |
| Building an outdoor planter box | Polyurethane Glue | Superior moisture and weather resistance |
| Gluing trim pieces temporarily while screws set | Hot Glue Gun | Fast, temporary clamping replacement |
Tips for Achieving the Best Possible Hot Glue Bond on Wood
Even within its limitations, we want the best performance from our hot glue. Here are Md Meraj’s best tips for maximizing durability:
1. Use the Right Sticks: Avoid the cheap, translucent glue sticks. Look for “heavy duty” or specialized craft sticks that often contain higher-quality polymers designed for better adhesion.
2. Maximize Surface Area: If possible, use a zigzag bead pattern instead of a single line. More glue contact equals more grab, even if the surface adhesion is low.
3. Test On Scrap: Before committing to your actual project pieces, try applying a dab of glue on a similar piece of scrap wood and let it cool. Try to pull it off immediately to see how hard it sticks.
4. Keep the Application Quick: The moment the hot glue hits the cooler wood, it starts cooling rapidly. Work efficiently to push the material into its sticky phase before it hardens completely.

Frequently Asked Questions About Hot Glue and Wood
This section covers the most common worries beginners have when using hot glue on wood projects.
Q1: Will hot glue hold a wooden dowel into a hole?
A: For light-duty dowel rods in small crafts, yes. However, if that dowel is meant to bear weight or significant sideways force (shear), it will fail. Use PVA wood glue for anything structural, as it fills the gap more effectively and forms a stronger bond.
Q2: Can I sand hot glue if I make a mistake?
A: Yes, but it’s messy. Hot glue tends to gum up sandpaper quickly because it is rubbery plastic. If you must sand it, use a lower grit sandpaper (like 80 or 100) and use quick, light passes. Be aware that sanding can remove surface wood fibers too.
Q3: Does paint stick well to a surface covered in dried hot glue?
A: Generally, paint doesn’t adhere well directly to smooth, glossy hot glue. It’s better to use hot glue only on the surfaces that will later be completely covered by other materials (like an internal joint) or apply a bonding primer first if the glue is going to be visible after painting.
Q4: If I use hot glue, how long does the joint last?
A: For non-stressed decorative crafts, the joint can last years indoors. For any application involving handling, weight, or temperature fluctuations, expect failure anywhere from a few weeks to a few months as the plastic naturally weakens or slides.
Q5: Is hot glue safe for toys made of wood?
A: For simple assembly, yes, but monitor use closely. Because hot glue is easily chewed or peeled apart by small children, and because it doesn’t meet strict safety standards for toy durability (especially regarding choking hazards if the pieces break off), wood glues are usually recommended by toy safety guidelines for high-use items.
Q6: Can I use hot glue to clamp wood while drying PVA glue?
A: This is an excellent hybrid approach! Use small dabs of hot glue just to hold the pieces perfectly square against each other. Apply your strong PVA wood glue inside the joint, put a proper clamp over the whole area, and use the hot glue to keep the alignment perfect while you tighten the clamps. Remove the hot glue spots later if you wish.
Conclusion: Choosing Confidence Over Convenience
We have explored the capability of the hot glue gun when faced with wood. It is an invaluable tool in the workshop, shining brightly for fast crafts, quick holds, and temporary setup tasks. Its speed and ease of use make it incredibly tempting for any project.
However, as you advance in your woodworking journey, remember this key lesson: Convenience should never replace structural integrity. When in doubt about the stress, moisture, or longevity of your creation, always choose dedicated wood adhesives like PVA glue. Investing the extra time in clamping with real wood glue ensures you build projects that last and that you can be truly proud of. Keep experimenting, keep learning the materials, and most importantly, keep building!