Can You Paint Pressure Treated Wood Right Away
It’s a question many DIYers wonder when they see that beautiful, new pressure-treated lumber deck or fence. You’re excited to get started, but then you pause. Can you paint pressure treated wood right away?
This common worry can stop projects before they begin. It’s a bit tricky because this wood is treated with chemicals. We’ll break it down super simply.
You’ll learn exactly what to do, step by step, so you can get that perfect painted finish. Stick around, and we’ll get your project looking great!
When Can You Paint Pressure Treated Wood
Deciding when to paint your new pressure-treated wood project is a key step. It’s not as simple as just grabbing a brush and going. Pressure-treated wood has chemicals forced into it to protect it from rot and bugs.
These chemicals need time to dry out and dissipate. If you paint too soon, the paint won’t stick well. It can peel and chip later, which is a big headache.
Understanding the timing prevents these problems. It ensures your paint job looks great for years. This section explores the factors that tell you when your wood is ready.
The Importance of Drying Time
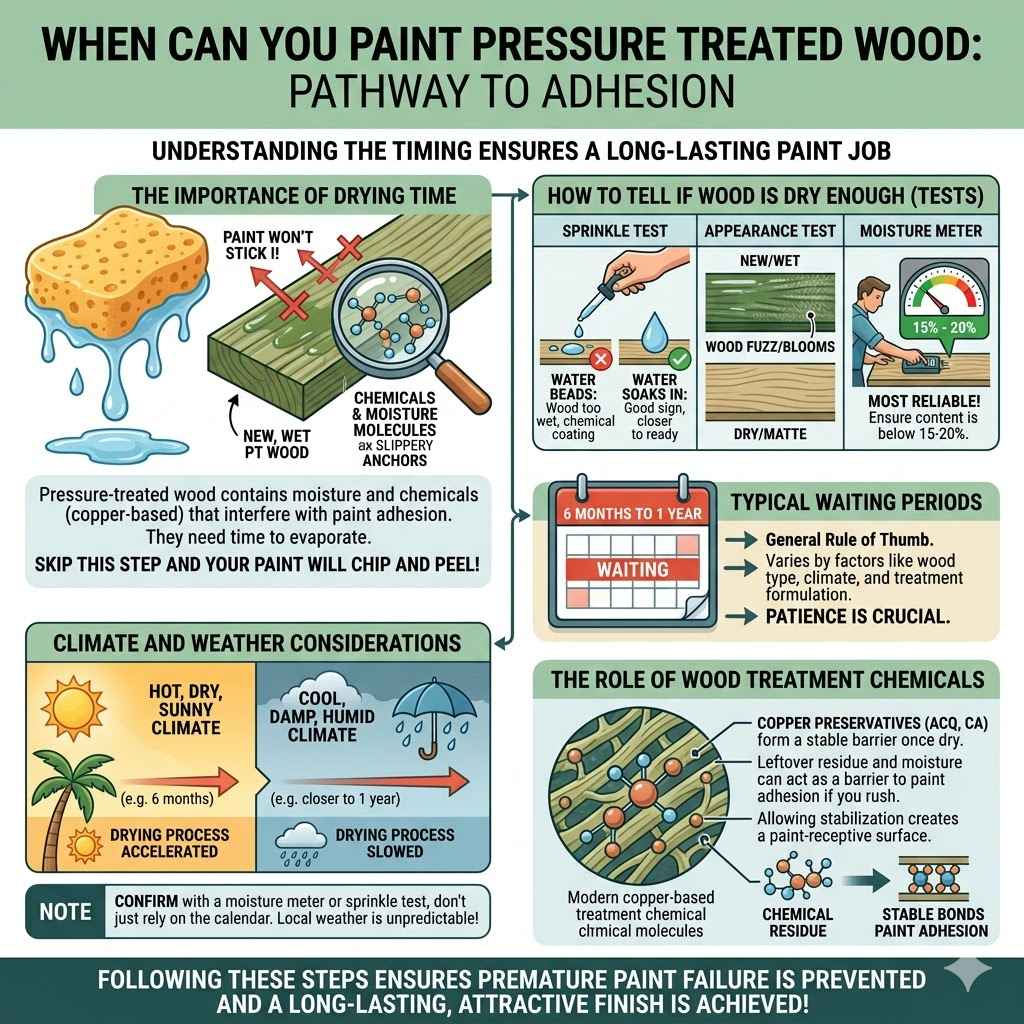
Pressure-treated wood contains a lot of moisture and chemicals when it’s new. This moisture needs to evaporate. It’s like letting a wet sponge dry out before you try to stick something to it.
The chemicals, often copper-based, are designed to protect the wood. However, they can interfere with paint adhesion if they are still too concentrated or moist. This is why waiting is crucial.
The wood needs to reach a stable moisture level.
Think of it this way: the chemicals are like little anchors holding the wood together and protecting it. But when they are very wet, they can feel slippery to paint. As the wood dries, these anchors become more stable and ready for a good paint bond.
Skipping this drying time is the most common mistake people make. It leads to premature paint failure.
How to Tell If Wood Is Dry Enough
There are a few simple ways to check if your pressure-treated wood is ready for paint. One common method is the sprinkle test. Sprinkle a few drops of water on the wood.
If the water beads up on the surface, it means the wood is still too wet and has a protective coating from the treatment. If the water soaks into the wood, it’s a good sign that it’s drying out properly and is closer to being ready.
Another indicator is the wood’s appearance. New, wet pressure-treated wood often looks darker green or has a shiny, almost slick surface. As it dries, it will lighten in color and develop a more matte finish.
You might also notice some fuzzy, white residue called “wood fuzz” or “blooms.” This is normal and can often be brushed off once the wood is dry. These visual cues, combined with the sprinkle test, help you make an informed decision.
You can also use a moisture meter. These tools are readily available at hardware stores and are very accurate. For painting, most manufacturers recommend the wood’s moisture content to be below 15% to 20%.
Inserting the meter’s probes into the wood will give you a precise reading. This is the most reliable way to know for sure if your wood is ready.
Typical Waiting Periods
The general rule of thumb for waiting to paint pressure-treated wood is about six months to a year. However, this can vary significantly. Factors like the type of wood, the climate you live in, and how much direct sunlight the wood gets all play a role.
In warmer, sunnier climates, the wood might dry out faster than in cooler, damper regions. Even the specific brand or type of pressure treatment can influence drying time.
Some newer formulations of pressure treatment are designed to dry out more quickly, but it’s still wise to be patient. Don’t rush the process. Waiting the recommended time ensures the best adhesion and longevity for your paint job.
Rushing can lead to costly repairs and a less attractive finish, so patience truly pays off in the long run. It’s better to wait a little longer than to repaint sooner than you have to.
Climate and Weather Considerations
Climate is a huge factor in how quickly pressure-treated wood dries. If you live in a region with high humidity and frequent rain, the wood will take much longer to dry. The moisture in the air can slow down the evaporation process significantly.
In these areas, it might be closer to the one-year mark before your wood is ready.
Conversely, if you’re in a hot, dry, and sunny climate, the wood can dry out much faster. Direct sunlight helps to bake out the moisture and chemicals. In such conditions, you might be able to paint after six months or even sooner.
However, always use a moisture meter or the sprinkle test to confirm. Don’t just rely on the calendar, as local weather patterns can be unpredictable. Extreme heat can sometimes cause surface drying while the core remains moist, so deep drying is what you are looking for.
The Role of Wood Treatment Chemicals
Pressure-treated wood uses chemicals, most commonly alkaline copper quaternary (ACQ) or copper azole (CA), to protect it. These chemicals are forced into the wood under pressure. While they are vital for preventing decay and insect damage, they can affect how well paint adheres.
Older types of treatments, like chromated copper arsenate (CCA), had different drying characteristics. Modern treatments are generally more paint-friendly once dry, but the principle of waiting remains the same.
These copper-based preservatives can leave a residue on the wood surface as it dries. This residue, along with any remaining moisture from the treatment process, can act as a barrier to paint. The goal is to allow this residue to stabilize or wash off naturally over time, making the wood a more receptive surface for paint.
Understanding this helps explain why immediate painting is not recommended.
Preparing Pressure Treated Wood for Painting
Once you’ve confirmed your pressure-treated wood is dry and ready, the next crucial phase is proper preparation. This is where you get the surface perfectly clean and smooth so the paint can do its job beautifully. Skipping any of these steps can mean a paint job that looks good for a little while but then starts to fade, peel, or blister.
Proper prep work is the foundation of a lasting, attractive finish.
This part involves more than just wiping down the wood. It’s about ensuring every bit of dirt, grime, or loose material is gone. We will go through each step that matters, from cleaning to sanding, so your painted surface will be something you can be proud of.
Follow along, and you’ll be well on your way to a professional-looking result.
Cleaning the Wood Surface
Before you even think about painting, the wood must be thoroughly cleaned. Any dirt, dust, mildew, or algae present on the surface will prevent the paint from adhering properly. You’ll want to use a good quality wood cleaner or a solution of mild detergent and water.
For tougher stains or mildew, you might need a specialized wood cleaner designed for outdoor projects.
Apply the cleaner with a brush or sprayer, then scrub the wood gently. Don’t use a wire brush, as it can damage the wood fibers. After scrubbing, rinse the wood thoroughly with clean water.
A garden hose with a good spray nozzle is usually sufficient. Make sure all traces of the cleaner are removed. Allow the wood to dry completely before moving to the next step.
This drying period is essential, as painting over damp wood will cause problems later.
Using a Wood Cleaner or Mildew Remover
Many products on the market are specifically formulated to clean outdoor wood surfaces. These cleaners often contain oxygen bleach or other agents that help lift dirt and kill mildew. When using a cleaner, always follow the manufacturer’s instructions carefully.
Some require diluting with water, while others can be applied directly. Wear protective gloves and eyewear, as these cleaners can be strong.
For mild cleaning, a solution of warm water and a few drops of mild dish soap can be effective. Scrub with a stiff-bristled brush, then rinse. If you notice any signs of mold or mildew, you’ll need a stronger solution.
A common DIY solution is one part bleach to three parts water. However, bleach can be harsh and may slightly lighten the wood color. Always test any cleaner on an inconspicuous area first to see how it affects the wood.
Sanding for Better Adhesion
Once the wood is clean and completely dry, sanding is often the next important step. Sanding creates a slightly rougher surface, giving the paint something to grip onto. This is especially important if the wood surface feels slick or has any remaining treatment residue.
You’ll want to use medium-grit sandpaper, something like 80-grit or 100-grit, to start. A random orbital sander can make this job much quicker and easier for larger areas like decks.
For smaller projects or tight spots, sanding by hand with a sanding block will work. Sand in the direction of the wood grain. The goal isn’t to remove a lot of wood, but just to lightly scuff up the surface.
After sanding, you must clean off all the dust. A shop vacuum or a leaf blower works well for this. Then, wipe the surface down with a damp cloth.
Make sure no dust is left behind, as it can interfere with the paint job.
Choosing the Right Grit Sandpaper
The grit of sandpaper refers to the coarseness of the abrasive material. Lower grit numbers mean coarser paper, and higher numbers mean finer paper. For preparing pressure-treated wood for painting, you want a grit that will create a good surface profile without being too aggressive.
Starting with a medium grit, like 80 or 100, is usually ideal.
If the wood is particularly rough or has a lot of imperfections, you might start with a slightly coarser grit, say 60, but be very careful not to over-sand. Once you’ve used the medium grit, you might consider a light pass with a finer grit, like 120 or 150, if you want a smoother finish. However, for most outdoor painting, a medium grit is sufficient to create the necessary adhesion.
Over-sanding can actually make the surface too smooth for paint to stick well.
Applying a Primer
Using a primer is a critical step when painting pressure-treated wood. A good quality exterior primer acts as a bridge between the wood and the topcoat of paint. It helps to seal the wood, block any remaining stains or chemicals from bleeding through, and provides a uniform surface for the paint to adhere to.
This is especially important with pressure-treated wood because of the chemicals used in the treatment process.
Look for a primer specifically designed for exterior use and suitable for use on wood. Some primers are formulated to block tannins, which can be an issue with certain types of wood. Others are designed to adhere to challenging surfaces.
Applying the primer evenly and allowing it to dry completely according to the manufacturer’s instructions is key. This step significantly improves the durability and appearance of your final paint job.
Types of Exterior Primers
There are several types of exterior primers you can choose from, each with its own benefits. Water-based acrylic primers are popular because they are easy to clean up with soap and water and dry relatively quickly. They offer good flexibility and are suitable for most exterior wood applications.
Oil-based or solvent-based primers are often recommended for challenging surfaces or when you need superior stain-blocking capabilities. These primers penetrate the wood more deeply and can create a very strong bond. They are excellent for sealing in any residual chemicals from the pressure-treatment process.
However, they typically have stronger fumes and require mineral spirits for cleanup. For pressure-treated wood, an oil-based primer is often the preferred choice due to its enhanced adhesion and stain-blocking properties.
Choosing the Right Paint for Outdoor Projects
Selecting the correct paint is just as important as preparing the surface. For pressure-treated wood that will be exposed to the elements, you need a paint that can withstand sun, rain, and temperature changes. Using the wrong type of paint will lead to premature fading, peeling, and cracking.
We will look at what makes a paint suitable for outdoor use and how to pick the best option for your specific project.
Getting this right means your painted wood will look vibrant and protected for a long time. It saves you the hassle of frequent touch-ups and repainting. Let’s explore the features that make an exterior paint a good choice and guide you toward making a smart purchase.
Exterior Grade Paints
For any project that will be outside, you must use exterior-grade paint. These paints are formulated differently than interior paints. They contain special additives that make them resistant to UV rays, moisture, mildew, and temperature fluctuations.
Interior paints simply cannot stand up to the harsh conditions of the outdoors and will fail quickly.
Exterior paints are also designed to be more flexible. Wood expands and contracts with changes in temperature and humidity. A flexible paint can move with the wood, reducing the risk of cracking and peeling.
Always look for paint specifically labeled for exterior use on wood surfaces. This ensures it has the necessary durability and protective qualities.
Latex vs. Oil-Based Exterior Paints
When choosing exterior paint, you’ll typically encounter two main types: latex (water-based) and oil-based (alkyd). Both have their pros and cons for painting pressure-treated wood.
Latex exterior paints are very popular. They are easy to apply, clean up with water, and dry quickly. They offer good flexibility, which is important for wood that expands and contracts.
Many high-quality acrylic latex paints are very durable and fade-resistant. They are a great choice for most outdoor wood projects.
Oil-based exterior paints, on the other hand, are known for their excellent adhesion and durability. They create a very hard, protective finish that is often more resistant to scuffing and wear. They are also excellent at blocking stains and sealing surfaces.
However, they have stronger odors, take longer to dry, and require mineral spirits for cleanup.
For pressure-treated wood, some professionals prefer an oil-based primer followed by a high-quality acrylic latex topcoat. The oil primer seals the wood and potential bleed-through from the treatment chemicals, while the latex topcoat offers flexibility and durability. However, many modern acrylic latex paints are also formulated to adhere well to properly primed pressure-treated wood.
Paint Finishes and Their Properties
The finish of a paint refers to its sheen level, which affects both the appearance and the durability of the paint job. The main finishes you’ll find are flat, satin, semi-gloss, and high-gloss. Each has different properties that make them suitable for different applications on outdoor wood.
A flat finish hides imperfections well and has a low sheen. It’s often used on siding or fences where a matte look is desired. However, flat paints are typically less durable and harder to clean than finishes with more sheen.
Satin and eggshell finishes offer a slight sheen and are more durable and easier to clean than flat. They are good all-around choices for decks, fences, and trim.
Semi-gloss and high-gloss finishes have a significant sheen. They are the most durable, easiest to clean, and most resistant to moisture and dirt. They are excellent for high-traffic areas like deck railings, doors, and trim where you want a tough, scrubbable surface.
However, their high sheen can highlight surface imperfections, so thorough preparation is essential.
Color Choice Considerations
When choosing colors for your outdoor projects, think about how the color will interact with sunlight. Darker colors absorb more heat than lighter colors. This can cause the wood to expand and contract more, potentially leading to premature wear on the paint.
For decks or other surfaces that get a lot of direct sun, lighter or medium colors are often a better choice. They will stay cooler and are less likely to cause the wood to overheat.
Consider the surrounding environment as well. Do you want your fence to blend in with the landscape, or stand out? What color is your house?
Coordinating the paint color with existing structures and natural elements can create a cohesive and pleasing aesthetic. Always get paint samples and test them on a small, inconspicuous area of your wood. This allows you to see how the color looks in different lighting conditions throughout the day.
The Painting Process Itself
With your pressure-treated wood dry and prepped, and your paint chosen, you’re ready for the actual painting. This part is straightforward but requires attention to detail to ensure a smooth, even finish. We’ll cover applying the paint, getting good coverage, and what to do for those tricky areas to make sure your project looks its absolute best.
Follow these steps carefully, and you’ll have a beautiful, durable painted finish that will enhance your outdoor space for years to come. It’s about working smart and applying the paint correctly to get the results you want.
Application Techniques
Start by stirring the paint thoroughly. Never shake the can, as this can create air bubbles. Use a high-quality brush for cutting in edges and detailed areas, and a roller for larger surfaces like decks or fences.
For vertical surfaces, a roller with a medium nap (about 3/8 inch) is usually best. For decks, a wider roller or a specialized deck-stain applicator can speed up the process.
Apply the paint in thin, even coats. It’s better to apply two thin coats than one thick coat. Thick coats can lead to runs, drips, and uneven drying, which can compromise the paint’s durability.
Work in sections, maintaining a “wet edge” to avoid visible brush marks or lap marks. This means applying the new section of paint while the previous section is still wet.
Applying Thin, Even Coats
The concept of “thin, even coats” is crucial for a professional-looking and long-lasting paint job. When you apply paint too thickly, it can pool in certain areas, leading to drips and an uneven texture. These thick areas also take much longer to dry.
If the surface isn’t fully dry before applying another coat or before it’s exposed to weather, it can trap moisture, leading to peeling or blistering later.
Instead, aim for a light, uniform layer of paint. For latex paints, this typically means dipping your brush or roller into the paint and spreading it out smoothly. You should be able to see a bit of the wood or primer through the first coat, which is perfectly normal.
Each coat builds upon the last, and two or three thin coats often provide better coverage and durability than one heavy coat.
Working in Sections
When painting larger areas like a deck or a fence, it’s essential to work in manageable sections. This helps you maintain a wet edge, which means the paint you are currently applying blends seamlessly with the paint you just applied. If you let a section dry completely before starting the next, you will likely see visible lines or lap marks where the two sections meet.
This can make your finished project look unprofessional.
For a deck, for example, you might paint one or two deck boards at a time, working from one end to the other. For a fence, you might paint one panel, then move to the next, making sure to overlap slightly with the wet edge of the previous panel. This systematic approach ensures a smooth, consistent finish across the entire surface.
Tips for Painting Decks and Fences
Decks and fences present unique challenges. For decks, focus on applying paint evenly to the horizontal surfaces. Avoid letting paint pool in the wood grain.
For railings and vertical posts, use a brush to get into corners and edges. Remember that decks get a lot of foot traffic, so durability is key.
For fences, consider using a sprayer for faster application on large areas, followed by a brush or roller to smooth out any drips or uneven spots. Ensure you paint both sides of the fence if possible, or at least the side that faces your property, for maximum protection. If painting a fence with pickets, paint the pickets individually first, then the rails, or work in alternating sections.
Allowing Proper Drying Times Between Coats
This cannot be stressed enough: patience is vital when painting. After applying the first coat of paint, you must allow it to dry completely before applying a second coat. The drying time will vary depending on the type of paint, the humidity, and the temperature.
Always check the paint can for the manufacturer’s recommended drying time between coats.
Rushing this process is a common mistake that leads to paint failure. If the first coat is not dry, the second coat can lift or wrinkle the first coat, or trap solvents that prevent proper curing. A fully cured paint job is essential for long-term durability, and this curing process takes time, even after the paint feels dry to the touch.
Can You Paint Pressure Treated Wood Right Away
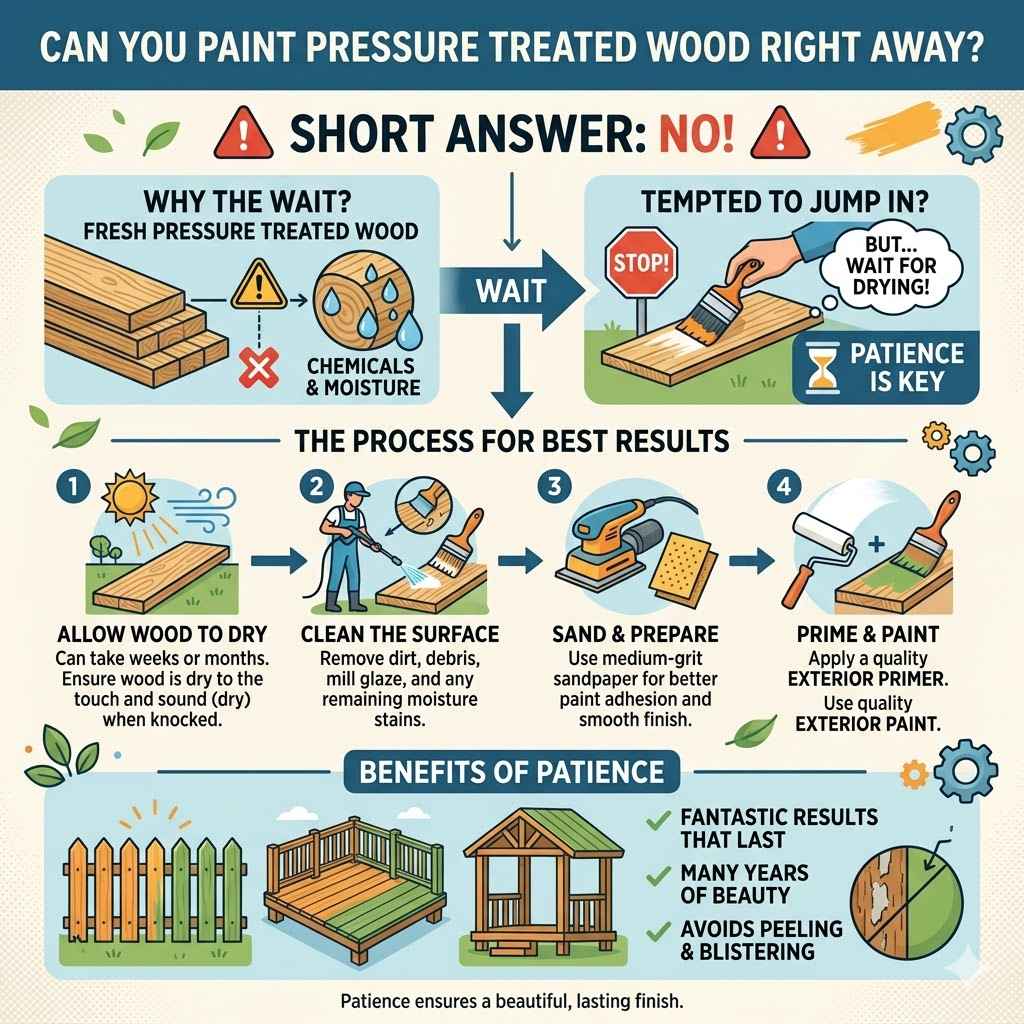
So, the short answer to “Can you paint pressure treated wood right away?” is a resounding no. It’s tempting to jump right in, especially when you have a new project that looks so inviting. However, the chemicals and moisture in fresh pressure-treated wood mean you need to wait.
The most important takeaway is that patience is your best friend. Allowing the wood to dry thoroughly, properly preparing the surface by cleaning and sanding, and then applying a quality exterior primer and paint will ensure your project looks fantastic and lasts for many years. It’s a process, but one that guarantees beautiful, lasting results.
Frequently Asked Questions
Question: How long should I wait before painting pressure treated wood?
Answer: Typically, you should wait at least six months, and often up to a year, before painting pressure-treated wood. This allows the wood to dry out and the treatment chemicals to dissipate. Always test the wood’s moisture content with a sprinkle test or a moisture meter; it should be below 20%.
Question: Can I just paint over new pressure treated wood without waiting?
Answer: No, painting over new pressure-treated wood right away is not recommended. The moisture and chemicals in the wood will prevent the paint from adhering properly, leading to peeling, bubbling, and a short-lived finish.
Question: What is the best way to clean pressure treated wood before painting?
Answer: Clean the wood with a mild detergent and water solution or a specialized wood cleaner. Scrub gently and rinse thoroughly with clean water. For mildew, a bleach solution can be used, but always test in an inconspicuous area first.
Question: Do I need to sand pressure treated wood before painting?
Answer: Yes, light sanding with medium-grit sandpaper (80-100 grit) is recommended after the wood is clean and dry. This scuffs up the surface, helping the primer and paint to adhere better.
Question: What kind of paint should I use on pressure treated wood?
Answer: Always use a high-quality exterior-grade paint. An oil-based primer is often recommended for its stain-blocking properties, followed by a durable acrylic latex exterior topcoat for flexibility and longevity.
Final Thoughts
Waiting to paint pressure-treated wood is essential for a lasting finish. Properly cleaning, sanding, priming, and painting with exterior-grade products ensures your project withstands the elements. Following these steps will give you beautiful results that you can enjoy for years without worry.