Can You Paint Redwood? Yes, But Only With the Right Primer
Yes, you can paint redwood, but it’s not necessary as it naturally contains tannin that makes it resistant to weather, moisture, and insects. If you still want to paint your redwood fence, opt for restaining it every five years to maintain the desired coloration.
Redwood is an excellent choice for exterior painting projects due to its durability and resistance to rot and insect damage. However, before starting the painting process, it’s vital to prepare the redwood surface correctly to achieve the desired results. We’ll discuss the necessary steps on how to paint redwood and some things to keep in mind while painting redwood surfaces.
So, let’s get started!
Overview Of Redwood Painting
Redwood doesn’t require paint or stain, but it can be painted if desired. Since redwood has natural tannin, it’s highly resistant to weather, moisture, and insects without auxiliary sealants. If you decide to paint it, use an oil-based primer before painting and follow proper preparation and finish methods for the best results.
Redwood is a popular choice of wood used for outdoor decks, fences, and siding. It is known for its beautiful natural hue and resistance to rot and insects. However, if you want to change the color of your redwood and add another layer of protection, painting is an option. Before painting your redwood, there are certain steps you need to follow to ensure that the paint adheres well and lasts for a long time.
Benefits Of Painting Redwood
Painting redwood offers several benefits. First, it enhances the beauty of the wood and gives it a fresh, modern look. Second, it provides an additional layer of protection against weather, UV rays, moisture, and insects. Lastly, painted redwood is easy to clean and maintain, making it a practical choice for outdoor projects.
Proper Preparation
Proper preparation is critical to achieving a successful painted finish on redwood. The following steps should be followed:
- Begin by cleaning the redwood surface with a power washer or a stiff-bristled brush and a mild detergent. This removes dirt, grime, and any loose fibers.
- Next, sand the surface to remove any remaining loose or rough fibers. Be sure to sand in the direction of the wood grain.
- Fill in any cracks, knots, or other imperfections using wood filler or putty.
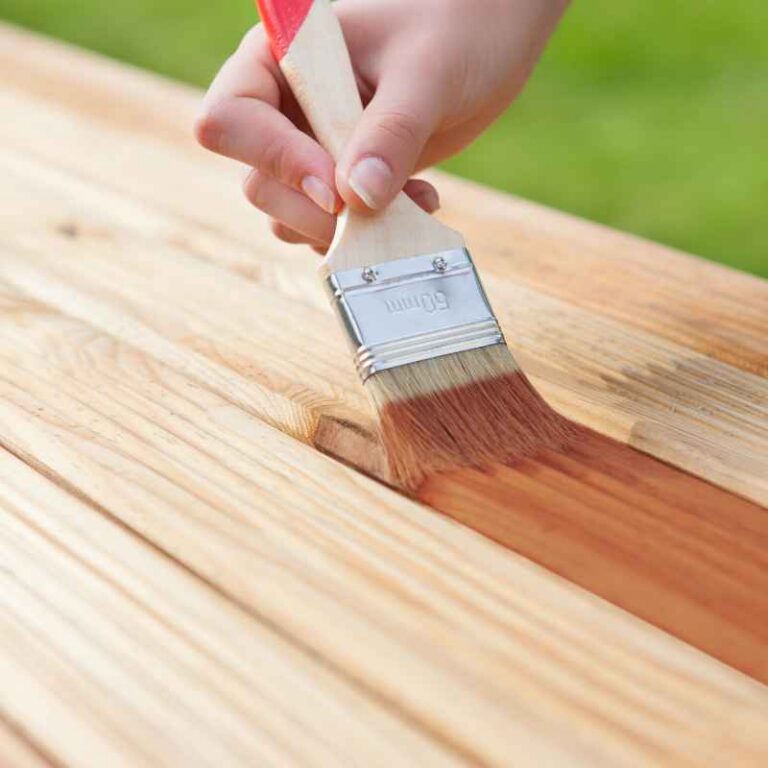
Use Of Primer
Primer is an essential step in painting redwood. It creates a barrier between the wood and the paint, preventing the paint from absorbing into the wood and causing it to fade or peel. Here are some tips for using primer:
- Choose a quality oil-based or alkyd resin-based primer that is suitable for redwood.
- Apply the primer evenly using a brush or roller, making sure to cover the entire surface.
- Wait for the primer to dry completely before painting.
By following these three steps: Benefits of Painting Redwood, Proper Preparation, and Use of Primer, you can ensure a long-lasting and beautiful painted finish on your redwood project.
Preparation Process
Redwood can be painted, but it is not necessary to preserve the wood’s natural qualities. If you choose to paint redwood, it’s important to properly prepare the wood surface with an oil-based primer before painting. Restaining the wood every five years is recommended to maintain the desired color.
the redwood surface before painting or staining. Proper preparation will ensure a long-lasting finish that looks great. The preparation process includes cleaning the surface, filling in any cracks or holes, and sanding the surface to create a smoother finish.
Cleaning the Redwood Surface
Before you get started with painting or staining, it’s essential to clean the redwood surface thoroughly. This will remove any dirt, debris, or mildew that could affect the finish of the paint or stain. You may use a power washer to remove stubborn dirt and grime. Avoid using too much pressure as this can damage the wood surface. After cleaning, allow the surface to dry completely before moving on to the next step.
Filling Cracks and Holes
Redwood may have cracks, knots, and holes that need to be filled before painting or staining. Use a putty knife to apply wood filler onto the affected areas. Smooth the filler with the putty knife and allow it to dry completely. After drying, sand the surface with fine-grit sandpaper to create a smooth and even finish.
Sanding the Surface
Sanding is an essential step in the preparation process. It helps to smooth out the surface, remove any leftover filler, and open up the pores of the wood, making it more receptive to paint or stain. Begin by sanding the surface with coarse-grit sandpaper, then move on to finer-grit sandpaper until you achieve the desired smoothness. Make sure to sand in the direction of the grain to avoid damaging the wood surface.
In summary, preparing the redwood surface is crucial before painting or staining. The preparation process includes cleaning the surface, filling in cracks and holes, and sanding the surface to create a smooth finish. By following these steps, you’ll be able to achieve a long-lasting and beautiful finish on your redwood surface.
Choosing The Right Type Of Paint
Yes, you can paint redwood. However, it’s important to note that redwood has natural tannins that help it resist weather, moisture, and insects without the use of additional sealants. If you choose to paint redwood, it’s recommended to use an oil-based primer and follow proper preparation techniques to ensure a long-lasting and high-quality paint job.
Types Of Paint For Redwood
Redwood is a popular and beautiful wood that is commonly used for outdoor projects such as decks, fences, and siding. However, choosing the right type of paint for your redwood project can be confusing. There are two main types of paint that are suitable for redwood, including oil-based and latex paint.
Exterior Vs. Interior Paint
When choosing a paint for your redwood project, it is important to consider whether it will be used for exterior or interior purposes. Exterior paint is designed to withstand harsh weather conditions, such as rain, snow, and UV rays. On the other hand, interior paint is not designed to withstand these elements and is best suited for indoor use.
Oil-based Vs. Latex Paint
Oil-based paint is a great option for redwood as it provides a durable and long-lasting finish that is resistant to scratches and dents. This type of paint is best suited for outdoor use as it is less likely to fade or peel over time. However, oil-based paint can be more difficult to clean up and may require the use of solvents such as mineral spirits.
Latex paint is a popular choice for redwood as it is easy to clean up and dries quickly. This type of paint is best suited for indoor use or areas with less exposure to harsh weather conditions. However, latex paint may not be as durable as oil-based paint and may require more frequent touch-ups over time.
When choosing the right type of paint for your redwood project, it is important to consider the purpose of the project, the location, and the level of durability required. By selecting the appropriate type of paint, you can ensure a beautiful and long-lasting finish that will enhance the natural beauty of your redwood project.
Tips For Painting Redwood
Yes, redwood can be painted. However, it is important to properly prepare the wood surface before painting. Use an oil-based primer and restain the redwood every five years to maintain its coloration. Avoid using preservatives as redwood already contains natural tannin, which enables it to resist weather, moisture, and insects.
Redwood is a sought-after wood for outdoor projects due to its natural resistance to moisture, insects, and rot. While the wood’s natural color looks great on its own, applying paint can help give it an updated look or provide additional protection. However, painting redwood requires careful preparation and application to prevent issues like peeling, fading, or cracking. Here are some tips for painting redwood to ensure a successful and long-lasting finish.
Using A Paint Sprayer Vs. Brushing
One of the first decisions when painting redwood is whether to use a paint sprayer or a brush. A paint sprayer can offer a faster and more even application, but it requires more preparation, cleanup, and skill to use effectively. Brushing, on the other hand, provides greater control and precision and tends to work better for smaller or more detailed areas.
Tip: Consider the size and scope of your project when deciding between a paint sprayer and a brush. Painting a small fence or trim may be better suited for brushing, while a large deck or house may benefit from a paint sprayer.
Painting Techniques For Smooth Finish
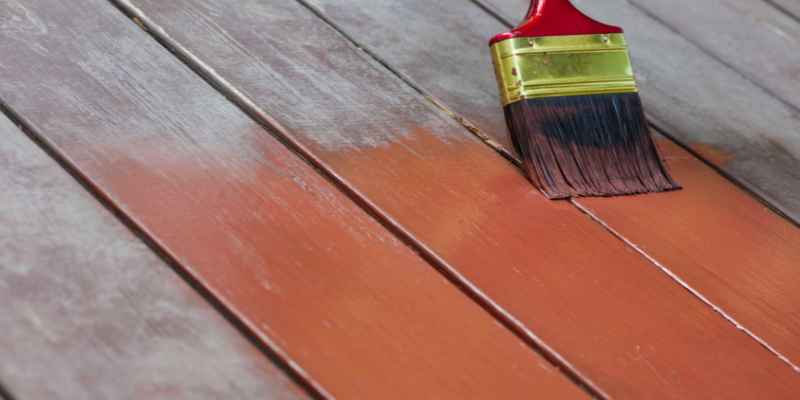
Achieving a smooth and even paint finish on redwood requires proper preparation and application techniques. Start by cleaning the wood surface thoroughly with a pressure washer, sandpaper, or a cleaning solution. Let the wood dry completely and then apply a primer specifically designed for redwood.
When it comes to painting, use a high-quality paint that is compatible with redwood and apply it in thin, even coats. Avoid painting in direct sunlight or on hot days, as this can cause the paint to dry too quickly and lead to uneven application. For extra smoothness, lightly sand the surface between coats and apply the next coat in a perpendicular direction to the previous one.
Tip: If possible, paint redwood in a controlled environment with minimal dust and wind to prevent debris from sticking to the wet paint.
Coat Thickness And Drying Time
When painting redwood, it’s important to apply the right amount of paint and allow each coat to dry fully. Applying too much paint can lead to cracking and peeling, while not applying enough can result in an uneven finish. Follow the manufacturer’s guidelines for coat thickness and drying time to ensure a quality finish.
Typically, redwood requires at least two coats of paint, with drying time between each one. Depending on the paint type and weather conditions, drying time can range from a few hours to a few days. Avoid applying a new coat of paint until the previous one is completely dry, or it may not adhere properly.
Tip: When painting horizontal surfaces like decks or stairs, start at the farthest end and work your way toward the exit, so you don’t step on wet paint.
In conclusion, painting redwood can be a rewarding project that enhances the wood’s natural beauty and protects it from the elements. Follow these tips for painting redwood, and your project is sure to look great and last for years to come.
Maintaining Painted Redwood
Redwood doesn’t require a preservative as it contains natural tannin for resistance to weather, moisture, and insects; however, you can stain it every five years for desired coloration. To paint cedar or redwood, appropriate preparation is necessary for the paint job to look its best.
If you want to paint green redwood, you may need specialty products as the surface requires significant prep work.
Frequency Of Repainting
Maintaining painted redwood is essential to keep it looking beautiful and to prevent any damage from deteriorating the wood. Generally, repainting of redwood is required every three to five years, depending on the condition of the painted surface. However, maintaining painted redwood in areas with intense sun exposure or near the sea may require more frequent repainting.
Removing Peeling Or Chipping Paint
Peeling and chipping paint not only look unsightly but can also cause harm to the underlying wood, allowing moisture to seep in and cause rot or decay. It is advised to remove all peeling and chipping paint from the surface with a wire brush or a sander, depending on the size of the area. It is important to wear protective gear while removing paint as it can be harmful to inhale. Once the loose paint is removed, the surface should be cleaned and sanded to create a smooth surface for repainting.
Use Of Sealants To Protect Painted Redwood
Sealants can be used to protect painted redwood from moisture, UV rays, and other weathering elements. After the primer and paint have been applied, a sealant should be used to protect the painted surface. It is important to use a sealant that is compatible with the type of paint used. The sealant should be applied evenly and thinly, and it is recommended to use multiple coats for optimal protection. Regular application of sealant can extend the life of the paint and protect the redwood from any damage.
Overall, maintaining painted redwood is important to ensure it remains in good condition for years to come. From repainting to removing peeling paint to using sealants, these steps can help protect and extend the life of painted redwood.
Can Redwood Be Stained?
Redwood can be painted with proper preparation and primer. However, it’s not necessary to paint or even stain redwood as it naturally contains tannin that helps it resist moisture, weather, and insects. If you do choose to paint it, using oil-based primer and properly preparing the surface will lead to better results.
Redwood is a popular choice for outdoor projects like decks and fences because its natural oils make it resistant to rot and insects. But what if you want to add some color to your redwood project? Can redwood be stained? The answer is yes! Redwood can be stained to enhance its natural beauty and protect it from the elements. In this article, we’ll explore the benefits of staining redwood, the types of stains available, and the differences between staining and painting redwood.
Benefits Of Staining Redwood
Staining redwood has several benefits, including:
- Enhanced color: Staining redwood can bring out its natural beauty and give it a rich, warm color that complements your outdoor space.
- Protection: Staining redwood can help protect it from water damage, UV rays, and other environmental factors that can cause it to degrade over time.
- Durability: Unlike paint, which can chip or peel over time, stain penetrates the wood to create a long-lasting finish that won’t crack or flake.
Types Of Stains For Redwood
There are two main types of stains for redwood: oil-based and water-based. Oil-based stains penetrate deeper into the wood, providing better protection and a longer-lasting finish. Water-based stains dry faster and are easier to apply, but may not provide as much protection as oil-based stains.
Some popular brands of redwood stain include:
| Brand | Type | Colors |
|---|---|---|
| Behr | Oil-based | Redwood Naturaltone, Cedar Naturaltone, Russet |
| Cabot | Water-based | Redwood, Cedar, Mahogany, Natural |
| Sikkens | Oil-based | Redwood, Cedar, Mahogany |
Staining Vs. Painting Redwood
Staining and painting are both options for adding color to your redwood project, but they have some key differences. Here are a few things to consider when deciding whether to stain or paint your redwood:
- Appearance: Stain enhances the natural beauty of the wood and can create a warmer, more rustic look. Paint covers up the wood grain and creates a solid color.
- Maintenance: Stain needs to be reapplied every few years to maintain the color and protect the wood. Paint may last longer, but can chip and peel over time and may require more extensive maintenance.
- Cost: Stain is generally less expensive than paint, both in terms of materials and labor.
Ultimately, the decision to stain or paint your redwood comes down to personal preference and the specifics of your project. Whether you choose to stain or paint your redwood, make sure to follow the manufacturer’s instructions and properly prepare the wood surface to ensure a long-lasting finish.
Tannin Bleed: The Real Reason Redwood Paint Jobs Fail
The most common way a redwood paint job goes wrong isn’t peeling — it’s tannin bleed. Redwood, along with cedar and mahogany, contains natural tannins that can bleed through a standard latex primer or paint, leaving brown, tan, or yellow stains months after the job looked perfect.
📊 The USDA Forest Products Laboratory ranks redwood in the highest category among softwoods for painting and finishing characteristics — and a properly primed, high-quality paint system on redwood typically lasts 7–10 years, versus just 1–3 years for natural (unpainted) finishes. — Source: California Redwood Association, Painting Redwood Siding Guidelines
Per Sherwin-Williams’ own guidance, tannin staining is most common in redwood, cedar, and mahogany specifically, and it can still occur even with proper preparation — especially on new wood. Sealing the tannins requires either a single coat of an oil/alkyd-based primer, or two coats of a water-borne “stain-blocking” primer specifically formulated for extractive-rich woods like redwood. Shellac-based primers (such as Zinsser B-I-N) are also highly effective, since they fully seal the wood and dry fast.
“Do not allow wood to weather in an unprimed state. Weathering at this time reduces the paint-holding quality of the wood surface.”
That’s a genuinely counterintuitive point worth calling out: the common advice to “let new wood weather before finishing” applies to staining, not painting. If you’re painting redwood, prime it promptly rather than letting it sit exposed — unprimed weathering actually reduces how well paint holds to the surface afterward. If some weathering has already happened before you got to it, simply clean the surface and lightly sand before priming.
Recommended Primers, Stain & Paint For Redwood
Verified Redwood Primers, Stain & Paint
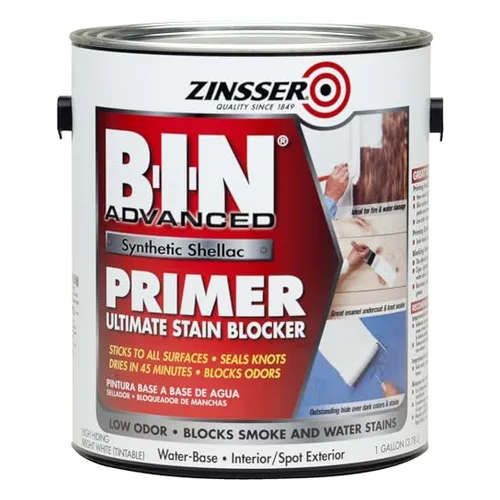
Zinsser B-I-N Shellac Primer, 1 Gallon
Fully seals tannins and dries fast — a top pick for redwood and cedar specifically.
Check Price on Amazon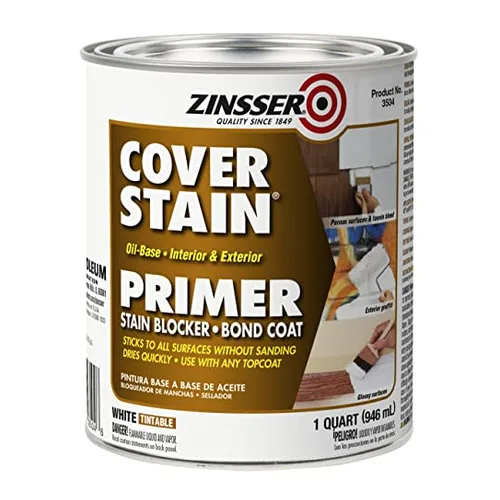
Zinsser Cover-Stain Oil Primer
The oil/alkyd-based option the CRA specifically recommends.
Check Price →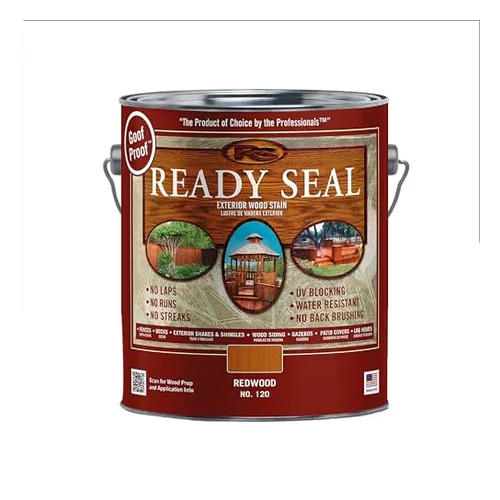
Ready Seal Redwood Stain & Sealer
For staining instead of painting — enhances redwood’s natural color.
Check Price →
Acrylic Latex Exterior Paint (Topcoat)
The CRA’s recommended topcoat type over an oil-based primer.
Check Price →Common Redwood Painting Mistakes To Avoid
Redwood can be painted, but it requires proper preparation and technique to avoid common mistakes. To ensure a successful painting project on redwood, avoid using latex paint, not cleaning the surface properly, and skipping the primer.
Painting redwood is a great way to enhance the natural beauty of the wood, while also providing protection from the elements. However, painting redwood can be challenging, especially if you are not familiar with the proper techniques. To help you achieve great results, we have compiled a list of common redwood painting mistakes to avoid.
Not Using Primer
One of the biggest mistakes people make when painting redwood is not using primer. Redwood contains a high amount of tannin, which can bleed through the paint if not sealed properly. To prevent this from happening, it is important to use a primer specifically designed for redwood. Primer creates a smooth, uniform surface for the paint to adhere to, and also seals the wood to prevent bleeding.
Painting Over Unprepared Surface
Another common mistake is painting over an unprepared surface. Redwood needs to be clean, dry, and sanded before painting. Otherwise, the paint will not adhere properly and may peel or crack over time. It is recommended to use a pressure washer or scrub brush to remove any dirt or debris, and then allow the wood to dry completely before sanding.
Choosing the Wrong Type of Paint
Choosing the wrong type of paint is another common mistake made while painting redwood. It is important to select a paint specifically designed for exterior use and that is also suitable for redwood. Oil-based paints are a great option for redwood as they provide excellent protection against moisture and weathering. Additionally, using a high-quality paint can help ensure longevity and reduce the need for future touch-ups.
In conclusion, by avoiding these common redwood painting mistakes, you can achieve beautiful and long-lasting results. Use a primer specifically designed for redwood, properly prepare the surface before painting, and choose the right type of paint for your project.
Frequently Asked Questions For Can You Paint Redwood
Should Redwood Be Stained Or Painted?
Redwood does not need to be painted or stained as it contains natural tannin, which makes it resistant to weather, moisture, and insects. However, if you choose to stain your redwood fence, you should restain it every five years to maintain the desired coloration.
Painting redwood requires proper preparation, such as using an oil-based primer before applying paint.
Can You Paint Cedar Or Redwood?
Yes, you can paint cedar and redwood. However, proper preparation is necessary. Cedar wood does not need preservatives due to its natural resistance to rot and insect damage. Redwood contains tannin that enables it to resist weather, moisture, and insects.
Before painting, it is important to apply an oil-based primer instead of latex primer to redwood wood. Fresh redwood surface adheres better to paint. Restaining a redwood fence every five years helps maintain desired coloration.
Can I Paint Green Redwood?
Yes, you can paint green redwood with specialty products designed for fresh-cut green wood. However, it is important to prep the surface properly and use the right primer base coat before painting to ensure that the finish adheres properly.
How Do You Paint Redwood Walls?
To paint redwood walls, start by using an oil-based primer. Apply one coat of wax, varnish, or lacquer to protect the surface from grease, dirt, and liquids. Use an oil-based paint and avoid taking any shortcuts. Redwood is best primed with oil- or alkyd resin-based primer to improve overall paint performance.
Follow proper preparation procedures, and use a primer base coat if painting bare redwood surfaces.
Does Paint Adhere Better To Redwood Or Red Cedar?
Both accept paint well when properly primed, and both share the same tannin-bleed risk, so the same oil/alkyd or shellac-based primer approach applies to either. The USDA Forest Products Laboratory ranks redwood in the highest softwood category for paint holding, with cedar close behind — in practice, surface preparation and priming matter more than the choice between these two species.
How Soon Can You Paint New Redwood?
Sooner than most people expect — per the California Redwood Association, unprimed redwood should not be left to weather before painting, since weathering reduces the paint-holding quality of the surface. Prime it promptly once it’s clean and dry. This is different from staining, where letting new redwood weather for a few weeks to months is often recommended.
Conclusion
Painting redwood is possible, but it requires proper preparation and maintenance. Redwood’s natural tannin provides resistance to weather, moisture, and insects. Staining can still be an option for those looking to maintain coloration, but it needs to be reapplied every five years.
Properly preparing the surface with an oil-based primer is an essential step when painting redwood, and products designed for green wood are available. Remember to avoid shortcuts and follow the correct procedure for the best results.