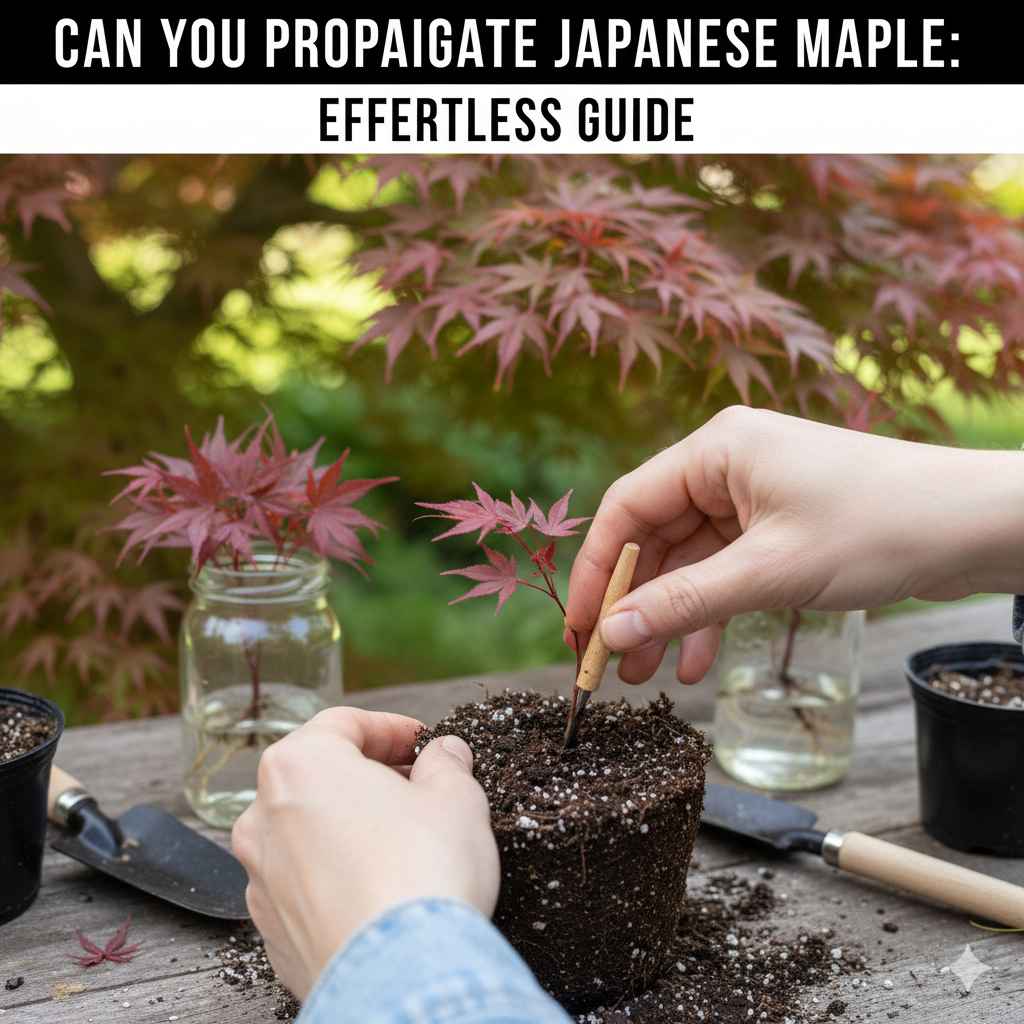
Can You Propagate Japanese Maple? Effortless Guide
Yes, you absolutely can propagate Japanese Maple! While it can be a bit more nuanced than other plants, with the right approach and a little patience, you can successfully grow new Japanese Maple trees from cuttings or seeds. This guide breaks down the process into simple, manageable steps, making it easy for any beginner to try. Let’s get growing!
Japanese Maples are truly magnificent trees, aren’t they? With their delicate, often colorful foliage and graceful forms, they’re a real showstopper in any garden. Many of us admire these beauties and think, “I wish I could have more of them!” The good news is, you can! The question of “can you propagate a Japanese Maple?” is a common one, and the answer is a resounding yes. It might seem like a complex process reserved for seasoned gardeners, but it doesn’t have to be.
Many people assume that creating new trees requires advanced horticultural skills or expensive equipment, leading to a bit of frustration. But I’ve found that with a few clear steps and the right mindset, propagating Japanese Maples becomes an achievable and deeply rewarding endeavor for anyone, even those just starting out. Think of it like learning a new woodworking technique – a bit of understanding and practice goes a long way!
In this guide, we’ll explore the most common and effective ways to propagate your beloved Japanese Maples. We’ll cover everything from taking cuttings to understanding seed germination, breaking it down into simple, easy-to-follow instructions. By the end, you’ll feel confident in your ability to give these stunning trees a new lease on life and expand your collection. Ready to get your hands dirty and grow some more maples?
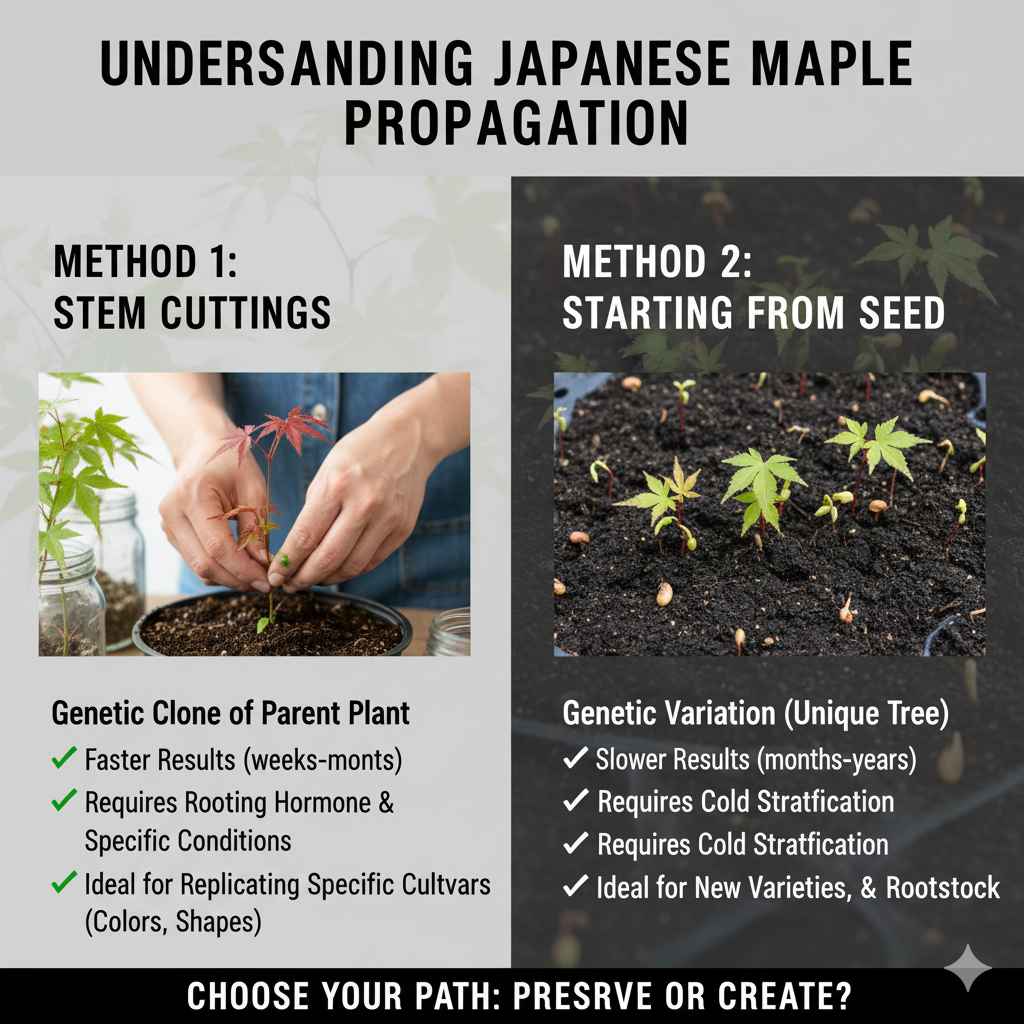
Understanding Japanese Maple Propagation
Before we dive into the “how-to,” it’s helpful to understand why certain methods work best for Japanese Maples. These trees, scientifically known as Acer palmatum, are often grafted to achieve specific cultivars with unique leaf shapes and colors. This means that if you want to replicate a particular variety, you’ll need to use methods that preserve its exact characteristics.
That’s where propagation comes in! We have two main methods to consider: taking cuttings and starting from seed. Each has its own advantages and challenges, and understanding these will help you choose the best approach for your goals. Just like selecting the right wood for a project, choosing the right propagation method is key to success.
Propagation by Cuttings: The Most Reliable Method for Cultivars
When you want to ensure your new Japanese Maple looks exactly like the parent tree – the same leaf shape, color, and growth habit – taking cuttings is the way to go. This method involves taking a piece of the parent plant and encouraging it to grow roots, essentially creating a clone. It’s the most common technique for preserving specific cultivars.
Types of Cuttings
There are a few types of cuttings you can use, and the best one often depends on the time of year and the specific cultivar you’re working with:
- Softwood Cuttings: Taken from new, flexible growth in late spring or early summer. These are often easier to root but require more consistent moisture and humidity.
- Semi-hardwood Cuttings: Taken from slightly more mature growth in mid-summer. They have a bit more rigidity than softwood cuttings and can be a good balance of ease and success.
- Hardwood Cuttings: Taken from dormant, mature wood in late fall or winter. These are the most challenging to root but are excellent for certain varieties and can be stored for a while.
For beginners, starting with semi-hardwood cuttings in mid-summer is often the most forgiving approach. We’ll focus on that in our step-by-step guide.
Propagation by Seed: A Journey of Discovery
Starting Japanese Maples from seed is an exciting option if you’re looking to experiment or if you’re not too concerned about the new plant being identical to the parent. Seeds from Japanese Maples often produce offspring that differ from the parent, which can result in unique and beautiful variations. It’s like finding a unique grain pattern on a piece of lumber – you never know what you’ll get!
However, seed propagation requires patience and a specific process called stratification to mimic natural winter conditions, which helps break the seed’s dormancy. The germination can be slow and sometimes unpredictable.
Effortless Guide to Propagating Japanese Maple by Cuttings
Let’s get down to business! Propagating through cuttings is generally more successful for creating a tree identical to the one you admire. We’ll walk through the semi-hardwood cutting method, which is a great starting point for beginners.
What You’ll Need: Your Essential Toolkit
Gathering your supplies beforehand makes the process smooth. Think of this like preparing your workspace before starting a woodworking project – everything in its place!
- Sharp, clean pruning shears or a grafting knife
- Rooting hormone powder or gel
- Small pots or seed trays with drainage holes
- A sterile, well-draining potting mix (a 50/50 mix of perlite and peat moss or coco coir works well)
- Clear plastic bags or a propagator with a lid
- Watering can or spray bottle
- Labels and a marker
- A suitable parent Japanese Maple tree
Step-by-Step: Taking and Rooting Cuttings
Follow these steps carefully, and almost like crafting a dovetail joint, precision will pay off!
Step 1: Select the Right Stem
In mid-summer, look for a branch on your Japanese Maple that has grown this year and is starting to firm up but is still somewhat flexible. Avoid very soft, new shoots or old, woody stems. You’re looking for wood that snaps cleanly when bent, rather than just bending. These are your semi-hardwood stems.
Step 2: Make Your Cut
Using your clean, sharp pruning shears, cut a section of the chosen stem that is about 4-6 inches long. Make the cut just below a leaf node (where a leaf attaches to the stem). A clean cut is crucial to prevent disease and encourage healing.
Step 3: Prepare the Cutting
Gently remove the leaves from the bottom half of the cutting. You want to expose the nodes where roots will form. If the remaining leaves are very large, you can carefully cut them in half horizontally to reduce water loss through transpiration, while still allowing the cutting to photosynthesize.
Step 4: Apply Rooting Hormone
Dip the cut end of the stem into rooting hormone powder or gel. Tap off any excess. This hormone contains auxins, which are plant hormones that stimulate root growth. It’s like giving your cutting a helpful boost to get started.
Step 5: Pot Your Cuttings
Fill your pots or trays with the moist, sterile potting mix. Make a small hole in the center of the mix with your finger or a pencil. Insert the prepared cutting into the hole, ensuring that several nodes are buried in the soil. Gently firm the soil around the base of the cutting.
Step 6: Create a Humid Environment
Water the potting mix gently. Then, cover the pot with a clear plastic bag, creating a mini-greenhouse effect. You can secure the bag with a rubber band or place the pot inside a propagator. Ensure the leaves don’t touch the plastic if possible; you might need to use stakes to prop up the bag.
Step 7: Placement and Care
Place the pots in a location that receives bright, indirect light. Avoid direct sunlight, which can overheat and scorch the cuttings. Keep the soil consistently moist but not waterlogged. Misting the leaves occasionally can also help maintain humidity.
Step 8: Patience is Key – Checking for Roots
This is where your patience gets a workout! It can take anywhere from 4 to 12 weeks for cuttings to develop roots. You can gently tug on the cutting; if there’s resistance, roots are likely forming. Another sign is new leaf growth. For a definitive check, you can carefully unpot a cutting. Successful rooting is often indicated by a small, healthy root system.
Step 9: Transplanting
Once your cuttings have a good root system (usually around 1-2 inches long and branching), they are ready to be transplanted into individual, slightly larger pots with a good potting mix. Continue to keep them in a protected environment, gradually acclimating them to less humid conditions over a few weeks.
To learn more about common plant propagation techniques, the University of California Agriculture and Natural Resources provides valuable insights into plant propagation and care.
Propagating Japanese Maple from Seed: A Bit More Involved
As mentioned, growing from seed is more of a lottery, but it can be incredibly rewarding. If you’re up for a challenge and love the idea of discovering new variations, this is for you.
Step 1: Collect Seeds
Japanese Maple seeds are called samaras. Collect them in the fall after they have matured and dried on the tree. They typically appear as winged seeds.
Step 2: Stratification (Crucial!)
Japanese Maple seeds need a period of stratification to break their dormancy. This mimics the cold winter conditions they would experience in nature. There are two types of stratification:
- Cold Stratification: Mix the seeds with a slightly damp medium like peat moss, vermiculite, or sand. Place this mixture in a sealed plastic bag or container and store it in the refrigerator (not the freezer) for about 90-120 days. Check the moisture level periodically to ensure it stays damp but not wet.
- Warm-then-Cold Stratification: Some sources suggest a period of warm stratification (around 20-25°C or 68-77°F for a month) followed by the cold stratification period.
Step 3: Sowing Seeds
After the stratification period, sow the seeds about 1/4 inch deep in a well-draining seed-starting mix. You can use pots or trays.
Step 4: Germination and Growth
Keep the soil consistently moist and place the pots in a warm location with bright, indirect light. Germination can be slow and erratic, sometimes taking several months. Be patient!
Step 5: Care for Seedlings
Once seedlings emerge, continue to provide consistent moisture and bright, indirect light. They will be delicate at first. As they grow larger, you can transplant them into individual pots.
The USDA Forest Service offers extensive research and information on tree propagation and silviculture, which can be very useful for understanding seed viability and germination.
Comparing Propagation Methods: Cuttings vs. Seed
To help you decide which method is right for you, let’s look at a quick comparison:
| Feature | Propagation by Cuttings | Propagation by Seed |
|---|---|---|
| Genetic Consistency | High (exact clone of parent) | Low (likely to be different from parent) |
| Time to Maturity | Faster (young tree may establish quicker) | Slower (seedlings take longer to grow to size) |
| Difficulty Level (Beginner) | Moderate (requires attention to detail and timing) | Moderate to High (stratification can be tricky, germination unpredictable) |
| Best For | Replicating specific cultivars, guaranteed appearance | Experimentation, creating unique variations, when exact replica isn’t critical |
| Resource Needs | Sharp tools, rooting hormone, consistent moisture | Patience, specific stratification process, sterile seed mix |
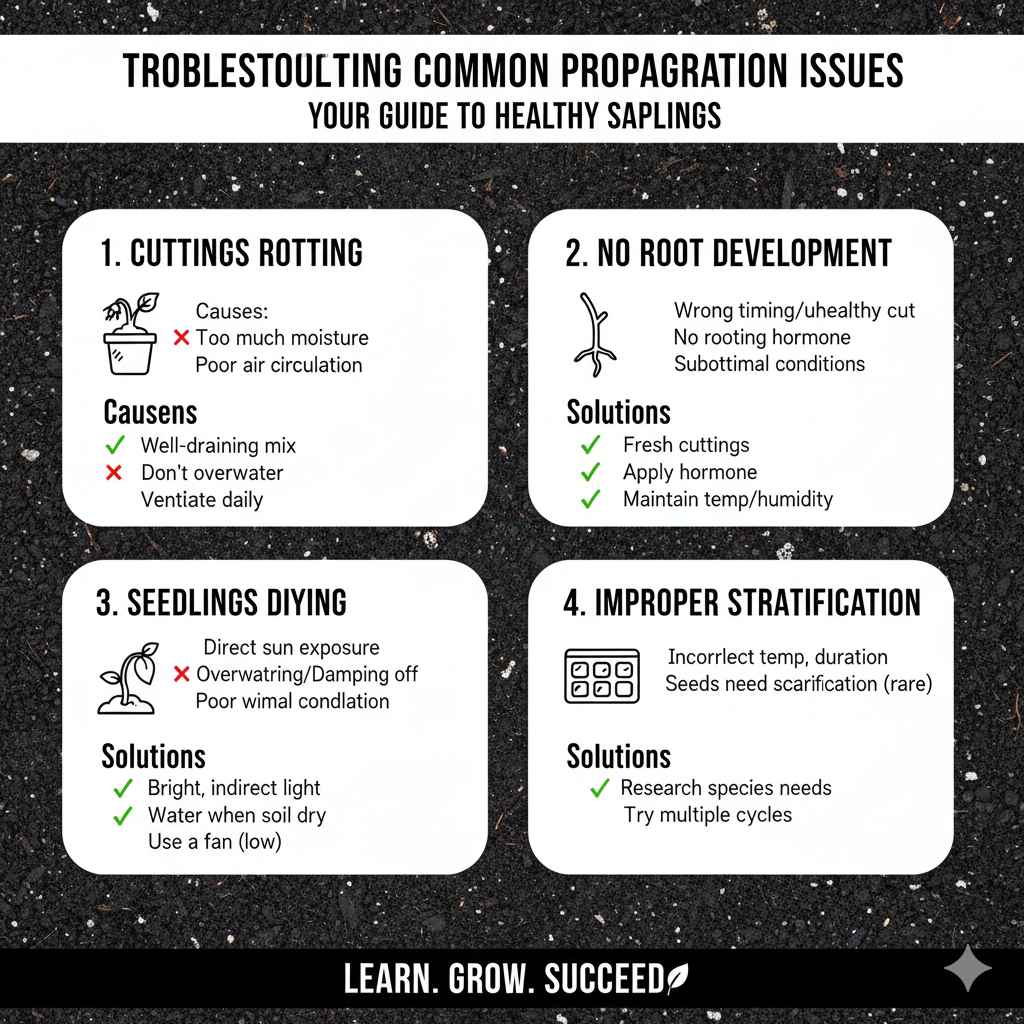
Troubleshooting Common Propagation Issues
Even with the best intentions, sometimes things don’t go as planned. Here are a few common issues and how to address them:
- Cuttings Rotting: This is usually a sign of too much moisture and not enough air circulation. Ensure your potting mix is well-draining and that you’re not overwatering. If using a plastic bag, open it for a few hours each day to allow air to circulate.
- No Root Development: This could be due to several factors: the cutting wasn’t taken at the right time, it wasn’t healthy to begin with, the rooting hormone wasn’t applied correctly, or the environmental conditions (temperature, humidity, light) weren’t optimal. Try again with fresh cuttings, ensuring all steps are followed precisely.
- Seedlings Dying After Germination: This often happens if the delicate seedlings are exposed to direct sun, overwatering, or poor air circulation, leading to fungal diseases (damping off). Ensure they have bright, indirect light and only water when the top layer of the soil starts to dry. A fan on a low setting can improve air circulation.
- Improper Stratification of Seeds: If seeds don’t germinate after sowing, they might not have received adequate stratification. Ensure correct temperature and duration. Sometimes, seeds require multiple stratification cycles or scarification (nicking the seed coat) to germinate, though this is less common for Acer palmatum.
For detailed information on specific plant propagation challenges, the Royal Horticultural Society (RHS) is a world-renowned authority with extensive gardening advice.
Frequently Asked Questions (FAQ)
Here are some common questions beginners have about propagating Japanese Maples:
Q1: When is the best time to take Japanese Maple cuttings?
The best time for semi-hardwood cuttings is typically mid-summer, when the new growth has started to mature but is still pliable. Softwood cuttings are taken in late spring/early summer, and hardwood cuttings in late fall/winter.
Q2: How long does it take for Japanese Maple cuttings to root?
It can vary, but you can generally expect rooting to occur within 4 to 12 weeks. Patience is key! You’ll know roots are forming when you feel resistance when gently tugging the cutting or see new leaf growth.
Q3: Can I use tap water to root my cuttings?
Yes, tap water is generally fine for watering your propagation medium. However, if your tap water is very hard or has a high chlorine content, letting it sit out for 24 hours before use can help dissipate some of the chlorine.
Q4: My Japanese Maple cutting is turning yellow. What’s wrong?
Yellowing leaves can indicate several issues: overwatering (leading to root rot), underwatering (leading to dehydration), or insufficient light. Check the soil moisture and ensure the environment is consistently humid but not waterlogged. It might also be a sign of natural leaf drop before rooting occurs if the cutting is preparing to shed old leaves.
Q5: Will a Japanese Maple grown from seed look exactly like the parent tree?
Rarely. Seeds of Japanese Maples are generally not true to type. This means the offspring will likely have different leaf shapes, colors, or growth habits than the parent tree. If you want an exact replica, you must use methods like cuttings or grafting.
Q6: Is it better to use rooting hormone powder or gel?
Both can be effective. Gel formulations tend to stick to the cutting better and can provide a more consistent coating. However, powder is also widely used and successful. The most important factor is to ensure the rooting hormone is fresh and applied correctly to the basal end of the cutting.
Q7: How do I know if my rooted Japanese Maple cutting is ready to be planted in a larger pot?
Once your cutting has developed a healthy root system, typically when roots are 1-2 inches long and beginning to branch, it’s ready. You can gently check this by carefully lifting the cutting from the soil or looking for roots emerging from the drainage holes. At this stage, it can be carefully transplanted into its own pot with a good quality potting mix.
Conclusion: Growing Your Own Maple Legacy
So, can you propagate a Japanese Maple? Absolutely! With this guide, you’ve learned that creating new Japanese Maples from cuttings is not only possible but also a manageable and rewarding process. Whether you choose the reliable path of cuttings to replicate your favorite cultivars or the exciting adventure of growing from seed, the journey of propagation is deeply satisfying. You’re not just growing a plant; you’re continuing a beautiful lineage and creating a living piece of art for your garden, much like a craftsman builds a legacy piece of furniture designed to last and be admired.
Remember, each step, from selecting the perfect stem to providing the right environment, is about care and attention – qualities that make any DIY project successful. Be patient with the process, learn from any setbacks, and celebrate every bit of progress.