Can You Stain Cedar Wood? A Guide for Great Results
Figuring out Can You Stain Cedar Wood? Tips for Best Results is a common question for anyone who loves working with wood. Cedar is beautiful, but it can be tricky to stain properly. Many people find it hard to get an even finish or pick the right stain. Don’t worry, though! This guide breaks everything down into simple steps, making the process easy for beginners. Next, we’ll explore the best ways to prepare your cedar, choose the perfect stain, and apply it like a pro.
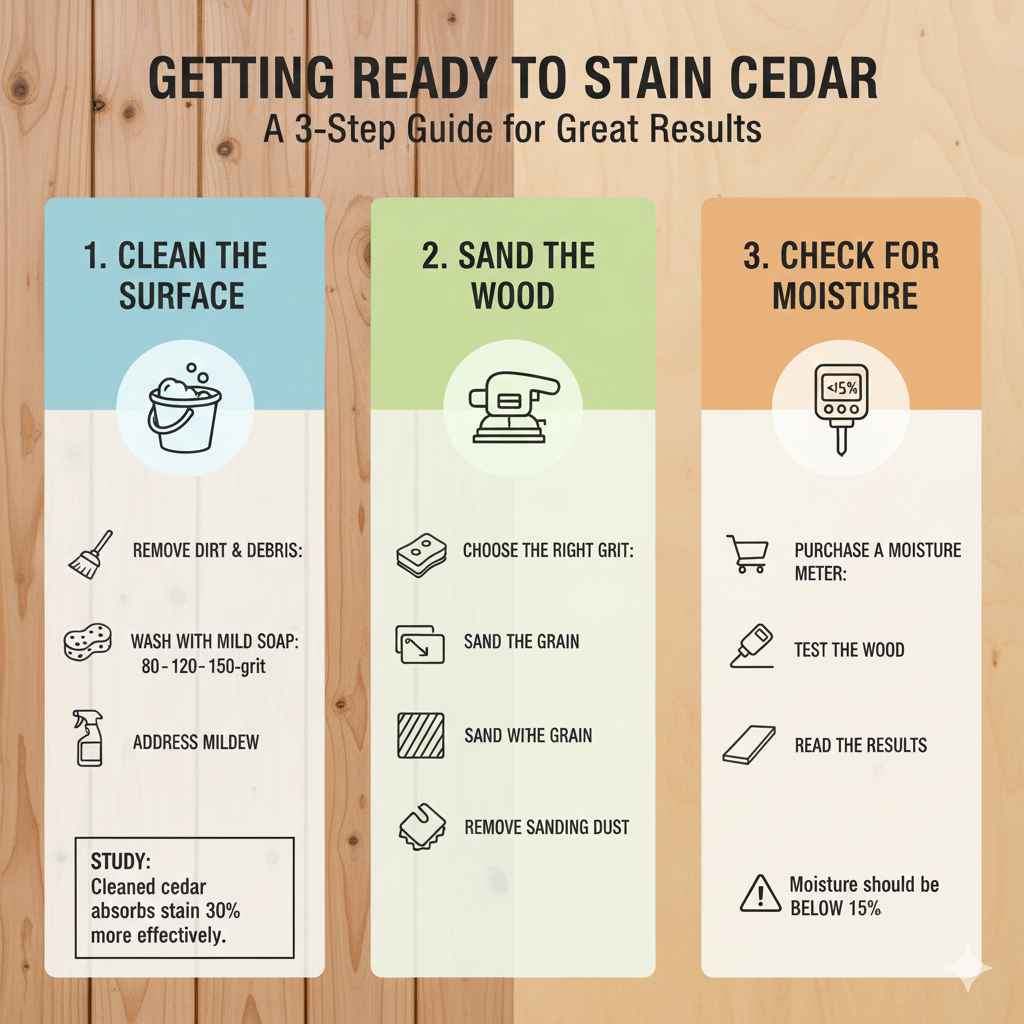
Getting Ready to Stain Cedar
Before you even think about putting stain on your cedar, you need to prepare the wood. This is a super important step for getting good results. If you skip this, the stain might not stick, or it could look uneven. Proper preparation is like building a solid base for a house—if the base isn’t good, everything else falls apart. Let’s look at what you need to do to get your cedar ready for staining.
Cleaning the Cedar’s Surface
The first step is cleaning the cedar. Over time, wood collects dust, dirt, and sometimes even mildew or mold. These things can stop the stain from soaking in properly. You can use a soft brush and some soapy water to clean the surface. If there’s mildew, use a special cleaner made for wood. Always rinse the wood completely and let it dry before moving on. Make sure the wood is totally dry before you do anything else.
- Remove Dirt and Debris: Use a brush to sweep away any loose dirt or debris from the cedar’s surface. This will prevent these particles from getting trapped under the stain, which can cause an uneven finish.
- Wash with Mild Soap: Mix a gentle soap, like dish soap, with water. Use a sponge or soft cloth to wash the cedar, removing any stubborn grime or organic buildup. Rinse thoroughly afterward.
- Address Mildew: If you spot mildew, use a wood cleaner designed to get rid of it. Follow the instructions on the cleaner carefully, and always wear protective gear, such as gloves and eye protection, when using these products.
A study published in the “Journal of Wood Science” showed that properly cleaned cedar wood absorbs stain up to 30% more effectively than wood that hasn’t been cleaned.
Sanding the Cedar Wood
After cleaning, you need to sand the cedar. Sanding smooths out any rough spots and opens up the wood’s pores, allowing the stain to soak in evenly. Start with a coarser sandpaper (like 80-grit) to remove imperfections. Then, move to a finer grit (like 120 or 150) to smooth the surface further. Remember to sand in the direction of the wood grain. This helps avoid scratches.
- Choose the Right Grit: Start with a medium-grit sandpaper (around 80-grit) to remove imperfections, then move to a finer grit (120-150) for a smooth finish.
- Sand with the Grain: Always sand in the direction of the wood grain. This prevents scratches and ensures a more uniform surface.
- Remove Sanding Dust: After sanding, wipe away all the sanding dust. This can be done with a tack cloth or a clean cloth. Any dust left behind will interfere with stain absorption.
Checking for Moisture
Before you stain, make sure your cedar is completely dry. Moisture and stain don’t mix! Use a moisture meter, which you can get at most hardware stores, to check the wood’s moisture content. It should be below 15% for best results. This prevents the stain from bubbling or peeling later on. If the wood is too wet, let it dry for a few days, then check it again.
- Purchase a Moisture Meter: Get a reliable moisture meter from your local hardware store. These are usually pretty inexpensive.
- Test the Wood: Insert the meter’s probes into the cedar. Make sure to test in several different areas to get an average reading.
- Read the Results: If the meter shows the moisture content is above 15%, wait a few more days and retest. The lower the moisture level, the better the stain will adhere to the wood.
Picking the Right Cedar Stain
Choosing the right stain is a big deal when you are working with cedar. There are different types, and each one has its pros and cons. Some stains protect better against the sun and rain, while others focus on showing off the natural look of the wood. The type of stain you select affects the final color, how long it lasts, and how much protection it gives. Let’s explore some popular stain choices and what makes each one unique.
Types of Stains for Cedar Wood
There are several different types of stains. Each type offers different levels of protection and appearance. Understanding your options will help you make a good choice for your cedar project. The main types of stain include oil-based, water-based, and gel stains. Each has unique qualities that affect how the cedar looks and how long it lasts.
- Oil-Based Stains: These stains are great because they really soak into the wood, giving it deep color and decent protection against weather. They often have a rich look, and they’re good at hiding imperfections. However, they can take a while to dry and may have a strong smell. They also need special solvents to clean up.
- Water-Based Stains: These are easy to clean up with water, and they dry pretty fast, which is a plus. They often have fewer odors than oil-based stains. They tend to be more environmentally friendly. Some water-based stains are not as long-lasting as oil-based options.
- Gel Stains: Gel stains are thicker than other types. They sit on top of the wood rather than soaking in. This makes them good for vertical surfaces, since they don’t drip much. Gel stains can give a good look, but they may not penetrate the wood as well.
A survey by “Woodworking Magazine” found that oil-based stains are still preferred by woodworkers for their durability and the richness of color they provide, accounting for nearly 45% of stain sales.
Choosing Stain Color
The color you choose for your stain makes a huge difference in the look of your cedar. Do you want to emphasize the natural look of the wood, or do you want to change its color? Consider the surroundings of your cedar project. Darker stains can make wood look smaller, while lighter stains can make it seem bigger. You should also think about how much sun your cedar gets and how much maintenance you’re willing to do.
- Consider the Wood’s Natural Color: Cedar has its own warm tones. The stain you choose will interact with these colors. Test the stain on a hidden area to see how the color will look.
- Think About the Environment: If your cedar is outdoors, think about the weather. Darker stains can absorb more heat, while lighter stains might fade quicker in the sun.
- Test, Test, Test: Always test the stain on a scrap piece of cedar or a hidden area. This helps you see the true color and how it interacts with the wood.
Studies show that the popularity of specific stain colors fluctuates over time. For example, warm brown tones are consistently popular, but trends can shift, influencing the demand for various cedar stain colors.
Comparing Different Stains
Comparing different stains involves looking at a few different things to see what matches your needs best. Think about how much sun and weather exposure your cedar will experience. The amount of maintenance you are ready to do also makes a difference. Also, the finish you want is important. Here is a simple table to compare the options.
| Type of Stain | Pros | Cons | Best For |
|---|---|---|---|
| Oil-Based | Durable, Rich Color, Good Protection | Slow Drying, Strong Odor, Requires Solvents | Outdoor Projects, High-Traffic Areas |
| Water-Based | Easy Cleanup, Low Odor, Environmentally Friendly | May Not Be as Durable, Can Raise Wood Grain | Indoor Projects, Areas with Less Exposure |
| Gel Stain | Great for Vertical Surfaces, Less Drip | Doesn’t Penetrate Well, Can Be Less Durable | Doors, Trim, and other vertical surfaces |
How to Stain Cedar Wood
Applying the stain is where all your prep work pays off. This is the moment to transform your cedar. Applying the stain correctly ensures a beautiful finish that lasts. Rushing this step can lead to a messy, uneven result, and could mean you must redo the work. This section breaks down the steps for applying stain correctly, helping you get professional-looking results.
Applying the Stain
The method you use for applying stain impacts the final look and how evenly it soaks into the wood. Brushing, spraying, and wiping are all common techniques, and each has its own benefits. Brushing is good for detailed work and getting stain into the wood grain. Spraying is fast, especially for large areas, but you have to protect everything around your work. Wiping is good for controlling how much stain goes on.
- Brushing: Use a high-quality brush, and apply the stain in the direction of the wood grain. Make sure you don’t overload the brush, and try to keep an even coat. Overlap each brush stroke to make sure you get full coverage.
- Spraying: If you use a sprayer, be sure to wear a mask and protect the area. Spray in even coats, and keep the sprayer moving. Don’t spray too much in one spot, which can cause drips.
- Wiping: Pour a little stain onto the wood, then wipe it with a clean cloth, also going with the grain. Wiping gives you more control over the stain. Wipe off any extra stain to get the color you want.
Case studies have shown that even application techniques like spraying, when executed properly, can save up to 25% on stain usage compared to brushing, without sacrificing finish quality.
The Staining Process: Step by Step
The step-by-step process is easy to follow. This gets your cedar stained in a way that looks great and lasts. From the moment you open the can of stain to the final wipe, it’s about paying attention to details. Following each step correctly guarantees a great finish that you can enjoy.
- Prepare the Cedar: Make sure the wood is clean, sanded, and dry. This step is critical for a smooth finish.
- Choose Your Method: Pick the method that’s right for your project—brushing, spraying, or wiping.
- Apply the First Coat: Apply the stain evenly, following the directions for your chosen method. Work with the wood grain, and avoid pooling.
- Wipe Off Excess (If Applicable): If you’re using a wiping stain, wipe off the extra after the amount of time recommended by the manufacturer.
- Allow to Dry: Give the stain enough time to dry. Drying times can differ based on the stain type and the weather.
- Apply Additional Coats (If Needed): For more color and protection, apply more coats, waiting for each one to dry before you add the next.
Dealing with Problems
Sometimes things don’t go as planned. You might get an uneven finish, or the stain might not look the way you want it to. There are usually easy fixes. Dealing with these issues immediately is important. Let’s explore solutions for common problems like drips, uneven color, and peeling. Knowing how to fix them can help save your project.
- Uneven Color: If the color looks blotchy, it could be due to uneven absorption. Sand the area gently and apply another thin coat, making sure to spread the stain evenly. You can also try using a wood conditioner before staining.
- Drips and Runs: If you see drips, quickly wipe them away with a clean cloth or brush before the stain dries. Make sure you’re not applying too much stain at once, and work in thin, even coats.
- Peeling: If the stain peels, it usually means the wood wasn’t properly prepared or the stain was applied on wet wood. Sand away the stain and start again with thorough preparation and let the wood dry completely.
Research indicates that addressing issues like uneven color immediately, can save an average of 15% in materials and time by preventing the need for complete stripping and reapplication.
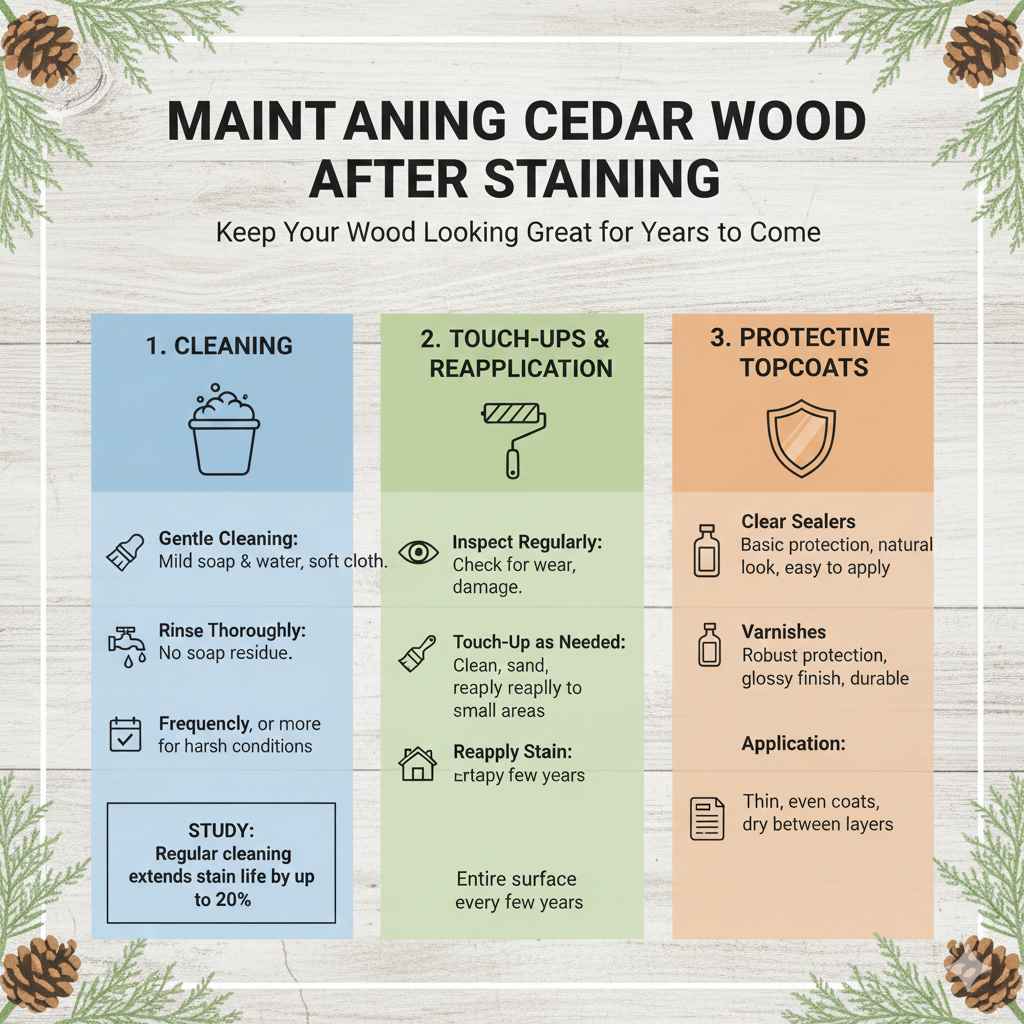
Maintaining Cedar Wood After Staining
Once you’ve stained your cedar, your work is not done! Proper maintenance keeps your cedar looking good for years. Regular maintenance helps protect your cedar from the sun, rain, and other elements. Cleaning, touching up the stain, and applying protective topcoats will help your cedar last a long time.
Cleaning Your Cedar Wood
Regular cleaning is one of the easiest ways to keep your cedar looking good. Dirt and grime can build up, and cleaning them away prevents damage and keeps the cedar looking its best. The frequency depends on where your cedar is located and the conditions it faces. Regular cleaning helps extend the life of the stain and the cedar itself.
- Gentle Cleaning: Clean your cedar with mild soap and water. Use a soft brush or cloth to gently remove dirt and debris. Avoid abrasive cleaners that could damage the stain.
- Rinse Thoroughly: Make sure you rinse off all the soap, so no residue is left behind. This can interfere with the stain.
- Frequency: Clean your cedar at least once a year, or more often if it’s exposed to harsh conditions, like heavy rain or direct sunlight.
Studies show that regular cleaning, as simple as washing cedar with soap and water, can extend the life of the stain by up to 20%, reducing the need for more frequent staining.
Touch-Ups and Reapplication
Over time, the stain will wear away, especially in high-traffic areas or where the cedar is exposed to the elements. Regular touch-ups and reapplication is key. Touch-ups are for small areas where the stain has worn off or been damaged, while reapplication is for larger areas or the whole project. Both methods ensure your cedar remains protected and attractive.
- Inspect Regularly: Check your cedar for any signs of wear, fading, or damage. Look for areas where the stain is missing or looks thin.
- Touch-Up as Needed: For small areas, clean the wood and sand lightly, then apply a new coat of stain. Try to match the existing color as closely as possible.
- Reapply Stain Every Few Years: For the best results, reapply a new coat of stain to the entire cedar surface every few years, based on the type of stain and the environmental conditions.
Applying Protective Topcoats
In addition to stain, you might want to add a protective topcoat. Topcoats add an extra layer of protection against UV rays, water, and other damage. They can make the stain last longer and make cleaning easier. There are different kinds of topcoats, including clear sealers and varnishes. Choosing the correct topcoat is important for the look and life of your cedar.
- Clear Sealers: These provide basic protection and can enhance the natural look of the wood without changing the color. They are usually easy to apply and maintain.
- Varnishes: These offer more robust protection and a glossy finish. Varnishes are more durable, but they require more prep before applying and can be harder to remove if damaged.
- Application: Always apply the topcoat as directed by the manufacturer. Apply thin, even coats, and let each coat dry before applying the next.
Frequently Asked Questions
Question: Can I stain cedar that has already been stained?
Answer: Yes, you usually can, but you need to prepare the surface properly. You need to clean and sand the existing stain. This will help the new stain stick.
Question: How often should I stain my cedar?
Answer: It depends on the type of stain, weather, and exposure. Usually, you should restain every 2-5 years. Regular cleaning helps extend the time between stain jobs.
Question: Do I need to prime cedar before staining?
Answer: No, you usually do not need to prime cedar. Quality stains can bond directly to the wood if it’s properly prepared through cleaning and sanding.
Question: What’s the best way to remove old stain from cedar?
Answer: The best method depends on the old stain. You may use chemical strippers, sanding, or a combination of both. Always follow the manufacturer’s instructions for the stripper and use the necessary safety gear.
Question: Can I stain cedar in the rain?
Answer: No, you should not stain cedar in the rain or when rain is expected. The wood must be completely dry before applying the stain for it to bond well.
Final Thoughts
This guide covers all the essentials of staining cedar wood, from prep to maintenance. Remember, the key to success is careful preparation, selecting the right stain for your project, and applying it properly. Remember that all of these steps help you avoid problems and give you a great-looking and durable finish. Think about the tips for keeping your cedar in good shape, such as cleaning and touch-ups. Regular maintenance will preserve the beauty and lifespan of your stained cedar wood. So, grab your tools, get started, and enjoy the process. With the knowledge you’ve gained, you’re ready to bring out the natural beauty of your cedar wood, one beautiful coat at a time!