Cedarwood Wax Melts: Your Essential Genius Guide
Making cedarwood wax melts is a simple, rewarding project for any DIY enthusiast. You just need to gently melt natural soy wax, stir in high-quality cedarwood essential oil at the right temperature, and pour the mixture into molds. Let them cool completely, and you’ll have beautiful, fragrant melts that bring the warm scent of a woodshop into your home.
Hello there! I’m Md Meraj. In my workshop, the scent of freshly cut cedar is one of my favorite things. It’s warm, calming, and grounding. What if you could capture that feeling and bring it into your home? Well, you can, and it’s easier than you think.
Many people buy expensive wax melts that are full of strange chemicals. But you don’t have to. You can make your own, and it’s a wonderfully simple project. In this guide, I’ll walk you through every step of creating your own cedarwood wax melts. No fancy skills needed. Let’s get started!
Why Make Your Own Cedarwood Wax Melts?
You might be wondering why you should bother making wax melts when you can just buy them. For me, it comes down to craftsmanship and quality, just like in woodworking. When you build something yourself, you know exactly what goes into it.
- You Control the Ingredients: Store-bought melts can contain synthetic fragrances and additives. When you make your own, you can choose 100% natural soy or beeswax and pure essential oils. It’s healthier for you and your home.
- It Saves Money: Crafting your own home fragrance is much more affordable in the long run. The raw ingredients are inexpensive and a little bit goes a long way.
- Customize Your Scent: You are the scent artist! You can make your cedarwood scent strong and woodsy, or you can blend it with other oils like pine or orange for a unique aroma.
- It’s a Fun, Relaxing Project: Much like sanding a fine piece of wood, the process of melting, mixing, and pouring wax is incredibly satisfying. It’s a perfect project for a quiet afternoon.
- Makes a Wonderful Gift: A handmade set of cedarwood wax melts is a thoughtful, personal gift for friends and family. It’s a little piece of your workshop and your heart.

Gathering Your Supplies: A Simple Checklist
Before we start, let’s get our tools and materials in order. You probably have some of these things around your house already. We’ll keep it simple and affordable.
Essential Tools
- A Digital Kitchen Scale: For accurately measuring your wax and fragrance oil. Precision is key!
- A Double Boiler or a Pot with a Pouring Spout: The safest way to melt wax is with gentle, indirect heat. A dedicated pouring pot inside a larger pot of simmering water works perfectly.
- Silicone Molds: Small molds used for candy or ice cubes are ideal. Look for shapes that make about 1-ounce melts.
- A Thermometer: A candy or digital cooking thermometer is essential for getting the wax to the right temperature.
- Stirring Utensil: A silicone spatula or a simple bamboo skewer works great for mixing.
- Paper Towels: For easy cleanup. Working with wax can get a bit messy.
Key Ingredients
- Natural Wax Flakes: I recommend soy wax for beginners. It’s easy to work with, eco-friendly, and holds scent beautifully. We’ll discuss other options below.
- Cedarwood Essential Oil: This is the star of the show! Make sure you buy 100% pure essential oil for the best, most natural fragrance.
- Optional – Other Essential Oils for Blending: Think about oils that pair well with cedar, like sandalwood, fir, or a touch of sweet orange.
- Optional – Wax Dye: If you want to add a bit of color, you can use special dye chips made for candle wax.
Choosing Your Wax: The Foundation of a Great Melt
The type of wax you choose will affect your melt’s scent, appearance, and ease of use. For beginners, I almost always point them toward soy wax. It’s forgiving and gives great results. But let’s look at the common choices so you can decide what’s best for you.
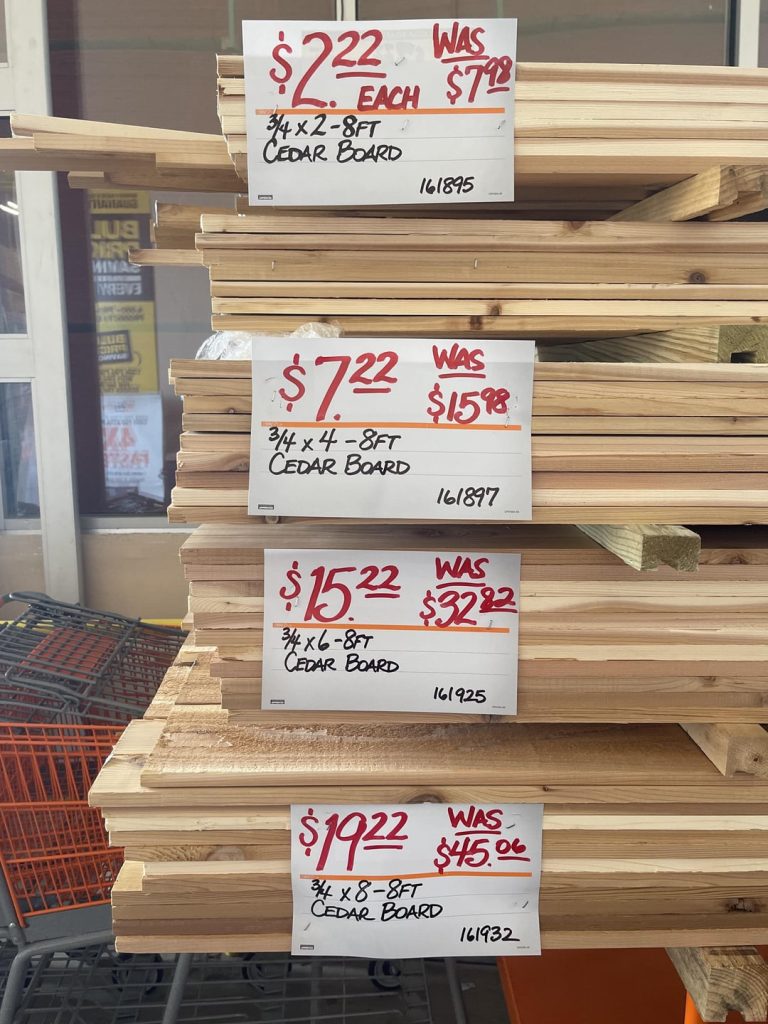
Here’s a simple table to help you compare your options:
| Wax Type | Pros | Cons | Best For |
|---|---|---|---|
| Soy Wax | Easy to find, eco-friendly, great scent throw, easy to clean up. | Can sometimes have a “frosty” look, softer than other waxes. | Beginners and anyone wanting an all-natural, easy-to-use option. |
| Beeswax | All-natural, very hard, has a subtle natural honey scent. | More expensive, doesn’t hold added scents as strongly as soy. | Those who want a very firm melt or prefer the natural beeswax aroma. |
| Paraffin Wax | Holds scent and color very well, very strong scent throw. | Petroleum-based (not renewable), can release soot if overheated. | Experienced makers looking for the strongest possible scent. |
For this guide, we will focus on using soy wax. Its properties make it a reliable and pleasant material to work with, much like a good piece of pine for a first woodworking project.
The Heart of the Scent: All About Cedarwood Oil
Cedarwood essential oil is what gives our melts their signature, soul-soothing aroma. Its benefits go beyond just a pleasant smell. For centuries, the scent of cedar has been used to promote feelings of calm, focus, and security. It truly is like bringing the tranquility of a forest into your living room.
When buying your oil, look for terms like “100% Pure,” “Therapeutic Grade,” and the specific Latin name of the tree, such as Juniperus virginiana (Virginia Cedarwood) or Cedrus atlantica (Atlas Cedarwood). This ensures you’re not getting a diluted or synthetic fragrance. Quality matters here!
Blending Cedarwood for a Custom Aroma
While cedarwood is fantastic on its own, it also plays very well with other scents. Think of it as your base wood, and the other oils as the finish or accent pieces. Blending is where you can get really creative. The key is to add complementary oils in smaller amounts.
Here are a few of my favorite combinations to get you started:
| Blend Name | Cedarwood Ratio | Complementary Oil(s) Ratio | Scent Profile |
|---|---|---|---|
| The Quiet Forest | 3 parts | 1 part Fir Needle + 1 part Sandalwood | Deeply woodsy, grounding, and fresh. |
| Cozy Cabin | 3 parts | 1 part Sweet Orange + a tiny drop of Clove | Warm, spicy, and inviting. Perfect for autumn. |
| Woodworker’s Morning | 2 parts | 1 part Bergamot | Earthy, bright, and uplifting. A clean and focused scent. |
Remember, scent is personal. Don’t be afraid to experiment with small batches to find the blend you love the most.
Let’s Make It! Your Step-by-Step Guide
Alright, you’ve got your supplies and you’re ready to go. This is the fun part. We’ll take it one step at a time. I’ll be right here with you.
Step 1: Prep Your Workshop (or Kitchen)
Before you handle hot wax, prepare your area. Lay down some newspaper or craft paper to protect your surfaces. Have your molds, thermometer, and essential oils within easy reach. Safety and organization are just as important here as they are at the workbench.
Step 2: Measure Your Ingredients
Using your digital scale, measure out your wax. A good starting batch is 8 ounces of soy wax flakes. Next, measure your essential oil. A general rule for a strong but not overpowering scent is to use about 0.5 to 1 ounce of fragrance oil per pound (16 ounces) of wax. For our 8-ounce batch, that means we’ll need about 0.25 to 0.5 ounces of cedarwood oil.
Step 3: Gently Melt the Wax
Set up your double boiler. Fill the bottom pot with an inch or two of water and bring it to a simmer. Place your pouring pot with the wax flakes inside. Let the wax melt slowly and completely. Stir it occasionally with your spatula or skewer. Never walk away from melting wax, and never let it boil. We’re aiming for a gentle, controlled melt. According to the U.S. Food and Drug Administration, it’s crucial to follow manufacturer instructions to avoid risks associated with overheating.
Step 4: Check the Temperature and Add the Scent
Once the wax is fully melted, turn off the heat. Use your thermometer to check the temperature. This is the most critical step for getting a great scent. You need to let the wax cool down slightly before adding your oil. If the wax is too hot, it will burn off the delicate scent. The ideal temperature to add essential oils to soy wax is around 180-185°F (82-85°C). Once it hits that temperature, pour in your measured cedarwood oil and stir gently but thoroughly for two full minutes. This ensures the oil binds properly with the wax.
Step 5: Pour With Care
Now, carefully pour the scented wax mixture into your silicone molds. Take your time to avoid spills. If your pouring pot doesn’t have a good spout, you can transfer the wax to a measuring cup with a spout first for better control.
Step 6: Cool and Cure
Let the molds sit undisturbed at room temperature. Don’t put them in the fridge or freezer, as this can cause cracking. The melts will need several hours to harden completely. For the best scent throw, it’s a good idea to let them “cure” for a day or two before using them. This gives the fragrance oil more time to fully incorporate into the wax.
Step 7: Time to Enjoy!
Once your melts are hard and opaque, gently pop them out of the molds. They are now ready to use! Place one or two melts in your wax warmer, turn it on, and in minutes your home will be filled with the rich, comforting scent of cedarwood. You did it!
Pro-Tips From the Workshop
After you’ve made a batch or two, you might want to try a few extra techniques. Here are some tips I’ve picked up over the years.
- Preventing “Frosting”: Soy wax can sometimes develop white, frosty-looking patches. This is a natural property and doesn’t affect the scent. To minimize it, make sure your pouring temperature is not too high and allow the melts to cool slowly and evenly.
- Adding a Touch of Nature: For a rustic look, you can try adding a tiny pinch of dried botanicals like lavender buds or even very fine cedar shavings into the molds before you pour the wax. Use these only in an electric warmer for safety.
- Making Stronger Scents: If you find your scent isn’t as strong as you’d like, you can slightly increase the amount of essential oil. Go up in small increments, as too much oil can cause the wax to become oily or not set properly.
- Easy Cleanup: The best way to clean your pouring pot and utensils is to wipe them out with a paper towel while the wax is still warm (but not hot). Then, wash with hot, soapy water. Never pour wax down the drain.
Safety First: A Woodworker’s Mantra
Just like in the workshop, safety should always be your top priority. We’re working with hot materials, so a little caution goes a long way. The National Candle Association provides excellent guidelines that apply to wax melts as well.
- Never leave melting wax unattended. Treat it just like a hot pan on the stove.
- Keep water away from your melting wax. Water can cause hot wax to splatter violently.
- Keep children and pets at a safe distance from your work area and your wax warmer.
- Use a proper wax warmer. Only use devices specifically designed for melting wax.
- Always work in a well-ventilated area to ensure good air circulation.
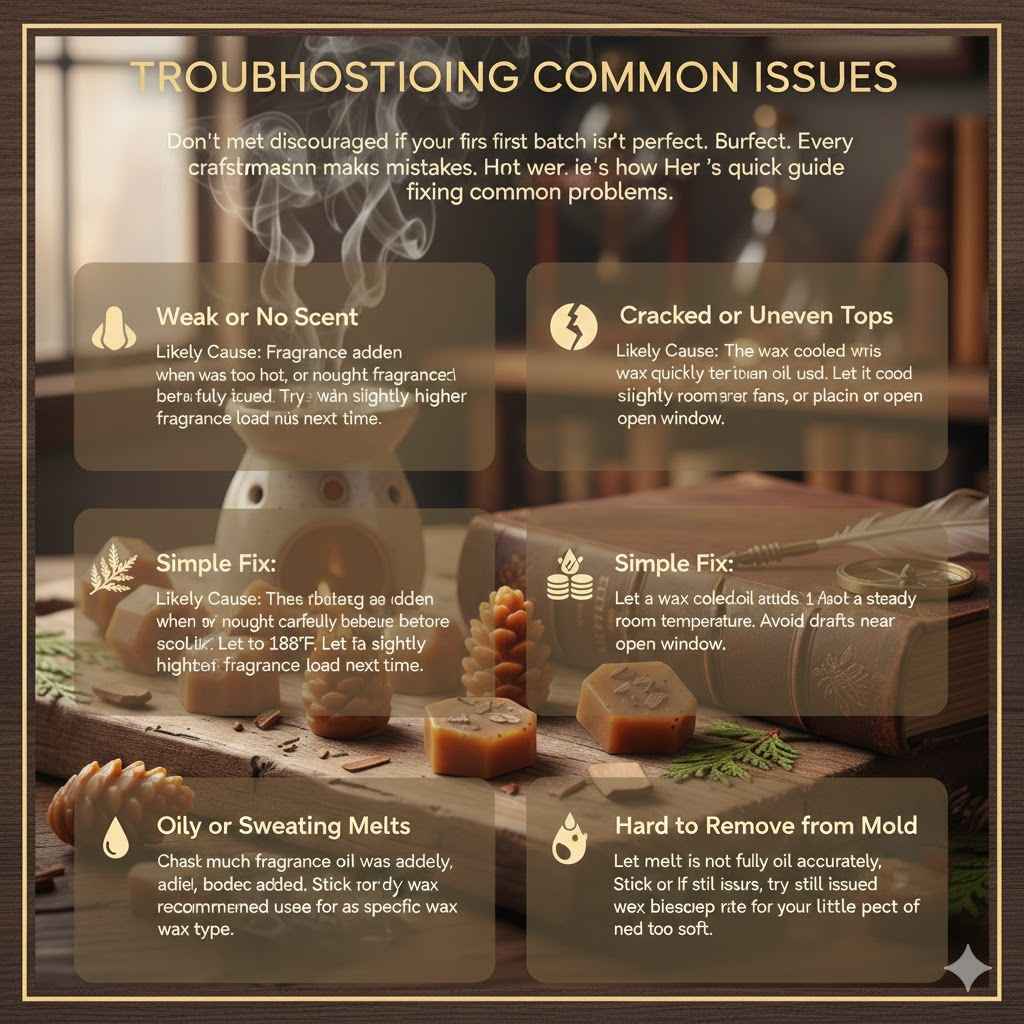
Troubleshooting Common Issues
Don’t get discouraged if your first batch isn’t perfect. Every craftsman makes mistakes. It’s how we learn! Here’s a quick guide to fixing common problems.
| Problem | Likely Cause | Simple Fix |
|---|---|---|
| Weak or No Scent | Fragrance added when wax was too hot, or not enough fragrance used. | Check your wax temperature carefully before adding oil. Let it cool to 185°F. Try a slightly higher fragrance load next time. |
| Cracked or Uneven Tops | The wax cooled too quickly. | Let your melts cool at a steady room temperature. Avoid drafts, fans, or placing them near an open window. |
| Oily or Sweating Melts | Too much fragrance oil was added. | Measure your oil accurately. Stick to the recommended usage rate for your specific wax type. |
| Hard to Remove from Mold | The melt is not fully cured, or the wax is too soft. | Let the melts harden for a few more hours. If it’s still an issue, try a wax blend with a bit of beeswax for added hardness. |
Frequently Asked Questions
How much essential oil should I use for wax melts?
A good starting point is a fragrance load of 6% to 10% by weight. For one pound (16 oz) of wax, this would be 1 to 1.6 ounces of essential oil. For beginners, I recommend starting with about 0.8 oz (or about 22 grams) of oil per pound of wax and adjusting from there.
Can I use cedar shavings from my workshop in the wax melts?
While it sounds like a lovely idea, adding raw wood shavings can be a fire hazard, even in an electric warmer, and they don’t release much scent. It’s safer to stick with a few dried botanicals or just enjoy the pure scent of the essential oil.
Why did my soy wax melts get a white, frosty coating?
This is called “frosting,” and it’s a very common, natural characteristic of 100% soy wax. It doesn’t impact the performance or scent of your melt at all. It’s just a sign that you are using pure, natural soy!
How long do homemade wax melts last?
When stored in a cool, dark place in an airtight container, your wax melts can keep their scent for over a year. Once you start melting one, the fragrance will typically last for 8-12 hours of use.
Can I use a microwave to melt the wax?
I strongly advise against it. Microwaves heat unevenly and can create dangerous hot spots, potentially scorching the wax or even causing a fire. The double boiler method is much safer and gives you far better control over the temperature.
What is the difference between essential oils and fragrance oils?
Essential oils are 100% natural, extracted directly from plants. Fragrance oils are synthetic and created in a lab. For a truly natural product that offers aromatherapy benefits, always choose pure essential oils.
Can I mix different types of wax together?
Yes, many professional candle makers create their own custom blends. For example, adding a small amount of beeswax to your soy wax can create a harder, longer-lasting melt. This is a more advanced technique to try once you’ve mastered the basics.
Bringing It All Together
There you have it. You’ve learned how to choose your materials, mix and melt with care, and pour your very own cedarwood wax melts. It’s a project that combines a little bit of science with a lot of craft, and the result is something that can bring warmth and comfort to your home.
Like any good woodworking project, the real joy comes from the process—the quiet focus, the transformation of simple materials, and the satisfaction of creating something beautiful and useful with your own two hands. So give it a try. Embrace the process, don’t worry about perfection, and soon you’ll be filling your space with a scent that is uniquely yours.