DIY Maple Tree Tap: The Best Proven Method
Making a DIY maple tree tap is simple: find a 6-inch elderberry or sumac branch, about 3/4-inch thick. Hollow out the soft pith from the center using a drill bit or a hot metal rod to create a tube. Taper one end to fit snugly into a drilled tap hole in the tree, and carve a notch on the other to hang a bucket.
Hello, friend! Md Meraj here. Have you ever stood in your backyard on a crisp late-winter day and wondered if you could make your own maple syrup? It’s a wonderful thought, isn’t it? Many people think it requires expensive, specialized gear, but I’m here to show you that’s not true. The heart of the whole process—the tap—is something you can make yourself with just a few simple tools. This project connects you directly to nature and ends with one of the sweetest rewards imaginable.
We’re going to walk through the best, time-tested method for crafting your own maple tree tap. Don’t worry, I’ll guide you through every single step. It’s easier than you think, and the pride you’ll feel is well worth it. Let’s get started!
Why Bother with a DIY Tap?
You might see shiny metal spiles (the official name for taps) for sale online and wonder why you should make your own. For a DIY enthusiast like us, the answer is about more than just function. It’s about the craft.
- Connection to Tradition: Making your own tap is how it was done for centuries. Using natural materials from the land connects you to the process in a deeper, more meaningful way.
- Affordability: This project is practically free! If you have a few basic tools, you can create effective taps without spending a dime.
- It’s a Great Skill: Learning to craft a simple, functional tool from a piece of wood is incredibly rewarding. It builds your confidence and teaches you basic woodworking principles you can use elsewhere.
- Sustainability: Using a fallen branch from your yard is the ultimate form of recycling. It’s a completely sustainable practice that leaves no waste.

First Things First: Understanding the Magic of Sap Flow
Before we grab our tools, let’s talk about why this even works. Maple syrup comes from maple sap, which is mostly water with a little bit of sugar. In the late winter and early spring, a magical thing happens in nature.
The trees need a specific weather pattern: nights that are below freezing (under 32°F or 0°C) and days that are above freezing (over 40°F or 4°C). This freeze-thaw cycle creates pressure inside the tree that pushes the sugary sap upwards from the roots. Our job is simply to place a tap in the right spot to catch a tiny fraction of this sap as it flows.
We aren’t hurting the tree. A healthy, mature maple tree produces a huge amount of sap, and we only collect a very small portion—like a person donating blood. The tree heals the small tap hole all on its own after we’re done.
When is the Perfect Time to Tap?
Timing is everything in maple sugaring. Tap too early, and the holes might start to heal before the main sap run. Tap too late, and you’ll miss it! The “sugaring season” typically lasts 4 to 6 weeks, but the exact timing depends on where you live.
The key is to watch the 10-day weather forecast. When you see a consistent pattern of freezing nights and warm, sunny days, it’s go-time. The sap stops flowing for good when the tree’s leaf buds begin to swell and open.
| Region | Typical Tapping Season |
|---|---|
| Southern New England / Mid-Atlantic (USA) | Late January to Mid-March |
| Northern New England / Upper Midwest (USA) & Southern Canada | Mid-February to Late March |
| Northernmost USA & Central/Eastern Canada | Early March to Mid-April |
Choosing the Right Tree: Is It a Maple?
This is the most important step! You need to correctly identify a maple tree. Tapping the wrong tree won’t yield sugary sap. Luckily, maples have some easy-to-spot features, even without their leaves.
Key Maple Tree Identifiers:
- Opposite Branching: This is your best clue in the winter. Look at a branch. The smaller twigs and branches growing off of it will be directly across from each other, in pairs. Most other trees have alternating branches that stagger up the branch. Remember the acronym MAD Horse: Maple, Ash, Dogwood, and Horse Chestnut trees have opposite branching.
- Bark: Sugar maples, the best for tapping, have gray, deeply grooved, and shaggy bark when they are mature. Red maples have smoother, grayer bark when young, which becomes more shaggy with age.
- Buds: Maple trees have sharp, pointed terminal buds (the bud at the very tip of a twig). Sugar maple buds are especially pointy, looking like tiny brown spears.
The best trees for tapping are Sugar, Red, or Silver Maples. The Penn State Extension offers a fantastic guide on identifying maple trees for beginners. Make sure your tree is healthy and at least 10-12 inches in diameter (about the size of a dinner plate) before you even think about tapping it.
Tools and Materials for Your DIY Tap
The beauty of this project is its simplicity. You don’t need a fancy workshop. Here’s all you’ll need to gather.
For Making the Tap:
- A Branch: The best choices are Elderberry or Staghorn Sumac branches. Both have a soft, spongy center (pith) that is very easy to hollow out. Look for a straight section about 3/4-inch to 1-inch in diameter.
- A Hand Saw: Any small handsaw will work to cut the branch to length.
- A Drill with a Long Bit: A 1/4-inch or 3/8-inch drill bit that is at least 6 inches long is perfect for hollowing the pith. Alternatively, a straightened wire coat hanger or a piece of metal rod heated over a fire can be used to burn out the pith (with proper safety precautions!).
- A Pocket Knife: For tapering one end and carving a notch.
- Sandpaper (Optional): To smooth any rough edges.
For Tapping the Tree & Collecting Sap:
- A Drill: Cordless is easiest, but a hand brace drill also works well.
- A Drill Bit: The size should match the diameter of your finished tap. A 7/16-inch or 1/2-inch bit is common.
- A Hammer or Mallet: To gently tap the spile into the tree.
- A Collection Container: A clean, food-grade plastic milk jug or bucket works perfectly.
- A Cover for Your Container: A simple piece of foil or a lid with a small hole will keep rain, debris, and insects out of your precious sap.
The Proven Method: Crafting Your Sumac or Elderberry Tap
Alright, let’s get to the fun part! This method has been used for generations because it’s simple and it works. We’ll turn that ordinary branch into a functional maple tap.
Step 1: Select and Cut Your Branch
Find a healthy, straight piece of elderberry or sumac. A section from last year’s growth is ideal. Using your handsaw, cut a piece that is about 5 to 6 inches long. Make sure the cuts are clean and straight.
Step 2: Hollow Out the Center Pith
This is the key step. The soft pith in the middle of these branches is what makes them perfect for this project. Firmly clamp your branch piece in a vise or hold it securely on a workbench.
Take your long drill bit and carefully drill straight down the center of the branch, from one end to the other. Go slowly and try to keep the drill bit centered. You are creating a hollow tube for the sap to flow through. If you don’t have a long bit, you can drill halfway through from one end, then flip it over and drill from the other to meet in the middle.
Traditional Method: If you’re feeling adventurous, you can use a hot metal rod. Heat a metal rod (like a straightened coat hanger) until it’s red hot, then carefully push it through the pith. It will sizzle and burn its way through, leaving a perfectly clean hole. Please do this outdoors and wear thick leather gloves for safety!
Step 3: Taper the “Tree End”
One end of your tap will go into the tree. We need to shape it so it fits snugly. Using your pocket knife, carefully whittle this end into a gentle taper, like you’re sharpening a pencil. Don’t make it too pointy—you want it to wedge securely into the drill hole. Taper it for about 1 inch. Periodically check it against the drill bit you plan to use for tapping the tree to ensure a good fit.
Step 4: Carve the “Bucket End”
The other end needs a way to hold your collection bucket. With your knife, carve a simple notch or hook shape on the top side of the tap, about half an inch from the end. This is where the handle of your milk jug or the wire bail of your bucket will hang.
Step 5: Clean and Finish
Blow through your finished tap to make sure it’s completely clear of any sawdust or debris. You can use a bit of sandpaper to smooth down the tapered end and the hook, but it’s not strictly necessary. That’s it! You’ve just made a traditional, functional maple tree tap. Make a few more so you can tap more than one tree.
| DIY Tap Material | Pros | Cons |
|---|---|---|
| Sumac / Elderberry Wood | – Completely free and natural – Easy to work with basic tools – Connects you to traditional methods | – Not as durable; may last only 1-2 seasons – Can be more difficult to clean and sanitize |
| Copper Tubing | – Very durable and long-lasting – Easy to clean and sterilize – Conducts cold, which some believe helps sap flow | – Requires purchasing materials – Needs a pipe cutter and more careful shaping |
| Food-Grade Plastic Tubing | – Inexpensive and widely available – Lightweight and easy to work with – Resists bacterial growth | – Less traditional feel – Can become brittle over time with UV exposure |
How to Tap Your Maple Tree (The Right Way)
Now that you have your beautiful handmade tap, it’s time to put it to work. Tapping the tree correctly is crucial for both getting sap and protecting the tree’s health.
Pick Your Spot
Find a healthy section of the trunk on the south or southwest side of the tree if possible, as this side warms up first in the sun. Look for an area with no old tap holes, cracks, or dead branches above it.
Drill the Hole
Using the drill bit that matches your tap’s diameter (e.g., 7/16″), drill a hole into the tree. The hole should be about 1.5 to 2 inches deep. Drill at a slight upward angle. This ensures that the sap will flow downhill and out of the tap. As you drill, you should see light-colored, healthy wood shavings. If the shavings are dark, that spot is not healthy—try another location.
Insert Your Tap
Take your DIY wooden tap and place the tapered end into the freshly drilled hole. It should fit snugly. Use your hammer or mallet to give it a few gentle taps—just enough to seat it firmly. Do not hammer it in hard! This can crack the wood and damage the tree. You want a snug fit that prevents leaks, but you should still be able to pull it out by hand at the end of the season.
Hang Your Bucket
You might see a drip of sap almost immediately! Hang the handle of your milk jug or bucket on the notch you carved. Place a cover over the top to keep out rain and twigs. Now, you wait for nature to do its work.
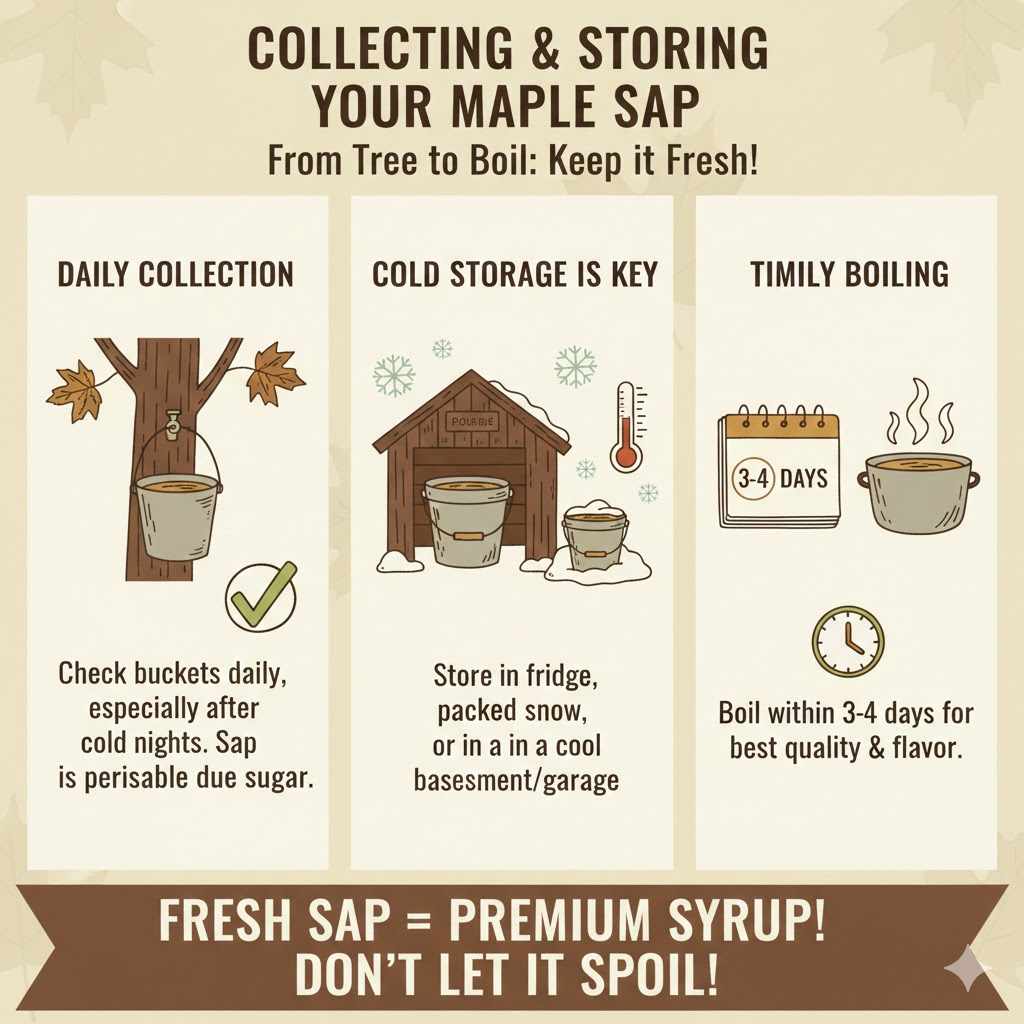
Collecting and Storing Your Sap
Check your buckets daily, especially on warm days after a cold night. Sap is perishable, much like milk, because of its sugar content. It can spoil if left out for too long in warm temperatures.
- Collect the sap every day.
- Store it in a cold place, like a refrigerator or packed in snow, until you have enough to boil. A large food-grade bucket in a cool garage or basement works well.
- Aim to boil your sap into syrup within 3-4 days of collection to ensure the best quality and flavor.
Frequently Asked Questions (FAQ)
1. Does tapping hurt the maple tree?
When done correctly on a healthy, mature tree, tapping is not harmful. The small hole is comparable to a minor wound that the tree easily heals and compartmentalizes (seals off) within a year. It is important to never tap a tree that is too small (under 10 inches in diameter) or appears unhealthy.
2. How much sap can I get from one tap?
This varies greatly depending on the weather, the tree, and the time of season. On a good day, a single tap can produce a gallon or more of sap. Over a whole season, you might collect anywhere from 10 to 20 gallons of sap per tap.
3. Can I use the same tap hole next year?
No, you must never use the same tap hole again. The tree will have already started the healing process. Always drill a new hole each season, moving at least 6 inches horizontally and 2 inches vertically away from any old tap holes.
4. What should the sap look like?
Fresh maple sap should be crystal clear, just like water. It has a very faint, sweet taste. If your collected sap ever looks cloudy, ropey, or smells off, it has begun to spoil and should be discarded.
5. What’s the ratio of sap to syrup?
The general rule of thumb for Sugar Maples is about 40 to 1. This means you need to boil down 40 gallons of sap to produce just 1 gallon of finished maple syrup. For other maples like Red or Silver Maples, the ratio can be closer to 60 to 1 because their sap has a lower sugar content.
6. How do I know when to stop collecting sap?
The season ends when the weather stays consistently above freezing and the tree’s leaf buds start to swell and break open. The sap will turn a yellowish color and develop an “off” or “buddy” flavor, which makes for poor-tasting syrup. At this point, gently remove your taps from the tree. There is no need to plug the holes.
7. Can I tap a maple tree in my yard?
Absolutely! As long as it is a maple tree (Sugar, Red, or Silver are best), is healthy, and meets the size requirement (at least 10 inches in diameter), it’s a perfect candidate for backyard sugaring.
Your Journey into a Sweet Hobby
There you have it—a complete guide to crafting and using your very own maple tree tap. This project is so much more than just a way to get syrup. It’s a chance to slow down, work with your hands, and connect with the rhythm of the seasons right in your own backyard.
Seeing that first clear drop of sap drip from a tap you made yourself is a truly magical moment. And when you finally pour that rich, amber syrup—made entirely by you—over a stack of pancakes, you’ll know it was worth every bit of effort. So get out there, find a branch, and give it a try. I know you can do it!