
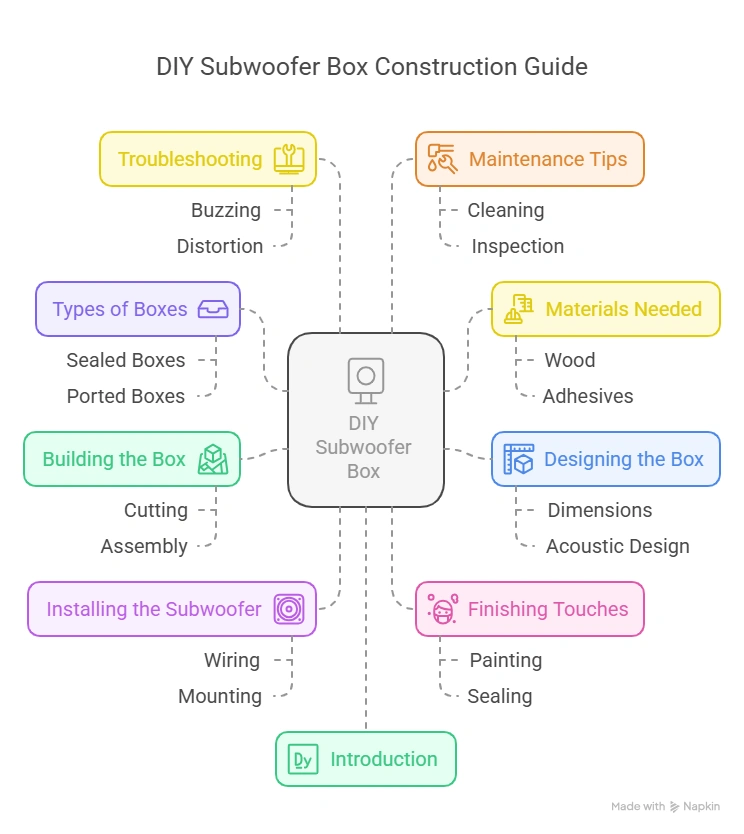
DIY Subwoofer Box: Ultimate Guide to Boost Your Bass
Building your own subwoofer box is both fun and rewarding. It can also improve your sound system.
Creating a DIY subwoofer box lets you customize your audio experience. You can build it to fit your specific needs and space. Whether you want deeper bass or a better fit in your car, making your own box gives you full control.
Plus, it’s a great project for those who love hands-on work. In this guide, we will explore the steps to create your own subwoofer box. You’ll learn what materials to use and how to assemble them. Get ready to enhance your sound system with a subwoofer box you built yourself.
Introduction To DIY Subwoofer Box
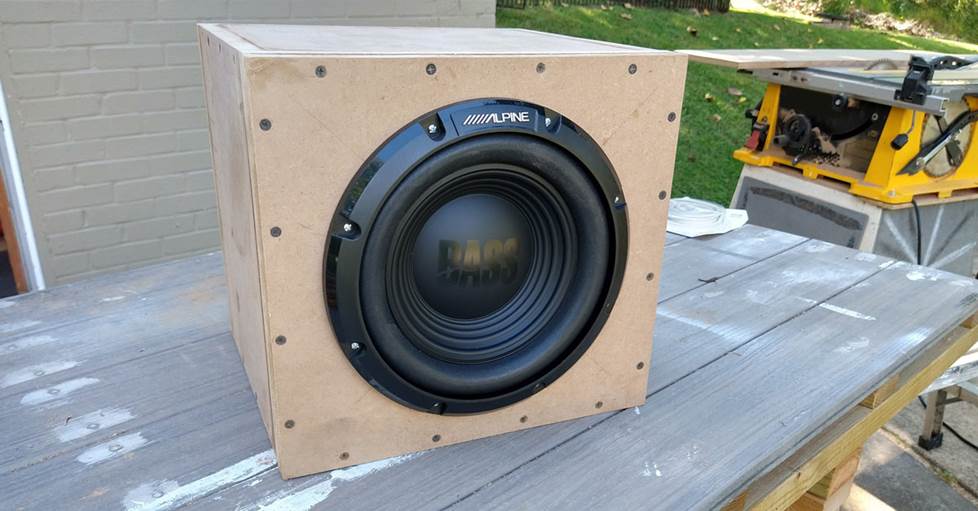
A subwoofer box is important for your audio system. It enhances sound quality. A good box makes the bass sound deeper and richer. Without a box, the subwoofer may not work well. The sound can be weak or unclear. A well-built box supports the subwoofer. It prevents damage and improves performance. A strong box is key to a great listening experience.
Building your own subwoofer box saves money. You can customize it to fit your needs. Choose the size, shape, and materials. It is a fun project. You learn new skills. You get to control the quality. A custom box can match your car or room decor. DIY projects give a sense of achievement. Enjoy the process and the results.
Credit: www.crutchfield.com
Types Of Subwoofer Boxes
Sealed boxes are airtight. They produce tight and accurate bass. They are simple to build. Ideal for small spaces. Bass sounds clean and controlled. Perfect for music lovers.
Ported boxes have holes or ports. They produce loud and boomy bass. They are larger than sealed boxes. Ideal for big spaces. Bass sounds rich and deep. Perfect for home theaters.
Bandpass boxes have two chambers. They produce very loud bass. They are complex to build. Ideal for car audio. Bass sounds powerful and punchy. Perfect for bass enthusiasts.
Materials Needed
Wood or MDF are the main materials. MDF is smooth and easy to cut. It provides a solid structure for your subwoofer box. Plywood is another option. But MDF is more popular.
You will need a saw, screws, and a drill. A tape measure is crucial for accurate cuts. Wood glue helps in sealing joints. Clamps keep parts in place while drying.
Foam or polyester fiber helps in sound absorption. These materials reduce vibrations. Speaker terminals are needed for wiring. They ensure good sound quality. Damping material can also improve sound.
Designing Your Subwoofer Box
Measure the space where the box will go. Write down the width, height, and depth. Use a ruler or measuring tape. Make sure to measure twice for accuracy. Proper measurements ensure a good fit.
Volume is important for sound quality. Calculate the volume by multiplying width, height, and depth. Use a calculator if needed. Volume affects how your subwoofer performs. Keep this in mind while designing.
Different designs have different benefits. Sealed boxes are compact and offer tight bass. Ported boxes are larger but louder. Choose the design based on your space and sound needs. Consider your music style too.
Building The Box
Measure the wood carefully. Mark each panel size. Use a saw for straight cuts. Double-check your measurements. Accuracy is important. Sand the edges smooth. This helps with fitting.
Lay out all the panels. Apply wood glue to the edges. Join the panels together. Use clamps to hold them. Let the glue dry fully. Screw the panels for extra strength. Check for gaps and fix them.
Use caulking to seal the inside edges. This stops air leaks. Add braces inside the box. Braces make the box stronger. Secure them with glue and screws. This improves sound quality. Let everything dry well.
Installing The Subwoofer
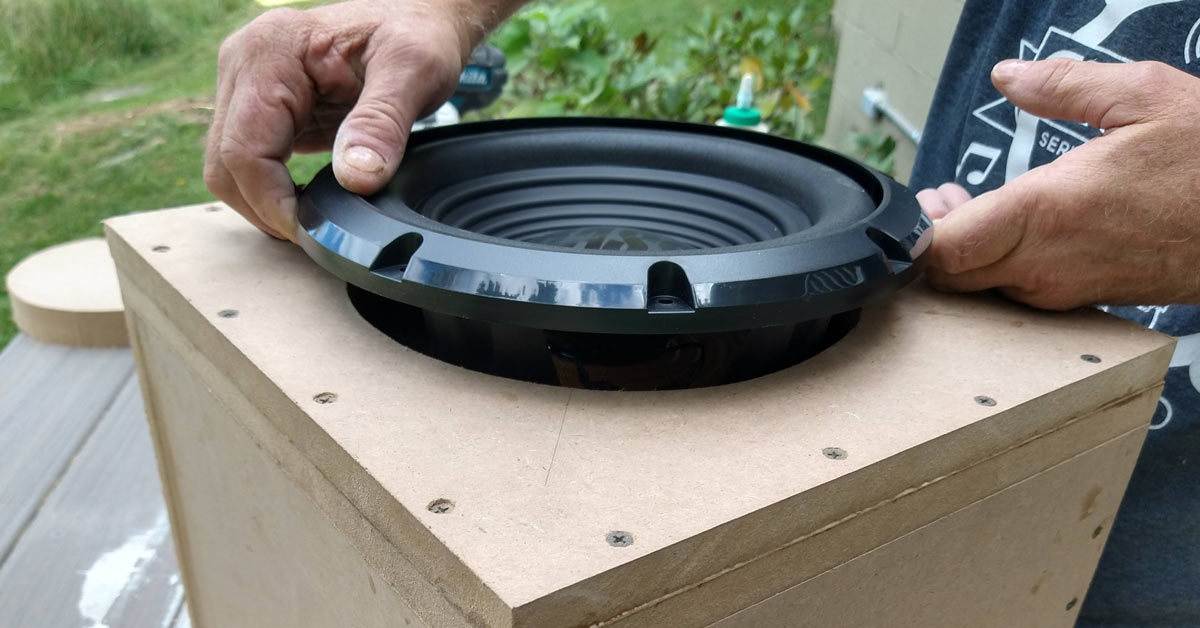
Place the subwoofer in the box. Align the holes with the box. Use screws to secure the subwoofer. Tighten each screw firmly but not too tight. This will keep the subwoofer in place.
Connect the wires to the subwoofer terminals. Red wire to the positive terminal. Black wire to the negative terminal. Ensure connections are tight. Loose wires can cause issues. Double-check the connections before moving on.
Play some music with bass. Listen for air leaks around the subwoofer. Seal any leaks with silicone. Sealing ensures the best sound quality. Test again after sealing. The sound should be clear and deep.
Finishing Touches
First, sand the surface of the box. Ensure it is smooth. This helps the paint or stain stick well. Next, apply a primer. Let it dry completely. Choose a color that matches your room. Apply the paint or stain evenly. Let it dry between coats. This will give a professional look.
Measure the box. Cut the carpet or vinyl to fit. Use a strong adhesive. Apply it to the box. Place the carpet or vinyl on the adhesive. Press firmly. Make sure there are no bubbles. Trim any extra material. This adds a nice finish and protects the box.
Grills protect the speaker. Choose a grill that fits your subwoofer. Attach it with screws or clips. Covers can be added for extra protection. These keep dust away. Make sure everything is secure. This will keep your subwoofer safe and sound.

Credit: www.youtube.com
Troubleshooting Common Issues
Check for loose screws or parts. Tighten everything carefully. Use foam tape or rubber gaskets to reduce vibrations. Make sure the subwoofer is secure in its box. Check the box for cracks or damage. Fix or replace damaged parts.
Ensure all connections are tight. Poor connections can affect sound. Check the wiring for any breaks or damage. Replace any bad wires. Adjust the amplifier settings. Sometimes, minor tweaks make a big difference.
Upgrade to better quality wires. Better wires improve sound. Use sound-deadening materials inside the box. This reduces unwanted noise. Properly seal the box. A well-sealed box improves bass. Place the subwoofer in the best spot in your room. Experiment with different locations.
Maintenance Tips
Check the box for cracks. Look for loose parts. Make sure wires are secure. Inspect the subwoofer regularly. Keep an eye on the box.
Dust the box often. Use a soft cloth. Avoid harsh chemicals. Clean the box gently. Keep it free of dirt. Regular cleaning helps.
Store the box safely. Avoid dropping it. Keep it away from moisture. Protect it from bumps. Use covers if needed. Handle with care.
Credit: www.crutchfield.com
Frequently Asked Questions
What Is The Best Material To Make A Subwoofer Box?
The best material for a subwoofer box is medium-density fiberboard (MDF). It provides excellent sound quality and durability.
Is Plywood Or Mdf Better For Sub Box?
Plywood is better for sub boxes due to its durability, resistance to moisture, and overall strength compared to MDF.
Can I Build My Own Subwoofer Box?
Yes, you can build your own subwoofer box. Ensure you use quality materials and follow precise measurements for optimal sound quality.
How Can I Make My Subwoofer Box Sound Deeper?
To make your subwoofer box sound deeper, ensure it’s properly sealed and constructed. Use a larger enclosure. Add internal bracing for reduced vibrations. Install sound-damping materials inside the box. Optimize port tuning for lower frequencies.
Conclusion
Building your own subwoofer box is a fun project. It saves money and lets you customize. Follow the steps carefully for the best sound. Choose quality materials for durability. Measure twice, cut once to avoid mistakes. Enjoy the deep, rich bass from your DIY subwoofer.
Share your experience with friends. Encourage them to try it too. Happy building!