Homemade Wood Kiln Dehumidifier: Efficient DIY Drying Solution
Drying wood at home can be a challenge. A homemade wood kiln dehumidifier offers a practical solution.
This method helps to control moisture in wood, making it ready for various projects. Wood needs to be dry before you work with it. Moist wood can warp or crack over time. Traditional drying methods may take too long or be too costly.
A homemade wood kiln dehumidifier can speed up the process. It is efficient and cost-effective. This method allows you to dry wood at home, ensuring it is ready when you need it. By using a dehumidifier, you can maintain the right conditions for drying wood. This ensures better quality and durability. Read on to learn more about setting up your own wood kiln dehumidifier.
Introduction To Wood Kiln Dehumidifiers
Dehumidifying wood helps prevent warping and cracking. It makes wood stronger and more durable. Proper drying also reduces the risk of mold and fungus. Dehumidified wood is lighter and easier to work with. Your projects will look better and last longer.
Building a homemade wood kiln dehumidifier can save money. It allows you to customize the size and features. A homemade solution can be more sustainable and use recycled materials. You have the freedom to improve and adjust it over time. Learning to build it yourself can be a fun and rewarding project.
Credit: www.woodworkersjournal.com
Materials Needed
Gather materials like a dehumidifier, plastic sheeting, a fan, and wood racks to create a homemade wood kiln dehumidifier. Ensure proper ventilation to optimize drying efficiency.
Essential Tools
You will need a few essential tools. A drill is important for making holes. A saw helps cut the wood. A screwdriver is used for fastening screws. You also need a tape measure for precise measurements. A level ensures your structure is straight.
Required Equipment And Supplies
Gather wood for the kiln structure. You will need screws to hold everything together. Insulation material keeps the heat in. A dehumidifier is key to removing moisture. Plastic sheeting helps seal the kiln. Finally, you need ventilation pipes for air circulation.
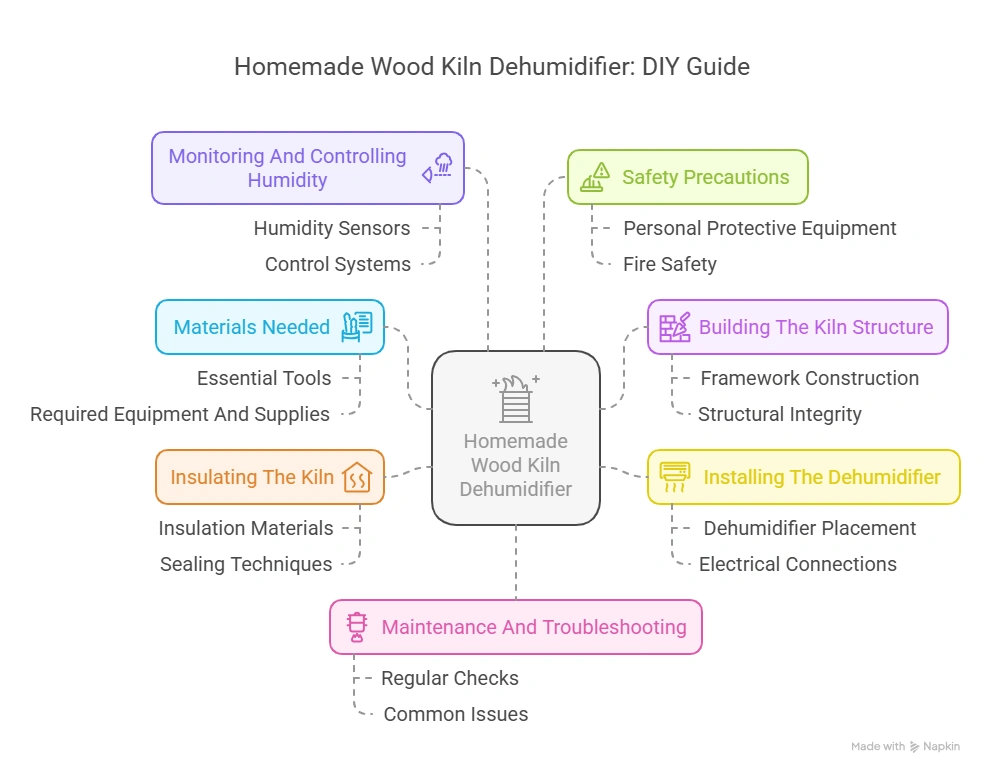
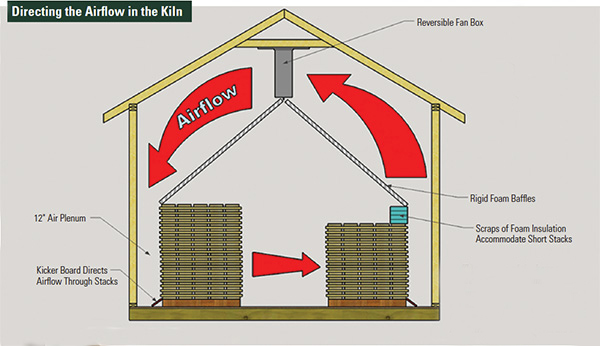
Building The Kiln Structure
Pick a dry spot for your wood kiln. Avoid wet areas. Damp places can hurt your kiln. Make sure the location is flat. This helps in building. Check the space. It should be big enough. Think about the weather. Rain can damage your kiln. Choose a sunny area. Sunlight helps in drying wood. Keep away from fire hazards. Safety is important.
Start with the base. Use strong wood. It must hold the weight. Measure the wood carefully. Cut the pieces to size. Join the pieces with screws. Make sure it’s sturdy. Add vertical posts. These will support the roof. Use level tools. Keep everything straight. Add cross beams. They give extra support. Check stability. The frame should not wobble. Finish the frame before moving on.
Installing The Dehumidifier
Choosing the right dehumidifier is crucial. Look for one that can handle your wood kiln size. Check the capacity and efficiency. A larger kiln needs a more powerful dehumidifier. Make sure it has adjustable settings. This allows you to control the humidity levels. Read reviews to find a reliable model. Select a unit that is easy to install and maintain. Ensure it has safety features like auto shut-off.
Place the dehumidifier inside the kiln. Position it in the center for even moisture removal. Ensure there is enough space around it. This helps air circulate properly. Connect the power supply securely. Set the desired humidity level. Monitor the settings regularly. Keep the unit clean and free of dust. This ensures it works efficiently. Regular maintenance will prolong its life.
Insulating The Kiln
Different insulation types work for wood kilns. Fiberglass is common. It is cheap and easy to install. Another option is foam board insulation. It is more expensive but works very well. Reflective insulation is another choice. It reflects heat back into the kiln. This keeps the inside warm.
Always measure your kiln first. Cut insulation to fit snugly. Use a sharp knife for clean cuts. Wear gloves to protect your hands. Attach insulation with screws or adhesive. Seal any gaps with tape. This will keep the heat inside. Make sure the door seals well. Check for leaks often. Replace any damaged insulation quickly.

Credit: www.youtube.com
Monitoring And Controlling Humidity
Hygrometers help you track the humidity levels. Place them inside the kiln. Check the readings often. Aim for a steady level. Fluctuations can harm the wood. Keeping an eye on humidity is crucial. Good monitoring ensures quality drying.
Set the dehumidifier to the right level. Too high or too low can be bad. Adjust the settings based on the hygrometer readings. Balance is key. Regular adjustments are needed. This helps in maintaining the wood’s integrity. Proper settings save time and energy.
Safety Precautions
Ensure the kiln has proper ventilation. Fresh air must flow in and out. This prevents heat buildup and dangerous gases. Place the kiln in a well-ventilated area. Open windows or use fans if needed. Avoid closed spaces to reduce risks.
Inspect all wires and connections before use. Look for any damaged cables. Replace them if found. Never overload circuits. Use a dedicated outlet for the kiln. Keep water away from electrical parts. Dry hands before touching any switches. Unplug the kiln when not in use. Use a surge protector to prevent damage.

Credit: www.reddit.com
Maintenance And Troubleshooting
Keep the kiln clean. Remove dust and debris. Check for any loose parts. Tighten screws and bolts. Inspect the dehumidifier. Ensure it is working well. Clean the filter regularly. Replace it if needed. Look for any leaks. Seal them quickly. Monitor the temperature. Adjust settings as needed. Maintain proper airflow. Clear any blockages.
If the kiln is not drying properly, check the dehumidifier. It might need cleaning or repair. Strange noises could mean loose parts. Tighten them to fix. Uneven drying can happen if airflow is blocked. Clear any obstructions. Leaks may occur in seals. Use sealant to fix them. If temperature is unstable, check the thermostat. Replace it if faulty. Monitor the wood. Make sure it is stacked well.
Frequently Asked Questions
How To Make A Homemade Kiln To Dry Wood?
Build a wooden frame and insulate it. Install a heat source and fan for air circulation. Monitor temperature and humidity.
How To Quickly Remove Moisture From Wood?
Use a dehumidifier or fan to speed up drying. Place wood in a well-ventilated area. Apply a moisture absorber.
How To Make A Diy Dehumidifier?
Create a DIY dehumidifier using a container with holes, filled with silica gel or rock salt. Place it in humid areas.
Will A Dehumidifier Dry Out Wood?
Yes, a dehumidifier can dry out wood. It reduces humidity levels, preventing wood from absorbing moisture and promoting drying.
Conclusion
Creating a homemade wood kiln dehumidifier can be a fulfilling project. It saves money and ensures well-dried wood. The process might seem complex, but with patience, you can succeed. Follow the steps carefully. Your wood will be ready for any project.
Enjoy the benefits of your hard work. Happy woodworking!