DIY Seating Bench: Simple Build Plan for Any Skill Level
A DIY seating bench built from standard 2×4 and 2×6 lumber costs under $40 in materials and needs only a saw, drill, and exterior wood screws — no advanced joinery required. Skipping pilot holes is the top reason beginner benches split at the legs. This guide covers cutting, assembling the frame, and a finish that survives outdoor weather.
Introduction To DIY Seating Bench
Best Exterior Wood Finish Pick
 |
Minwax Helmsman Indoor/Outdoor Spar Urethane, Quart, SatinMinwax | Our pick | $23.49
Price as of 20 Oct 2026
|
View |
The real cost gap between a basic 2×4-frame bench and a store-bought equivalent isn’t the wood — it’s the labor and design markup retailers charge for something you can build in an afternoon. A simple frame-and-seat bench, sized to your exact entryway or garden spot rather than whatever standard size a store carries, uses lumber that’s readily available at any home center and needs no joinery more advanced than butt joints, screws, and glue. That simplicity is also what makes it a genuinely approachable first build for someone who’s never framed anything before.
Materials And Tools Needed
Gather wood, screws, and sandpaper for your DIY seating bench. Basic tools like a saw, drill, and measuring tape are essential.
Essential Materials List
2x4s work for the legs and frame, and 2x6s (or a few 2x4s edge-glued together) make a solid seat surface without needing a wider, pricier board. Exterior-rated wood screws hold up outdoors far longer than interior screws, which corrode and stain the wood around the screw head within a season or two of rain exposure. Wood glue at the joints adds real shear strength beyond what screws alone provide, and clamps are what let that glue actually cure under pressure instead of just sitting loosely mated while it sets.
Recommended Tools
A circular saw or miter saw for square, accurate crosscuts, a drill/driver for pilot holes and driving screws, and 120-150 grit sandpaper for breaking the sharp edges that otherwise catch clothing and splinter fingers are really the core kit. A speed square is worth having specifically for marking 90-degree cut lines quickly and accurately — freehand marking is where most beginner cutting errors start.
Design And Planning
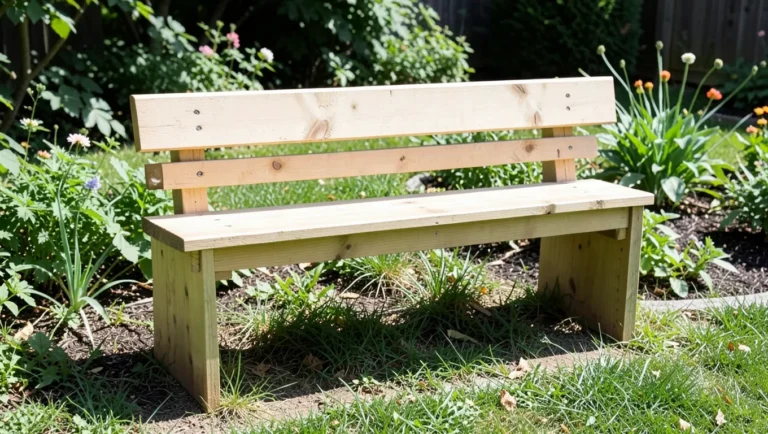
A backrest turns a bench from a place you perch on briefly into one you’d actually sit at for a while — worth the extra lumber and cut angle if the bench is going somewhere people linger (a porch, an entryway you put shoes on at), less necessary for a purely utilitarian spot. Seat height matters more than most first-time builders think about: 17-18 inches matches a standard dining chair and feels natural, while going much lower reads as a low bench or ottoman-style seat instead.
Measure the actual space the bench will occupy, not just a rough guess, and leave at least a foot of clearance on the sides people will walk past regularly — a bench that fits the wall length exactly but leaves no walking room ends up in the way daily. Sketching the frame dimensions on paper first, with each board’s length labeled, turns the cut list in the next section from guesswork into a simple shopping list.
Cutting And Preparing Materials
Cut every piece from your sketch’s dimensions before assembling anything — measuring and cutting as you go tends to compound small errors, since a slightly-off leg length throws off the next measurement that’s referenced from it. Mark each cut line with a speed square rather than eyeballing it, and cut just outside the line rather than exactly on it, since a saw kerf removes roughly 1/8″ of material that adds up across several cuts if you’re not consistent about which side of the line the blade runs on.
Work through the grits in order — 120 to knock down mill marks and rough spots, then 150 or 220 for a finish-ready surface — rather than jumping straight to fine sandpaper, which won’t remove the deeper scratches a coarser grit leaves behind. Pay particular attention to the seat’s top edges and corners: rounding them slightly with sandpaper (rather than leaving a sharp 90-degree edge) is what keeps the bench comfortable against the back of someone’s legs and prevents the edge from splintering under regular use.
Assembling The Bench Frame
Screws and wood glue hold a bench frame together far better than nails alone — a screw’s threads resist the joint pulling apart under load the way a smooth nail shank can’t, and glue adds shear strength across the whole joint face rather than just at the fastener points. Dry-fit the frame first (assemble it without glue, check that it’s square by measuring corner to corner in both directions) before committing glue to any joint, since a squeeze-out mess is much easier to prevent than to clean up after the fact.
Once glued and screwed, a frame that still racks side to side under gentle pressure needs a diagonal brace, not just more fasteners in the same joints — fasteners resist the joint pulling apart, but they don’t inherently resist the whole rectangle deforming into a parallelogram under lateral load the way a diagonal brace does. Pre-drilling pilot holes before driving screws, especially near the ends of a board, is what actually prevents the classic beginner mistake of the screw splitting the wood outright.
Adding The Seat And Backrest
Screw the seat boards down from underneath where possible, driving up through the frame’s top rail into the seat boards, rather than through the top face — it leaves no visible screw heads on the sitting surface, which is both more comfortable and better-looking. If underneath access is too tight to drive screws that way, countersinking screws slightly below the surface on top and filling the holes with wood filler achieves a similar clean look.
A backrest carries real leaning force, so it needs a more robust connection than the seat does — through-bolts or at minimum longer screws with glue at each upright, rather than short screws alone, since a backrest that works loose over time under repeated leaning becomes both wobbly and a fall risk. Setting the backrest at a slight rearward angle (5-10 degrees off vertical) rather than perfectly upright makes a real difference in comfort for anything more than brief sitting.
Finishing Touches
Whether the bench lives indoors or out should decide the finish, not just the color: an indoor-only bench can use interior polyurethane or paint, but a bench that sits outside needs an exterior-rated spar urethane like the pick above, since interior finishes lack the UV blockers and flexibility to handle direct sun and temperature swings without cracking and peeling within a season. Two thin coats, sanding lightly between them with fine sandpaper, build a more durable, even film than one heavy coat does — the same principle that applies to floor refinishing applies here at a smaller scale.
Outdoor cushions specifically rated for UV and moisture resistance (rather than repurposed indoor cushions) hold their color and don’t mildew the way indoor fabric does when it’s left out through humidity and rain. If the bench sits somewhere it gets rained on directly, a cushion storage solution — a lidded bench with hinged storage underneath, or simply bringing cushions in when not in use — extends their life considerably longer than leaving them out permanently.
Maintenance And Care Tips
A quick wipe-down with a soft cloth handles routine dust, and a mild soap-and-water rinse (followed by full drying, not left damp) removes grime without stripping the finish. For an outdoor bench specifically, checking the finish once a season and recoating at the first sign of the wood graying or the film starting to look dull catches wear before bare wood is exposed to weather — recoating early is far less work than sanding back a fully failed finish later.
Surface scratches sand and refinish out easily; deeper gouges need wood filler first, sanded flush once cured, before refinishing over the repair. Loose screws are worth checking specifically at the backrest connection and any joint that sees repeated lateral stress from people leaning or shifting weight — those loosen well before the seat joints typically do, since they carry more variable directional load.
Showcasing Your Finished Bench
An entryway bench does double duty as a practical landing spot for putting on shoes and a first impression for anyone walking in, which is why it’s worth the extra step of a backrest and cushion even for a spot people only sit at briefly. Placed under a window, it also puts natural light on whatever detail work (stain color, joinery) went into building it, rather than tucking the bench into a dim corner where that effort doesn’t show.
Outdoors, the same bench works differently depending on where it lands: near a garden bed or a pond, it becomes a spot people actually sit and linger; on a covered porch, it needs less weather protection than one sitting fully exposed in a backyard. An umbrella or a spot under existing shade cuts down on both direct sun fading the finish and the surface getting too hot to sit on comfortably in peak summer.
Frequently Asked Questions
How Much Does It Cost To Build Bench Seating?
A basic frame-and-seat bench built from 2×4 and 2×6 lumber, screws, and glue typically costs under $40 in materials. Cost climbs from there with upgrades: hardwood instead of construction lumber, outdoor cushions and fabric, or a built-in storage compartment can push a fully finished, furnished bench into the $150-300+ range.
What Is The Best Fabric For Diy Bench Cushion?
The best fabric for DIY bench cushions is durable, water-resistant, and easy to clean. Consider using outdoor fabrics like Sunbrella.
How To Make Outdoor Bench Seating?
To make outdoor bench seating, gather materials like wood, screws, and a saw. Measure and cut the wood. Assemble the frame and seat. Sand and paint or stain the bench. Secure the bench in your desired location. Enjoy your new outdoor seating!
What Angle Should A Bench Seat Back Be?
The ideal bench seat back angle is 100 to 110 degrees. This provides optimal comfort and support.
Conclusion
A simple 2×4-frame bench is a genuinely forgiving first build — butt joints, screws, and glue leave little room for the kind of mistakes that ruin more advanced joinery, and the low materials cost means a miscut board is a minor setback rather than a wasted investment. Get the frame square, glue and screw every joint rather than relying on nails alone, and finish it to match where it’s actually going to live, and it’ll outlast most store-bought benches at a fraction of the price.
Sponsored / affiliate links. As an Amazon Associate I earn from qualifying purchases. I may earn additional commission from eligible campaigns.