How Do You Clean Wooden Decking? Essential Guide
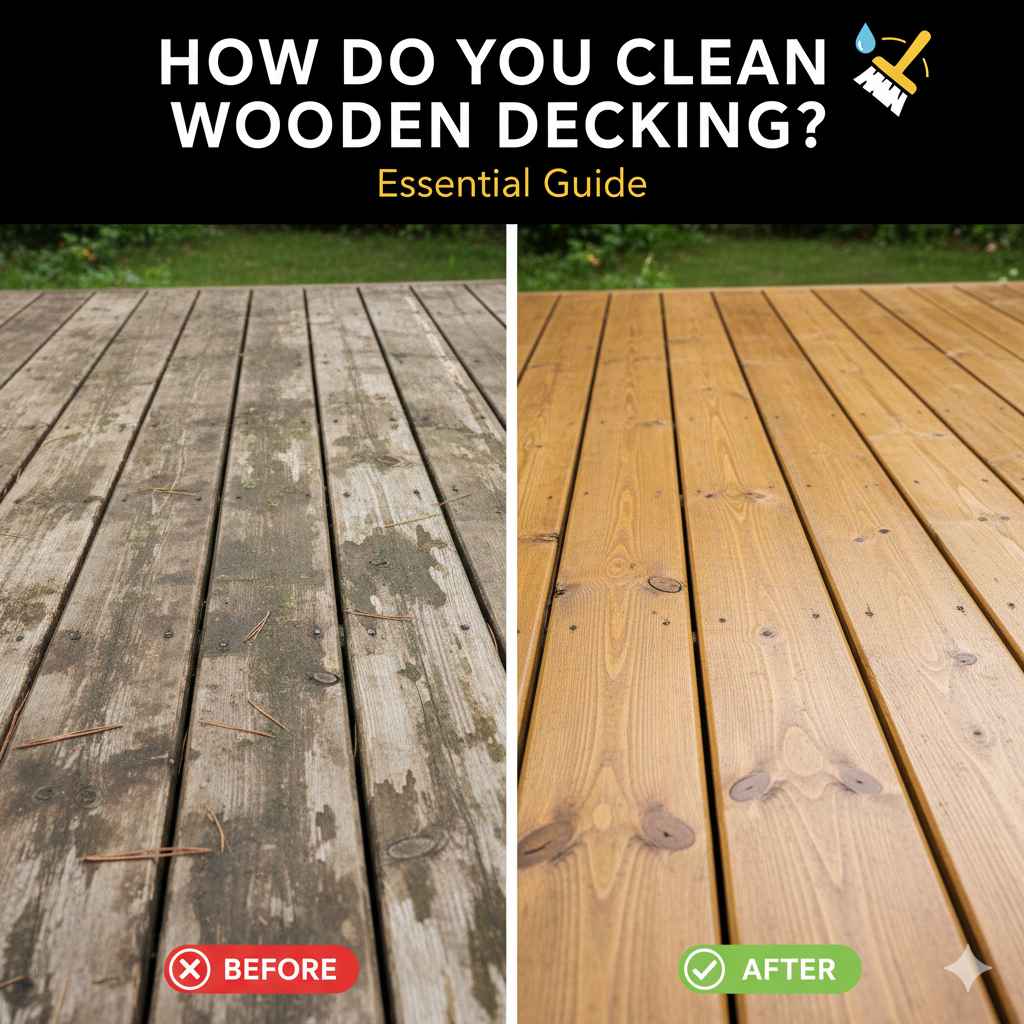
To clean wooden decking effectively, start by sweeping away debris. Then, choose a deck cleaner suitable for wood type (mild soap for regular upkeep, oxygen bleach for tougher stains, or specialized deck cleaners). Apply, scrub gently with a soft brush, rinse thoroughly, and allow to dry completely before sealing. Regular cleaning prevents damage and keeps your deck looking great.
Hello there! As your woodworking mentor, Md Meraj, I know how frustrating it can be to see your beautiful wooden deck lose its shine. Grimy surfaces, stubborn stains, and the worry of damaging the wood can make you hesitant to even step outside. But don’t let that stop you from enjoying your outdoor space! Cleaning your wooden deck is simpler than you might think, and with the right approach, you can make it look revitalized and protect your investment.
This guide is here to break down the process into easy, manageable steps. We’ll cover everything you need to know, from gathering your supplies to the best cleaning methods for different situations. Get ready to transform your deck from dull to dazzling!
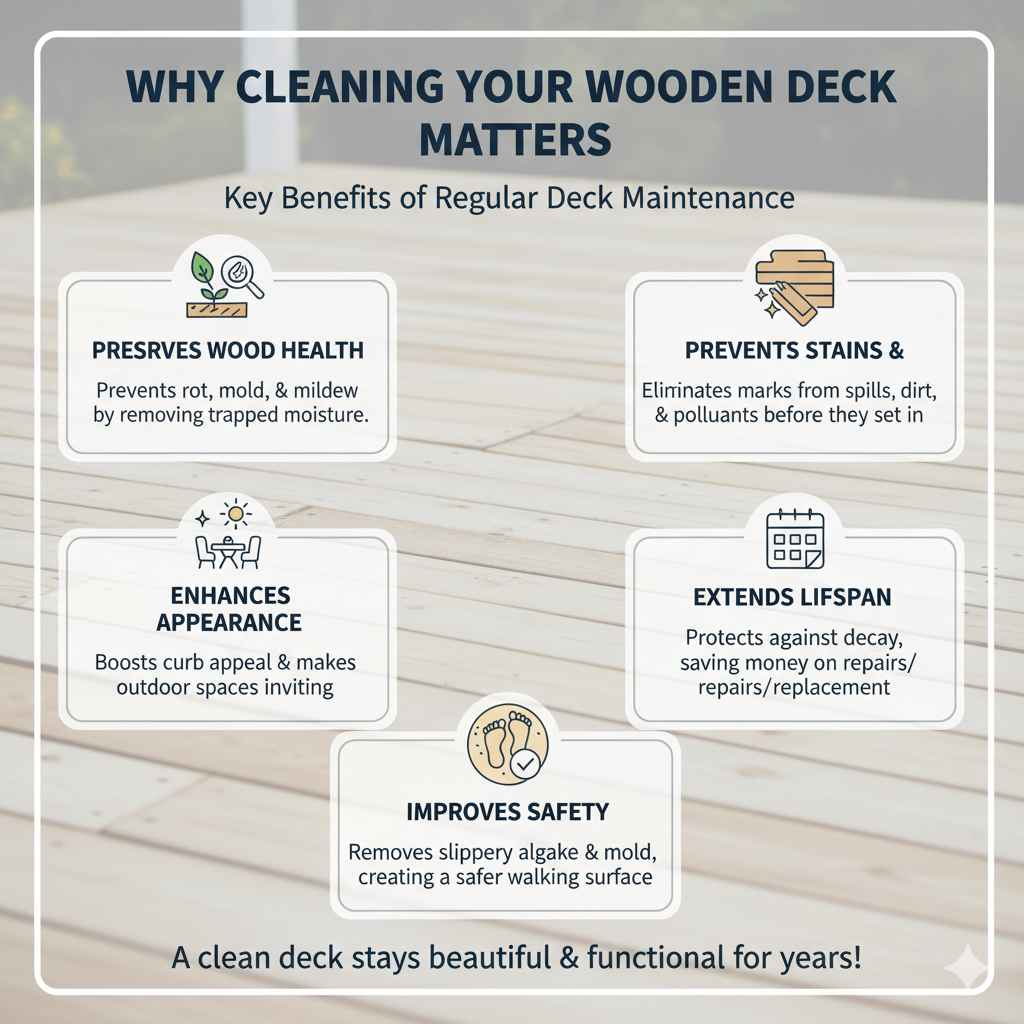
Why Cleaning Your Wooden Deck Matters
Your wooden deck is a wonderful extension of your home, a place for relaxation, gatherings, and enjoying the outdoors. However, it’s constantly exposed to the elements. Rain, sun, fallen leaves, dirt, and even algae and mold can take their toll. Left unaddressed, this buildup can not only make your deck look unsightly but also lead to more serious problems.
Here’s why regular cleaning is essential:
- Preserves Wood Health: Organic debris like leaves and dirt can trap moisture. This moisture can lead to rot, mold, and mildew growth, which weaken the wood over time.
- Prevents Stains and Discoloration: Spills, pet waste, and airborne pollutants can leave unsightly marks. Regular cleaning helps remove these before they set in.
- Enhances Appearance: A clean deck looks inviting and can significantly boost your home’s curb appeal. It makes outdoor entertaining much more pleasant.
- Extends Lifespan: By preventing decay and damage, regular maintenance, including cleaning, directly contributes to your deck lasting longer, saving you money on repairs or premature replacement.
- Improves Safety: Slippery mold and algae can make your deck hazardous. A clean surface is a safer surface for everyone.
Think of it like this: your deck is a proud part of your home’s exterior. Just like you wouldn’t let your interior rooms become cluttered and dusty, giving your deck a good clean will ensure it stays beautiful and functional for years to come.
When and How Often Should You Clean Your Deck?
The frequency of deck cleaning depends on several factors, including your climate, the amount of shade your deck receives, and how much it’s used. However, here’s a general guideline to keep your deck in top shape:
- Deep Cleaning: Once or Twice a Year. The best times for a thorough cleaning are typically in the spring, after the last frost and before heavy use, and in the fall, to remove accumulating debris before winter.
- Light Cleaning: As Needed. Sweep your deck weekly or bi-weekly to remove loose debris like leaves, dirt, and pollen. This simple step prevents buildup and makes deep cleaning much easier.
- Spot Cleaning: Immediately. Clean up spills (like drinks, food, or oil) and pet messes as soon as they happen to prevent staining.
In wetter climates or areas with lots of trees, you might find yourself needing to do a light cleaning more frequently to combat mold and mildew growth. Pay attention to your deck; it will tell you when it needs attention!
Gathering Your Deck Cleaning Supplies
Before you dive in, having the right tools and cleaning agents makes the job much easier and more effective. Here’s a list of common items you’ll likely need:
Essential Tools:
- Stiff-Bristled Broom or Deck Brush: A broom is great for sweeping loose debris, while a deck brush (with stiff but non-metal bristles) is essential for scrubbing away grime. Look for brushes with long handles to save your back!
- Garden Hose with Spray Nozzle: You’ll need this for rinsing away dirt and cleaning solutions. A nozzle with a strong spray setting is ideal.
- Bucket: At least one large bucket for mixing cleaning solutions.
- Gloves: Protect your hands from cleaning chemicals and grime.
- Safety Glasses: Essential for protecting your eyes from splashes of cleaning solutions and debris.
- Old Clothes: You’ll likely get wet and dirty.
- Scraper (Optional but helpful): For stubborn, dried-on gunk like mud or bird droppings.
Cleaning Solutions:
Choosing the right cleaner is crucial and depends on the type of dirt and your deck’s wood. Here are common options:
- Mild Soap and Water: For regular maintenance and light dirt. Dish soap or a dedicated deck wash can work well.
- Oxygen Bleach (e.g., OxiClean): A safer and more eco-friendly alternative to chlorine bleach. It’s effective for mold, mildew, and general brightening but is gentler on wood and plants.
- Specialized Deck Cleaners: Available at hardware stores, these are formulated for specific wood types or cleaning challenges (e.g., grease, rust stains). Always follow manufacturer instructions.
- Vinegar Solution (Diluted): A mild acidic option that can help with some staining and mildew. Use a 1:1 ratio of white vinegar to water.
Important Note: Avoid using chlorine bleach on wood decks. It can dry out the wood fibers, making them brittle, and can damage surrounding plants. Always test any cleaning solution on an inconspicuous area of your deck first to see how it affects the wood.
Step-by-Step Guide: How to Clean Wooden Decking
Ready to get started? Follow these simple steps for a sparkling clean deck. We’ll cover the general process, which can be adapted based on your chosen cleaning solution.
Step 1: Clear and Prepare the Deck
First things first, remove everything from your deck. This includes furniture, potted plants, grills, rugs, and any decor. This ensures you have a clear workspace and prevents any dirt or cleaning solution from getting on your items.
Sweep Thoroughly: Use your stiff-bristled broom to sweep away all loose debris. Pay attention to corners, gaps between boards, and areas around railings. Getting rid of as much dry dirt and leaves as possible now will make the washing phase much easier.
Scrape Stubborn Spots: If you have any dried mud, paint splatters, or other hardened debris, gently use a scraper to lift it off. Be careful not to gouge the wood.
Step 2: Wet the Deck
Before applying any cleaning solution, thoroughly wet the entire deck surface with your garden hose. This not only helps loosen dirt but also prevents the cleaning solution from drying too quickly on the wood, which can lead to uneven cleaning or staining.
Ensure all surfaces, including railings and steps, are damp. If you have delicate plants nearby, cover them with plastic sheeting or thoroughly water them beforehand; fresh water makes them more resistant to chemical absorption.
Step 3: Apply Your Chosen Cleaner
Now it’s time to introduce your cleaning agent. The method will vary slightly depending on what you’re using:
- For Mild Soap and Water: Mix a small amount of mild dish soap or deck wash into a bucket of water. Apply the soapy water liberally to a section of the deck using your deck brush or a sponge.
- For Oxygen Bleach: Follow the manufacturer’s instructions for mixing. Typically, you’ll dissolve a scoop or two of powdered oxygen bleach in a bucket of warm water. Apply the solution to a section of the deck.
- For Specialized Deck Cleaners: Always read and follow the product’s label instructions precisely. They may recommend specific dilution ratios, application methods, and dwell times.
- For Vinegar Solution: Mix equal parts white vinegar and water in a bucket. Apply the mixture to your deck.
Important Technique: Work in manageable sections. Don’t try to apply cleaner to the entire deck at once, especially on a warm day, as it might dry too fast. Work your way from one end of the deck to the other, cleaning one or two boards at a time, or a square section.
Step 4: Scrub the Deck
This is where the real cleaning happens. Using your deck brush, gently scrub the surface of the wood. Scrub in the direction of the wood grain. This helps to lift the dirt, grime, mold, and mildew out of the wood pores without damaging the surface.
Apply consistent, even pressure. If you encounter particularly stubborn spots, you may need to scrub a bit more vigorously, but always be mindful of the wood’s surface. For areas with detailed elements like railings or spindles, use a smaller brush or a rag.
Allow the cleaner to sit on the surface for the time recommended by the manufacturer, or about 10-15 minutes for most common solutions if no specific instructions are given. This “dwell time” allows the cleaner to penetrate and break down the grime.
Step 5: Rinse the Deck Thoroughly
This is a critical step to ensure no cleaning residue is left behind, which could attract dirt or damage the wood. Using your garden hose with a spray nozzle set to a medium-to-strong stream, rinse the deck thoroughly. Again, work in sections, rinsing away all the loosened dirt and cleaner.
Make sure to rinse from the top of the deck down towards the lowest point so that dirty water flows away from the cleaned areas. Rinse any surrounding plants, siding, or doors that may have come into contact with the cleaning solution.
A powerful hose spray can even help lift some of the remaining loosened dirt, but avoid using a high-pressure washer unless you are very experienced, as it can easily damage the wood fibers, causing “fuzzing” or splintering.
Step 6: Inspect and Re-clean if Necessary
Once you’ve rinsed everything, step back and inspect your deck. Are there any areas that still look dirty or stained? If you see any spots that need more attention, repeat steps 3 through 5 on those specific areas. Some tough stains might require a second cleaning or a different type of cleaner.
Step 7: Allow the Deck to Dry Completely
This is a crucial waiting period. Before you even think about applying a sealant or stain, your deck needs to be completely dry. This usually takes at least 24 to 48 hours, depending on the weather conditions (humidity, temperature, and sunshine).
Walking on a damp deck can cause new scratches and dents. For sealing, moisture in the wood can prevent the sealant from adhering properly, leading to premature failure.
While it’s drying, keep it clear of foot traffic and anything that could deposit new debris.
Choosing the Right Cleaning Method for Your Deck
Not all decks are the same, and the type of wood or the kind of mess you’re facing might call for a specific cleaning approach. Here’s a quick breakdown:
For General Grime and Maintenance
If your deck is looking a bit dull from everyday dirt and is due for its regular cleaning, mild soap and water or a diluted vinegar solution are usually sufficient. This is about preserving the wood’s natural appearance and removing light buildup.
For Mold, Mildew, and Algae
These organic growths thrive in damp environments. Oxygen bleach is highly effective at killing mold and mildew spores and brightening the wood. For severe cases, a commercial deck cleaner specifically designed for mold and mildew may be necessary. Always test these cleaners first.
For Tough Stains (Grease, Rust, Pet Messes)
These require targeted solutions:
- Grease/Oil Stains: For fresh spills, sprinkle cat litter or sawdust on the stain to absorb as much as possible. For set-in stains, you might need a degreaser formulated for decks or a strong detergent.
- Rust Stains: These are often caused by metal furniture or railings. Look for a specialized rust remover for decks. Oxalic acid-based cleaners are often recommended for rust.
- Pet Stains: Clean these up quickly to prevent them from etching the wood. A good scrub with a deck cleaner specifically designed for biological stains or a mild soap and water solution often works.
For Older or Soft Woods (like Pine or Cedar)
These woods are more susceptible to damage from harsh chemicals and aggressive scrubbing. Always opt for the gentlest cleaner possible. A mild deck soap, a diluted oxygen bleach solution, or even just a good scrub with water and a soft-bristled brush might be best. Avoid high-pressure washing at all costs.
For Hardwoods (like Ipe or Teak)
Harder woods are more durable and can often withstand slightly stronger cleaners and scrubbing. However, it’s still best practice to start with milder options and only use specialized hardwood deck cleaners if necessary. Always follow manufacturer guidelines and test in an inconspicuous spot.
What NOT to Do When Cleaning Your Deck
As a mentor, I always emphasize safety and proper technique. Here are a few common mistakes to avoid:
- Using Chlorine Bleach: As mentioned, it damages wood fibers, making them brittle and prone to splintering. It can also harm surrounding plants.
- Using a High-Pressure Washer Incorrectly: While a low setting might be okay for very durable wood, excessive pressure will gouge, splinter, and essentially blast away the top layer of your deck, shortening its lifespan. If you must use one, keep it at a safe distance and use a wide fan-tip nozzle.
- Scrubbing with Metal Brushes: Metal bristles can scratch the wood surface and leave behind metal particles that can rust, causing unsightly stains.
- Letting Cleaners Dry on the Surface: Dry cleaners can leave streaks or etch marks on your wood. Always work in sections and keep the surface wet.
- Skipping the Rinse: Leaving cleaning residue can attract dirt, cause discoloration, and break down the wood over time. A thorough rinse is non-negotiable.
- Sealing a Damp Deck: Moisture trapped beneath a new sealant will cause it to peel, blister, and fail prematurely. Patience is key for drying.
For more information on deck maintenance, the Building Science Information offers valuable insights into cleaning and finishing wood decks.
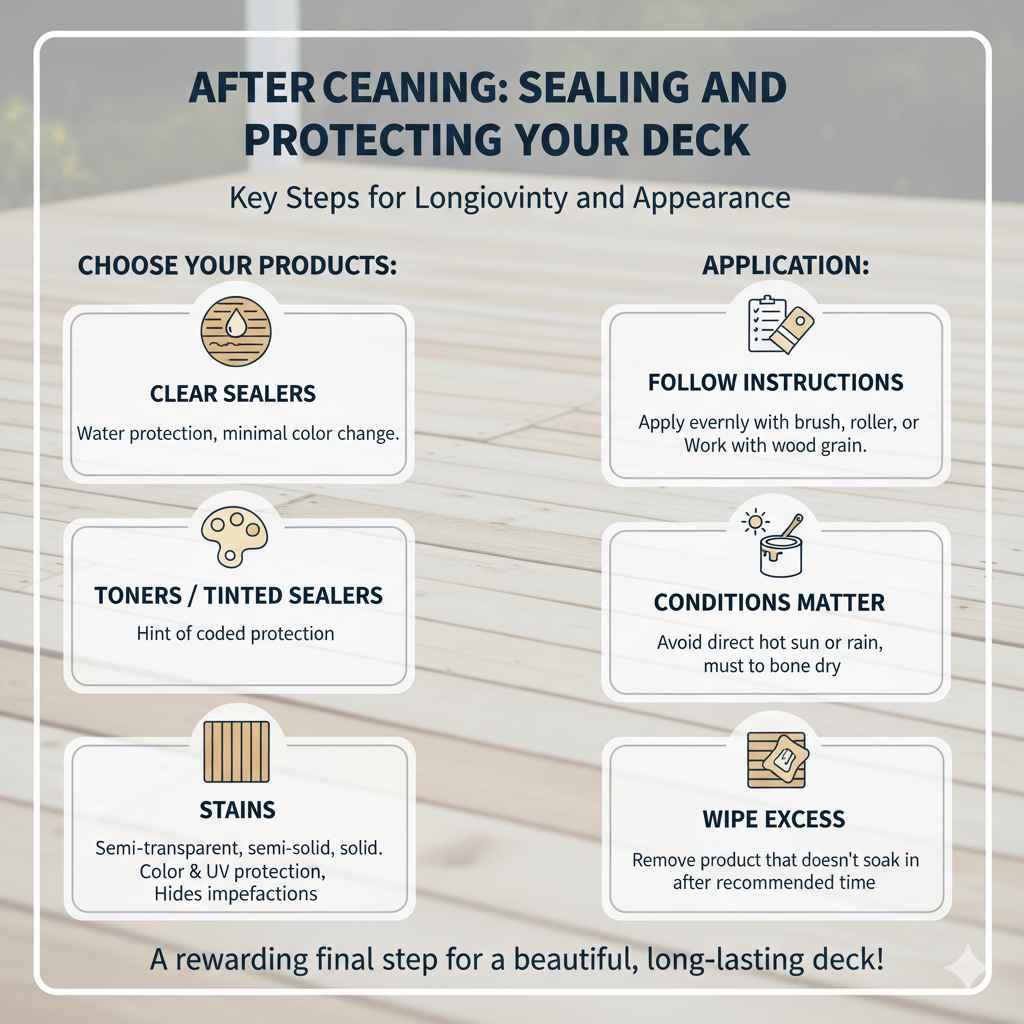
After Cleaning: Sealing and Protecting Your Deck
Once your deck is sparkling clean and bone dry, the next crucial step for longevity and appearance is sealing or staining it. This protects the wood from UV rays, moisture, and general wear and tear.
Here’s a quick overview:
-
- Choose Your Product:
- Clear Sealers: Offer water protection with minimal change to the wood’s color.
- Toners/Tinted Sealers: Add a hint of color while providing protection.
- Stains: Come in semi-transparent, semi-solid, or solid finishes, offering varying degrees of color and UV protection. Solid stains can hide minor imperfections.
- Application:
- Follow the product’s instructions carefully.
- Apply evenly with a brush, roller, or sprayer, working with the wood grain.
- Avoid applying in direct, hot sunlight or when rain is expected.
- Wipe off any excess product that doesn’t soak into the wood after the recommended time (check product instructions).
- Choose Your Product:
Remember, sealing adds another layer of protection and beauty to your hard work. It’s a rewarding final step that will help your deck weather beautifully.
Frequently Asked Questions (FAQ)
Q1: How do I remove black spots from my wooden deck?
A1: Black spots are usually mold or mildew. Start by sweeping thoroughly. Then, use a deck cleaner containing oxygen bleach, or a specialized mildew remover. Scrub gently with a deck brush in the direction of the wood grain, and rinse very well. Ensure the area stays dry afterwards to prevent regrowth.
Q2: Can I use a power washer on my deck?
A2: You can, but you must be extremely careful. Power washers can easily damage wood fibers, causing splintering and a fuzzy look. If you use one, set it to a low pressure, use a wide fan-tip nozzle (40 degrees recommended), and keep the wand at least 12-18 inches away from the deck surface. Always test in an inconspicuous area first. For most homeowners, a garden hose and a stiff brush are safer and just as effective.