How to Burn Lightning into Wood: Unleash the Electrifying Beauty
To burn lightning into wood, carve or etch a lightning design on the wood’s surface and use a wood-burning tool to carefully follow the design, applying heat until the desired effect is achieved. Creating natural-looking lightning patterns can be achieved by varying the thickness and depth of the burn marks, allowing for a realistic and dramatic result.
Additionally, using different techniques such as dabbing, shading, or cross-hatching can add texture and dimension to the burnt lightning design. Ensure safety precautions are taken when handling the hot tool and practice on scrap wood before working on the final piece.
The Art Of Burning Lightning Into Wood
Discover the captivating technique of burning lightning into wood with our expert guide. Learn how to create intricate designs and patterns using this unique and mesmerizing art form. Unleash your creativity and transform ordinary wood into stunning works of art.
Understanding The Mesmerizing Appeal Of Burnt Lightning Patterns
Burnt lightning patterns in wood have a captivating allure that is hard to resist. The unique and intricate designs created by burning lightning into wood grab attention and evoke a sense of wonder. Understanding the mesmerizing appeal of these patterns can help us appreciate the artistry behind this woodworking technique.
Here are a few reasons why burnt lightning patterns are so fascinating:
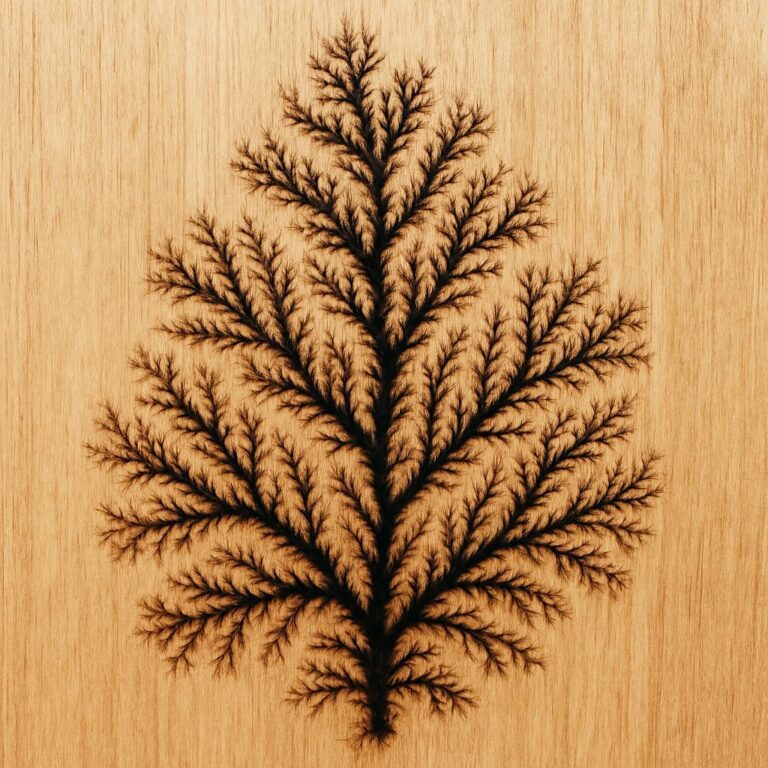
- Exquisite beauty: It’s hard to look away from the mesmerizing patterns that resemble bolts of lightning. The contrast between the dark burnt lines and the wood’s natural grain creates a visually stunning effect.
- Natural element: The combination of fire and wood signifies a harmonious connection with nature. The organic patterns created by scorching the surface of the wood resonate with our primal instincts and evoke a sense of raw beauty.
- Uniqueness and unpredictability: No two burnt lightning patterns are the same. The process of creating these designs involves controlled burns, but the outcome is always somewhat unpredictable. Each piece of wood has its own character and grain, which contributes to the uniqueness of the patterns.
- Skill and craftsmanship: Burning lightning patterns into wood requires a delicate touch and precise technique. Woodworkers who specialize in this art form possess a honed skill set and an eye for detail. The intricate process of creating these designs adds to their allure.
Exploring The History And Origins Of This Unique Woodworking Technique
The art of burning lightning into wood has a rich history that dates back centuries. This unique woodworking technique has been practiced by cultures around the world. Let’s delve into the origins of this captivating craft:
- Ancient origins: Burning lightning patterns into wood can be traced back to ancient civilizations. The Egyptians, Greeks, and Indigenous cultures used fire to decorate wooden artifacts and create symbolic designs.
- Traditional techniques: Over time, different regions developed their own traditional techniques for burning patterns into wood. For example, Japanese woodworkers practice the art of yakisugi, where they char the surface of wood to enhance its durability and aesthetic appeal.
- Modern adaptations: In recent years, burning lightning patterns into wood has gained popularity as a decorative technique in modern woodworking. Artists and craftsmen have pushed the boundaries, experimenting with new tools and methods to create unique designs.
- Cross-cultural influences: With the advent of global connectivity, the art of burning lightning into wood has become a melting pot of ideas. Woodworkers now draw inspiration from different cultures and adapt techniques to create their own distinct styles.
Appreciating The Artistic And Creative Possibilities It Offers
The art of burning lightning into wood offers a wealth of artistic and creative possibilities. It goes beyond simply scorching a surface and opens up avenues for expression and innovation. Here’s why this unique woodworking technique appeals to artists and craftsmen alike:
- Adding depth and texture: Burning lightning patterns into wood adds depth and texture to the surface, transforming a plain piece of wood into a visually captivating artwork.
- Enhancing natural features: The burnt lines highlight the natural grain and beauty of the wood, enhancing its organic qualities and creating a visually striking contrast.
- Versatility of designs: Artists can experiment with a variety of designs, ranging from bold and dramatic lightning bolts to delicate and intricate patterns. The flexibility of this technique allows for artistic expression and the creation of one-of-a-kind pieces.
- Functional and decorative applications: Burnt lightning patterns can be incorporated into various woodworking projects, including furniture, wall art, and even jewelry. This versatility opens up a world of possibilities for both functional and decorative applications.
The mesmerizing appeal of burnt lightning patterns in wood lies in their exquisite beauty, ancient origins, and the creative possibilities they offer. The art of burning lightning into wood is a testament to the infinite potential of wood as a medium and the mastery of craftsmen who bring it to life.
Tools And Materials You’Ll Need
To burn lightning into wood, you’ll need a few essential tools and materials like a wood burning pen, a variety of wood pieces, a stencil or design template, sandpaper, and protective gear like gloves and goggles. With these items, you can create intricate designs that add a unique touch to your wooden projects.
Essential Tools For Burning Lightning Into Wood:
To successfully burn lightning into wood, you’ll need the following tools and materials:
- Wood burning tool: This is the key tool used to create the lightning effect on the wood. It typically consists of a heated metal tip that is used to burn the surface of the wood.
- Assorted tips: Different tips offer a variety of patterns and effects. Experimenting with different tips can help you achieve the desired lightning effect.
- Sandpaper: Before burning the lightning onto the wood, it’s essential to prepare the surface by sanding it. This helps remove any roughness or imperfections, ensuring a smooth and even burn.
- Stencils or tape: If you want precise and consistent lightning patterns, using stencils or tape can be helpful. They act as guides and ensure the lightning design is accurately burned onto the wood.
- Pencil and eraser: Drawing your lightning design lightly with a pencil allows you to make adjustments and ensure the placement is to your liking. An eraser can come in handy to remove any mistakes or unwanted markings.
- Safety goggles: Protect your eyes by wearing safety goggles throughout the burning process. These goggles shield your eyes from flying sparks or wood particles when using the wood burning tool.
- Ventilation: Working in a well-ventilated area is crucial. The process of burning wood can release fumes, so make sure there is proper airflow to avoid inhaling any harmful substances.
- Fire extinguisher: As a safety precaution, it’s wise to have a fire extinguisher nearby. Though unlikely, accidents can happen, and it’s important to be prepared in case of an unexpected fire.
Now that you know the essential tools and materials needed for burning lightning into wood, let’s move on to the next important aspect – choosing the right type of wood for optimal results.
Preparing The Wood Surface
To prepare the wood surface for burning lightning into it, follow these essential steps. Start by sanding the wood to create a smooth base, then apply a wood conditioner to promote even burning. Finally, clean the surface thoroughly to remove any dust or debris that could interfere with the burning process.
These steps will help ensure a successful and long-lasting lightning burn on the wood.
Selecting The Ideal Wood Surface For Burning Lightning Patterns:
Choosing the right wood is crucial for achieving a beautiful lightning pattern burnt into the surface. Consider the following factors when selecting your wood:
- Opt for a light-colored wood, such as birch or pine, as it provides a striking contrast for the burnt lightning pattern.
- The wood should be smooth and free of knots or imperfections that could interfere with the burning process.
- Make sure the wood is properly seasoned and moisture-free to prevent warping or cracking during the burning process.
Preparing The Wood Through Sanding And Cleaning:
Before you begin burning the lightning pattern, it’s essential to prepare the wood surface adequately. Follow these steps:
- Start by sanding the wood using a fine-grit sandpaper to create a smooth and even surface for the burning process.
- Remove any dust or debris by wiping the wood with a clean, damp cloth.
- Allow the wood to dry completely before proceeding to the next step.
Applying A Sealant Or Finish To Enhance The Burning Process:
Applying a sealant or finish to the wood surface not only protects it but also enhances the burning process. Consider the following options:
- Use a wood sealer designed for burnishing projects to protect the wood from excessive burning and ensure a more controlled outcome.
- Alternatively, consider using a wood finish like polyurethane, which adds a protective layer to the wood and enhances the contrast of the burnt lightning pattern.
- Apply the sealant or finish evenly across the entire wood surface, following the manufacturer’s instructions. Allow it to dry completely before proceeding to burn the lightning pattern.
By carefully selecting the wood surface, properly preparing it through sanding and cleaning, and applying a suitable sealant or finish, you are setting the stage for creating a stunning lightning pattern that will amaze everyone who sees it. Remember to follow all safety protocols when working with fire and always have proper ventilation in the area.
Now, let’s move on to the exciting part – burning the lightning pattern itself!
Creating Lightning Patterns
Learn how to create stunning lightning patterns by burning them into wood. Discover step-by-step techniques and tools to achieve unique and eye-catching designs. Elevate your woodworking projects with this captivating artistic touch.
Wood burning is an art form that allows you to create unique and eye-catching designs on wooden surfaces. One popular design that many artists love to create is the mesmerizing pattern of lightning bolts. If you’re interested in learning how to burn lightning into wood, this section will guide you through the process of creating stunning lightning patterns.
We’ll cover everything from visualizing and planning your design to sketching it on the wood surface, and finally, the techniques for burning intricate details.
Visualizing And Planning Your Lightning Design
- Start by gathering inspiration from various sources, such as photographs, artwork, or even sketches. This will help you visualize the type of lightning pattern you want to create.
- Consider the size and shape of your wood surface. Visualize how the lightning bolts will flow and interact with each other in that particular space.
- Experiment with different styles of lightning bolts, such as jagged or branching patterns, to add more dynamism to your design.
- Sketch or make a rough outline of your intended lightning pattern on a piece of paper or using a software design tool. This will give you a clearer direction when it’s time to transfer the design onto the wood.
Sketching The Design On The Wood Surface
- Once you have a clear idea of your lightning design, lightly draw it onto the wood surface using a pencil or an erasable marker. This step ensures that you have a guide to follow while burning the wood.
- Take into account the natural grain and texture of the wood. Plan your design around these elements to enhance the overall aesthetic.
- Use small, light strokes to create the outline, making sure to adjust the thickness and angles of the lightning bolts as you go.
- Don’t worry about perfection at this stage; the sketch is merely a reference for the burning process.
Techniques For Burning Lightning Bolts And Intricate Details
- Start by selecting the right wood burning tool or pyrography pen. Choose a pen with a fine tip that allows for precision and control.
- Begin by burning along the pencil or marker lines, gradually filling in the lightning bolt shapes. Take your time and apply even pressure to ensure consistent and crisp lines.
- For a realistic effect, vary the thickness of the lines throughout the lightning bolts. This will add depth and dimension to your design.
- Experiment with shading techniques to create contrasting areas within the lightning bolts. This can be achieved by adjusting the pressure and duration of the burn.
- Be mindful of safety precautions. Always work in a well-ventilated area, wear protective goggles, and avoid touching the hot tip of the wood burning pen.
- Practice on scrap wood before working on your actual project. This will help you become familiar with the wood burning tool and refine your technique.
Burning lightning into wood is a rewarding and captivating art form that allows you to showcase your creativity and mastery. With careful planning, precise sketching, and skillful burning techniques, you can create stunning lightning patterns that will leave a lasting impression.
So grab your wood burning tool and let your imagination run wild!
Burning Techniques And Tips
Discover effective techniques and tips to burn lightning into wood with our comprehensive guide. From choosing the right tools to creating intricate designs, this resource will help you master the art of woodburning.
Burning wood is a creative and fascinating art form that allows you to create intricate designs and patterns on different wooden surfaces. By mastering various burning techniques, you can achieve stunning effects that add depth and dimension to your projects.
In this section, we will explore the different burning tools and their effects, discuss how to adjust heat and pressure for the desired results, and delve into blending techniques that can help you create truly mesmerizing pieces. So let’s dive in and uncover the secrets of burning lightning into wood!
Introducing Different Burning Tools And Their Effects:
- Wood Burning Pen: With its fine tip, the wood burning pen is ideal for precision work and creating intricate details. It allows for controlled strokes, making it perfect for creating precise lines and delicate shading.
- Wire Tips: Wire tips, available in various shapes and sizes, offer versatility when it comes to burning lightning into wood. They can be used to create different textures, patterns, and effects, adding depth and character to your artwork.
- Shading Pens: Shading pens, also known as texture pens, are designed specifically for creating shadows and adding depth to your wood burning projects. They produce darker and lighter shades, allowing you to create a sense of contrast and three-dimensionality.
- Calligraphy Tips: If you want to add elegant calligraphy or lettering to your wood burning designs, calligraphy tips are your go-to tools. They have a rounded tip that enables smooth strokes, making it easier to create beautifully curved letters and intricate designs.
Adjusting Heat And Pressure For Desired Results:
- Heat Control: Different wood types and burning tools may require adjustments in heat levels. Experimenting with temperature settings can help you achieve the desired darkness and intensity of burned lines. Start with a low setting and gradually increase the heat until you achieve the desired effect.
- Pressure Control: Just like heat, applying the right amount of pressure is crucial to achieve the desired burning effect. Light pressure creates lighter lines, while heavier pressure produces darker and deeper burns. Practice on scrap wood to find the right balance between heat and pressure.
Blending Techniques To Create Depth And Dimension:
- Crosshatching: This technique involves creating intersecting lines to achieve shading and depth. By varying the spacing and angles of the lines, you can create different textures and tones, adding a realistic touch to your wood burning artwork.
- Stippling: Stippling is done by creating a series of dots or small marks. By varying the density and size of the dots, you can create shading and textures that give a sense of depth and dimension to your design.
- Feathering: Feathering involves using a gentle touch and a light stroke to create soft and subtle transitions. This technique is particularly useful for creating smooth gradients and blending different shades together.
- Smudging: Smudging can be achieved by using a pointed object or a soft cloth to blend the burned lines. It helps create a softer and more diffused effect, ideal for creating gradients and adding depth to your wood burning artwork.
With these burning techniques and tips, you have the tools and knowledge to create beautifully burned designs on wood. Remember, practice makes perfect, so don’t be afraid to experiment and explore different techniques, ultimately finding your own unique style. Find inspiration, let your creativity flow, and enjoy the mesmerizing art of burning lightning into wood!
Enhancing The Burnt Design
Enhance your burnt wood design by learning how to burn lightning patterns into the surface. Discover step-by-step techniques for creating captivating and unique designs that will impress with their intricacy and beauty.
To truly elevate the burnt design on your wooden piece, there are several techniques you can use to add color and depth. Here are some ways to enhance the burnt areas and create a stunning visual effect:
Using Stains And Dyes To Highlight The Burnt Areas:
- Apply a wood stain or dye to the burnt areas to make them stand out even more.
- Choose a stain or dye color that complements the natural tones of the wood.
- Wipe off any excess stain or dye to create a subtle highlighting effect.
- Use a brush or cloth to evenly distribute the stain or dye on the burnt sections.
Adding Colored Resin Or Epoxy For A Vibrant Effect:
- Colored resin or epoxy can be applied to the burnt areas to give them a striking vibrant effect.
- Mix the resin or epoxy with a colorant of your choice, ensuring it complements the burnt design.
- Apply the colored resin or epoxy over the burnt sections, following the manufacturer’s instructions.
- Use a brush or spatula to spread the resin or epoxy evenly and remove any air bubbles.
Incorporating Other Woodworking Techniques For Unique Finishes:
- Combine other woodworking techniques with the burnt design to create unique finishes.
- Consider using techniques like carving, sanding, or distressing to add texture and character to the burnt areas.
- Experiment with different woodworking tools to achieve various effects, such as a rustic or polished look.
- Seal the wood with a clear finish like varnish or lacquer to protect the enhanced burnt design and give it a glossy or matte appearance.
Remember, these techniques are meant to enhance the burnt design and create an eye-catching piece of art. Have fun exploring different color options and woodworking techniques to bring your vision to life.
Finishing And Protecting The Wood
Learn how to burn lightning into wood while also giving it a finishing and protective touch. Discover the step-by-step process and techniques for creating unique and captivating wood designs.
Sanding And Smoothing The Burnt Surface
Before applying any finish to the burnt wood, it is crucial to sand and smooth the surface to ensure a polished and professional result. Here’s how you can do it:
- Begin by selecting the appropriate grit sandpaper. Start with a coarse grit, such as 60 or 80, to remove any rough areas and prominent burnt marks.
- Gently sand the entire surface of the wood, ensuring consistent pressure throughout. Use a back-and-forth motion or circular strokes, whichever feels more comfortable for you.
- As you progress, switch to a finer grit sandpaper, like 120 or 150, for a smoother finish. Continue sanding until the burnt wood feels even to the touch, and any imperfections are minimized.
- After sanding, use a soft brush or cloth to remove any dust and debris from the wood surface. This step prepares the wood for the next stage of finishing and protects against any particles that may interfere with the final outcome.
Applying A Protective Finish To Seal And Preserve The Artwork
Once the burnt wood is sanded and smoothed, the next step involves applying a protective finish. This not only seals the artwork but also enhances its appearance and adds durability. Follow these steps to achieve an excellent protective finish:
- Begin by choosing an appropriate finish for your desired look and level of protection. Options such as polyurethane, lacquer, or varnish are commonly used for this purpose.
- Apply the finish using a brush, roller, or spray gun, depending on the type of finish you’ve selected. Start from one end of the wood and work your way across the surface, ensuring even coverage.
- Allow the first coat to dry according to the manufacturer’s instructions. This may take several hours or even overnight.
- Once dry, lightly sand the wood with fine-grit sandpaper, around 220 or 320, to remove any imperfections or roughness caused by the finish.
- Apply subsequent coats of the finish, repeating the drying and sanding process between each coat. The number of coats depends on the desired level of protection and appearance.
- After the final coat is applied and fully dried, inspect the wood for any areas that may require touch-ups. If necessary, lightly sand those areas and apply a final coat for a polished look.
Buffing And Polishing For A Professional Look
To achieve a truly professional finish, the last step involves buffing and polishing the wood. This process helps to enhance the sheen and smoothness of the protective finish. Follow these guidelines for a remarkable result:
- Use a soft cloth or buffing pad and apply a small amount of a quality polishing compound or wax onto the surface of the wood.
- Work the compound into the wood using circular motions, applying even pressure. This process helps to remove any fine scratches or imperfections, leaving a smooth and glossy finish.
- Continue buffing until the desired shine is achieved. If using a polishing compound, remove any excess residue with a clean cloth.
- For an added level of sheen, you can use a furniture polish specifically designed for wood surfaces. Apply the polish according to the manufacturer’s instructions, using a clean cloth or sponge.
- Once the wood is buffed and polished, take a step back and admire the beautiful result. Your burnt wood artwork is now not only protected but also showcases a professional and refined finish.
Remember, sanding, applying a protective finish, and buffing are essential steps to ensure the longevity and appeal of your burnt wood artwork. Following these instructions will help you achieve the best possible outcome, allowing your artwork to stand out and be enjoyed for years to come.

Showcasing And Displaying Your Burnt Lightning Woodwork
Discover the art of burning lightning into wood and proudly showcase your stunning burnt woodwork. Learn expert tips and techniques for creating unique and captivating designs that will enchant any space.
Introducing your unique burnt lightning woodwork to the world requires careful consideration of display options, lighting techniques, and connecting with the woodworking community. From frames to shelves and stands, there are various ways to beautifully showcase your creations. Incorporating lighting techniques can further enhance the visual impact, while social media offers a platform to share your work and engage with like-minded individuals.
Get ready to put your burnt lightning woodwork in the spotlight!
Considering Various Display Options Such As Frames, Shelves, Or Stands:
- Frames: Choose a frame that complements the overall aesthetic of your burnt lightning woodwork. Opt for materials like wood or metal that align with the rustic feel, and consider different finishes, such as distressed or aged, to add character.
- Shelves: Displaying your burnt lightning woodwork on shelves allows for versatile arrangements and easy accessibility. Floating shelves offer a minimalist look, while rustic wooden shelves create a cozy atmosphere. Play around with different heights and positions to find the most appealing display.
- Stands: If you prefer a standalone display, using stands can provide an elevated presentation. Look for sturdy and visually appealing options, such as wooden or metal stands with intricate designs or simple elegance. Stands offer flexibility in terms of moving and arranging your burnt lightning woodwork as needed.
Incorporating Lighting Techniques To Enhance The Visual Impact:
- Spotlighting: Directing focused light onto specific areas or features of your burnt lightning woodwork can create dramatic effects. Use spotlights or track lighting to highlight intricate details or patterns.
- Backlighting: Placing lights behind your burnt lightning woodwork can produce a mesmerizing glow. This technique emphasizes the wood’s grain and catches the eye, especially in darker spaces or when combined with dimmer ambient lighting.
- Ambient lighting: Consider using soft, warm lighting fixtures to create a cozy and inviting atmosphere around your burnt lightning woodwork. This enhances the overall visual appeal in a subtle way, allowing the woodwork to take center stage.
Showcasing Your Work On Social Media And Connecting With The Woodworking Community:
- Instagram: Create an Instagram account dedicated to your burnt lightning woodwork. Post high-quality photos and use relevant hashtags to attract woodworking enthusiasts. Engage with followers and explore the woodworking community through comments, likes, and collaborations.
- Facebook Groups: Join woodworking-focused groups on Facebook and share your creations there. Connect with fellow woodworkers, receive feedback, and gain inspiration from others’ projects. Active participation in these groups can help you grow your network and visibility.
- YouTube Tutorials: Consider creating YouTube tutorials showcasing the process of burning lightning into wood. Share your techniques, tips, and tricks to gain recognition as an expert in the field. Engage with viewers through comments and build a community centered around your unique craft.
Remember, your burnt lightning woodwork is a masterpiece that deserves to be showcased and admired. By carefully selecting display options, incorporating lighting techniques, and leveraging social media, you can attract attention, inspire others, and connect with the woodworking community. Let your creativity shine and let the world appreciate the beauty of your burnt lightning woodwork!
Inspiration And Ideas For Burnt Lightning Woodwork
Discover the ultimate source of inspiration and ideas for creating stunning burnt lightning woodwork. Unlock the secrets of how to burn lightning into wood with expert techniques and tips. Find endless possibilities to unleash your creativity and transform ordinary wood into extraordinary works of art.
Exploring Different Artistic Interpretations And Styles:
- Woodburning Art: Discover the beauty of burnt lightning woodwork, where the intricate patterns formed by burning the wood with lightning-like streaks create stunning pieces of art.
- Traditional Techniques with a Twist: Explore woodburning techniques such as pyrography and combine them with the unique concept of burnt lightning to create striking artwork.
- Lightning-Inspired Designs: Get inspired by the energy and power of lightning bolts, incorporating their dynamic shapes and electrifying atmosphere into your woodburning projects.
- Embracing Contrast and Texture: Experiment with the contrast between the dark, charred lightning marks and the natural grain and color of the wood, adding depth and texture to your creations.
- Geometric and Organic Patterns: Play with geometric shapes and organic patterns, blending them together to create harmonious designs that reflect a balance between nature and structure.
- Emotion and Movement: Capture the essence of lightning’s intensity and motion by utilizing flowing and expressive lines in your burnt lightning woodwork.
- Minimalistic and Intricate Approaches: Whether you prefer simple and clean designs or intricate and detailed artwork, burnt lightning offers a versatile canvas to showcase your creativity.
- Mixing Wood Species: Combine different types of wood to enhance the visual impact of burnt lightning patterns, exploring how various grains and colors can interact with the scorch marks.
Drawing Inspiration From Nature, Mythology, And Abstract Concepts:
- Forces of Nature: Take inspiration from nature’s raw elements, drawing from the power and energy of thunderstorms, lightning, and the natural world as a whole.
- Mythological Symbolism: Dive into the fascinating realm of mythology and its connection to lightning, exploring ancient tales and legends featuring gods, goddesses, and mythical creatures associated with thunder and lightning.
- Embracing Abstract Concepts: Use burnt lightning woodwork to represent abstract ideas or emotions, allowing the scorch marks to evoke specific feelings or conceptual themes.
- Spiritual Interpretations: Connect with spiritual beliefs and metaphysical concepts, using burnt lightning woodwork as a visual representation of higher energies, enlightenment, or divine intervention.
- Personal Stories and Experiences: Infuse your burnt lightning woodwork with personal narratives, using this unique art form as a medium to tell your own stories and memories.
- Cultural Significance: Examine the role of lightning and electricity in different cultures around the world, exploring cultural symbols, rituals, and customs associated with these natural phenomena.
Pushing The Boundaries Of Creativity With Unconventional Designs:
- Beyond Traditional Boundaries: Break away from conventional woodburning techniques and established norms, incorporating burnt lightning as a disruptive element that brings innovation and uniqueness to your designs.
- Unexpected Materials: Experiment with unconventional materials, combining burnt lightning woodwork with elements like metal, glass, or fabric to add unexpected textures and dimensions.
- Interactive Art: Transform your burnt lightning woodwork into interactive installations or functional pieces that allow viewers to engage with your art on a tactile or sensory level.
- Exploring Mixed Media: Blend burnt lightning woodwork with other art forms, such as painting, sculpting, or photography, creating multidimensional pieces that transcend the limitations of a single medium.
- Collaborative Projects: Join forces with artists from different disciplines and explore the possibilities of combining burnt lightning woodwork with their expertise, resulting in collaborative and boundary-pushing artworks.
- Environmental and Sustainable Initiatives: Utilize reclaimed or ethically sourced wood for your burnt lightning woodwork, showcasing your commitment to environmental consciousness and promoting sustainable art practices.
- Embracing Imperfections: Instead of aiming for perfection, embrace the natural variations and unpredictability of the burnt lightning technique, allowing imperfections to add character and authenticity to your work.
- Transforming Functional Objects: Repurpose everyday objects or furniture pieces, applying burnt lightning woodwork to breathe new life into them and transforming them into unique and visually striking pieces.
Remember that burnt lightning woodwork offers endless opportunities for creativity and artistic expression. Let your imagination run free and explore the vast possibilities that this captivating technique has to offer.
Exploring Advanced Techniques And Beyond
Discover the fascinating art of burning lightning into wood and unlock advanced techniques that go beyond the ordinary. Transform your wooden creations into captivating works of art with this unique method.
Wood burning, also known as pyrography, is an art form that allows you to create intricate designs and captivating artwork by burning lightning into wood. While the basics of wood burning are essential to master, it’s always exciting to explore advanced techniques and push the boundaries of your creativity.
In this section, we’ll delve into the world of advanced wood burning techniques, including experimenting with different tools and technologies, combining burning techniques with other woodworking disciplines, and creating groundbreaking artwork that will leave a lasting impression.
Experimenting With Different Wood-Burning Tools And Technologies:
- Variable temperature wood-burning pens: These versatile pens offer adjustable heat settings, allowing you to experiment with various temperatures for different effects. Lower heat settings are ideal for delicate shading, while higher temperatures are great for bold lines and detailed work.
- Wire-nib burners: This alternative to traditional wood-burning pens offers a unique experience, utilizing a thin, heated wire to create precise lines and intricate designs. The flexibility of wire-nib burners opens up a world of possibilities for your artistic expression.
- Laser wood burning: By harnessing the power of lasers, you can achieve incredibly detailed and precise wood burnings. Laser wood burning machines allow you to transfer intricate designs onto wood with utmost accuracy, enabling you to bring your imagination to life.
- Woodburning with electricity: This unconventional technique involves utilizing electricity to create captivating patterns on wood surfaces. High-voltage electricity can be controlled to burn specific areas, resulting in stunning and unexpected designs.
Combining Burning Techniques With Other Woodworking Disciplines:
- Wood carving and burning fusion: By integrating wood carving techniques with wood burning, you can achieve textured and multi-dimensional artworks that truly stand out. Carve intricate patterns and use wood burning to highlight and enhance the details, creating a visually captivating piece that showcases your skills across multiple disciplines.
- Wood staining and burning: Transform the appearance of your wood burnings by incorporating wood staining techniques. Apply stains to the wood surface before or after burning, highlighting the contrast between the burned and non-burned areas. This combination adds depth and dimension to your artwork, elevating it to a whole new level.
- Inlay and pyrography integration: Inlay techniques involve embedding contrasting materials into wood surfaces. By combining inlay work with pyrography, you can create stunning pieces that blend various textures and colors. Use wood burning to enhance the inlayed elements and create a seamless fusion of techniques.
Pushing The Limits Of Imagination And Creating Groundbreaking Artwork:
- Mixed media wood burnings: Push your creativity to the limits by incorporating other materials and mediums into your wood burnings. Explore possibilities such as adding paint, ink, or even metal accents to your artwork. This combination of techniques and materials will help you create unique and eye-catching pieces that break traditional artistic boundaries.
- Exploring abstract wood burning: Take a departure from realism and venture into the realm of abstract wood burning. Experiment with unconventional designs, shapes, and patterns, allowing your imagination to take the lead. Abstract wood burnings challenge traditional notions of art and offer a fresh and contemporary approach to the medium.
- Using unconventional tools: Step outside the realm of customary wood-burning tools and explore alternative options. Experiment with heated metal objects, such as unique tips or wire shapes, to create distinctive textures and effects on the wood surface. Unconventional tools can bring a fresh perspective to your artwork, creating visually striking results.
In the world of wood burning, there is no limit to creativity. By embracing advanced techniques, combining wood burning with other woodworking disciplines, and pushing the boundaries of your imagination, you can create groundbreaking artwork that will captivate viewers and leave a lasting impact.
So, don’t be afraid to explore beyond the basics and embark on a journey of artistic discovery that will truly set your wood burnings apart.
Frequently Asked Questions For How To Burn Lightning Into Wood
How Do You Burn Lightning Marks On Wood?
To burn lightning marks on wood, follow these steps:
1. First, draw or trace the lightning pattern on the wood surface.
2. Next, use a woodburning tool to carefully etch the design onto the wood.
3. Adjust the temperature and pressure of the tool as needed to achieve the desired depth and darkness of the burn.
4. Finally, finish the wood with sealant or varnish for protection and to enhance the appearance of the lightning marks.
How To Do Fractal Burning Safely?
To do fractal burning safely, follow these guidelines:
1. Research and understand the process thoroughly before attempting it.
2. Wear proper safety gear, such as gloves and goggles, to protect yourself.
3. Use a suitable and well-ventilated workspace to avoid harmful fumes.
4. Follow the recommended tools, techniques, and precautions to minimize any risks involved.
What Is The Best Solution For Lichtenberg Wood Burning?
The best solution for Lichtenberg wood burning is to use a high-voltage power supply and specialized tools.
What Is The Power Source For Lichtenberg Wood Burning?
The power source for Lichtenberg wood burning is electricity.
Conclusion
Learning how to burn lightning into wood can be a fascinating and rewarding experience for both beginners and experienced woodworkers. By understanding the technique and using the right tools, you can create stunning and unique patterns on your wooden creations.
Whether you want to add a touch of nature-inspired beauty to your furniture or showcase your artistic skills, this technique offers endless possibilities. As you experiment with different types of wood, techniques, and finishes, remember to stay safe and follow proper safety precautions.
With practice and patience, you can master the art of burning lightning into wood and create one-of-a-kind masterpieces that will leave a lasting impression. So gather your tools, unleash your creativity, and let the magic begin!