How to Change Blade on Ryobi Miter Saw
To change the blade on a Ryobi miter saw, follow these steps: disconnect the saw from power, loosen the blade bolt with a wrench, remove the blade, insert the new blade onto the spindle, tighten the blade bolt, and finally, reconnect the power. This simple process allows you to quickly and safely replace the blade on your Ryobi miter saw.
Are you a proud owner of a Ryobi miter saw but unsure of how to change the blade? Don’t worry, we’ve got you covered. In this guide, we will walk you through the step-by-step process of changing the blade on your Ryobi miter saw.
Whether you’re a seasoned DIYer or a beginner, our clear and concise instructions will ensure that you can safely and effortlessly replace the blade on your saw. So let’s get started and equip you with the knowledge to swap out that old blade for a new one in no time.
Tools Needed
Learn how to change the blade on your Ryobi Miter Saw with these simple steps. Upgrade your tool with ease and keep your projects running smoothly.
When it comes to changing the blade on your Ryobi Miter Saw, having the right tools is essential. Here are the tools you’ll need for this task:
- Wrench or Allen key: This tool will be necessary to loosen and tighten the bolts that hold the blade in place. Make sure you have the appropriate size wrench or Allen key for your miter saw model.
- Screwdriver: Depending on the type of blade clamp on your Ryobi Miter Saw, you may need a screwdriver to remove any screws or fasteners that secure the blade. Keep a screwdriver with the correct tip handy to make the process easier.
- Blade clamp: This is a specialized tool designed specifically for safely changing the blade on a miter saw. The blade clamp holds the blade securely in place, allowing you to remove and replace it without any risks. Make sure you have a reliable blade clamp that fits your Ryobi Miter Saw model.
To change the blade on your Ryobi Miter Saw, these tools will be your best allies. With the wrench or Allen key, screwdriver, and blade clamp in hand, you’ll have everything you need to successfully complete the task. Remember to follow the manufacturer’s instructions and safety guidelines throughout the process.
Happy blade changing!
Safety Precautions
Learn the step-by-step process of changing the blade on your Ryobi Miter Saw to ensure safety and efficiency. Follow these simple instructions to complete the task seamlessly and with ease.
To ensure your safety while changing the blade on your Ryobi Miter Saw, here are some important precautions you need to follow:
- Disconnect the power: Before doing anything else, make sure to disconnect the power supply to your miter saw. This ensures that there is no risk of accidental operation or electrical shock while you work on changing the blade.
- Wear safety goggles and gloves: Protecting your eyes and hands is crucial when working with power tools. Wear safety goggles to shield your eyes from any debris or flying particles that may be generated during blade removal. Additionally, wearing gloves provides added protection to your hands and reduces the risk of cuts or injuries.
- Secure the saw before blade removal: It is essential to properly secure the miter saw to ensure stability and prevent any accidental movement during blade removal. Follow these steps:
- Place the saw on a stable work surface, such as a workbench or table.
- Engage the miter saw’s locking mechanism to hold it in place.
- Use clamps to secure the saw if necessary, especially if you’re working on an uneven or slippery surface.
Remember, these safety precautions must always be followed to minimize the risk of accidents or injuries when changing the blade on your Ryobi Miter Saw. Maintaining a safe working environment ensures a smooth and problem-free blade replacement process.
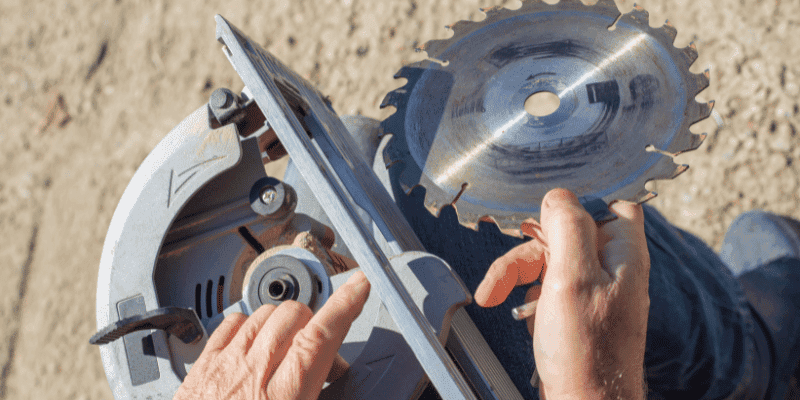
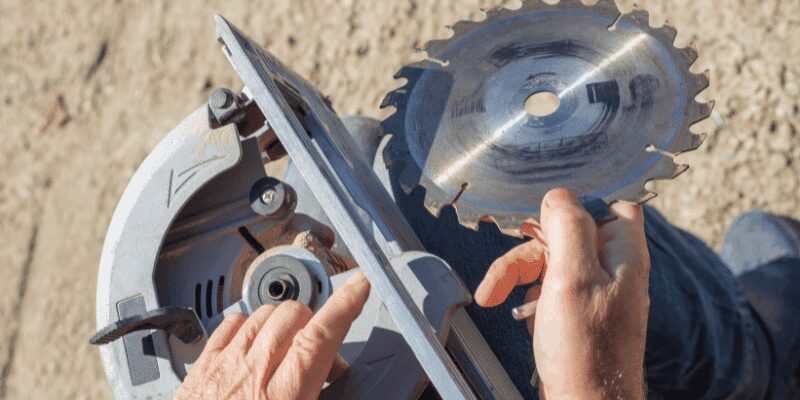
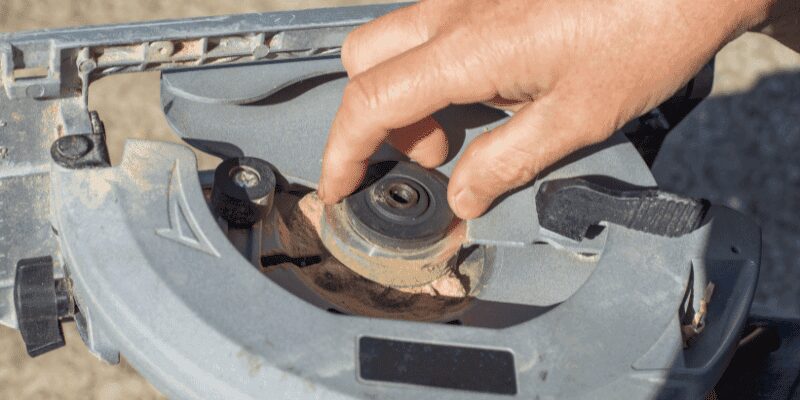
Removing The Old Blade
To change the blade on a Ryobi Miter Saw, start by removing the old blade carefully. Follow the steps provided in the user manual for a seamless process.
When it’s time to change the blade on your Ryobi Miter Saw, you’ll need to follow a few simple steps. The first step is to locate the arbor lock button, which is typically found on the back of the saw near the blade.
This button is crucial in securing the blade during removal and installation.
Here’s a step-by-step guide on how to remove the old blade:
- Locate the arbor lock button: Look for the arbor lock button on the back of the saw near the blade. It’s usually a small button that you’ll need to press and hold throughout the blade removal process.
- Press and hold the arbor lock button: With your finger, press and hold the arbor lock button firmly. This action will prevent the blade from spinning when you loosen the bolt.
- Use the wrench or Allen key to loosen the blade bolt: Locate the wrench or Allen key that came with your miter saw. Insert the tool into the blade bolt and turn it counterclockwise to loosen it. Remember to keep holding the arbor lock button while you’re doing this.
- Remove the outer blade washer: Once the blade bolt is loosened, you can remove the outer blade washer. Simply slide it off the arbor and set it aside.
- Slide the old blade off the arbor: With the arbor lock button still pressed, carefully slide the old blade off the arbor. Be sure to keep your fingers clear of the sharp teeth as you remove the blade.
Remember, safety should always be your priority when working with power tools. Follow the manufacturer’s instructions and take the necessary precautions to avoid accidents. With these steps, you’ll be able to remove the old blade from your Ryobi Miter Saw with ease.
Next, we’ll discuss how to properly install the new blade in our next section, “Installing the New Blade”. Stay tuned!
Installing The New Blade
Learn how to easily change the blade on your Ryobi Miter Saw with these step-by-step instructions. Keep your tool in top condition for precise cuts every time.
So, you’ve successfully removed the old blade from your Ryobi Miter Saw. Now it’s time to install the new one and get back to work. Follow these steps to ensure a smooth installation process:
Clean The Arbor And Blade Washers
Before putting on the new blade, take a moment to clean the arbor and blade washers. Use a clean cloth or brush to remove any dust, debris, or residue that may have accumulated. This step is crucial in maintaining the longevity and performance of the saw blade.
Position The New Blade On The Arbor
Carefully place the new blade onto the arbor, ensuring that the mounting hole in the blade aligns with the arbor’s spindle. It’s essential to position the blade correctly to guarantee smooth and accurate cutting.
Place The Outer Blade Washer Back On
After positioning the blade on the arbor, slide the outer blade washer back on the spindle. This washer helps distribute the load evenly and provides stability during operation. Double-check that the washer is securely in place and properly seated against the blade.
Tighten The Blade Bolt With The Wrench Or Allen Key
To secure the blade in place, use the provided wrench or Allen key to tighten the blade bolt. Rotate it clockwise until it is snug and firmly holding the blade in place. It’s crucial to tighten the blade bolt sufficiently to prevent any unintended movement while cutting.
Release The Arbor Lock Button
Once the blade is securely installed and tightened, you can release the arbor lock button. This button is typically located near the blade housing and keeps the arbor from turning during blade changes. Releasing the arbor lock button allows the arbor to rotate freely, enabling you to carry out your cutting tasks effectively.
By following these simple steps, you can confidently install a new blade on your Ryobi Miter Saw. Remember to prioritize safety while working with power tools and always refer to the manufacturer’s instructions for specific guidelines. Happy cutting!
Checking Blade Alignment
To change the blade on the Ryobi Miter Saw, follow these steps to ensure proper blade alignment. This guide will help you make the necessary adjustments for a precise and safe cutting experience.
Adjust The Bevel Angle To 0 Degrees:
- Begin by locating the bevel adjustment knob on your Ryobi Miter Saw. It is typically located at the back of the saw.
- Turn the bevel adjustment knob counterclockwise to loosen it.
- Gently tilt the miter saw’s blade until it reaches a 0-degree bevel angle.
- Hold the bevel adjustment knob firmly and tighten it clockwise to lock the bevel angle in place.
Verify The Blade Is Parallel To The Miter Gauge Slot:
- Position your miter saw with the blade facing forward and the miter gauge slot visible.
- Take a long straight edge, such as a ruler or a flat piece of wood, and align it to the miter gauge slot.
- Carefully examine the blade’s alignment; it should run parallel to the straight edge and miter gauge slot.
- If necessary, adjust the blade alignment by loosening the screws that secure the blade to the saw and making minor adjustments. Repeat the alignment check until the blade is perfectly parallel to the miter gauge slot.
Slide The Fence Against The Blade And Check For Alignment:
- The fence of the miter saw provides support and stability for the workpiece during cuts. It is crucial to ensure the fence aligns properly with the blade.
- Slide the fence towards the blade, making sure it is snugly against the blade’s teeth.
- Observe if the fence is perfectly aligned with the blade. There should be no gaps or deviations.
- If the fence is misaligned, make adjustments using the adjustment screws or knobs provided on the saw. Keep sliding the fence against the blade and checking for alignment until they are perfectly parallel.
Remember, always prioritize safety when working with power tools like the Ryobi Miter Saw. Double-check that the saw is unplugged before making any adjustments or blade changes. Regularly inspect and maintain your tools for optimal performance. This way, you can achieve accurate and precise cuts every time you use your miter saw.
Credit: www.homedepot.com
Testing The Blade
Learn how to easily change the blade on your Ryobi Miter Saw with this step-by-step guide. Upgrade your cutting game with these simple instructions.
Reconnect The Power:
Before testing the blade on your Ryobi Miter Saw, make sure to reconnect the power. Follow these steps:
- Plug the power cord of the Miter Saw back into a functioning power outlet.
- Double-check that the saw is properly connected to the power source and that there are no loose connections.
Inspect The Blade For Any Wobbling:
Inspecting the blade for wobbling is crucial to ensure safe and accurate cutting. Here’s how to inspect the blade:
- Ensure that the Miter Saw is turned off and unplugged.
- Visually inspect the blade for any signs of damage or wear.
- Check for any visible signs of wobbling or irregular movement by gently shaking the blade side to side.
- If you notice any wobbling or irregular movement, it is important to replace the blade before proceeding.
Ensure The Blade Is Spinning Freely:
To ensure smooth operation, the blade should spin freely. Follow these steps to ensure the blade spins without any obstructions:
- Double-check that the Miter Saw is turned off and unplugged.
- Carefully rotate the blade by hand, ensuring that it moves smoothly and without any resistance.
- If you encounter any resistance or the blade does not spin freely, investigate the cause and resolve the issue before proceeding.
Test The Saw With A Scrap Piece Of Wood:
Before using your Ryobi Miter Saw for actual projects, it is advisable to test it with a scrap piece of wood. Follow these steps to test the saw:
- Select a scrap piece of wood that is similar to the material you intend to cut.
- Make sure the Miter Saw is securely positioned and ready for use, adhering to safety guidelines.
- Align the wood piece with the blade and hold it firmly in place.
- Power on the Miter Saw and slowly bring the blade down to make a cut through the wood.
- Observe the cutting action and ensure that the blade smoothly slices through the wood without any visible issues.
- Check the cut for accuracy and uniformity.
- If the blade cuts smoothly and accurately, you can proceed confidently with your cutting tasks.
By following these steps, you can test the blade on your Ryobi Miter Saw effectively, ensuring safe and reliable performance for your woodworking projects.
Maintenance And Care Tips
Learn how to change the blade on a Ryobi Miter Saw with ease. Follow these maintenance and care tips for a smooth and efficient blade replacement process.
Taking proper care of your Ryobi Miter Saw is essential to ensure its longevity and optimal performance. Regular maintenance will not only help prolong the lifespan of your saw but also contribute to achieving precise and clean cuts. In this section, we will explore some maintenance and care tips to keep your blade and arbor in pristine condition.
Regularly Clean The Blade And Arbor:
To maintain the efficiency and cutting performance of your Ryobi Miter Saw, it is important to clean the blade and arbor regularly. Here are some steps you can follow:
- Start by unplugging the saw and removing the blade guard.
- Use a stiff brush or an old toothbrush to gently remove any sawdust or debris from the blade and arbor.
- For tougher residues, you can mix a mild detergent with water and apply it to the blade using a sponge or cloth. Make sure to rinse it off thoroughly and dry it completely before reattaching.
- Take a moment to inspect the arbor for any accumulated debris or sawdust and clean it out carefully.
- Once everything is cleaned and dry, you can reattach the blade guard, ensuring it is securely in place.
Regular cleaning will prevent sawdust buildup, reduce the risk of blade slippage, and maintain maximum cutting efficiency.
Check For Any Signs Of Wear Or Damage:
As with any cutting tool, it’s crucial to inspect the blade and arbor for signs of wear or damage. Regular checks will help you identify any issues and prevent accidents or subpar cuts. Here’s what you should look out for:
- Examine the blade for any signs of dullness or chipping. Dull blades can lead to burning or splintering of the wood, while chipped blades can cause uneven cuts.
- Inspect the teeth of the blade. If you notice any broken or missing teeth, it’s time for a replacement.
- Check the arbor for any looseness or wobbling. A secure and stable arbor is essential for precise cuts.
- Ensure that the blade is properly aligned and tightened to the arbor. Loose or misaligned blades can compromise both safety and cutting accuracy.
By regularly checking for wear and damage, you can promptly address any issues and keep your Ryobi Miter Saw in optimal condition.
Replace The Blade When It Becomes Dull:
Even with regular care, blades can become dull over time due to extended use. Dull blades not only compromise the quality of your cuts but can also put unnecessary strain on the motor. It’s important to replace the blade when it shows signs of dullness.
Here’s what you need to do:
- Start by unplugging the saw and removing the blade guard.
- Loosen the arbor nut using the provided wrench to remove the dull blade.
- Replace it with a new blade of the appropriate size and tooth count, ensuring it is properly aligned with the arbor.
- Tighten the arbor nut securely with the wrench, but be careful not to overtighten.
- Once the new blade is securely in place, reattach the blade guard and ensure it functions properly.
Regularly replacing dull blades will maintain the cutting performance of your Ryobi Miter Saw, resulting in cleaner and more precise cuts.
Remember, proper maintenance and care of your Ryobi Miter Saw will not only increase its lifespan but also ensure your safety while using the tool. By regularly cleaning the blade and arbor, checking for wear or damage, and replacing dull blades, you can enjoy optimal performance and professional-level results from your saw.
Frequently Asked Questions Of How To Change Blade On Ryobi Miter Saw
How Do You Change The Blade On A Ryobi Mitre?
To change the blade on a Ryobi Mitre, follow these instructions:
1. Unplug the saw to ensure safety.
2. Loosen the blade bolt using the provided wrench.
3. Remove the old blade from the saw. 4. Place the new blade, making sure it is aligned correctly.
5. Tighten the blade bolt securely.
6. Double-check the tightness of the bolt.
7. Plug in the saw and test the new blade before use. Remember to always prioritize safety when changing the blade on your Ryobi Mitre.
How Do You Change The Blade On An Old Ryobi Miter Saw?
To change the blade on an old Ryobi miter saw, follow these steps carefully:
1. Unplug the saw and secure it on a sturdy surface.
2. Loosen the arbor bolt with a wrench and remove the blade cover.
3. Slide out the old blade and carefully remove any washers or spacers.
4. Place the new blade on the arbor, ensuring it aligns with the saw’s rotation direction.
5. Put back the washers or spacers in the same order as before.
6. Tighten the arbor bolt securely.
7. Double-check all connections before plugging in and using the saw.
How Do You Loosen A Ryobi Miter Saw Blade?
To loosen a Ryobi miter saw blade, follow these steps:
1. Unplug the saw and locate the blade lock button.
2. Press and hold the blade lock button while using a wrench to turn the blade bolt counterclockwise.
3. Once the bolt is loosened, release the blade lock button and remove the blade carefully.
4. Remember to always use caution and wear protective gear when working with power tools.
How Do You Unlock A Ryobi Saw Blade?
To unlock a Ryobi saw blade, follow these steps: remove the battery, locate the blade lock button, press and hold the button, then use a wrench to loosen the blade.
Conclusion
Changing the blade on your Ryobi Miter Saw is a straightforward process that can greatly enhance the saw’s performance and ensure clean and precise cuts. By following these simple steps, you can easily replace the blade and get back to completing your woodworking projects in no time.
First, make sure to disconnect the power source to avoid any accidents. Then, using the provided wrench, loosen and remove the blade nut. Carefully remove the old blade and replace it with the new one, making sure it is securely tightened.
Remember to follow the manufacturer’s instructions for blade installation. Regularly changing the blade on your Ryobi Miter Saw is essential for maintaining its efficiency and safety. Dull blades can lead to rough cuts, splintered wood, and even potential accidents. By replacing the blade when necessary, you can ensure that every woodworking project is completed with precision and effortless ease.
So, the next time your Ryobi Miter Saw blade shows signs of wear and tear, don’t hesitate to change it out. With a few simple steps, you can keep your saw running smoothly and enjoy exceptional cutting performance for years to come.