
How to Cut 45-Degree Angle With Miter Saw: Mastering Precision Cuts
To cut a 45-degree angle with a miter saw, adjust the saw to the desired angle and secure the workpiece in place. Make sure to wear proper safety gear, such as safety goggles and ear protection, before operating the saw.
A miter saw is a versatile tool that allows for precise angle cuts, commonly used in various woodworking and carpentry projects. Whether you’re creating picture frames, building furniture, or installing molding, knowing how to cut a 45-degree angle with a miter saw is essential.
By following a few simple steps and safety precautions, you can achieve accurate and clean angle cuts for your next project. In this guide, we will walk you through the steps to cut a 45-degree angle with a miter saw and offer some tips for a successful outcome.
Mastering Precision Cuts: Miter Saw Basics
When it comes to woodworking or DIY projects, mastering precision cuts is essential to achieving professional-looking results. One tool that excels in providing accurate and angled cuts is the miter saw. Understanding the basics of a miter saw and how to achieve precise 45-degree angles can elevate your woodworking skills to the next level.
What Is A Miter Saw?
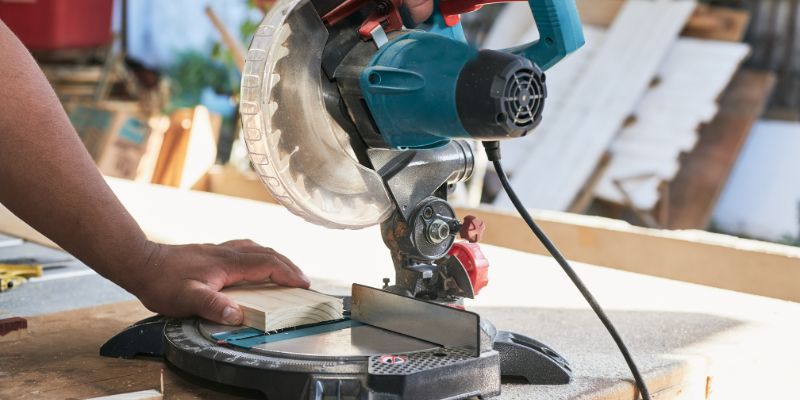
A miter saw is a specialized power tool designed to make accurate crosscuts and miter cuts at various angles. It consists of a circular blade mounted on a pivoting arm, allowing the wood to be positioned against a fence at a precise angle.
Key Components For Precision
When it comes to mastering precision cuts with a miter saw, understanding its key components is essential. The main components include the blade, miter gauge, bevel adjustment, and fence. These elements work together to ensure the accuracy and precision of the cuts, allowing for consistent and professional results.
 45 Degree Angle With Miter Saw” width=”800″ height=”400″ />
Safety Tips Before Cutting
- Wear eye and ear protection: Prioritize safety by wearing goggles and ear defenders to protect yourself from wood chips and loud noises.
- Secure workpiece: Use clamps or a vise to secure the wood firmly in place before making any cuts to prevent kickback or movement.
- Familiarize with the saw: Always read the manual and familiarize yourself with the specific features and safety precautions of your miter saw.
- Clear work area: Ensure the work area is clear of any obstructions and that there is adequate space for the wood and the saw to move freely.
Setting Up For The Perfect 45 Degree Cut
Making a precise 45-degree angle cut with a miter saw requires meticulous setup to ensure accuracy and clean edges. Before you begin cutting, it’s essential to secure the material properly, adjust the saw blade, and align the cutting angle to achieve the desired result.
Securing The Material
Prior to making the cut, secure the material firmly in place to prevent any shifting or movement. Utilize clamps or a sturdy work surface to keep the piece stable and ensure a smooth and consistent cut.
Adjusting The Saw Blade
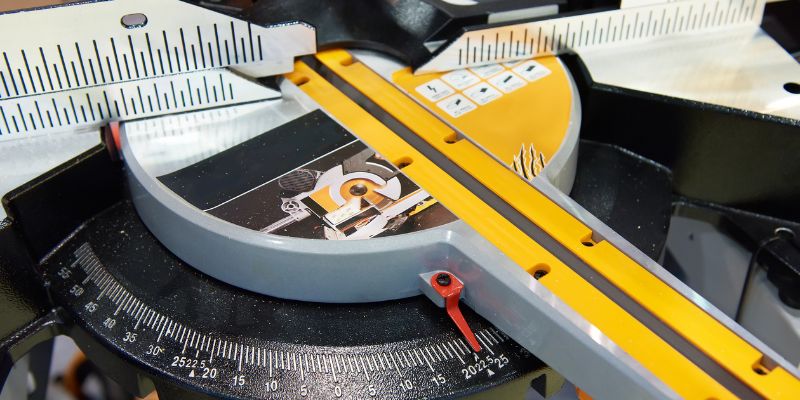
Begin by adjusting the miter saw blade to a 45-degree angle. This can usually be done by releasing the locking mechanism, rotating the blade to the desired angle, and then securely locking it back in place. Checking the angle with a protractor or the saw’s built-in angle gauge can help verify precision.
Aligning The Cutting Angle
Once the saw blade is set to the correct angle, align the cutting angle by positioning the material against the saw’s fence. Ensure that the material is snug against the fence and in the correct cutting position to achieve a clean and accurate 45-degree cut.
Expert Tips To Cut 45 Degree Angle With Miter Saw
Cutting a 45-degree angle with precision is a crucial skill for carpenters and DIY enthusiasts. So, if you’re looking to perfect this art, look no further. In this blog post, we’ll delve into expert tips to cut a 45-degree angle with a miter saw. From selecting the right blade to fine-tuning the blade angle, we’ve got you covered. Let’s explore some of the essential elements for mastering this technique.
The Right Blade Matters
When it comes to cutting a 45-degree angle with a miter saw, the choice of blade holds paramount importance. Using a quality carbide-tipped blade designed for angled cuts will ensure clean and precise results. A fine-toothed blade with at least 80 teeth is ideal for achieving smooth and splinter-free cuts, especially on hardwoods. Equipping your miter saw with the right blade is the first step toward achieving accurate 45-degree angles with ease.
Fine-tuning The Blade Angle
Before diving into your project, it’s crucial to ensure that your miter saw’s blade angle is meticulously calibrated. Using a protractor or a digital angle finder, confirm that the saw’s bevel is precisely set to 45 degrees. Additionally, some miter saws are equipped with preset detents for common angles, including 45 degrees, making the process more convenient. Taking the time to fine-tune the blade angle will result in flawless 45-degree cuts, preventing the need for adjustments later on.
Importance Of Supporting The Wood
Supporting the wood adequately during the cutting process is often overlooked but holds significant importance in achieving precise 45-degree angles. Utilize clamps or a sturdy workbench to secure the workpiece, minimizing any potential movement or slippage. Ensure that the wood is firmly and steadily positioned against the miter saw’s fence to prevent inaccuracies in the cut. Properly supporting the wood will contribute to the overall accuracy of your 45-degree cuts, resulting in professional-looking finished products.
 45 Degree Angle With Miter Saw” width=”800″ height=”400″ />
Troubleshooting Common Cutting Mistakes
Despite your best efforts, cutting perfect 45-degree angles with a miter saw can sometimes lead to various mistakes. Understanding common issues and knowing how to troubleshoot them is crucial for achieving precise results.
Understanding Why Cuts Deviate
Several factors can cause deviations in your 45-degree cuts when using a miter saw. Misaligned blades, inconsistent material feeding, and inaccurate measurements are some common reasons that can contribute to deviated cuts.
Correcting Blade Misalignment
Blade misalignment can result in inaccurate cuts. Regularly checking and adjusting the blade angle using the built-in features of your miter saw can help maintain precision. Additionally, ensuring the blade is securely fastened and not warped can prevent misalignment issues.
Solutions For Splintered Edges
When cutting at a 45-degree angle, splintered edges can detract from the overall quality of your work. Using a higher tooth count blade and attaching a sacrificial backing board to your workpiece can help minimize splintering for cleaner, smoother cuts.
Achieving Seamless Joints And Edges
When working with a miter saw, achieving seamless joints and edges with 45-degree angles is crucial for creating professional-looking woodwork and carpentry projects. Whether you’re trimming crown molding, framing doors, or crafting intricate trim pieces, mastering the technique of cutting precise 45-degree angles with a miter saw is essential for seamless joints and edges. In this guide, we’ll delve into the techniques, accuracy checks, and tips for flawlessly joining angles to ensure your woodworking projects turn out with exceptional precision and finesse.
Technique For Smooth Cuts
When cutting a 45-degree angle with a miter saw, it’s important to use the following technique to ensure smooth, precise cuts:
- Prepare the workpiece and double-check the miter saw’s bevel and angle settings.
- Secure the workpiece firmly against the saw’s fence and adjust the saw’s position for the 45-degree cut.
- Engage the saw blade and carefully guide the workpiece through the cut, maintaining steady pressure and control.
- After cutting, inspect the edges for smoothness and adjust the saw’s settings if needed for a perfect 45-degree angle.
Checking The Accuracy Of Cuts
Ensuring the accuracy of your cuts is essential for achieving seamless joints and edges. Here are steps to check the precision of your 45-degree cuts with a miter saw:
- Use a combination square or protractor to measure the cut angle and verify it’s precisely at 45 degrees.
- Inspect the cut edges for any roughness, gaps, or imperfections that may require re-cutting or adjustments to the saw settings.
- Perform a dry-fit assembly of the mitered workpieces to check for any misalignments or discrepancies in the joint connections.
Joining Angles Flawlessly
After cutting and verifying the accuracy of your 45-degree angles, the next step is to join them flawlessly. Follow these tips for achieving seamless joints and edges:
- Apply wood glue evenly on the mitered surfaces and use clamps to firmly press the joints together for a tight bond.
- Secure the joined pieces in place for the glue to set and cure properly before sanding and finishing the assembled workpiece.
- Use a fine-grit sandpaper to smooth any visible seams, creating a seamless transition between the joined angles.
Frequently Asked Questions On How To Cut 45 Degree Angle With Miter Saw
How Do You Cut A 45 Degree Angle With A Miter Saw?
To cut a 45-degree angle with a miter saw, adjust the angle on the saw to 45 degrees, then position and secure the material. Once ready, carefully make the cut following the manufacturer’s instructions for safety and precise results.
What Type Of Miter Saw Is Best For 45 Degree Angle Cuts?
A compound miter saw is best for cutting 45-degree angles. It allows you to adjust the blade in two directions, giving you the ability to make bevel cuts as well as angled miter cuts.
What Safety Precautions Should Be Taken When Using A Miter Saw?
When using a miter saw, always wear eye protection and use clamps to secure your material. Keep hands clear of the blade, and never reach under the blade guard while it’s in motion. Follow all safety guidelines provided by the manufacturer.
Conclusion
Mastering the technique to cut a 45-degree angle with a miter saw can elevate your carpentry game. With the proper equipment and knowledge, you’ll be able to execute precise and professional cuts for various projects. Keep practicing and honing your skills to achieve mastery.
Your future woodworking projects will surely benefit from this essential skill.