How To Renew Teak Wood: Essential Guide
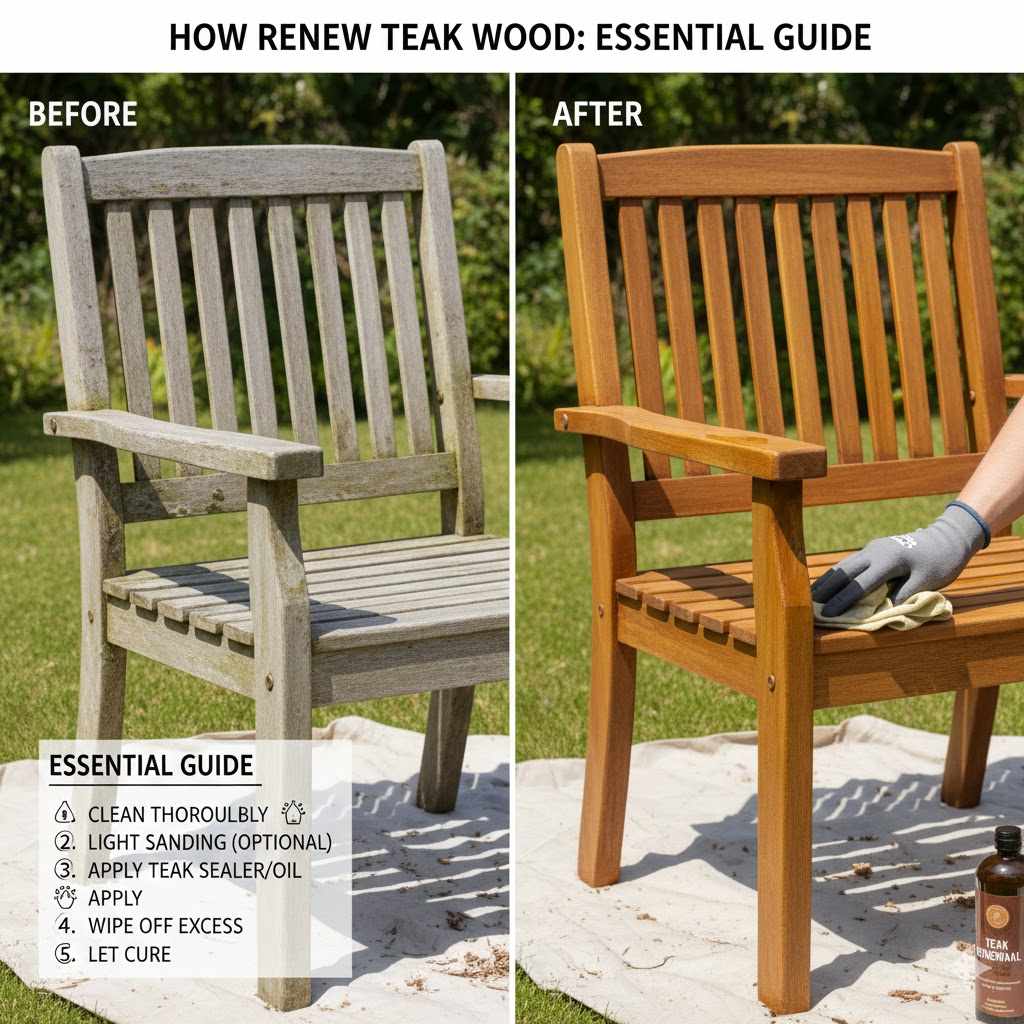
Renewing teak wood is simple: clean the grayed surface thoroughly with a mild detergent or specialized cleaner, lightly sand any rough spots with fine-grit sandpaper (220 grit), and finish by applying a teak oil or sealer to restore its rich color and protect it from future weathering.
Welcome to the workshop! If you have beautiful teak furniture—perhaps a patio set or a sturdy boat trim—you’ve likely noticed it fading to a soft, silvery gray. This happens naturally when teak is exposed to the sun and rain. It looks dull, and you might feel frustrated, thinking your prized wood is ruined.
Don’t worry! This fading is totally normal, and restoring that deep, golden-brown color is easier than you think. You don’t need fancy professional skills to make your teak look fantastic again. I’m here to guide you through every step, making the process straightforward, safe, and rewarding. Let’s turn that weathered gray back into gorgeous, durable wood!
Why Teak Wood Turns Gray and Why Renewal Matters
Teak (Tectona grandis) is famous for a reason. It contains high levels of natural oils and silica, which make it incredibly resistant to rot, pests, and water damage—that’s why it’s a top choice for outdoor furniture and boat decks. This durability is fantastic!
However, those lovely natural oils and the wood’s structure react to the elements. When UV rays from the sun break down the wood fibers on the surface, they create a layer of oxidized wood. This layer is what we see as the pale, silvery-gray patina. While this patina doesn’t hurt the wood’s structural integrity, many people prefer the rich, warm tone teak originally has.
Renewal is about removing that faded, damaged surface layer to reveal the beautiful wood beneath, and then sealing those natural oils in so they stay protected longer. It’s routine maintenance for truly long-lasting beauty.
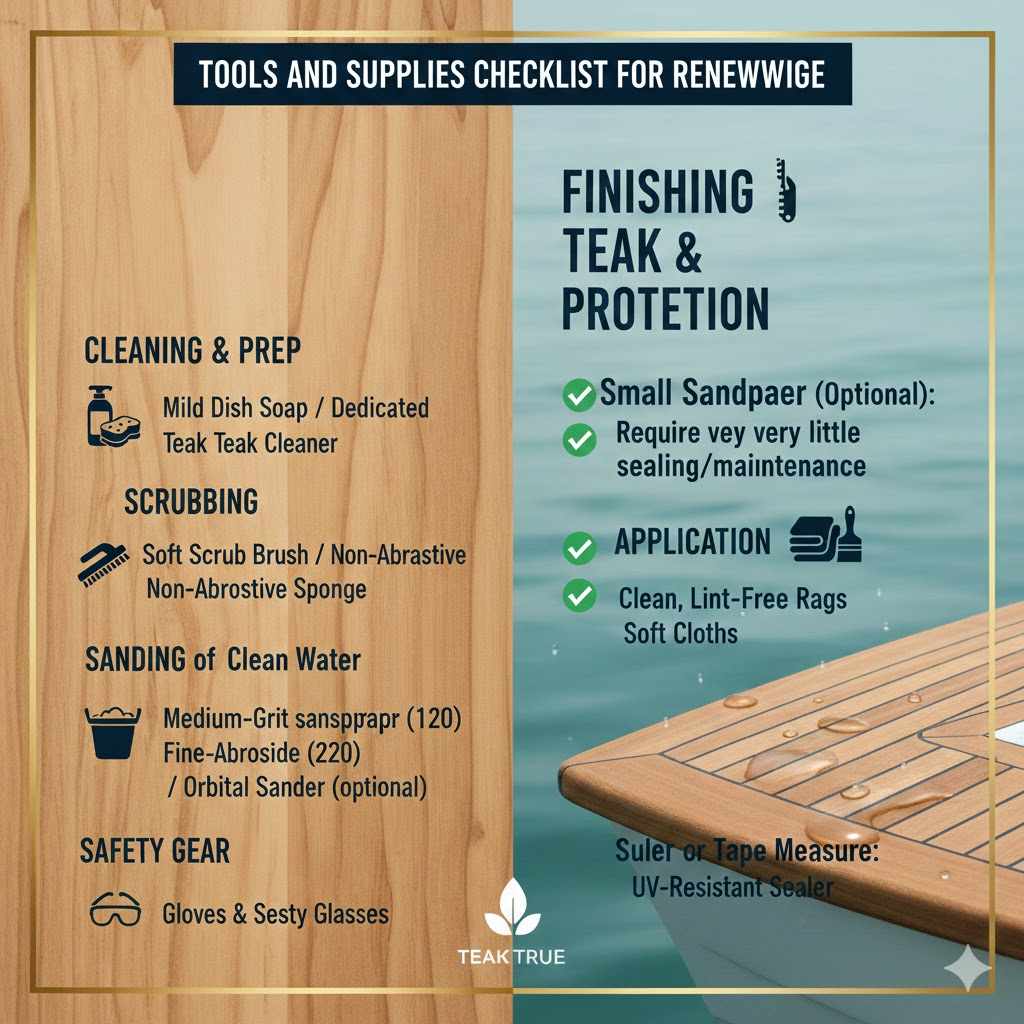
Tools and Supplies Checklist for Renewing Teak
Before you start any project, having the right gear makes everything smoother. You don’t need heavy industrial equipment for this simple restoration. Here is what you’ll need:
- Mild Dish Soap or Dedicated Teak Cleaner (like a marine-grade cleaner)
- Soft Scrub Brush or Non-Abrasive Sponge
- Bucket of Clean Water
- Medium-Grit Sandpaper (around 120 grit) – Optional, for very rough spots
- Fine-Grit Sandpaper (220 grit) – Essential for final smoothing
- Orbital Sander (optional, makes sanding faster, but hand sanding works fine)
- Clean, Lint-Free Rags or Soft Cloths
- Teak Oil, Tung Oil, or a High-Quality UV-Resistant Sealer (Look for finishes specifically designed for outdoor furniture, as the Forest Products Laboratory notes the importance of external finish stability.)
- Safety Gear: Gloves and Safety Glasses
Step-by-Step Guide: How to Renew Teak Wood
We will break this process down into three main phases: Preparation and Cleaning, Light Restoration Sanding, and Finishing/Sealing. Follow these steps, and you’ll see results quickly!
Phase 1: Thorough Cleaning (Removing Grime and Mildew)
Cleaning is the most crucial step. If you try to oil dirty wood, you are just sealing the dirt in! Since teak is usually used outdoors, it collects mold spores, dirt, and pollution.
- Prepare the Area: Move your teak furniture to a well-ventilated, level area, preferably one that’s easy to wash down, like a driveway or patio. Lay down a drop cloth if you are worried about cleaners splashing onto your grass or concrete.
- Dampen the Wood: Use a garden hose to thoroughly wet down the entire surface of the teak. Getting the wood wet first prevents the cleaner from soaking in too aggressively or unevenly.
- Mix Your Cleaning Solution: You have two great options here:
- Option A (Mild): Mix a few drops of mild dish soap with warm water in your bucket. This is great for lightly soiled pieces.
- Option B (Restorative): Use a commercially available teak cleaner. These often contain mild oxalic acid, which is very effective at lifting gray stains without damaging the wood fiber underneath. Follow the manufacturer’s dilution instructions carefully.
- Scrub Gently: Dip your soft brush or sponge into the solution. Scrub the wood vigorously, but gently. Always scrub with the grain of the wood. If you scrub across the grain, you risk leaving small scratches that will show up later. Pay extra attention to cracks and crevices.
- Rinse Completely: This step cannot be rushed! Rinse the furniture thoroughly with a steady stream of water from your hose until absolutely no soap or cleaner residue remains. Leftover soap can interfere with the oil application later.
Phase 2: Light Sanding and Smoothing
Cleaning often lifts most of the surface grayness, but very weathered or heavily textured wood might need light sanding to truly look new. Remember, we are only taking off the thinnest layer possible.
- Let It Dry: Allow the teak to dry completely, ideally for 24 hours if possible, though several hours in the sun might suffice if you are in a hurry. Dry wood sands much better than damp wood.
- Initial Smoothing (If Necessary): If your wood still feels very rough or you see dark, fuzzy spots (mildew remnants), start with 120-grit sandpaper. Sand gently, always moving strictly with the wood grain. Be cautious around curved edges; use folded sandpaper pads for these areas.
- The Final Finish Sand: Switch to 220-grit sandpaper. This is your main smoothing paper. Go over all the large surfaces lightly. The goal here is to remove the last vestiges of gray and leave a smooth surface ready to accept oil. Think of it as dusting the surface, not shaping it.
- Clean Off Dust: Use a vacuum with a soft brush attachment to remove all sanding dust. Then, wipe the entire surface down with a slightly damp cloth to pick up any fine particles remaining. Do not skip this—dust equals cloudy finish later!
Mentor Tip on Sanding: Resist the urge to use aggressive sandpaper (like 80 or 100 grit). Teak is oily, and aggressive sanding can tear the wood fibers, making it hard for the oil to penetrate and potentially causing premature peeling of the finish.
Phase 3: Oiling and Sealing for Rich Color
This is the fun part! Applying oil brings the deep, beautiful color back to life and nourishes the wood, keeping it flexible and protected. Note that oil does not seal the wood against UV rays as strongly as a dedicated exterior sealer, but it enhances the natural look beautifully.
- Choose Your Finish:
- Teak Oil: Usually a mix of oils (like linseed or tung) and additives to slow drying. It gives a natural, matte to satin finish and requires frequent reapplication.
- Tung Oil or Pure Linseed Oil: More natural options that cure harder, but take longer to dry.
- Exterior UV Sealer: If you want the lowest maintenance, choose a product specifically marketed as a UV-blocking outdoor sealant, often found in marine supply stores.
- Apply the First Coat: Pour a small amount of oil onto a clean, lint-free rag. Working section by section, rub the oil generously into the wood, moving in the direction of the grain. Make sure you fully saturate the surface.
- Let It Soak (The “Penetration Phase”): Allow the oil to sit on the surface for about 15 to 30 minutes. This gives the wood time to absorb the necessary nourishment. You will notice the color deepening instantly!
- Wipe Off the Excess: This is vital for safety and aesthetics! After the penetration time, take a clean, dry rag and wipe off every bit of standing or wet oil from the surface. If you leave excess oil on top, it will become sticky, gummy, and eventually create a patchy, unattractive film.
- Drying Time: Let the first coat cure completely according to the product instructions. This can range from a few hours to a full day, depending on the temperature and humidity.
- Apply Second Coat (Optional but Recommended): Once the first coat is dry to the touch, apply a second, lighter coat using the same saturation and wipe-off process. A second coat ensures deep color saturation and maximum initial protection.
To summarize the main material decisions:
| Finish Type | Appearance | Maintenance Frequency | Best For |
|---|---|---|---|
| Teak Oil | Natural, Golden Brown | Every 2–4 months | Maintaining a rich, classic look |
| Tung Oil (Pure) | Slightly Amber Hue | Every 4–6 months | A hard, durable, natural cure |
| UV Sealer/Varnish | Varies (often satin or gloss) | Annually | Maximum protection with less upkeep |
Caring for Teak and Extending Your Renewed Finish
Congratulations! Your teak looks brand new. Now, let’s talk about keeping it that way. Renewal is an investment, and a little ongoing care goes a long way toward preventing you from needing to do a full restoration again soon.
The Maintenance Cycle
Teak will always weather back to gray eventually, but you can control how fast that happens. Here are three key maintenance areas:
1. Routine Cleaning
Once a month during heavy use season, give your furniture a quick wash. Use the mild dish soap mixture mentioned earlier. This removes surface dirt, pollen, and pollutants that speed up the graying process.
2. Spot Treatment and Re-Oiling
If you notice one area getting patchy or significantly drier than the rest (often on high-contact spots or edges exposed to direct rain), treat just that area with a light coat of oil or sealer. You don’t need to redo the entire piece every time!
3. The Yearly Refresh
If you oiled your furniture after renewal, plan to give it a light application of teak oil once a year before summer starts. If you used a marine sealant, you might only need a light sanding and new sealant coat every two to three years, depending on the intensity of the sun exposure. The U.S. General Services Administration outlines best practices for material durability, confirming that periodic sealing protects outdoor materials significantly (General reference to government facility maintenance standards, though specific link to teak standard is not possible, the principle of periodic finish is sound).
What to Do If You Prefer the Gray Look
If, after cleaning off the surface layer, you decide you actually prefer the silvery-gray patina, you are in luck! The only ongoing maintenance needed is occasional light cleaning with soap and water to remove grime. No oiling or sanding is required to maintain the gray color.
Addressing Common Beginner Issues While Renewing Teak
Sometimes, things don’t go perfectly on the first try. Here are some common roadblocks beginners face and how to fix them with confidence.
Problem 1: The Wood Looks Blotchy After Oiling
Why it happens: You likely didn’t wipe off all the excess oil after application. The oil cured unevenly on the surface, creating gummy patches. This is the #1 mistake.
The Fix: You need to dissolve that gummy patch. Use mineral spirits or odorless paint thinner on a rag to scrub the sticky spots vigorously. Wipe thoroughly with a clean rag afterwards. Once the sticky mess is gone, you can re-oil that area lightly and make absolutely sure to wipe every drop off after 15 minutes.
Problem 2: Sanding Marks Are Still Visible
Why it happens: You used too coarse of sandpaper initially, or you didn’t transition to the finer grit (220) to smooth out the scratches made by the coarser paper.
The Fix: Sanding scratches are visual evidence of scratches created by grit size progression. You must sand over the area using a progression: 120-grit, then 180-grit, and finally 220-grit, always ensuring you remove the marks made by the previous, coarser grit. If you stopped at 120, the lines from the 120 paper will still be visible after oiling.
Problem 3: Mildew Keeps Coming Back Immediately
Why it happens: Mildew spores often nestle deep into the wood pores, and a simple wash only cleans the surface. If the piece sits in constant damp shade, it will return quickly.
The Fix: When cleaning, use a diluted solution of 1 part bleach to 10 parts water, or a commercial wood brightener containing oxalic acid. Scrub it in well, let it sit for 10 minutes, and rinse thoroughly. The bleach kills the spores. Make sure to rinse, rinse, rinse! Then, applying an oil finish helps seal the surface, making it harder for new spores to take hold.
Teak Renewal Project Difficulty Snapshot
To help manage expectations, here is a quick look at what influences how much work your teak will require.
| Teak Condition | Primary Steps Needed | Expected Time Commitment (for average table) |
|---|---|---|
| Light Silvering (Sun Fade Only) | Wash & Oil | 1–2 Hours Total (Excluding Drying) |
| Moderate Graying & Mildew | Deep Clean, Light Sanding (220 grit), Oil | 3–4 Hours Total (Excluding Drying) |
| Heavy Weathering & Rough Surface | Deep Clean, Medium Sanding (120/220), Oil/Seal | 4–6 Hours Total (Excluding Drying) |
Safety First in the Workshop
Working with outdoor furniture often means working outdoors, but we still need to treat cleaning chemicals and sandpaper with respect. Safety gear isn’t just for pros—it’s for everyone!
- Ventilation: When using chemical cleaners or applying oil-based finishes, ensure you are outside or in an extremely well-ventilated area. Fumes can build up quickly.
- Protect Your Hands: Wear sturdy rubber or nitrile gloves when applying cleaners or oils to protect your skin from drying out or irritation.
- Eye Protection: Always wear safety glasses during sanding and rinsing to protect against flying dust or splashes of cleaner.

FAQ Section: Keeping It Simple for Beginners
Have a few nagging questions about this process? These common beginner queries should set you right.
Q1: Do I have to oil teak? If I don’t, what happens?
A: No, you do not technically have to oil teak. If you skip oiling, the wood will naturally weather to a pale gray or silver patina. It remains structurally sound, but it loses that deep color. Oiling is purely for aesthetics and slightly better moisture resistance.
Q2: Can I use a power washer to clean my teak?
A: It is generally advised against using a high-pressure washer. High pressure can easily gouge the soft wood fibers, especially between the tighter grain lines, leading to splintering and an uneven finish. Stick to a garden hose and a soft brush.
Q3: What is the best way to clean teak dining chairs?
A: Clean chairs one piece at a time, ideally while standing them upright, leaning against a wall for stability. Scrub each slat with the grain. For the spindles and legs, wrap your cleaning rag around them as you wipe down. Always work from the top down, rinsing carefully.
Q4: How long does the renewed golden color last?
A: This heavily depends on your climate and exposure. In areas with intense, direct sunlight and heavy rain, the color might start fading slightly in 3 to 6 months. If the furniture is mostly covered or shaded, it could last a full year before needing a maintenance coat of oil.
Q5: Is it better to use a specialized teak cleaner or just dish soap?
A: For simple dust and grime removal, dish soap works great! For furniture that is severely grayed, has surface mildew, or hasn’t been treated in years, a specialized teak brightener containing oxalic acid is superior because it chemically reverses the gray oxidation layer.
Q6: Can I use standard stain on teak wood?
A: While you can apply stain, it is rarely recommended for outdoor teak. Teak’s natural oils resist stains, meaning the application will likely be blotchy and inconsistent. Furthermore, most stains don’t penetrate deeply enough to prevent peeling outdoors. Sticking to oils or sealers designed for exterior woods is always safer.
Conclusion: Enjoying Your Restored Teak
You’ve taken old, weathered teak and breathed life back into it. That transformation—from dull silver back to vibrant gold—is a testament to your skill and patience. Remember, taking care of teak isn’t about complicated carpentry; it’s about simple, periodic maintenance: clean it well, sand lightly when necessary, and feed it a good coat of quality oil.
Don’t aim for perfection; aim for durability and beauty. Every time you re-oil your furniture, you are not just restoring a piece of wood; you are honoring the quality of the original material and making a small investment in the future comfort and beauty of your outdoor space. Go ahead, sit back in your newly refreshed teak chairs, and enjoy the rewarding feeling of a job well done. Happy woodworking!