Ideas For Cedar Logs: 5 Genius Buys
Looking for smart ways to use cedar logs? Discover 5 beginner-friendly, high-value buys that transform raw logs into beautiful, durable projects for your home and garden. These ideas don’t require pro skills, making them perfect for DIYers wanting lasting beauty and function.
Thinking about what to do with those inviting cedar logs? Sometimes, the biggest challenge for a DIYer isn’t the sawing or sanding, but knowing exactly what to make. Raw logs can seem a bit intimidating, but they’re a fantastic source of natural beauty and incredible durability. Cedar, with its wonderful aroma and natural resistance to rot and insects, is a woodworker’s dream. You don’t need a workshop full of fancy tools to get started. With a few clever ideas, you can turn those logs into stunning pieces that add charm and value to your home and garden. Let’s explore five brilliant uses for cedar logs that a beginner can tackle with confidence!
Why Cedar Logs Are a Great Choice for DIY
Cedar wood is truly special, and using logs as your starting point is a fantastic way to tap into its natural beauty and strength. What makes cedar so popular? For starters, it naturally resists rotting and deterring insects. This means whatever you build with it, especially if it’s going outside, is likely to last much longer than if you used other woods. Think vibrant red cedar or the classic aromatic cedar – both bring a wonderful scent and a unique look to any space. Another big plus is that cedar is relatively lightweight compared to its strength, making it easier to handle for DIY projects. Plus, its natural oils mean it doesn’t always need heavy sealants, keeping some projects simpler and more natural-looking. When you’re just starting out in woodworking, working with cedar logs can be less intimidating than you might think. The raw, natural shape is forgiving, and many projects celebrate that rustic charm rather than requiring perfect, precise cuts.
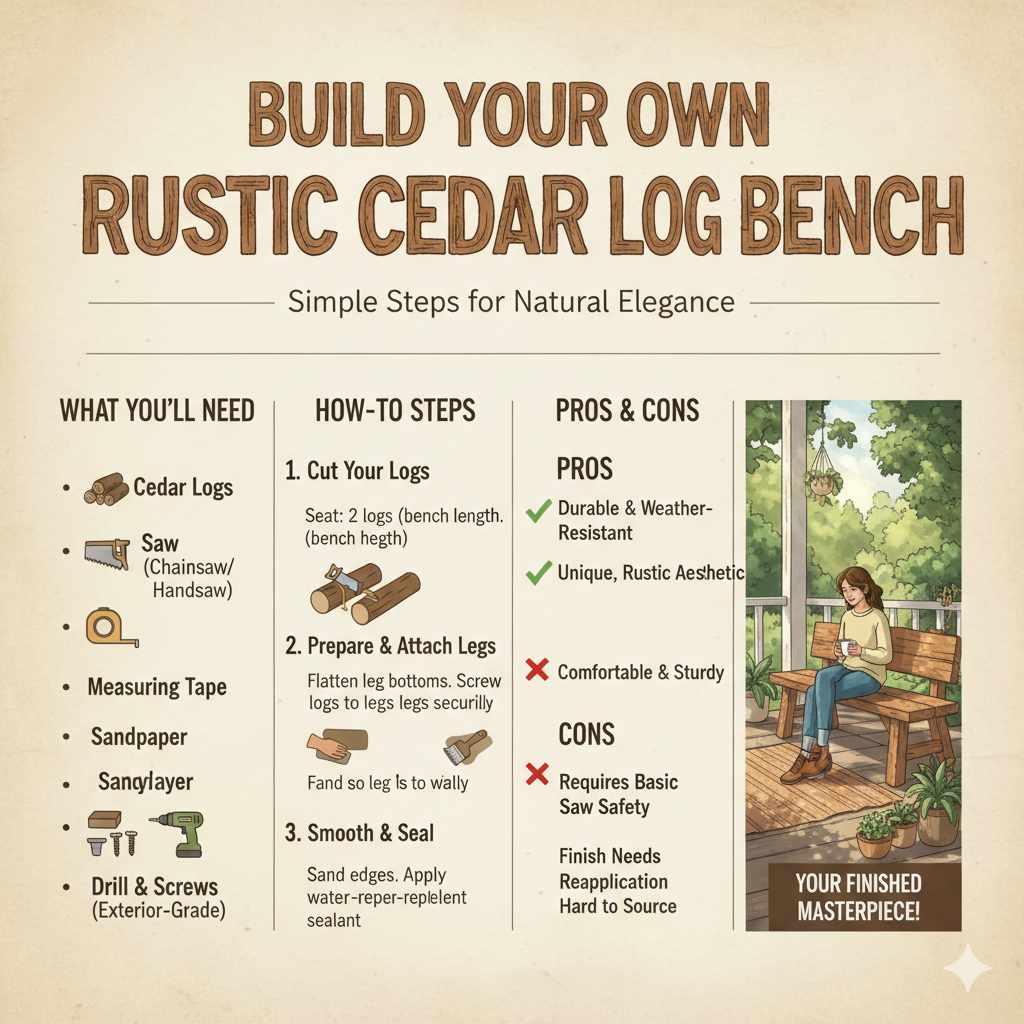
Buy 1: The Rustic Cedar Log Bench
Imagine sitting in your garden or on your porch on a beautiful cedar log bench. It’s a project that brings natural elegance right to your doorstep, and it’s surprisingly simple to build. This isn’t about complex joinery; it’s about embracing the log’s form.
What You’ll Need for Your Cedar Bench
- Cedar Logs: Two main logs for the seat and back, and two shorter, thicker logs for the legs. The diameter can vary, but aim for logs that are comfortable to sit on and sturdy.
- Saw: A chainsaw or a sturdy handsaw to cut logs to length.
- Measuring Tape: For precise cuts.
- Sandpaper: Medium to fine grit (e.g., 80-120 grit) to smooth rough edges.
- Drill and Screws: Strong, exterior-grade screws to attach the legs securely.
How to Build Your Cedar Bench: Simple Steps
- Cut Your Logs: Cut your two “seat” logs to your desired bench length. Cut your “leg” logs to the height you want your bench to be. You can aim for a uniform height or stagger them slightly for a more organic look.
- Prepare the Legs: If your logs are round, you might want to flatten one side of each leg log so they sit more stably on the ground. A few passes with a chainsaw or a hand saw can do this.
- Attach the Legs: This is where you connect the seat to the legs. You can either drill holes through the seat logs and screw directly into the leg logs, or you can create simple notches in the leg logs for the seat logs to rest in. Using long, strong exterior screws is key for stability. For example, you might place two legs near each end of the main seat log.
- Add a Backrest (Optional): For a backrest, take another log and attach it to the back of your seat log. You can use the same screw-in method, ensuring it’s at a comfortable angle.
- Smooth and Seal: Once everything is securely attached, use sandpaper to smooth any sharp edges or rough spots, especially where people will be sitting. For outdoor use, consider a clear, water-repellent sealant to protect the wood while letting its natural beauty shine. Look for sealants recommended for outdoor furniture, like those found at reputable hardware stores or a resource like the U.S. Forest Products Laboratory’s Wood Handbook on finishing.
Pros and Cons of a Cedar Log Bench
| Pros | Cons |
|---|---|
| Extremely durable and weather-resistant | Can be heavy to move if using very large logs |
| Unique, rustic aesthetic | Requires basic safety knowledge for cutting logs |
| Comfortable and sturdy seating | Finish may need reapplication every few years |
| Simple construction, perfect for beginners | Cedar logs can be difficult to source depending on location |
Buy 2: Charming Cedar Log Planters
Add a touch of natural beauty to your garden or patio with custom-made cedar log planters. These are not only functional for growing your favorite flowers or herbs but also serve as decorative pieces that enhance your outdoor space. Cedar’s natural resistance to decay means these planters will hold up beautifully against the elements, season after season.
What You’ll Need for Cedar Planters
- Cedar Logs: Shorter sections of cedar logs. You can use single logs hollowed out, or combine multiple logs to create a planter box. Medium-sized logs, 12-24 inches in diameter, often work well.
- Tools for Hollowing: For single log planters, you’ll need tools like a large auger bit and chisel, or a smaller chainsaw operated with care, to hollow out the inside.
- Saw: To cut logs to desired lengths.
- Drill and Screws: For assembling multi-log planters or adding drainage.
- Drainage Material: Gravel or small stones for the bottom.
- Landscape Fabric or Plastic Liner: To protect the wood from constant soil moisture and improve longevity.
How to Create Cedar Log Planters: Easy Method
- Choose Your Log Style:
- Single Log Planters: Select a solid cedar log segment. The length is up to you, but aim for a log that’s at least 12-18 inches in diameter for a decent planting depth.
- Box Planters: Use four or more smaller diameter logs or sturdy branches to create a rustic box shape.
- Prepare the Log(s):
- For Single Logs: Carefully hollow out the top center of the log. You can do this with a chainsaw, making controlled cuts to remove a section, or by using powerful auger bits and chisels. Leave a thick wall of wood (at least 2-3 inches) for strength.
- For Box Planters: Cut your logs to the desired lengths for the sides of your box. You can join them at the corners by notching them or by simply screwing them together from the outside. Sometimes cutting them at a 45-degree angle for a cleaner corner fit is possible.
- Ensure Drainage: This is crucial! Drill several holes (at least 3-4) in the bottom of your planter. If hollowing a single log, drill up from the bottom. If building a box, drill through the bottom pieces.
- Line the Planter: To protect the cedar from direct contact with moist soil and extend its life, line the inside with heavy-duty landscape fabric or a sturdy plastic liner. Staple it in place, making sure it extends up the sides. Cut a few small slits in the liner where the drainage holes are.
- Add Soil and Plants: Place a layer of gravel or small stones at the bottom for extra drainage, then fill with good quality potting soil and your chosen plants.
Pros and Cons of Cedar Log Planters
| Pros | Cons |
|---|---|
| Adds significant natural beauty to gardens | Hollowing out a single log requires care and specific tools |
| Excellent natural rot and insect resistance | Lining is recommended to prolong the planter’s life |
| Cost-effective if logs are sourced affordably | May require drainage holes to be re-drilled periodically |
| Customizable in size and shape | Weight can be considerable, making them hard to move once filled |
Buy 3: Natural Cedar Log Footrest or Stool
Looking for a charming and functional piece for your living room, mudroom, or even a covered outdoor area? A segment of cedar log can be repurposed into a unique footrest or a rustic stool. It’s a simple project that feels incredibly rewarding, adding a warm, natural element to your décor without requiring complex carpentry.
What You’ll Need for a Cedar Stool
- Cedar Log Piece: A section of cedar log, about 12-18 inches tall, with a diameter that feels stable (10-16 inches is usually good).
- Saw: To cut the log to your desired height.
- Sandpaper: Various grits (e.g., 60, 80, 120) for smoothing.
- Optional: Legs or Casters: If you want to elevate the stool or make it mobile.
- Optional: Wood Sealant or wax: To protect the surface and enhance its look.
How to Make Your Cedar Log Stool in 3 Steps
- Prepare the Log: Cut your cedar log to the desired height. Once cut, take your sandpaper and begin smoothing the top and sides. Start with a coarser grit to remove any rough bark or splintered edges, then move to finer grits for a smooth, touchable surface. Cedar can be left with a bit of its natural texture, but ensure there are no splinters where users will make contact. For a more finished look, you can remove the bark completely, or leave some on for rustic charm.
- Add Legs or Casters (Optional): If you want to raise your stool or add mobility, you can attach small legs or casters to the bottom. Many kits are available at hardware stores. Simply mark their placement, pre-drill small pilot holes, and screw them securely into the bottom of the log. Ensure they are attached to a solid part of the log. For a sturdier base without added hardware, you can cut short, thicker cedar blocks and attach them as “feet” to the bottom of your main log.
- Apply a Finish: To protect the wood and bring out its natural beauty, apply a clear wood sealant, a natural oil finish like tung oil, or a furniture wax. Follow the product instructions for application and drying times. For indoor use, a simple buffing with a soft cloth can enhance its natural sheen. A good tip for outdoor-covered use is looking for sealants approved by woodworking professionals for exterior applications, as recommended in resources like the Woodworkers Guild of America for finishing techniques.
Pros and Cons of a Cedar Log Stool
| Pros | Cons |
|---|---|
| Adds a unique, natural touch to any room | Can be quite heavy depending on log size |
| Very simple to create with minimal tools | May require a waterproof sealant for use in damp areas |
| Multi-functional as a footrest, stool, or side table | Natural shape might make it slightly uneven to sit on without a cushion |
| Durable and long-lasting due to cedar’s properties | If adding legs, ensure they are securely attached for stability |
Buy 4: Cedar Log Birdhouse or Feeder
Attract feathered friends to your yard with a charming birdhouse or feeder crafted from cedar logs. Cedar is an excellent material for birdhouses because its natural oils make it resistant to decay and pests, and it doesn’t require harsh chemical treatments that could harm birds. This project is a wonderful way to bring wildlife closer and add a quaint, rustic element to your garden.
What You’ll Need for a Cedar Birdhouse
- Cedar Log Section: A section of a smaller diameter cedar log (e.g., 6-10 inches diameter), about 12-18 inches long. If creating a feeder, a flatter, wider log segment might be better.
- Tools for Hollowing: A drill with a hole saw bit (various sizes for entrance holes, e.g., 1 ¼” to 1 ½” for many small birds), or a spade bit and chisel.
- Saw: To make clean cuts.
- Sandpaper: To smooth edges.
- Exterior Wood Glue and Screws/Nails: For assembly.
- Hanging Mechanism: Screw eyes or wire.

Frequently Asked Questions About Cedar Log Projects
Q1: What makes cedar wood a good choice for outdoor projects?
Cedar is naturally resistant to decay and insects, meaning it lasts a long time outdoors without special treatments. It also smells wonderful!
Q2: Do I need professional tools to work with cedar logs?
Not at all! For many beginner projects, you’ll only need basic tools like a chainsaw (used safely!), a saw, sandpaper, and basic fasteners. Special tools are usually for advanced techniques.
Q3: How difficult are cedar log projects for beginners?
We’ve selected projects that are very beginner-friendly. They focus on simple cuts and assembly, giving you great results without needing years of experience.
Q4: Where can I find cedar logs if I don’t have them already?
You might find cedar logs from local sawmills, arborists when trees are cleared, or even by contacting people who have recently had cedar trees removed. Always ensure you have permission to take logs.
Q5: How should I prepare cedar logs before using them for a project?
It’s best to let logs dry (season) for a while to prevent cracking later. You’ll also want to remove bark if the project requires a smoother finish, though some projects use the natural bark for charm.
Q6: Are cedar log projects expensive to make?
Cedar log projects can be very budget-friendly, especially if you source your logs for free or at a low cost. The main expenses are typically your tools and any finishing supplies like sealers or fasteners.
Q7: What kind of finish is best for cedar log projects?
For outdoor projects, a clear water-repellent sealant is often best to protect the wood while letting its natural color show. For indoor pieces, a simple wax or poly seal can be lovely.