Ideas for Cedar Planks: Genius Grilling Essentials
Unlock incredible flavor and elevate your grilling game with simple cedar planks! These easy-to-use grilling essentials impart a smoky, woody essence to your favorite foods, making even beginner cooks feel like barbecue pros. From fish to vegetables, discover how cedar planks transform ordinary meals into extraordinary outdoor feasts.
Grilling can sometimes feel a bit… ordinary, right? You’ve got your trusty tools, your favorite recipes, but something feels missing to really wow your taste buds. If you’re looking to add a special touch to your backyard barbecues that’s both simple and incredibly effective, then you’re in the right place! Many home cooks find it challenging to introduce new flavors or techniques without a lot of fuss or fancy equipment. But what if I told you there’s an age-old secret that’s been hiding in plain sight, and it requires just a simple piece of wood? Get ready to discover the magic of cedar planks and how they can seriously upgrade your grilling. We’ll go through everything you need to know, from picking the right plank to creating mouthwatering dishes that will have everyone asking for more.
What Exactly Are Cedar Grilling Planks?
Cedar grilling planks are simply planks of wood, most commonly made from Western Red Cedar, that are used as a cooking surface on a grill. They’re typically about 1/2 inch thick and come in various sizes. The genius behind them is twofold: they act as a barrier between your food and direct heat, preventing delicate items from falling through the grates or burning too quickly, and they release a subtle, aromatic smoke as they heat up, infusing your food with a wonderful woody flavor. It’s a bit like steaming your food with a hint of forest mist!
Why Choose Cedar?
Cedar is the go-to wood for grilling planks for good reason. It has a naturally delicious aroma and a flavor profile that perfectly complements a wide variety of foods, especially salmon and other rich fish, but also poultry, pork, and vegetables. It’s also readily available and relatively inexpensive, making it an accessible upgrade for any home cook.
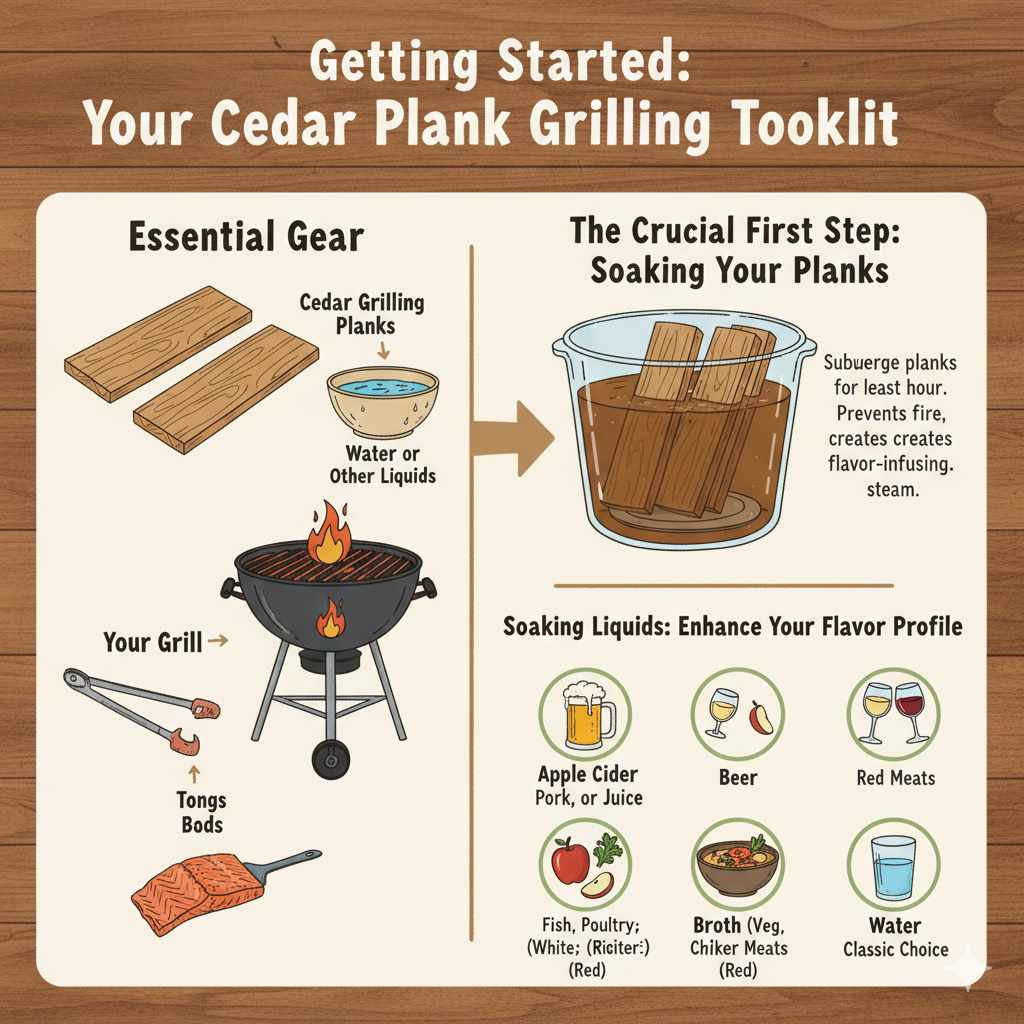
Getting Started: Your Cedar Plank Grilling Toolkit
Before we dive into the delicious recipes, let’s make sure you have what you need. It’s pretty straightforward, which is part of the beauty of this grilling method!
Essential Gear
Cedar Grilling Planks: You can find these at most grocery stores, specialty cooking shops, or online retailers. Look for planks specifically designed for grilling, usually labeled as food-grade.
Water or Other Liquids: For soaking.
Your Grill: Gas or charcoal, both work!
Tongs: For handling the planks.
* Food: Whatever deliciousness you plan to cook!
The Crucial First Step: Soaking Your Planks
This is hands-down the most important part of using cedar planks safely and effectively. Skipping this step can lead to a flaming plank and a smoky disaster, not a smoky delight!
Soaking your cedar planks is vital to prevent them from catching fire and to create the steam that infuses your food with flavor. The wood needs to absorb moisture so it smolders and steams rather than burns up. Aim for at least 1 hour of soaking time in water. Some folks like to get creative and soak their planks in other liquids for an extra flavor boost.
Soaking Liquids: Enhance Your Flavor Profile
While plain water is perfectly fine, why not add another layer of taste?
- Water: The classic choice, allowing the cedar’s natural flavor to shine.
- Apple Cider or Juice: Adds a touch of sweetness that pairs wonderfully with pork and chicken.
- Beer: A lager or pale ale can impart a subtle malty note, excellent for red meats.
- Wine: White wine for fish and poultry, or red wine for richer meats.
- Broth: Vegetable, chicken, or beef broth adds a savory base.
To soak, submerge the planks completely in your chosen liquid. You might need to place a plate or a heavy object on top to keep them underwater. Ensure they’re fully saturated before placing them on the grill.
Cedar Plank Grilling: Step-by-Step Guide
Ready to get grilling? Follow these simple steps for a successful and delicious experience.
- Preheat Your Grill: Get your grill to a medium heat, around 350-400°F (175-200°C). For gas grills, this means setting your burners to medium. For charcoal grills, arrange your coals for indirect heat. This means having the coals mainly on one side, so your food isn’t directly over the hottest part of the grill.
- Prep Your Plank: Remove your soaked cedar plank from the liquid. Gently brush off any excess water, but don’t try to dry it completely. You want it damp. Apply any seasonings or marinades directly to the plank’s surface where your food will rest.
- Place Food on the Plank: Arrange your prepared food (salmon, chicken breasts, vegetables, etc.) onto the plank. Leave a little space between pieces if possible to allow for even cooking and smoke circulation.
- Grill Gently: Carefully place the plank with the food onto the preheated grill, ideally over the indirect heat zone. Close the grill lid. This traps the smoke and heat, allowing the cedar to work its magic.
- Cook and Monitor: Cooking times will vary based on the type and thickness of your food and the heat of your grill. For salmon fillets, it might take 15-25 minutes. Chicken will take longer, potentially 30-45 minutes depending on thickness. Keep an eye on the plank; if it starts to flare up excessively, briefly move it to a cooler spot on the grill or close the lid to starve the flames of oxygen. A little smoldering is good; fiery flames are not. You’ll know fish is done when it flakes easily with a fork. Chicken should reach an internal temperature of 165°F (74°C). Consider investing in a reliable digital instant-read thermometer for perfect results.
- Rest and Serve: Once cooked, carefully remove the plank and food from the grill using tongs. Let it rest for a few minutes before serving directly from the plank. This allows the juices to redistribute and makes for a beautiful presentation!
Genius Ideas for Cedar Planks: Beyond the Salmon
While salmon is the undisputed king of cedar plank cooking, don’t stop there! These planks are incredibly versatile and can elevate a surprising range of ingredients.
Seafood Sensations
Your favorite fish will sing on a cedar plank! The gentle, smoky infusion is perfect for delicate seafood.
- Shrimp: Marinate shrimp in garlic, herb butter, or a lemon-dill mixture. Grill on a plank for about 5-8 minutes until pink and opaque.
- Scallops: Sear large sea scallops for a few minutes per side on a preheated plank with a touch of butter and herbs.
- Cod, Halibut, or Other White Fish: These milder white fish benefit greatly from the subtle cedar aroma. A simple preparation with lemon slices, dill, and a drizzle of olive oil works wonders.
Poultry Perfection
Chicken and turkey take on a wonderfully moist and flavorful profile when plank-grilled.
- Chicken Breasts or Thighs: Marinate chicken pieces in your favorite sauce (teriyaki, BBQ, lemon-herb) and grill on a plank until cooked through. The plank helps keep chicken breasts from drying out.
- Cornish Game Hens or Quail: Cut them in half or quarters and grill on a larger plank for a unique presentation and taste.
- Turkey Cutlets or Tenderloin: Excellent for faster cooking meats, imparting a lovely smoky note without overcooking.
Meat Masterpieces
Don’t shy away from grilling red meats and pork on cedar planks!
- Pork Tenderloin or Chops: Pork pairs exceptionally well with the woody notes of cedar. A brine or a simple seasoning rub before grilling works beautifully.
- Steak: For a more subtle smoky flavor than direct grilling, steaks cooked on cedar planks can be a delightful alternative, especially for thinner cuts or when you want to avoid excessive char. Season well and grill to your preferred doneness.
- Bacon-Wrapped Anything: Wrap asparagus, shrimp, or dates in bacon and grill on a cedar plank. The plank contains any grease runoff and adds a hint of smoke.
Vegetable Vibrancy
Vegetables benefit from the gentle cooking and added aroma that cedar planks provide.
- Asparagus: Toss with olive oil, salt, pepper, and garlic powder. Grill for 10-15 minutes.
- Corn on the Cob: Husk your corn, brush with butter or oil, and place directly on the plank. Grill with the lid closed, turning occasionally, until tender and slightly charred.
- Zucchini and Squash: Slice lengthwise or into planks, toss with herbs and olive oil, and grill until tender.
- Mushrooms: Large portobello mushrooms or clusters of cremini can be grilled with butter, garlic, and herbs.
- Onions and Peppers: Slice thick and grill for a sweet, smoky side dish.
Desserts? Yes, Desserts!
Cedar planks can even add a sophisticated twist to your sweet endings!
- Grilled Fruit: Slices of pineapple, peaches, or pears brushed with cinnamon sugar or a hint of maple syrup become wonderfully caramelized and smoky.
- Cheesecake: Yes, you can bake a small cheesecake on a cedar plank for a unique, smoky crust! Use a recipe for individual cheesecakes or a small springform pan.
Cedar Plank vs. Other Grilling Methods
It’s helpful to see how cedar plank grilling stacks up against other popular methods.
| Method | Pros | Cons | Best For |
|---|---|---|---|
| Cedar Plank Grilling | Infuses food with smoky, woody flavor. Keeps food moist. Prevents delicate foods from falling through grates. Easy cleanup (often disposable). Beautiful presentation. | Requires soaking. Planks can catch fire if not properly used. Limited direct searing capability. Planks are single-use. | Fish (especially salmon), poultry, vegetables, softer meats. |
| Direct Grilling (Grill Grates) | Achieves excellent sear and char. Fast cooking times for thinner items. Can handle marinades with sugar that would burn on indirect heat. Versatile. | Delicate foods can fall through grates. Risk of burning or drying out. Requires more attention to prevent flare-ups. | Steaks, burgers, chicken pieces, vegetables, corn on the cob. |
| Indirect Grilling (Kettle Grill or Gas Grill Zone) | Provides gentle, even cooking without constant turning. Good for larger cuts or thicker items. Reduces risk of burning. | Doesn’t impart sear or char. Can be slower. Less intense smoky flavor compared to direct grilling with wood chips. | Roasts, whole chickens, ribs, larger cuts of meat. |
| Foil Packets (Parchment or Aluminum) | Keeps food incredibly moist and tender. Easy cleanup. Keeps flavors contained. Easy to customize with different liquids and seasonings. | No sear or char. Doesn’t impart wood smoke flavor. Can steam food rather than grill it. | Vegetables, fish, chicken pieces, stews. |
Tips for Cedar Plank Success
Here are some pro tips to ensure your cedar plank grilling adventures are always a hit.
- Choose the Right Plank Size: Make sure your plank is large enough to hold your food without pieces hanging off the sides.
- Don’t Overcrowd: Give food space on the plank for even cooking and smoke circulation.
- Prevent Flare-Ups: If flames become too intense, close the grill lid to starve them of oxygen. You can also move the plank to a cooler part of the grill temporarily. A light spritz of water can help, but be careful not to extinguish the smoldering process.
- Consider the Lid: Always keep the grill lid closed when cooking on a plank. This traps the smoky steam and cooks your food more efficiently.
- Re-using Planks? Generally, cedar planks are intended for single use. Once they’ve been thoroughly burned and charred, they lose their optimal infusing qualities. However, you might get a second use out of a plank if it’s only lightly used, but for the best flavor and safety, it’s recommended to use a fresh plank each time. For more information on wood types for grilling, resources like those from the U.S. Forest Service can be very informative.
- Flavor Combinations: Experiment! Marinate your protein or vegetables beforehand, and then use simple toppings like lemon, herbs, garlic, or a drizzle of honey on the plank itself right before placing the food.
Safety First!
Working with heat and wood requires a little care.
Always place your soaked plank on the grill over indirect heat if possible, especially when you’re starting out. This gives you more control. Keep an eye on it, and have tongs ready to move it if needed. Never leave a grilling plank unattended. Ensure your grill is stable and on a level surface.

Frequently Asked Questions About Cedar Planks
Have more questions? We’ve got answers!
Q1: How long do I need to soak cedar planks?
You should soak your cedar planks for at least 1 hour. For thicker planks or to ensure maximum moisture saturation, 2 hours or even overnight is recommended. This prevents them from burning up too quickly.
Q2: Can I reuse cedar planks?
Cedar planks are generally designed for single use. After one or two uses, they become heavily charred and can lose their ability to impart flavor effectively. For the best results and safety, it’s usually best to use a fresh plank for each grilling session.
Q3: What kind of wood is best for grilling planks?
Western Red Cedar is the most popular and widely available choice for grilling planks because of its pleasant aroma and mild flavor that pairs well with many foods. Other woods like Alder or Maple can also be used, offering slightly different flavor profiles.
Q4: My plank caught fire! What did I do wrong?
This usually happens if the plank wasn’t soaked long enough, or if it’s placed directly over high, direct heat for too long. Ensure your plank is thoroughly saturated, and try to cook over indirect heat. If it flares up, close the grill lid to cut off oxygen for a moment, or move the plank to a cooler zone.
Q5: Can I use cedar planks on an electric grill?
Yes, you can use cedar planks on an electric grill. Preheat the electric grill to medium-high heat. Place the soaked plank directly on the grill grates and allow it to heat up for a few minutes before adding your food. Keep the lid closed as much as possible.
Q6: Whatfoods are most suitable for cedar plank cooking?
Cedar planks are fantastic for fatty fish like salmon, milder white fish, shrimp, chicken, and pork. They also work well for vegetables like asparagus, corn, and root vegetables, as well as fruits for dessert. The gentle steam and smoke infusion are ideal for these ingredients.
Conclusion
There you have it! Cedar plank grilling is a simple, accessible technique that can dramatically enhance the flavor and moisture of your grilled dishes. From that perfect piece of salmon to tender chicken and sweet grilled fruit, the possibilities are surprisingly vast. Remember the key steps: soak thoroughly, preheat your grill, and cook with the lid closed. Don’t be afraid to experiment with different foods and marinades. With just a few easy-to-find planks, you can transform your backyard barbecues into memorable culinary experiences. So grab some planks, fire up the grill, and get ready to taste the subtle, smoky magic that cedar brings to your table. Happy grilling!