
Staining Mahogany Wood: Achieve a Luxe Finish!
Staining mahogany wood enhances its rich color and grain. Use a quality wood stain for best results.
Mahogany wood is renowned for its beauty and durability, making it a popular choice for furniture and cabinetry. The natural reddish-brown hue gives it a warm, luxurious appearance that many homeowners love. Staining mahogany not only enhances its color but also protects the wood from wear and tear.
Different stain types, from oil-based to water-based, can alter the final look. Choosing the right stain allows you to highlight the unique grain patterns of mahogany. Proper preparation and application techniques are crucial for achieving an even finish. With the right approach, you can transform your mahogany pieces into stunning focal points in your home.
Introduction To Mahogany Wood
Mahogany wood is renowned for its beauty and durability. This rich, reddish-brown wood is a favorite among woodworkers. Its unique properties make it ideal for various projects. Understanding its appeal and uses enhances your woodworking skills.
The Appeal Of Mahogany
Mahogany has several features that attract woodworkers:
- Rich Color: The deep, warm tones add elegance.
- Grain Pattern: The fine, straight grain creates a smooth finish.
- Workability: It is easy to cut, shape, and sand.
- Durability: Resistant to decay and insects.
This wood ages beautifully. It develops a patina that enhances its charm over time.
Common Uses In Woodworking
Mahogany is versatile and used in many projects:
| Application | Description |
|---|---|
| Furniture | Used for tables, chairs, and cabinets. |
| Cabinetry | Ideal for kitchen and bathroom cabinets. |
| Musical Instruments | Common in guitars and pianos for sound quality. |
| Boat Building | Resistant to moisture, perfect for marine use. |
Crafting with mahogany elevates your projects. Its rich qualities lead to stunning results.
Preparation For Staining
Preparing mahogany wood for staining is crucial. Proper preparation ensures even color and a smooth finish. Follow these steps for the best results.
Cleaning The Wood Surface
Cleaning is the first step. Dust, dirt, and grease can ruin your finish. Use the following steps:
- Gather your materials: a soft cloth, mild soap, and water.
- Dampen the cloth with soapy water.
- Wipe the surface gently. Avoid soaking the wood.
- Rinse with a clean, damp cloth.
- Allow the wood to dry completely.
Sanding Techniques
Sanding prepares the wood for a smooth finish. Use the right techniques for the best effect:
- Start with coarse sandpaper (80-120 grit).
- Sand along the grain of the wood.
- Progress to finer sandpaper (220 grit).
- Remove dust with a vacuum or tack cloth.
- Check for rough spots and sand again if needed.
Proper sanding helps the stain absorb evenly. It enhances the beauty of mahogany.
Choosing The Right Stain
Staining mahogany wood enhances its natural beauty. Selecting the right stain is crucial. Different stains offer unique finishes and durability. Understanding the types helps in making a smart choice.
Oil-based Stains
Oil-based stains are popular for mahogany wood. They penetrate deeply, providing rich color. Here are some benefits:
- Durability: Oil-based stains last longer.
- Deep penetration: They enhance the wood grain.
- Color variety: Many shades are available.
Consider these points:
| Advantages | Disadvantages |
|---|---|
| Long-lasting finish | Long drying time |
| Rich color depth | Strong odor |
Water-based Stains
Water-based stains are eco-friendly. They dry quickly and are easy to clean. Benefits include:
- Fast drying: Ready for the next coat sooner.
- Low odor: More pleasant to use.
- Easy cleanup: Just soap and water.
Key points to know:
| Advantages | Disadvantages |
|---|---|
| Quick to apply | May raise wood grain |
| Less harmful chemicals | Less color depth |
Staining Techniques
Staining mahogany wood enhances its natural beauty. Different techniques can achieve stunning results. Choosing the right method is crucial for the best finish.
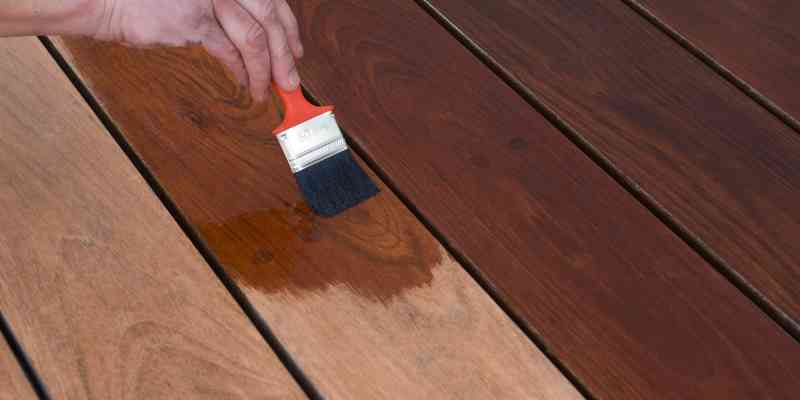
Applying Stain With A Brush
Using a brush is a popular method for applying stain. Here are some steps to follow:
- Choose a high-quality brush. A synthetic brush works well with water-based stains.
- Stir the stain thoroughly. This ensures an even color.
- Dip the brush into the stain. Remove excess stain by wiping the brush on the rim of the can.
- Apply the stain evenly. Work in long, smooth strokes.
- Follow the wood grain. This enhances the natural look.
- Wait a few minutes. Let the stain penetrate the wood.
- Wipe off excess stain. Use a clean cloth to remove any puddles.
Brush application gives good control. It works well for intricate areas.
Using A Cloth For Stain Application
Applying stain with a cloth is another effective method. It allows for a more hands-on approach. Follow these steps:
- Select a clean, lint-free cloth.
- Pour some stain onto a flat surface.
- Dip the cloth in the stain.
- Rub the cloth on the wood. Use circular motions for even coverage.
- Keep applying until satisfied. Ensure even color across the surface.
- Wipe off excess stain with a clean section of the cloth.
This method is quick and easy. It is perfect for larger areas. Cloth application gives a softer finish.
Enhancing The Grain
Staining mahogany wood can bring out its beautiful grain. The rich colors and patterns add depth and character. Proper techniques enhance the natural beauty of mahogany.
Conditioning The Wood
Before staining, prepare the wood properly. Conditioning helps the stain absorb evenly. This step prevents blotchiness and uneven color.
Follow these steps for conditioning:
- Clean the wood surface thoroughly.
- Apply a wood conditioner with a brush.
- Allow the conditioner to dry as per instructions.
Using a conditioner ensures your stain has a smooth finish.
Layering Stains For Depth
Layering different stains can create stunning effects. Start with a base color. Then, add additional layers for complexity.
Consider these tips for layering:
- Choose colors that complement mahogany.
- Apply the first layer and let it dry completely.
- Test on a scrap piece to see the effect.
Layering enhances the grain and adds richness.
Here’s a simple table summarizing stain layering:
| Layer | Color | Purpose |
|---|---|---|
| 1 | Light Walnut | Base tone |
| 2 | Dark Mahogany | Add depth |
| 3 | Cherry | Warmth |
Experimenting with layers can lead to unique results.
Sealing And Protecting
Sealing and protecting mahogany wood is crucial for longevity. Proper sealing prevents moisture damage, scratches, and fading. A good sealant enhances the wood’s natural beauty. It also keeps the rich color vibrant over time.
Selecting The Right Sealant
Choosing the right sealant is essential. Different types offer various benefits. Below are common sealant options:
| Sealant Type | Benefits | Best For |
|---|---|---|
| Polyurethane | Durable, water-resistant | High-traffic areas |
| Varnish | UV protection, glossy finish | Outdoor furniture |
| Oil-based Sealants | Deep penetration, natural look | Indoor projects |
| Water-based Sealants | Quick drying, low odor | Indoor and outdoor use |
Consider the environment and usage. For outdoor projects, choose UV-resistant options. For indoor items, an oil-based sealant may work best.
Application Tips For A Smooth Finish
Applying sealant correctly ensures a smooth finish. Follow these tips for best results:
- Prepare the Surface: Clean the wood thoroughly.
- Choose the Right Tools: Use a high-quality brush or roller.
- Test First: Always do a test patch.
- Apply Evenly: Use long, even strokes.
- Follow Instructions: Check the sealant’s specific guidelines.
- Allow Drying Time: Let each coat dry completely.
For a flawless finish, avoid over-brushing. Keep the application light and even. This ensures a beautiful, protective layer over your mahogany wood.
Troubleshooting Common Issues
Staining mahogany wood can be rewarding. Yet, common issues may arise. Knowing how to troubleshoot these problems will improve your results. Below are solutions for two frequent issues: blotching and uneven stain.
Dealing With Blotching
Blotching occurs when the stain absorbs unevenly. This often happens with soft spots in the wood. Follow these steps to minimize blotching:
- Use a Pre-Stain Conditioner: This evens the absorption.
- Test Before Staining: Always test on a scrap piece.
- Apply Thin Coats: Layering helps control absorption.
For tough blotches, sand the area lightly. Use fine-grit sandpaper for best results.
Fixing Uneven Stain
Uneven stain can ruin the beauty of mahogany wood. This issue often arises from inconsistent application or different wood densities. Here’s how to fix it:
- Identify the Problem Areas: Look for lighter or darker spots.
- Sand the Affected Areas: Lightly sand with fine-grit paper.
- Reapply Stain: Use a clean brush for even application.
- Blend with a Clean Cloth: Wipe gently to smooth the finish.
Always allow each coat to dry completely before applying another. This ensures a uniform color.
Maintenance And Care
Proper maintenance is essential for keeping stained mahogany wood looking beautiful. Regular care will enhance its natural beauty and longevity. Follow these simple tips to ensure your mahogany remains in top condition.
Regular Cleaning Tips
Cleaning your mahogany wood regularly helps maintain its shine. Use these tips for effective cleaning:
- Dust Regularly: Use a soft, dry cloth to remove dust.
- Avoid Harsh Chemicals: Use mild soap and water for cleaning.
- Wipe Spills Immediately: Prevent stains by cleaning up spills right away.
For a deeper clean, consider these steps:
- Mix a solution of warm water and mild soap.
- Soak a cloth in the solution, then wring it out.
- Wipe the wood gently, following the grain.
- Dry the surface immediately with a clean cloth.
Touch-up Techniques
Touch-ups can fix minor scratches and blemishes. Follow these techniques for effective touch-ups:
| Technique | Description |
|---|---|
| Wood Filler | Apply wood filler to deep scratches. Sand after it dries. |
| Stain Marker | Use a stain marker for small scratches. Match the color. |
| Touch-Up Stain | Apply touch-up stain with a fine brush. Blend carefully. |
Use these techniques to maintain the beauty of your mahogany wood. Regular care will ensure it remains a stunning feature in your home.
Advanced Techniques
Staining mahogany wood can elevate its natural beauty. Advanced techniques help create stunning finishes. Explore these methods to enhance your projects.
Creating Custom Stain Colors
Custom stain colors allow for unique wood finishes. Here’s how to mix your own:
- Start with a base stain color.
- Add a small amount of different stains.
- Mix thoroughly until you achieve the desired shade.
Test the color on a scrap piece of mahogany. This helps ensure the final look meets your expectations.
Here’s a simple table for mixing ratios:
| Base Color | Additional Color | Ratio |
|---|---|---|
| Light Brown | Dark Walnut | 3:1 |
| Cherry | Espresso | 2:1 |
| Golden Oak | Mahogany | 1:2 |
Staining Inlays And Engravings
Inlays and engravings add charm to mahogany wood. Staining these details requires precision.
Follow these steps for best results:
- Sand the area to smooth the surface.
- Apply a wood conditioner to prevent blotching.
- Use a fine brush to carefully stain the inlays.
- Wipe off excess stain quickly to avoid streaks.
- Seal the stained area with a clear finish.
Staining enhances the contrast between the inlays and the wood grain. This creates a striking visual effect.
Frequently Asked Questions
How Do You Prepare Mahogany Wood For Staining?
To prepare mahogany wood for staining, start by sanding the surface. Use fine-grit sandpaper for a smooth finish. Remove dust with a tack cloth. If the wood has imperfections, fill them with wood filler. Ensure the wood is clean and dry for optimal stain absorption.
What Type Of Stain Is Best For Mahogany?
Oil-based stains are often recommended for mahogany wood. They penetrate deeply and enhance the natural grain. Water-based stains can also be used, providing quicker drying times. Choose a stain that complements mahogany’s rich color for the best results. Test on a scrap piece first.
How Long Does Mahogany Take To Dry After Staining?
Mahogany typically takes about 24 hours to dry after staining. However, drying time may vary based on humidity and temperature. Always check the manufacturer’s instructions for specific drying times. Ensure the area is well-ventilated to speed up the drying process.
Can You Stain Over Existing Finishes On Mahogany?
Staining over existing finishes on mahogany is possible but requires caution. Ensure the surface is clean and lightly sanded. Remove any gloss to allow the new stain to adhere. Test a small area first to see if the result meets your expectations.
Conclusion
Staining mahogany wood enhances its natural beauty and richness. Proper preparation and technique are essential for the best results. Choosing the right stain will make a significant difference in the final appearance. With care and attention, your mahogany projects will shine, showcasing the wood’s stunning grain and color.
Enjoy your woodworking journey!