Are Toilet Flanges Glued? Proven Essential
Toilet flanges are typically not glued to the drainpipe. They are usually secured with screws directly to the subfloor, ensuring a stable and leak-free connection. Understanding this essential detail prevents common installation errors, guaranteeing a long-lasting toilet setup.
Hey there, DIY adventurers! Md Meraj here, ready to demystify another common home plumbing puzzle. Ever found yourself scratching your head, wondering about the right way to connect a toilet to the sewer line? It’s a crucial step in any bathroom renovation, and one question often pops up: “Are toilet flanges glued?” It’s a valid question, especially when you see other pipes connected with glue. But guess what? For a toilet flange, the answer is usually a resounding “no.” This might seem a little confusing at first, but stick with me, and we’ll clear it all up.
We’ll walk through exactly how a toilet flange should be installed, what materials are involved, and why the proper method is so important for a leak-free and stable bathroom. Let’s get your toilet installed with confidence, the right way, every time!
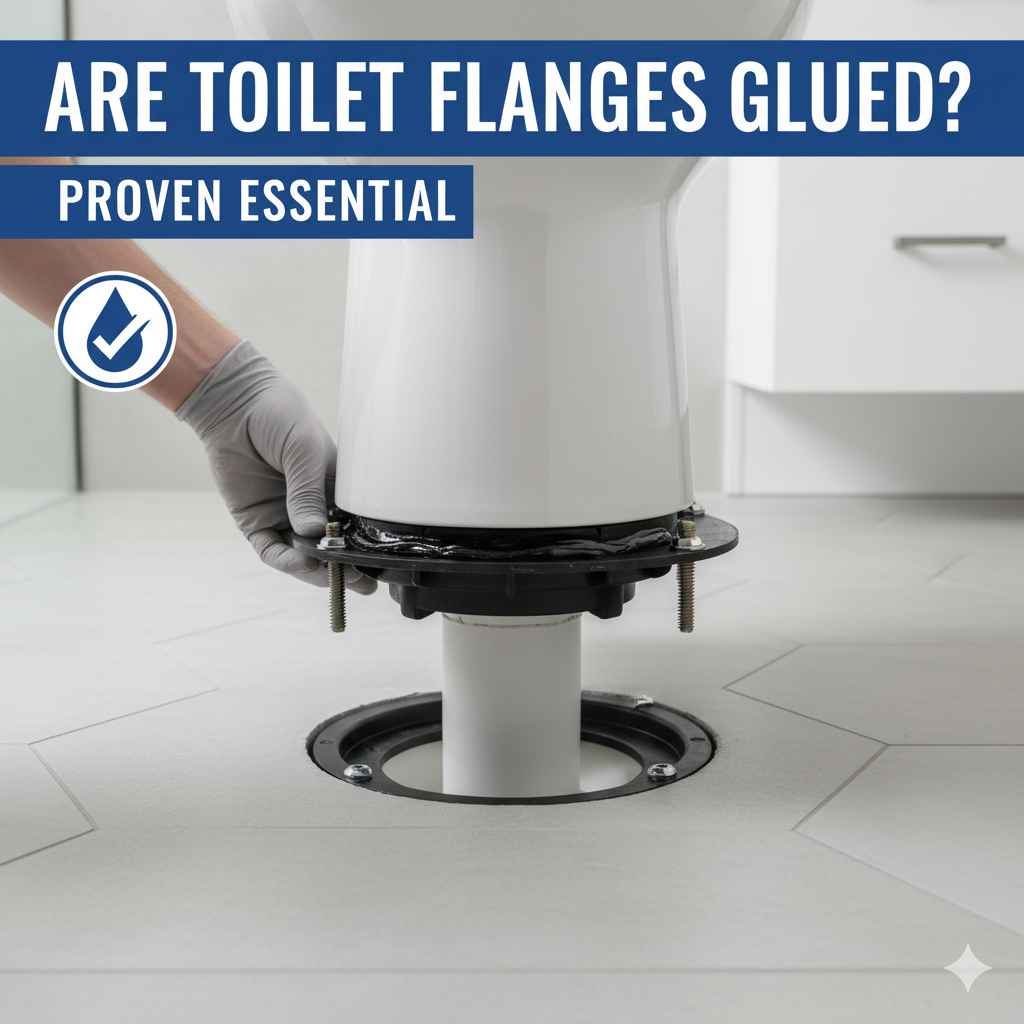
Understanding the Toilet Flange: More Than Just a Ring
Before we tackle the gluing question, let’s get acquainted with what a toilet flange actually is. Think of it as the unsung hero of your bathroom plumbing. It’s the fitting that connects your toilet to the waste pipe inside your floor. It sits directly on the subfloor or finished floor, and the toilet bolts directly into it. A good flange forms a watertight seal with the wax ring (or alternative seals) that sits on top of it, preventing any nasty leaks from escaping into your home. It also provides a secure anchor for your toilet.
You’ll typically find toilet flanges made of PVC (polyvinyl chloride), ABS (acrylonitrile butadiene styrene), or even cast iron for older plumbing systems. Each material has its pros and cons, but understanding their characteristics helps in choosing the right one and knowing how to install it. The key takeaway here is that the flange’s job is twofold: create a seal and provide stability. This is why the method of attachment is so critical.
Why the Confusion About Glue?
It’s understandable why many DIYers might think toilet flanges are glued. After all, in the world of PVC plumbing, solvent cement—more commonly known as glue—is the go-to method for joining pipes. You might have seen it used for connecting drain, waste, and vent (DWV) pipes in your home. The process involves cleaning the pipe and fitting, applying primer (usually purple, so you know it’s done!), and then applying the solvent cement before pushing the pipe into the fitting. This creates a molecular bond, making the connection permanent and watertight.
However, the toilet flange isn’t just a regular pipe fitting that gets inserted into another pipe. It’s a specialized component designed to sit on the floor and connect to the vertical drainpipe below the floor. The connection point that needs sealing is between the toilet bowl and the flange, not typically the flange itself to the drainpipe in the way you might assume. While some flange adapters might use glue to connect to a drainpipe, the flange itself, the part visible in your bathroom that the toilet bolts to, is secured differently.
Are Toilet Flanges Glued? The Proven Essential Answer
The short and direct answer to “Are toilet flanges glued?” is: Typically, no. While the drainpipe connecting to the underside of the flange might be glued if it’s a PVC or ABS fitting, the toilet flange itself, the crucial ring that sits on your bathroom floor and anchors the toilet, is almost always secured to the subfloor using screws. This is the proven, essential method for ensuring a stable and leak-free toilet installation.
Why screws? Because the flange needs to be a solid, immovable anchor point for the toilet. Imagine the forces a toilet experiences—weight, shifting, flushing. A glued connection from the flange to the pipe might be strong, but it wouldn’t provide the necessary structural rigidity against the floor. Screws create a direct, robust mechanical bond between the flange and the framing of your house, preventing any wobble or movement of the toilet. This stability is paramount for maintaining the seal between the toilet and the wax ring, preventing leaks and ensuring your toilet stays put.
How a Toilet Flange is Actually Installed
Let’s break down the standard, proven method for installing a toilet flange. This process ensures that your toilet is not only securely fastened but also forms a reliable seal with your plumbing.
- Prepare the Drainpipe: Ensure the end of the drainpipe rising from below (typically the 3-inch or 4-inch PVC or ABS waste pipe) is clean and properly cut so that the flange will sit at the correct height – usually flush with or slightly above the finished floor. If this connection uses a glued PVC/ABS fitting, this is where the solvent cement would be applied to join the drainpipe to the flange’s hub.
- Position the Flange: Place the toilet flange over the drainpipe. The pipe should fit snugly into the underside of the flange’s hub. Make sure the flange is oriented correctly, with the screw holes positioned to allow for secure attachment to the subfloor and to align with the toilet bolt slots.
- Secure the Flange to the Floor: This is the critical step. Use appropriate screws—typically stainless steel or brass to prevent rust—to anchor the flange directly to the subfloor. The flange will have specific holes for these screws. Drive the screws through these holes and firmly into the subfloor. It’s essential to use at least two screws, but four is better for maximum stability. Ensure the flange is snug against the floor but not so tight that it warps.
- Test for Stability: Once screwed down, give the flange a gentle push and pull. It should feel solid and immovable, with no rocking or shifting.
- Gasket and Toilet Installation: The flange is now ready for the wax ring (or a wax-free alternative) to be placed on top of it. The toilet then sits over the wax ring, aligning its bottom horns with the flange’s slots, and is bolted down to the flange.
This screw-down method is the industry standard for a reason. It provides the necessary mechanical strength and stability that simply gluing wouldn’t achieve for this specific fixture. For more detailed guidance, the International Code Council Evaluation Service (ICC-ES) provides standards and testing protocols for plumbing products, including flanges, ensuring they meet safety and performance requirements.
Types of Toilet Flanges and Their Installation Nuances
While screw-down flanges are the norm, there are a few variations, and understanding them can prevent installation headaches. Most flanges are designed to connect to standard PVC or ABS drainpipes.
Common Flange Materials
- PVC (Polyvinyl Chloride): The most common type today. It’s lightweight, durable, and easy to work with. PVC flanges typically have a hub designed to accept standard PVC primer and solvent cement for connecting to the PVC drainpipe.
- ABS (Acrylonitrile Butadiene Styrene): Similar to PVC, but often found in older homes. ABS also uses primer and solvent cement for connections.
- Cast Iron: A heavier, more durable material, often found in older plumbing systems. Cast iron flanges may have a leaded joint or a rubber gasket connection to the drainpipe, and they are always screwed to the floor.
- Brass: Sometimes used, particularly for specific applications or in older high-end installations. Brass flanges are also screwed down.
Flange Designs for Different Needs
Most flanges are designed to sit either flush with the finished floor or slightly above it. There are also specialized flanges:
- Offset Flanges: These allow you to shift the toilet’s position slightly forward or backward from the drainpipe’s center. This is incredibly useful when the rough-in plumbing isn’t perfectly centered. They are still secured with screws.
- Reinforced Flanges: These have metal reinforcements built into the flange ring, offering extra strength, particularly beneficial for heavy toilets or high-traffic bathrooms. These are also screwed down.
- Surface-Mount Flanges: These are designed to attach directly to the surface of a finished floor (like tile) without needing to be recessed into the subfloor. They will still require screws for secure attachment.
Connecting the Flange to the Drainpipe (Where Glue Might Appear)
This is where the confusion often lies. The connection of the toilet flange’s hub to the main drainpipe can indeed be glued if both the flange hub and the drainpipe are made of PVC or ABS. The process involves:
- Cutting the drainpipe to the correct height for the flange to sit properly.
- Cleaning the inside of the flange hub and the outside of the drainpipe.
- Applying PVC or ABS primer to both surfaces.
- Applying the appropriate solvent cement to both surfaces.
- Quickly inserting the pipe into the hub with a slight twist to ensure even distribution of the cement.
- Holding the joint for about 30 seconds while the cement sets initially.
However, it’s crucial to remember that this glued joint is under the floor. The flange itself, the part visible in your bathroom that the toilet bolts to, is still independently secured to the subfloor with screws. The glue secures the flange to the pipe; the screws secure the flange to the floor. Both are essential for a robust installation.
The Importance of a Secure Flange: Why It’s Proven Essential
A properly installed toilet flange is the foundation of a stable and leak-free bathroom. Let’s not underestimate its role:
- Preventing Leaks: A secure flange, combined with a properly seated wax ring, creates a watertight seal. If the flange is loose or wobbly, the wax ring can be compromised, leading to leaks under the toilet. These leaks can cause significant damage to subfloors, joists, and even ceilings below.
- Stability and Safety: Imagine sitting on a wobbly toilet! A securely screwed-down flange prevents the toilet from shifting, making it safe and comfortable to use. This is especially important for households with children or elderly individuals.
- Longevity of the Installation: A robust flange installation means your toilet will remain stable and leak-free for years. It reduces the stress on the wax ring and the toilet itself, leading to fewer maintenance issues down the line.
- Structural Integrity: The flange acts as an anchor. For heavy ceramic toilets, the screws ensure that the weight is distributed correctly and supported by the floor structure, not just by a potentially weak glued joint to the pipe.
The plumbing codes mandate that toilet flanges must be securely fastened to the floor. For example, the Uniform Plumbing Code (UPC), widely adopted across the United States, specifies requirements for the support and fastening of plumbing fixtures and their connections. You can find detailed information on these requirements within the code’s sections relating to drainage, rough-in plumbing, and fixture installation.
DIY Installation: Tools and Materials You’ll Need
Getting this right yourself can be very rewarding! Here’s a checklist of what you might need:
Essential Tools
- Measuring tape
- Pencil or marker
- Reciprocating saw or hacksaw (if drainpipe needs trimming)
- Drill/driver with appropriate bits
- Screwdriver (if not using a power driver)
- Pliers or pipe wrench (for older pipe types)
- Safety glasses
- Work gloves
- Primer and solvent cement (if connecting PVC/ABS flange hub to pipe)
- Rags or clean cloths
- Level (to ensure flange is positioned correctly)
Essential Materials
- Toilet flange (PVC, ABS, or cast iron, matching your drainpipe)
- Screws (stainless steel or brass, appropriate length for subfloor, usually #10 or #12)
- Wax ring (or wax-free alternative)
- Toilet
- Toilet bolts (often come with the toilet or wax ring kit)
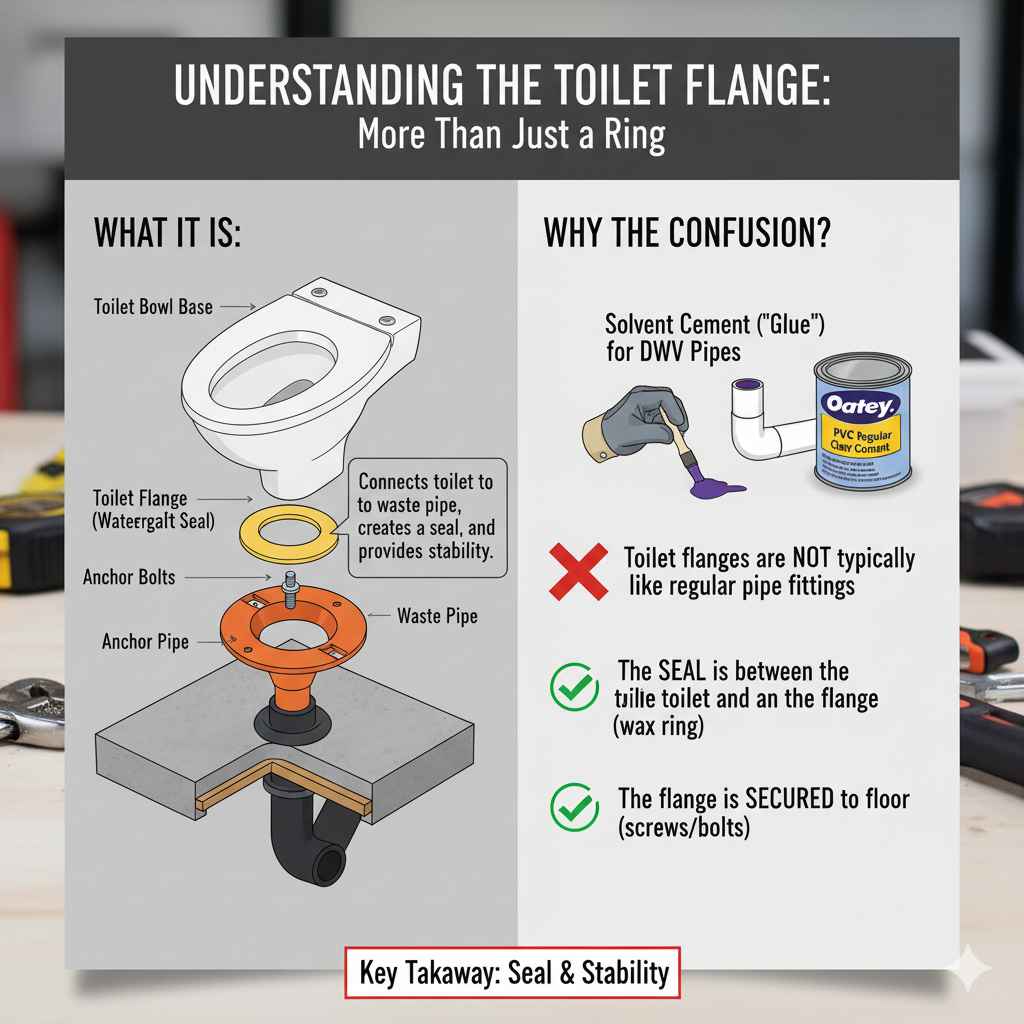
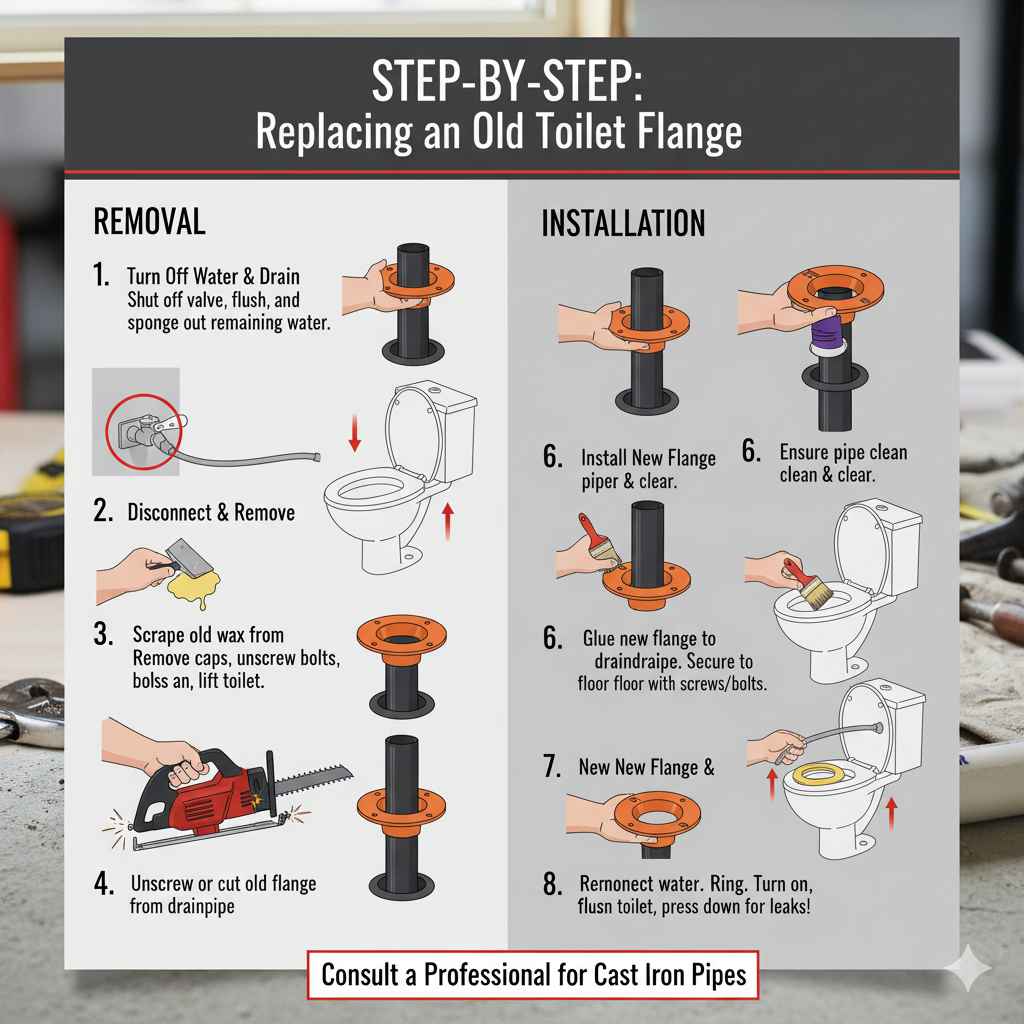
Step-by-Step: Replacing an Old Toilet Flange
Sometimes, an old flange needs replacing. Here’s a general outline of how you might do that:
- Turn Off Water and Drain Toilet: Locate the toilet shut-off valve (usually on the wall behind the toilet) and turn it clockwise to shut off the water supply. Flush the toilet to drain as much water as possible from the tank and bowl. Use a sponge to soak up any remaining water.
- Disconnect Water Supply Line: Unscrew the water supply line from the toilet tank.
- Remove Toilet: Remove the decorative caps from the base of the toilet, revealing the bolts. Unscrew these bolts. Gently rock the toilet side to side to break the wax seal. Lift the toilet straight up and place it on a piece of cardboard or old towels.
- Remove Old Wax Ring: Scrape away the old wax ring from the flange and the bottom of the toilet.
- Remove Old Flange: If the old flange is screwed down, unscrew it. If it’s a glued PVC/ABS flange, you might need to cut it away from the drainpipe using a reciprocating saw or a specialized pipe cutter. Be careful not to damage the drainpipe below.
- Clean the Drainpipe: Ensure the drainpipe opening is clean and free of debris.
- Install New Flange: Follow the installation steps outlined earlier for your new flange. If it’s a PVC/ABS flange, you’ll likely prime and glue the hub to the drainpipe first, then screw the flange to the subfloor.
- Install New Wax Ring and Toilet: Place the new wax ring on the new flange. Carefully position the toilet over the flange, aligning the bolt holes. Press down firmly to set the wax seal. Bolt the toilet down securely, but don’t overtighten, as this can crack the porcelain.
- Reconnect Water Supply and Test: Reconnect the water supply line. Turn the water back on and let the tank fill. Flush the toilet several times and check carefully for any leaks around the base.
Remember, if you encounter old or corroded cast iron pipes, the process can be more involved. In such cases, consulting a professional plumber is always a wise decision.
Troubleshooting Common Flange Issues
Even with the best intentions, you might run into a snag. Here are common problems and how to address them:
Flange is Too Low
If your finished floor is thicker than anticipated (e.g., you added tile over the subfloor), the flange might sit too low. The toilet needs to sit flush on the flange, not rock on the wax ring.
- Solution: Use a flange extender or a taller flange. Alternatively, you can build up the area around the flange with durable shims or repair pieces before installing the final flange, ensuring it’s level and secure. Some flanges are designed to sit slightly higher on the pipe.
Flange is Too High
Less common, but if the flange sits too high above the finished floor, the toilet might not seal properly and could even rock.
- Solution: You may need to trim the drainpipe further down or use a flange that sits lower. Flanges designed to be recessed into the subfloor offer more flexibility here.
Loose Flange
If the flange wobbles after installation, it’s a serious issue.
- Solution: Ensure all screws are fully driven into the subfloor. If the screw holes in the flange or subfloor are stripped, you might need to use larger screws, wood filler, or even specialized flange repair kits to create a solid anchor point.
Cracked Flange
Especially with PVC or ABS, a flange can crack if overtightened or impacted.
- Solution: A cracked flange must be replaced immediately to prevent leaks. Follow the replacement steps outlined above.
Dealing with plumbing can feel daunting, but by understanding the function and proper installation of each component, like the toilet flange, you can tackle many home maintenance tasks with confidence. Remember, a solid foundation, secured by screws, is key!
Frequently Asked Questions (FAQ)
Q1: Can I use glue to attach a toilet flange directly to a PVC drainpipe without screwing it down?
A: No, you absolutely should not do this. While glue is used to connect the flange’s hub to the drainpipe if both are PVC or ABS, the flange itself must be screwed securely to the subfloor to provide stability and anchor the toilet. Relying only on glue would result in a wobbly toilet and potential leaks.
Q2: What type of screws should I use to attach a toilet flange?
A: You should use corrosion-resistant screws, such as stainless steel or brass. These prevent rust and staining in a damp bathroom environment. The screws should be long enough to securely penetrate the subfloor, typically #10 or #12 size and at least 1.5 inches long.